TUTORIAL - Creating a Genesis series Full Body Morph for DAZ Studio Pro 4.10 by RKane_1
 RKane_1
Posts: 3,039
Okay, this is a repost from the old forums but I thought it would be helpful to put here. It is not as illustrative because you cannot post multiple pics in order anymore in the new forum (or I have not mastered that trick) so I placed the links to the images there for you. This has been updated and tested to know it still works in the current environment.
Enjoy!
Creating a Genesis series (including G8 Series) Full Body Morph for DAZ Studio Pro 4.10 by RKane_1
with GENEROUS assistance (They wrote most of it and I copied it from the DAZ forum where we had this discussion) from josephquick & RAMWolff and finally, last but not least, Richard Haseltine whose the author (I think) of the original document that can be found here: Tweaking A Figure Skeleton for a Custom Shape (WIP)
For this Tutorial, I used :
• DAZ Studio 4 Pro or higher
• Hexagon 2.5 (or some other modeller such as Blender or ZBrush, which is my favorite)
Both DAZ Studio and Hexagon were gotten for free during the giveaway that DAZ had in February through April of 2012 but the cost currently is uncertain.
Exporting and Modelling Genesis
1. First make sure Genesis is at its lowest subdivision level and in its zero position. To make sure of this, go to the parameters Tab and change the Res olution Level to "Base". To Zero the figure, go to the Parameters Tab to the little menu icon in the top corner -> Zero -> Zero Figure to instantly remove all poses and shaping modifiers to your figure.
IMPORTANT NOTE ABOUT EXPORTING G3F AND G3M: HI! :) If you zero the figure before you export, it will remedy this but, just so you know this is very important. Before you export either G3F or G3M, turn off the Mouth Details Morph and the Navel Morph. To see what I mean, load either G3F or G3M. Go to the base figure in the Scene Tab and then, in Parameters, select "Currently Used". Now, even though you haven't touched your figure dials yet, you will see two dials turned up to 100%: "Mouth Realism HD" and "Navel". Turn both down to zero before you export your figure and this will rectify issues you will have otherwise with your final morph.
There is also a VERY good tutorial on correcting these if you have already made a few morphs WITHOUT changing these, Cleaning Up Morphing Mistakes by Xenic101
IMPORTANT NOTE ABOUT EXPORTING G8F AND G8M: HI! :) DAZ has GENEROUSLY provided the Developer Kit which includes (among other things) an Export Base Resolution OBJ which you can load and export with no other preparation needed and a Genesis 8 Male & Female Dev Load which loads the base figure without the added eyelashes but will still require you change the resolution to Base before export.
2. Export figure out as a .obj file in DAZ scale.
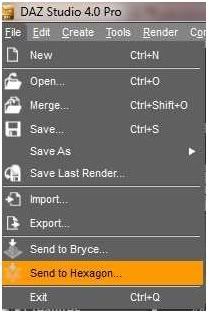
3. Open the Genesis.obj file in your modeling app. (In DAZ Studio Pro, you should be able to just go to File>Go to Hexagon and these first three steps will be done for you if you are Using Hexagon. Same for Go to ZBrush for ZBrush users.)
4. In the modeling program you've chosen, change the figure to your heart's content BUT DO NOT change the total number of Vertices. This means do not subdivide and leave it subdivided or use any tools which add vertices to your model. It must remain the same number of vertices from export to import.
In Hexagon or ZBrush, there are certain tools that will add vertices. This is a no-no as it will prohibit the object from being imported as a morph and make it so your morph won't... well... morph.
In Hexagon, you should be safe with the simple tools that modify Scale, Position, and Rotation as well as Bulge, Smooth, Pinch, Bloat and my favorite Tweak. Never change the Subdivision levels permanently. If you are doing a morph that will change both sides of the Mesh in the same way but mirrored, you use the Symmetry function on the "X" axis.
Zbrush has a very rich palette of tools as well, moreso than Hexagon however the cost is much steeper. Most of the brushes will work fine without any issue.
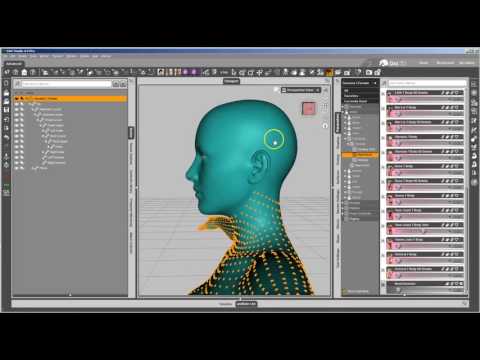
In this example, I have lengthened the palm of Genesis for some monkey like hands I wished to make.

Returning Genesis back to DAZ Studio
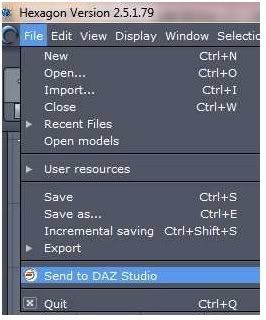
5. Export the model making sure to utilize DAZ scale (If you have Hexagon, use File>Go to DAZ Studio or, if you have ZBrush, the GoZ bridge should be there as well for you) and bring in the model back into DAZ Studio. If you have Hexagon and the Hexagon Bridge, this is an easy step. After making your changes in Hexagon, you simply to go to File-> Send to DAZ Studio, though you may wish to save your work In Hexagon for use in the future.
With ZBrush, the same information applies.
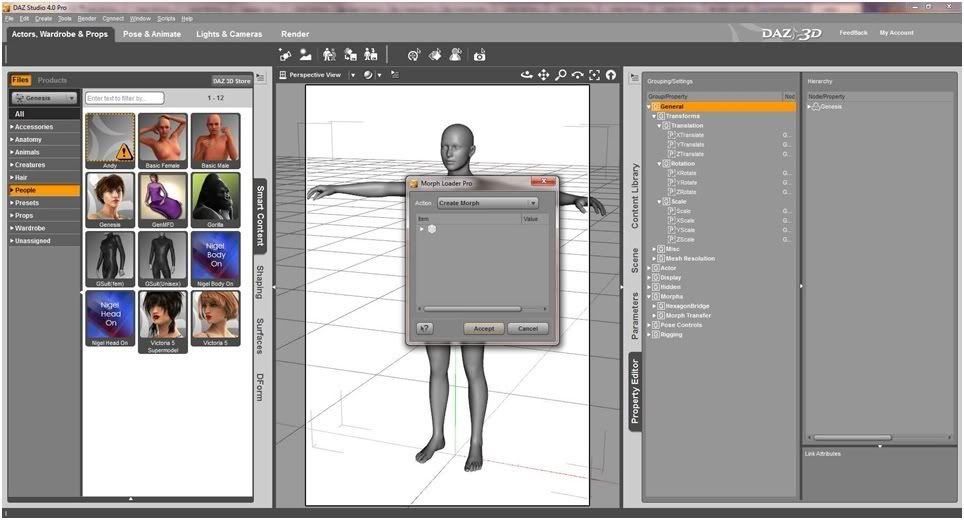
6. Apply the model as a morph to the Genesis figure that usually loads when opening DAZ Studio 4. In the Morph Loader Pro box presented, you can change the name of the morph by clicking on the name "Morph" and choosing a more descriptive name for the morph. In step #15, it will be helpful to name your morph something with an odd letter that is not often used as it helps locate the morph in the ERC freeze stage because you have to scroll through each individual morph that Genesis contains so, word to the wise, steer clear of "J", "M", and "V", if at all possible. (Helpful Hint: Use a dash "-" to start the name of your morph. You can always chage it later and during the ERC Freeze portion of the tutorial, it will be very helpful and quick to find your morph.)
If you are NOT using a bridge, you will need to open Morph Loader and then locate the .OBJ file you intend to use as your new morph after opening DAZ Studio 4. THEN follow the directions above.
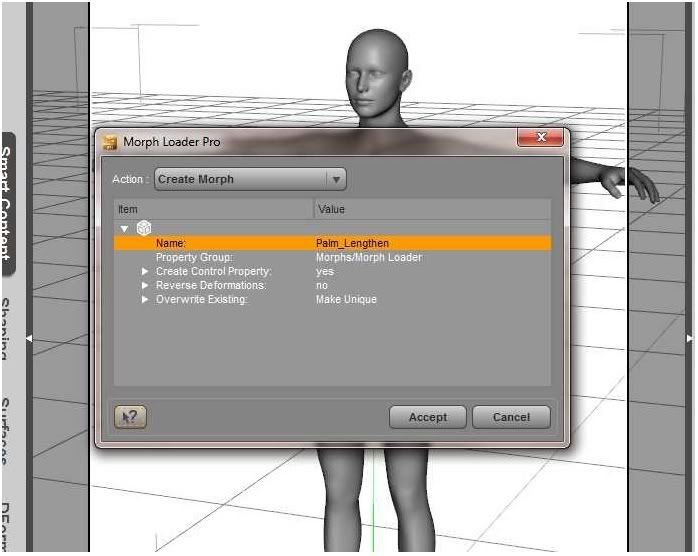
You should get the following message after you click "Accept"
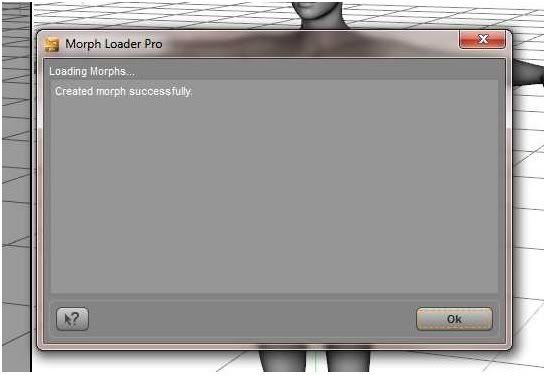
and then just click "OK".
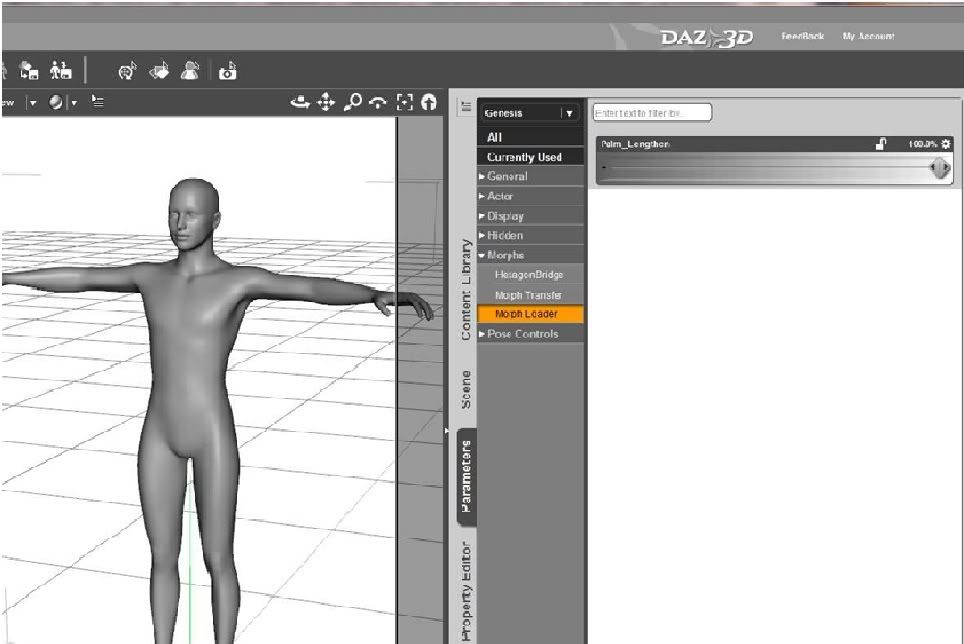
7. Go to the Parameters tab and turn your Morph on to 100%. in the Parameters Tab, you should find it under morphs if Genesis is Selected. If you used Morph Loader Pro, then it will be under that heading. If you are simply doing a cosmetic morph where the rigging is not changed, you are pretty much done and can skip to step #17. You can save the morph and be done by saving the figure. If, however, you have completed a morph that changes the Rigging on the Genesis Figure, a little more work is needed. I will still go through these steps as you never know when you may have modified a figure and accidentally moved the wrong vertices. You don't want to find that mistake down the line after doing all these other steps.
Adjusting Rigging to Shape
8. Select the Joint Editor tool from the Tools pull-down menu at the top left section of the DAZ Studio 4 Pro screen.
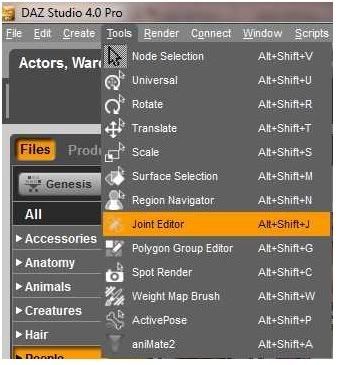
9. The rigging of the figure should now be visible.Then bring up the Tool Settings tab.
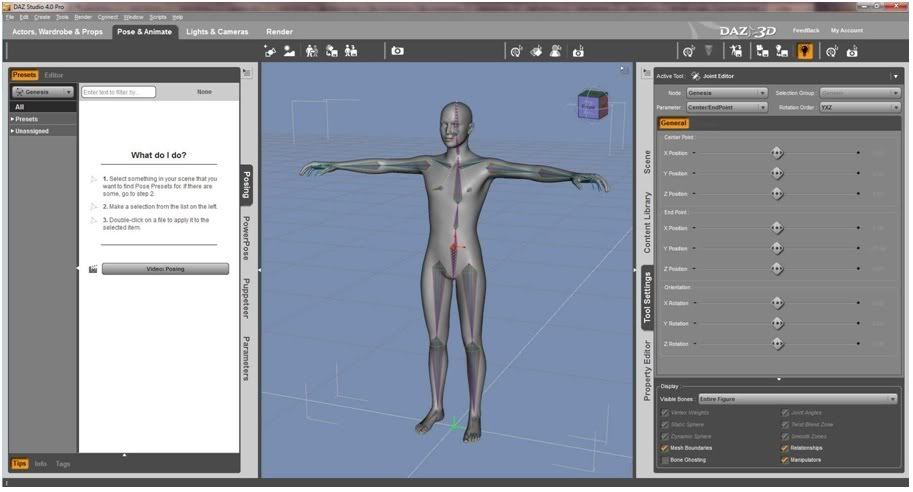
10. Click the thing up in the left hand corner of the tab or Right click on the bones (really anywhere on the figure) and choose "Edit > Adjust Rigging to Shape" option.
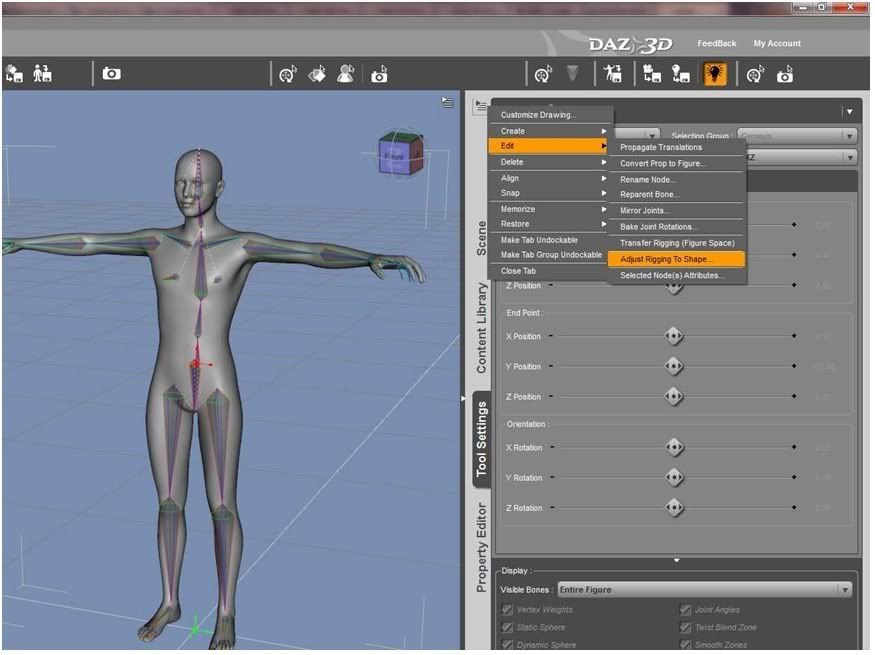
11. Change nothing on the window and click "Accept". A NOTE: You can experiment with "Adjust Orientation" but this way lies madness. If you have a DRASTIC change to the figure though and want to make sure the limbs are correctly modified, run Adjust Rigging to shape WITH OUT if first, then run it again BUT uncheck the Eyes, and all parts of the mouth before running it again. Messing with this will lead to morphs that look fine until you try to move the eyes or mouth then they may go screwy. My advice is make sure Adjust Orientation is *NOT* clicked so that an orange check-mark DOES NOT appears there and click "Accept".
12. A Dialog A dialog box Calculating Mean Value Weights will appear and finish loading. The next step is to do the ERC Freeze to the new rig shape especially if you are saving it as a DSF or DUF file or the rigging will convert back to the original rigging....
ERC Freeze
13. In the Parameters tab, you will need to be in Edit Mode which you can get to in the Display Options menu in the Parameters tab.
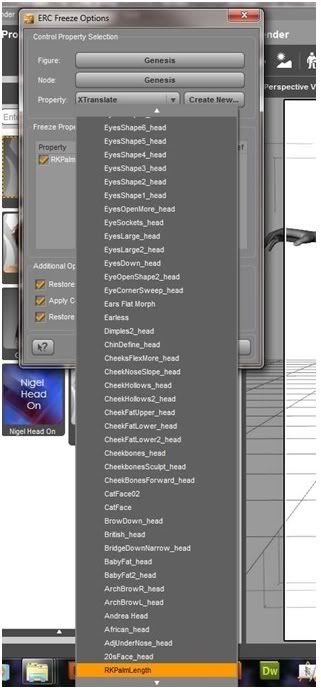
14, Once in Edit Mode, right click on your morph in the parameters pane and select "ERC Freeze..." In the ERC Freeze Option Box that appears. Figure node and Property should be auto-populated. ERC Freeze ensures that all the dials that are turned and all the adjustments to the rig that were just made are "frozen" or linked to the current setting on the dial you are freezing. That way when you turn the dial on it next time , any other dials that you have turned and any adjustments you've made go into effect for that one dial.
15. MAKE NO CHANGES. That is VERY important or you will have to start over.
16. Click "Accept"
If you have not updated recently, the old instructions are as follows for 4.5 or less.If you can't find the Property Editor Tab, that is a clue that you haven't updated yet. If you are this far and had no problems, skip to Placing your Morph in the Hierarchy section below
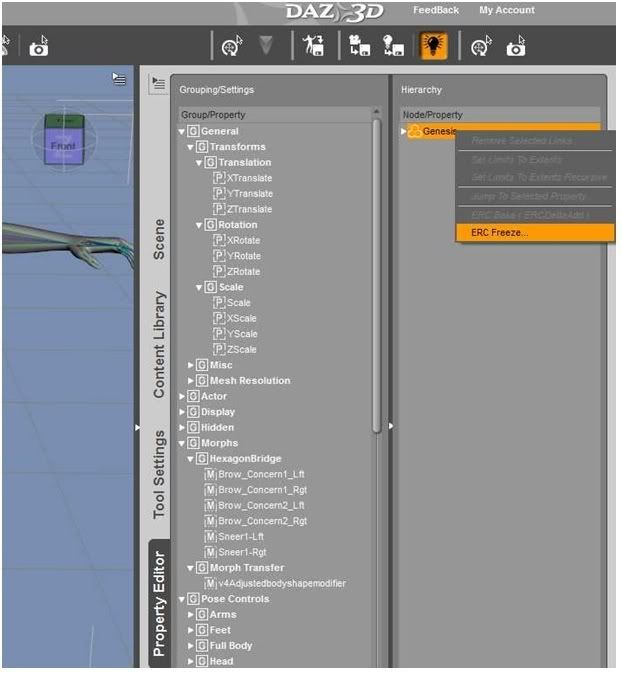
13. In the Property Editor tab, right click on the name of Genesis in the Hierarchy section and click ERC Freeze.
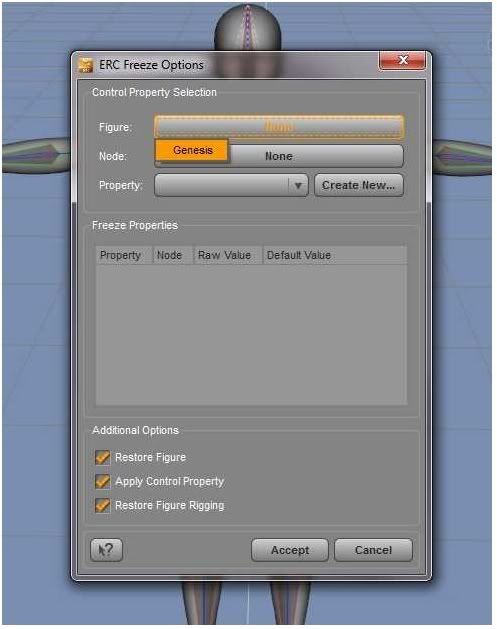
14. In the ERC Freeze Options dialog box, select Genesis for Figure and Node should auto-populate.
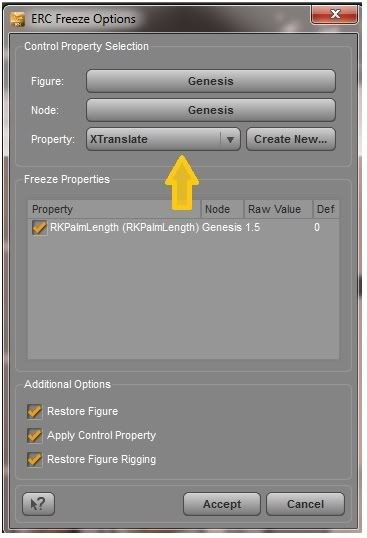
15. Now, click on the Property bar and on your keyboard, type the first letter of the name of your morph from step # repeatedly until you find the name of your morph. (Yes, this can take a while, unless you followed my hint and used a dash "-" at the beginning of your morph name). If it's not there then you will need go back and save it out as a new DSF or DUF file and do it all over again which means going back to step #6
16. DO NOT CLICK ACCEPT until you UNCHECK the "Restore Figure Rigging" check box. That is VERY important or you will have to start over at step #14.
Placing your Morph in the Hierarchy
17. To place your morph in the appropriate place so that you or others in future can find it in the shaping or posing tab, go to the Property Editor Tab and find your morph. It will be in one of the folders title "Morph" depending on how you brought it into DAZ or it may be in the main Morph file. If you used ZBrush and the GoZ interface, then it will be in a folder titled "ZBrush" Most others are in a folder titled "Morph".
18. Right click on the the name of your morph. This is also a good opportunity to change the name of your morph if you like by right clicking on the morph and selecting "Label". This will change the name of the morph as it shows to you and others in the Shaping or Posing Tab. You may also change the items you may have forgotten to change in the presentation editor earlier such as Minimum and Maximum value and whether your morph should me measured by value or percentage. This info can also be changed by clicking the little gear icon in the Parameters or Shaping tab at the top right side of the morph and then clicking "Parameter Settings".
19. Before grouping your morph in the Hierarchy, make sure you know the exact location where the morph will be as you will be confronted with a lot of options. Just choose what you feel is most logical. right click on the name of the morph as before and now select Grouping. A large window will open and out of this list, you need to find the intended folder you want to put your morph in.
Determining if Auto-Follow is needed on your Morph
20. Auto-Follow either makes clothing and hair that is Auto-Fitted to your figure change according to your morph too.. When Auto-Follow is on, the morph will also change clothing and hair and props auto-fitted to the Genesis model. This can, however, change nearby props in an unwanted way such as a ripple in the hair if there is a morph on an eyelash and the hair drapes the face. The nearby eyelash morph will skew the bangs that are over or near the eye. For minor facial morphs that don't really change the shape to a major degree, then Auto-Follow is not necessary, but if your morph was extreme enough to warrant using Auto-Adjust Rigginbg to Shape and ERC Freeze, then it is likely that turning Auto-Follow on will be required.
To turn Auto-Follow on or off, you need to right click the morph in the Property Editor and then choose the menu item "Auto-Follow"
Saving your Morph as a Support Asset Morph file
21. Turn your morph to zero before saving. If you do not, every time you load Genesis, it will load with that morph on.
22. Under the File menu, choose Save As→ Support Asset (at the bottom) -> Morph Asset(s) File…
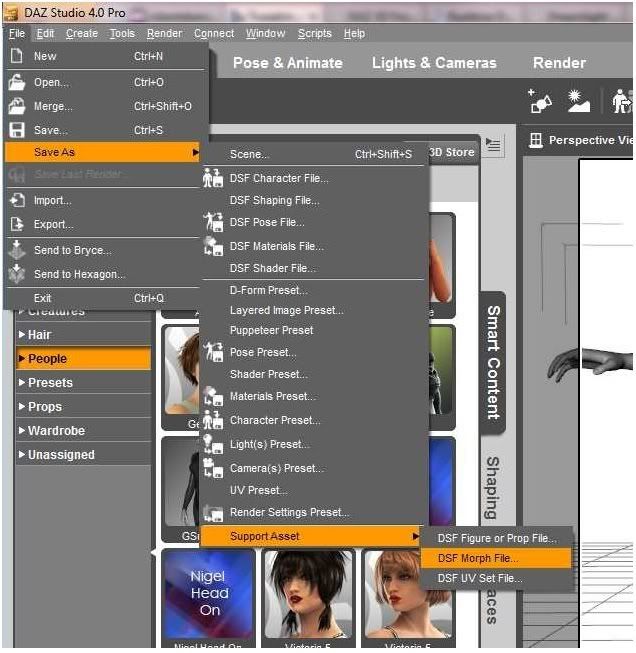
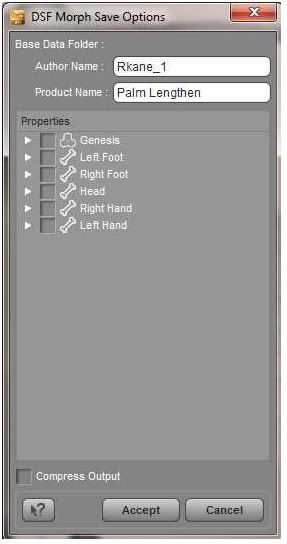
23. Enter your name or company name as the Author Name and a unique name for this morph as the Product Name. Future morphs you can save under this same name if they are grouped together, as this is the name of the folder under your My Library -> data -> DAZ3D -> Genesis ->Base -> Morphs -> (name of the author) -> (name of the file you just made) folder. (For G3F it is My Library -> data -> DAZ 3D -> Genesis 3 -> Female -> Morphs & for G3M it is My Library -> data -> DAZ 3D -> Genesis 3 -> Male -> Morphs)
24.Click open the Figure Properties hierarchy and find your morph. If using ZBrush, it will be under the ZBrush heading. Likewise for Hexagon. Morphloader will load it under Morph menu. click the check box next to it. Do not check the body parts, just the morph. CHECK YOUR MORPH AND YOUR MORPH ONLY. Then Click "Accept".
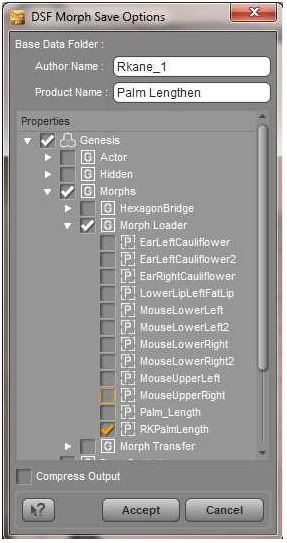
25. You are done saving your morph. Now it will show up whenever you open a fresh Genesis and can be distributed!
Any input you give is helpful.
Please feel free to ask question about this and the process here in this forum post.
Common problems
"When I save a morph, the base Genesis loads with the morph applied 100%. It’s no big deal to Zero the Character, just an extra step. But is there a way to Fix this ??"
Yes, Open Daz and zero the figure, the go to save the morph again in a zeroes state. When you save a morph with it on, it will autoapply it everytime when you open up the Genesis figure. If you save it in a zeroes state, then you won't have to.
Also, mjc1016 added a way to do it in a text editor if you prefer just a few posts down.
"My morph seems to change nearby clothing/hair in an unwanted way. OR Clothes don't change when I morph them."
Auto-Follow may be on an undesired setting. When Auto-Follow is on, the morph will also change clothing and hair and props auto-fitted to the Genesis model. This can, however, change nearby props such as a ripple in the hair if there is a morph on an eyelash and the hair drapes the face. The nearby eyelash morph will skew the bangs that are over or near the eye.
To turn Auto-Follow on or off, you need to right click the morph in the Property Editor and then choose the menu item "Auto-Follow"
Thank you for reading my tutorial.
TERMINOLOGY
I didn't write this. This is stolen LIBERALLY from posts I cut and paste together in an effort to understand and parse the information together in an easily understandable set of info. The posts originally come from Syrus83227_202e840f4e, Richard Haseltine, Herald of Fire, Sickleyield, Ramwolff, and many others here too numerous to name.
"If I have seen further, it is by standing on the shoulders of giants." - Bernard of Chartres. (English Version - Isaac Newton)
I humbly ask all those who know a good bit to read over and correct any assumptions made by either me or the previous parties in an effort to further understanding of this great tool. Thanks! :)
Auto-Follow: "Auto-follow On" tells DAZ Studio to create a morph in conformed figures when the morph in the base figure is dialed up (if there isn't one already). This allows conformed items like clothing to change to conform to the shape of the new figure. Leaving it Auto-follow off will prevent DAZ Studio from creating this automatic morph. Auto-follow should be on when it will make sense for a conformer to try to mimic the morph in the main figure, and off when it won't. You'd probably want to turn it off for something that shouldn't be mimicked by clothes or hair - eyelash morphs, for example. Hair problems have often occurred with eyelash or ear morphs. Eyelashes shouldn't be set to Auto Follow on as a general rule, ears are harder to judge. There are many reasons you might decide either way - for example, the clothing cleavage modifier on Genesis uses two actual morphs for each visible morph (a hidden one linked by ERC to the visible one); one morph, with Auto-Follow on, fills in the space between the breasts and the clothing follows, while the other, with Auto-Follow off, undoes the effect on the base figure while leaving it active in the clothing.
Adjust Rigging to Shape: Adjust rigging to shape moves the end points of the bones so they line up with the same bits of mesh as they do in the base state. When a morph reshapes the body to the point that the rigging doesn't work, the Adjust Rigging to Shape moves the points about which the joints turn so that they are once more inside the mesh at about the equivalent point - though in some cases that may need a bit of manual adjustment. An ERC Freeze is needed to link the moved joints to the morph, so that when it is off the joints are in the normal position and when it is at 100% they are moved to the modified position (and when it's at half strength they are moved half-way). You need an Adjustment Rigging to Shape and ERC Freeze only if the shape has changed sufficiently that the default rigging does not work, and the freeze should link only the change joint centers as controlled properties of the morph slider. If you have unwanted ERC links you can find and delete them in the Property Editor.
ERC: ERC stands for Extended Remote Control. It's basically a way to make one dial control multiple dials, but it's also a little more advanced than that in DAZ Studio since you can also get it to deal with changes in the figure skeleton on top of premade dials.
ERC Freeze 'Freezes' the current figure pose into an ERC channel. This allows you to set your dials the way you want them to be when your new ERC dial is at its maximum and then use the ERC Freeze to create a new dial property. When zeroed, those same dials will be at their defaults (usually also zero). When at maximum, those dials will be at the limits they were set to previously. The best part about this is that DAZ handles the 'in between' parts as well, so that you can have a 50% dial spin which puts those dials at the middle-ground between zero and their ERC setting. ERC Freeze, by default, links every changed property to the one you set as master. That's why it is important not to have anything set that you don't want linked, though you can (and should) run your eye down the list and deselect anything that is included in error.
It's used for a variety of things. The Basic Child morph on Genesis, for example, uses it to scale the figure down to a child size. The actual child morph would otherwise be an adult-sized toddler! It also reworks the bone structure to match the new figure size dynamically.
If your joint settings are not in their memorized base state then ERC Freeze will see the differences between base state and memorized state as part of the changes it should be linking to the morph, and when it restores the figure it will restore it to the memorized state not the actual state on load. You must memorize rigging before using these features.
You can access the ERC-Freeze command in the "Parameters" tab if you change to "Edit Mode" in the right-click menu. Then if you right-click on any property in "Parameters" tab the menu shows many other useful commands and you can see the "ERC-Freeze" in there.
ERC-Bake: ERC-Bake is the opposite of ERC-Freeze. If a Morph or Pose dial is "ERC-Freeze"ed and has "sub-components" that need to change, it can be reversed by using ERC-Bake. It will delete all the sub-components of that property and make them "currently used“ property values again in parameters pane (unfreeze) so they are easily editable there and can be "ERC-Freeze"ed later. If done with more than one control property all the sub-components these are now "currently used“ can be combined with ERC-Freeze to a new property.
ERC-Bake can be found in the right-click menu of that new property in the Property Hierarchy tab - so the "sub-components" gets deleted from that new property and become "currently used" property values again.


Comments
Using ZBrush with DAZ Studio for Morphs
YouTube Tutorials and videos for ZBrush Users
Using ZBrush to make Morphs
DAZ Studio 4 Pro - GoZ
DS4Pro-GOZ-ZBRUSH Import and Export Full Body Morphs
Using Morph Target in ZBrush to remove part of Morph in DAZ Studio by ezhexagon
dazgoz
dazgoz II
Using Polypaint for Texture and Displacement Maps
Zbrush 3.5r3: Polypainting on Victoria 4
V4 Displacement Maps by sixus1
Also general info on ZBrush and how to use it can be found here:
ZClassroom
CG Society
Working in ZBrush
1. Send the model to ZBrush via GoZ
2. Click in the middle of the screen and drag to create one figure but do not click more than once. If you accidentally click and get more than one figure then CTRL - Z (Undo) til only one appears.
3. Click on Edit button so that you may actually modify the figures mesh shape.
4. Click "x" or go to Transform menu to Activate Symmetry on X axis if you intend for modifications you make on one side to be changed on the other.
5. Sculpt the desired effect making sure to never use methods which add vertices to a poly model. Most of the brushes such as the Standard brush, Smooth, Inflate, Magnify, and Clay brushes are all safe. Snakehook brush rarely yields changes that adapt over well, however. It won't change the vertices but does change the surface so drastically few changes made with it will port over well. NEVER increase the poly count or use the Make Polymesh3D tool.
6. Once you have the sculpt you want, make sure you have a Genesis figure in the DAZ Studio app which should still be open and click on Zero Figure in DAZ to ensure the figure you are importing the morph to has no morphs turned on and that it is in an undeformed state by morph or pose.
7. Back in ZBrush, click on GoZ button and it will return to DAZ Studio. It may give you the option of importing a new figure or using the importing figure to make a morph of the one open in DAZ if they are a similar mesh. It is important to know that you should go. this should put you back in the Returning Genesis back to DAZ Studio section of the tutorial above.
Navigation inside ZBrush
When in Edit mode, anytime you hold down the left mouse button outside the figure, you will be able to rotate the figure by dragging the mouse.
Hold on Shift key and drag outside of the figure and it will snap to a 45 degree angle of your viewpoint when you hold down Shift.
Hold down Alt key and drag outside of the figure and you will be able to move the figure.
Helpful Hints
-Click on Polyframe button or hit Shift and "f". The poly frame will now be visible for your Genesis figure.
-In the side menu, click on the menu Polygroups and then Autogroups with UV then hold down Shift and Ctrl and click on the head. This will hide and mask off the rest of the figure so you may concentrate on the face without fear of moving or disturbing anything else such as the teeth or eyes or even the toes which can happen if you are using a brush at an odd angle. It is HIGHLY recommended to use this method so you don't finish with the PERFECT lip morph and then realize you screwed up the teeth behind them.
-If you make a series of morphs, often times, you may want to make a morph which uses several of them and use ZBrush to tweak it altogether BUT make SURE you do NOT incorporate copyrighted morphs into your creation unless it is strictly for personal use and not commercial. Your morphs are okay to sell, others repackaged are strictly a no-no.
Making Mirrored Morphs in ZBrush
Sometimes, especially for expression morphs, you will want to make a morph and have the exact mirror of it on the other side BUT not in every instance. I want to arch the eyebrow on the left side only, as an example. It is possible to make an identical morph on the opposite side of a figure using this method.
Some of this tutorial developed from helpful info VERY neatly laid out by ShannonHoppe in a thread about Making Two Symmetrically Mirrored Morphs in ZBrush but to paraphrase:
1. Once you have imported Genesis into ZBrush via the Bridge and are in Edit mode, click on Morph Target menu on the right of the screen and click the Store MT button.
2. Make sure that Symmetrical is turned on. The shortcut for this is 'x' You will need to start out making the same morph on both sides.
3. Sculpt what you want.
4. Make sure the figure is facing you at precisely a 45 degree angle by using the Shift key and dragging outside the figure until it faces you.
5. It is suggested you also have Polyframe on so you can find the exact center point easily to use as a guide. You can do this with the 'f' key shortcut.
6. Mask the half you want to keep by holding down the Ctrl key as you drag outside the figure directly down the middle section of the figure.
7. Use morph brush to return the unmasked area to original form prior to GoZ. Send the model back to DS.
8. Use GoZ to export the morph side into DAZ Studio and save the morph in DS.
8. Go back to ZBrush (via the OS, NOT via GoZ. Just change the active application window).
9. Use Undo in ZBrush to go back to the figure before the use of the Morph Brush which will negate the change just made with the Morph brush.
10. Follow the above procedure now for the opposite side masking the other side and applying the morph brush to the opposite side being as precisely identical as you can.
11. Hit GoZ to return to DS.
12. You should now have two morphs which do the identical change to opposite sides of the face. Mozeltov.
(Thanks, ShannonHoppe)
Removing Unwanted Parts of a Full Body Morph
Every once in a while you may find a morph where the face is perfect but maybe the rest of the body just looks weird to you, of visa versa. You may wish to "dial down" that area but since Genesis only truly has Full Body Morphs, they may be linked. ZBrush can fix it.
1. Load Genesis into ZBrush WITHOUT the morph and
2. Click on the menu area to the right of the screen on the section labelled Morph Target and click on Store MT.
3. Then you load the morphed Genesis figure into ZBrush from DAZ GoZ.
4. You can view either version by going to Tool>Morph Target>Switch.
5. Use the Morph Brush to paint back those areas that you want restored to the original mesh utilizing mask if need be OR just use the mask and the slider in the Morph Target menu if you like.
6. Then you can save it out as a morph with all the other places restored to the original Genesis.
Special thanks to RAMWolff for really beating the bushes to find the solution to this last one. You rocks, Rammy! :)
ALSO special thanks, of course, also to EZHexagon who posed these on YouTube as well.
Okay, this was Stolen from a blog by Sickleyield's DeviantArt page. SY is an invaluable resource for info and I suggest you go to the DeviantArt page in question to heck out further posts.
http://sickleyield.deviantart.com/
I have modified it slightly to be more in line with the format of the previous posts and numbered the steps.
[Tutorial] Tidying Your Genesis Morph List
by SickleYield, Oct 25, 2013, 1:05:59 PM
Introduction
This tutorial is to help you deal with quickly reorganizing your morph directories for Genesis. It will eventually probably apply to Genesis 2 as well, but hopefully knowing this you can keep things from getting as messy as I know my Genesis Actor groups are.
---
But First: EVERYTHING NEEDS TO GO UNDER ACTOR.
This is all that's required for them to appear in the Shaping tab. I don't care about this, because I think the Shaping tab is completely unnecessary, but it may save you a few complaints if you release products or freebies. Also, if you want to offer a product to DAZ, they prefer morphs to appear under Actor as well.
I'll also take the opportunity to apologize for the products for Genesis I sell at Rendo that are poorly categorized. I didn't sell at DAZ yet, and I didn't know. I can't really update them now, either, because without uninstalling manually people would just have morphs appearing in two places. I promise to do it from now on.
Meanwhile, for tidying your own library: get the latest public beta of DAZ, or make sure you have a version that has the edit mode Parameters tab (the last full release does, and the ERC freeze crash won't bother us in this tutorial, at least).
Preparing Genesis
1. Load Genesis from the Content Library.
Find a group of inappropriately placed morphs. So as not to pick on other artists, I'll say the Mutations freebie I did, which appears in Actor/Mutations instead of somewhere sensible.
2. Outside of Studio, locate the folder for it in data/DAZ 3D/Genesis/Base/Morphs. Mutations is located all by itself here when it should really be under SickleYield/Mutations. Don't do anything to it yet. /data is either under My Library or My DAZ3D Library in Windows, depending on when you installed, and assuming you didn't do a custom directory (the way I always do); if you did a custom directory you presumably know where it is.
Going into Edit Mode and Selecting the Morphs for relocation
3. Right-click in the Parameters tab and check the "Edit Mode" box. If you don't have one, you didn't follow the above instructions on updating DS, and this tutorial is not going to help you.
The appearance of the problem morphs will change.
4. Select them all together using click+shift+click or ctrl+click.
Relocating through the Property Group Editor
5. Right-click again, and choose Set--Property Group.
It should pop up and show where they are all grouped.
6. Click the plus sign beside the words to change it.
7. Change it to something more useful and orderly. In this case, I changed it to Actor/Universal/Fantasy SciFi/Mutations. If you wish you can split a group out to its head and body components, too, depending on how important that is to you. DAZ has morphs split all the way out to upper body/hands/fantasy sci fi, etc. in their official products.
8. Click Accept.
Things blink and disappear as the morphs are moved. Now if you click to expand Actor/Universal/Fantasy SciFi, you should see Mutations there.
Saving as a Morph Asset
9. Now File--Save As--Support Asset--Morph Assets. Under Vendor Name, put SickleYield, and under Product Name, Mutations. For different products you should check their /data folder names (the ones you found earlier) to put them in the right place. That's if you can. With Mutations you can't.
10. Check the boxes for the morphs you edited under Genesis below the Vendor/Product names.
11. Click Accept.
Deleting unused morph files
12. Now if you look at the /data folders, you'll see there's now a Mutations folder under data/DAZ 3D/Genesis/Base/Morphs/SickleYield as well as the original under just Base/Morphs. This lets you easily tell which one is the "incorrect" old one, and delete it. Leave the new one.
Checking your Final Work
13. Back in DAZ Studio, Delete Genesis from the scene and reload it from the library to check that you have just one set of morphs, and it is in the right place.
Epilogue
Fortunately, Dariofish has put his HFS morphs under Base/Morphs/HellfishStudios/ and subfolders, so his can be recategorized without having to delete any data folders afterward. This is useful because his first morph products have a LOT of morphs, and are a little messily categorized (like me, he got better later), but they are amazing and a must-have.
Going through this process will also make the process of transferring morphs to Generation 2 much easier, should you end up being interested in that down the line (see last Tutorial post for how to do that).
A List of Helpful vidoes on YOUTUBE I have found:
Loading Your New Morph On Genesis 2 Female in DAZ Studio - the AMAZING Sickleyield :)
Cleaning Up Morphing Mistakes by Xenic101
Character Creation Full - Xenic101
Using a Mask when Importing Morphs - Xenic101
New Morph Tools Intro - Josh Darling
Morph Loader Pro Presets - Josh Darling
Introduction To Loading and Saving Morphs - Josh Darling
As with my other tutorials,
I was just wondering if anyone had used this tutorial and if you were happy with it?
Was everything clear and step-by-step for you or should I clarify anything?
As always, I appreciate your input.
worked for me, i do have one issue after the mesh is re-imported from sculptris. for some reason when i dial the morph in DAZ i also get a xyz translate of the character. the morph works fine, no scale issues just as i dial the morph it also moves to a diferent x y or z location and is different with each morph.
when i import the obj into sculptris i have very little control over the placement and this may be the issue, do you know a workaround to remove any zxy translation from the morph?
I am not familiar with Sculptris and only recently purchased ZBrush (Wow.... just.... wow.) but perhaps another helpful person here might chime in with an answer who knows OR checking the Sculptris forum might help too.
Sorry, I was not more help in this BUT if you find the answer, PLEASE post it here for all to learn more about it.
I and the others who may go the Sculptris route will appreciate it.
it was user error on my part in sculptris on loading the obj file.
in the end it did not really matter anyway, if you use the "DSF Toolbox" (see daz store) one can automate the process of converting the exported obj from zbrush to a dsf morph file.
so i can save any amount of versions of the zbrush edits and batch convert to daz morphs in seconds all with my metadata loaded ( no need for morph loader pro or save as steps)
.
The tutorial looks good, although I haven't tried it yet it does make some things clearer. I do have one question though. If I want to create a morph based on one of the DAZ bodyshapes, i.e. a character for the David 3 bodyshape, can I morph genesis before exporting and then somehow remove the DAZ bodyshape when creating the morph, or do I need to build the morph on the genesis base shape, return to DS and combine the morphs, then see what tweaks are needed? I want to create morphs for use with the premade bodyshapes, D3, V5, genesis male etc. and am wondering the best way to do this.
Hi meowl...
For some reason my cat calls your name every time he is hungry....
Hmmm...
Anywho.
Curiously enough there is a shortcut for it and the long way around.
The Long way around
The long way around is simply do all you need to do to make your morph.
Return to DAZ making a morph target on a fresh figure of the .obj file you had customized.
Turn your morph to 100%
Find the morph body shape your figure is based on and set it to NEGATIVE 100% (or negative the percentage you used in the original figure before export)
Export that again out as a .obj file
ONLY to turn right around and reimport it.
If the morph you were using won't go to negative 100%, you need to change the parameter setting on the morph (The little gear in the top right corner of every morph open a window with that selection in it.)
The SHORT way works if you are using ZBrush and DAZ with the GoZ bridge.
Once you have made your modifications with ZBrush, Before you hit GoZ to return to DAZ, make sure there is a Genesis figure active in DAZ with the morph you used to base the customization off of turned up to the original percentage you used.
When you hit GoZ, the new morph will be there but it will have imposed itself as a morph of the difference between what you sculpted and the figure you imported it in on (The one with the David morph turned up to 100%, for instance) . You can then turn up your morph to test it and then turn down the base morph to see the result of what you did.
It is kind of funny, BTW, I found this out on accident and didn't figure it out until I meant to replicate what I perceived to be an error. I also encourage you to take your morph, subtract the David Morph and then turn up, say, Michael 4 to 100%, export him and smooth him out and do some touch up, and then you will have a new Michael 4 character as well. Lather, rinse, and repeat with the whole slew of shapes you have. *smile*
My old cat did. The current batch just squeak.
Thanks for the speedy reply.
Updated the following info in the tutorial:
-Added a Helpful Hint regarding using a dash "-" on the name of your morph when importing into DAZ Studio Pro to make it easier to find during the ERC Freeze portion of the tutorial.
- with info regarding making sure to turn your morph to zero before saving it or Genesis will load with it turned on whenever Genesis is loaded.
If you have any questions or helpful advise regarding this process, please feel free to post it here so all might learn.
Thanks!
There's an easy way to 'fix' the problem if you do save your morph 'on'.
It takes a few seconds with a text editor to change the value in the dsf file.
Open the file in a text editor and near the top will be a section starting with channel. The value you are looking for is in that section. It's called 'current value'. Change it to zero, save and you are done...
Thanks, mjc1016. I take it the same goes for the new DUF format or have you checked that yet?
it is same. I tweak morph dsf, manytimes ^^;
the morph file is not duf. (in future, if daz will change or not,, I do not know)
morph filie is dsf , in new DSON too.
and I think if the morph file is zipped (when you save the morph there is option, as same as other files)
you need to extrac the file by zip tool which can extract.
eg 7zip etc,,
Thanks, kit and mjc for that helpful information!
:)
Okay, I have greatly fleshed out the ZBrush portion which is in the second post of the thread for your perusal.
I am not a Zbrush expert and I am just learning but if you have any questions, please feel free to ask and we will see if we can't get them answered.
Bringing this back to the top. The last two tutorials are just what I was looking for. Thanks for taking the time to type all this out in easy to understand language Robert! :coolgrin:
If you have parts of Genesis that you have morphed and don't like it's an easy fix via ZBrush:
http://www.daz3d.com/forums/discussion/1866/P45/#141636
No worries, Richard. I am here to help... as much as I can. *smile* I learn by teaching. It's weird.
And if you learn anything in your travails in texturing in ZBrush, PLEASE let me know. I would love to document it so that we have it for future reference together.
:)
OK.. just posted a thread over at the ZBrush Central forums... just seems like a good idea! Never know!
http://www.zbrushcentral.com/showthread.php?172350-Restoring-older-mesh-tutorial-issues&p=979439#post979439
Sorry the restoring thing is giving you a hiccup. I have not been able to test it yet so I am sure I am missing something. I will maybe shoot a line to Joequick to see if he may have a solution.
Also, updated and added some YouTube links for ZBrush tutorials that I shared with you earlier. Hope they helped.
Have fun! :-)
EXCELLENT! I will add these to the second post regarding using ZBrush and give you mad props, Rammy!
You deserve them for finding this little obscure bit of info.
Special thanks, of course, also to EZHexagon who posed these on YouTube as well.
Hey, I'm just the messenger that tries stuff out and then drives them crazy with questions afterwards! lol
I did find a really great way to do Genesis textures in ZBrush too..... wanna know?? :P
Absolutely. I have a couple of links already regarding texturing in the second post but the more, the merrier!
If you can write down the steps step-by-step, even better! :)
OK, this tutorial was created from corinthianscori & fivecat's help notes..
http://www.daz3d.com/forums/discussion/1866/P45/#140176
I think the title should be change Robert... should read more like User Friendly Tutorials by RKane & RAMWorks or something like that! lol
AND Richard Haseltine and JoeQuick. :)
I could definitely see a new texturing tutorial based on this info. Do me a favor and post it new in this forum and preface it with the word "TUTORIAL" in all caps to make it easy to locate and I will come contribute for sure! *smile*
Well the tutorial is a complete tutorial. Nothing more to add really. ;-)
THANK YOU SO MUCH for your helpful tutorials, they are amazing.
Many thanks!
Share the love if you can. Find something there is little info on or hasn't been updated for 4.5 yet and make a tutorial. *smile*
Pay it forward. :)
This is the first time I've actually needed to adjust rigging for an extreme morph (I usually work with clothes) but it works splendidly on my new spider legs figure for the back area of Genesis. Much appreciated.