• Daz 3D
  • Shop
  • 3D Software
    • Daz Studio Premier
    • Daz Studio
    • Install Manager
    • Partnerships
    • AI Training data
    • Exporters
    • Daz to Roblox
    • Daz to Maya
    • Daz to Blender
    • Daz to Unreal
    • Daz to Unity
    • Daz to 3ds Max
    • Daz to Cinema 4D
  • 3D Models
    • Genesis 9
    • Genesis 8.1
    • Free 3D Models
  • Community
    • Gallery
    • Forums
    • Blog
    • Press
    • Help
  • Memberships
    • Daz Premier
    • Daz Plus
    • Daz Base
    • Compare
  • Download Studio
ADVANCED SEARCH
  • Menu
  • Daz 3D
ADVANCED SEARCH
Add image
  • Shop
  • 3d Software
    • Daz Studio Premier
    • Daz Studio
    • Install Manager
    • Partnerships
    • AI Training data
    • Exporters
    • Daz to Roblox
    • Daz to Maya
    • Daz to Blender
    • Daz to Unreal
    • Daz to Unity
    • Daz to 3ds Max
    • Daz to Cinema 4D
  • 3D Models
    • Genesis 9
    • Genesis 8.1
    • Free 3D Models
  • Community
    • Our Community
    • Gallery
    • Forums
    • Blog
    • Press
    • Help
  • Memberships
    • Daz Premier
    • Daz Plus
    • Daz Base
    • Compare

Notifications

You currently have no notifications.

Loading...
    • Categories
    • Recent Discussions
Daz 3D Forums > 3rd Party Software > Blender Discussion

Show us your Blender Renders

«1…15161718192021…26»

Comments

  • SDevSDev Posts: 158
    February 2021 edited February 2021

    benniewoodell said:

    TheMysteryIsThePoint said:

    benniewoodell said:

    I was playing around with some stuff to show my producer today and came up with this image with the new dForce Lynx Steampunk Armor for Genesis 8.1, which I think is awesome. I was even able to get the hair to simulate! I didn't do it for this render, but I successfully got it to move.

    The one image is how I color graded it in light room, and I have the original rendered file in cycles and for fun what it looked like in Eevee. I exported these all to Blender with diffeomorphic. My producer is going to want something done fast so I know he's going to want to use Eevee (5 seconds to render versus 11 minutes) but I do like the Cycles render better.

    Ah now that I'm looking at it, might have too much contrast in the light room color grading. The characters look fine, but the building has some noise that is coming out. Ah well, it's all a learning process. 

    @benniewoodell Can you please explain what is "color grading"?

    Absolutely. It's the process of enhancing an image and creating the overall aesthetic for the film or project as a whole. Every single film and TV show that is released goes through this. The easiest and best example to bring up is Transformers, the movies were color graded with orange and teal tones to give the blockbuster look, which is the most common color grading technique as it's so pleasing to the eye. Here's an excellent video example of the process if you're interested in seeing it. https://nofilmschool.com/2013/07/juan-melara-summer-blockbuster-color-grading-tutorial

    But you play around with contrast, highlights, curves, saturation stuff like that. Before digital, they did color correction which was trying to get the image to resemble exactly how the eye would see it. I've shot a ton of 16mm film over the years, only a handful of 35mm sadly, and it looks beautiful after being developed but you always have to correct things. Or like when I was in film school, you inevitably would forget the proper filter l, forget it was on the camera or something and use the wrong film stock so your footage would come back orange or blue tinted so you'd have to correct that, or fluorescent lights would have a green tint you'd take out (or bring up higher if you're like me and watch too many films from Hong Kong lol).

    I think people refer to it as post work here on Daz. But I love the color grading process as you discover so much about the image you didn't know was there when you created it, but I am nowhere near at a level of being good, for my films I'll work with a colorist.

    Hi Bennie, it is always good to see people thinking about light and color. The role of colors when it comes to subtile mood influence is one of the most important things in my opinion. There is one addon which helps me a lot, here's a link to a vimeo video about uber compositor.

    (You can do all the works in the native Blender compositor as well, btw)

    Vimeo Code: 395938347 (For some reasons I can't post any vimeo video link)

    This tool helps me to do color works directly in blender after rendering a scene with some clicks :) 

    Example: Img1 - Blender E-Cycles, Img2 - Max Contrast, Img3 - Color refinement to lower/adapt some red zones. Images cropped (SFW).

    Lights in scene: 2x static portal lights, 3 point light rig (2,250 lm Photography CFL parented to the master cam, back light, left fill light, right main light). As usual, the diametral color composition does the trick to bring more vitality/life into my render images. 


    K3.5-Cycles.jpg
    1487 x 1600 - 373K
    KE3.5-LowKey-MaxContrast.jpg
    1487 x 1600 - 511K
    KE3.5R.jpg
    1680 x 1600 - 745K
    Post edited by SDev on February 2021
  • benniewoodellbenniewoodell Posts: 1,999
    February 2021

    Hi Bennie, it is always good to see people thinking about light and color. The role of colors when it comes to subtile mood influence is one of the most important things in my opinion. There is one addon which helps me a lot, here's a link to a vimeo video about uber compositor.

    (You can do all the works in the native Blender compositor as well, btw)

    Vimeo Code: 395938347 (For some reasons I can't post any vimeo video link)

    This tool helps me to do color works directly in blender after rendering a scene with some clicks :) 

    Example: Img1 - Blender E-Cycles, Img2 - Max Contrast, Img3 - Color refinement to lower/adapt some red zones. Images cropped (SFW).

    Lights in scene: 2x static portal lights, 3 point light rig (2,250 lm Photography CFL parented to the master cam, back light, left fill light, right main light). As usual, the diametral color composition does the trick to bring more vitality/life into my render images. 

    Hi @SDev, thank you so much for this information, I had no idea you could do this right in Blender! The link didn't show up here like you mentioned, but I googled vimeo uber compositor and found some videos on it. I'm going to delve into this this evening after I get done working. This is really exciting to not have to port everything to light room to work on the coloring :D 

  • SDevSDev Posts: 158
    February 2021 edited February 2021

    benniewoodell said:

    Hi Bennie, it is always good to see people thinking about light and color. The role of colors when it comes to subtile mood influence is one of the most important things in my opinion. There is one addon which helps me a lot, here's a link to a vimeo video about uber compositor.

    (You can do all the works in the native Blender compositor as well, btw)

    Vimeo Code: 395938347 (For some reasons I can't post any vimeo video link)

    This tool helps me to do color works directly in blender after rendering a scene with some clicks :) 

    Example: Img1 - Blender E-Cycles, Img2 - Max Contrast, Img3 - Color refinement to lower/adapt some red zones. Images cropped (SFW).

    Lights in scene: 2x static portal lights, 3 point light rig (2,250 lm Photography CFL parented to the master cam, back light, left fill light, right main light). As usual, the diametral color composition does the trick to bring more vitality/life into my render images. 

    Hi @SDev, thank you so much for this information, I had no idea you could do this right in Blender! The link didn't show up here like you mentioned, but I googled vimeo uber compositor and found some videos on it. I'm going to delve into this this evening after I get done working. This is really exciting to not have to port everything to light room to work on the coloring :D 

    YW!

    And don't forget to have a look at photographer 4 - Fabien did a great job as usual! He also has some very valuable light packs. Version 2.0 is still free...

    https://blenderartists.org/t/photographer-camera-exposure-white-balance-autofocus-and-physical-lights/1101721


    Post edited by SDev on February 2021
  • SadRobotSadRobot Posts: 116
    February 2021

    I noticed that the vellus hair in the recent Unreal Human metacreator pack really adds a lot of realism, so I'm trying to create my own in Blender. This is a modified Hagar model with custom shaders (but using her textures).

    rach.jpg
    1920 x 1080 - 254K
  • CinusCinus Posts: 118
    February 2021 edited February 2021

    @SadRobot That looks great! 

    Here is my attempt at vellus hair. I was going for a subtle look, but it might just be a little too subtle. You have to look closely to see it ;)

    Portrait 11-Adjusted.jpg
    1500 x 1440 - 964K
    Post edited by Chohole on February 2021
  • nicsttnicstt Posts: 11,715
    February 2021

    Very nice renders.

    @Cinus yes, just a little too subtle.

  • SadRobotSadRobot Posts: 116
    February 2021

    For whatever it's worth, I googled and found the hairs should be about 2mm long and .065mm thick. I think I set it to like 2.5mm long and made half the hairs up to half that length, then I just adjusted the number of hairs to taste. I think I ended up with something like 100k over the whole body (with like 6k actual hairs and the rest children).

  • lilweeplilweep Posts: 2,746
    February 2021

    SadRobot said:

    For whatever it's worth, I googled and found the hairs should be about 2mm long and .065mm thick. I think I set it to like 2.5mm long and made half the hairs up to half that length, then I just adjusted the number of hairs to taste. I think I ended up with something like 100k over the whole body (with like 6k actual hairs and the rest children).

    it looks good

  • Krys KryngleKrys Kryngle Posts: 311
    February 2021

    Agreed, very nice renders.  Both are well done.  @SadRobot got some nice shadows going on...

    Just my opinion, I think visible vellus hair is a little distracting.  I think @Cinus nailed it.  They are very short, almost not noticeable.  You have to look close to see them, but they are there and affect the light reflections on the sides of the face.  I'm lazy and turn up the sheen instead of adding hair. 

    Nice work though, love seeing everyone's progress.


  • deathbycanondeathbycanon Posts: 1,227
    February 2021 edited February 2021

    Here's some apples I made in blender following a free tutorial from CGBoost on youtube... I would love to show you daz content in blender but my bridge is still not working. Here is a link to my thread about the issue if anyone has any other ideas to try. :)

    Eevee

    eevee


    Cycles

    cycles

    AppleCycles.jpg
    1000 x 563 - 456K
    ApplesEevee16b2.jpg
    1000 x 563 - 450K
    Post edited by deathbycanon on February 2021
  • Andy-MAndy-M Posts: 2
    February 2021

    I've only recently started to use Daz3D/Blender bridge 2.1.0.

    One thing I found exporting a GBF base figure is that the materials are very pale and the node setup looks quite complicated. So as a challenge I decided to come up with my own shader for Cycles using the G8F base textures (diffuse, specular and bump). I used 4 hdrihaven images for lighting only. Below are my test renders so far with no tweaking between renders. There are a number of things that don't look right (i.e. eyes, excessive forward scattering on the ears). I don't know if I can get much more out of my shader. Might have another crack at it next weekend.


    I don't know if it's just me, but the DAZ render (the last of the five) look nothing like its Blender equivalent (the first of the five). I used the same hdri, iray, and G8F with translucency maps. No other changes. Must be doing something wrong.


    2.jpg
    1080 x 1920 - 387K
    1.jpg
    1080 x 1920 - 425K
    3.jpg
    1080 x 1920 - 459K
    4.jpg
    1080 x 1920 - 388K
    DAZ 2 TRANS MAT.jpg
    1200 x 1920 - 363K
  • Krys KryngleKrys Kryngle Posts: 311
    February 2021

    Andy-M said:

    I've only recently started to use Daz3D/Blender bridge 2.1.0.

    One thing I found exporting a GBF base figure is that the materials are very pale and the node setup looks quite complicated. So as a challenge I decided to come up with my own shader for Cycles using the G8F base textures (diffuse, specular and bump). I used 4 hdrihaven images for lighting only. Below are my test renders so far with no tweaking between renders. There are a number of things that don't look right (i.e. eyes, excessive forward scattering on the ears). I don't know if I can get much more out of my shader. Might have another crack at it next weekend.


    I don't know if it's just me, but the DAZ render (the last of the five) look nothing like its Blender equivalent (the first of the five). I used the same hdri, iray, and G8F with translucency maps. No other changes. Must be doing something wrong.
     

    Hi @Andy-M

    We had a discussion about skin shaders a while back -

    https://www.daz3d.com/forums/discussion/441922/skin-shader-from-scratch-version-1-1/p1

    Only 2 pages but some pretty good info there.  Be glad to offer what I know when you have questions.  Screenshots of your node setups usually help. 

    Have fun!

  • lilweeplilweep Posts: 2,746
    March 2021

    Andy-M said:

    I've only recently started to use Daz3D/Blender bridge 2.1.0.

    One thing I found exporting a GBF base figure is that the materials are very pale and the node setup looks quite complicated. So as a challenge I decided to come up with my own shader for Cycles using the G8F base textures (diffuse, specular and bump). I used 4 hdrihaven images for lighting only. Below are my test renders so far with no tweaking between renders. There are a number of things that don't look right (i.e. eyes, excessive forward scattering on the ears). I don't know if I can get much more out of my shader. Might have another crack at it next weekend.


    I don't know if it's just me, but the DAZ render (the last of the five) look nothing like its Blender equivalent (the first of the five). I used the same hdri, iray, and G8F with translucency maps. No other changes. Must be doing something wrong.


    the first four look good, and the last looks bad, so you are clearly doing something right... 

  • Ben OaksBen Oaks Posts: 68
    March 2021 edited March 2021

    Rendered in Blender 2.92.

    Eevee is sooooo fast it's ridiculous!

    Rystung Soldern.jpg
    2880 x 1620 - 3M
    Post edited by Ben Oaks on March 2021
  • PadonePadone Posts: 4,001
    March 2021

    @Andy-M You're doing nothing wrong. The daz bridge doesn't get material conversion so you have to tweak. Then you may also like to try diffeo that gets material conversion, among other things.

    http://diffeomorphic.blogspot.com/

  • Ben OaksBen Oaks Posts: 68
    March 2021

    Padone said:

    @Andy-M You're doing nothing wrong. The daz bridge doesn't get material conversion so you have to tweak. Then you may also like to try diffeo that gets material conversion, among other things.

    http://diffeomorphic.blogspot.com/

    Diffeo FTW!  

  • benniewoodellbenniewoodell Posts: 1,999
    March 2021 edited March 2021

    Took a break from everything the past hour to just relax and do something. 

    Practice.jpg
    1920 x 1080 - 2M
    Post edited by benniewoodell on March 2021
  • Krys KryngleKrys Kryngle Posts: 311
    March 2021

    We all need a break sometimes.  Very nice render.

  • benniewoodellbenniewoodell Posts: 1,999
    March 2021

    Krampus said:

    We all need a break sometimes.  Very nice render.

    Thank you :)

  • TheMysteryIsThePointTheMysteryIsThePoint Posts: 3,220
    March 2021

    benniewoodell said:

    Took a break from everything the past hour to just relax and do something. 

    Practising Tai-Chi in a serene paradise right next to urban decay is a nice metaphor for what you just said about needing to sometimes drop things and take a break. This image is actually kind of deep.

  • benniewoodellbenniewoodell Posts: 1,999
    March 2021

    @themysteryisthepoint thank you! I was thinking of keeping traditions going in a modern world, but I like your interpretation better :) 

  • deathbycanondeathbycanon Posts: 1,227
    March 2021 edited March 2021

    material building renders... because my bridge still will not install. 


    bricks.jpg
    777 x 781 - 599K
    Post edited by deathbycanon on March 2021
  • peterpeterpeterpeter Posts: 34
    March 2021 edited March 2021

    This plugin and Diffeo are very nice, but the software is terrible. I tried to do cloth simulation on a shirt and Blender just froze. Subdivision Surface off. Did the same thing using C4D and Maya and both worked smoothly.

    Has anyone tried do cloth simulation in Blender using Daz clothing? Perhaps I'm doing something wrong?

    Post edited by peterpeter on March 2021
  • benniewoodellbenniewoodell Posts: 1,999
    March 2021

    peterpeter said:

    This plugin and Diffeo are very nice, but the software is terrible. I tried to do cloth simulation on a shirt and Blender just froze. Subdivision Surface off. Did the same thing using C4D and Maya and both worked smoothly.

    Has anyone tried do cloth simulation in Blender using Daz clothing? Perhaps I'm doing something wrong?

    You can absolutely do cloth sim with Daz clothing! If you watch just the first like thirty seconds of the short I did last April when I learned Blender with the Diffeomorphic tool, you can see how well the cloth sim can work. 

    (299) Lost Souls - 2020 - YouTube

    Now when I did this, I couldn't for the life of me get her hair to really simulate, but since I completed this I've been able to make hair from Daz move with cloth sim as well. The trick I didn't realize was to look at the weight painting that was already completed in the vertex groups instead of doing my own weight painting. Same with cloth, if there's a vertex group already done with weight painting that would work, I'll use that in lieu of doing it myself. 

    If you go in the Diffeormophic thread here in the forum, last night I actually outlined the steps in a post on how to do it. 

  • peterpeterpeterpeter Posts: 34
    March 2021

    benniewoodell said:

    peterpeter said:

    This plugin and Diffeo are very nice, but the software is terrible. I tried to do cloth simulation on a shirt and Blender just froze. Subdivision Surface off. Did the same thing using C4D and Maya and both worked smoothly.

    Has anyone tried do cloth simulation in Blender using Daz clothing? Perhaps I'm doing something wrong?

    You can absolutely do cloth sim with Daz clothing! If you watch just the first like thirty seconds of the short I did last April when I learned Blender with the Diffeomorphic tool, you can see how well the cloth sim can work. 

    (299) Lost Souls - 2020 - YouTube

    Now when I did this, I couldn't for the life of me get her hair to really simulate, but since I completed this I've been able to make hair from Daz move with cloth sim as well. The trick I didn't realize was to look at the weight painting that was already completed in the vertex groups instead of doing my own weight painting. Same with cloth, if there's a vertex group already done with weight painting that would work, I'll use that in lieu of doing it myself. 

    If you go in the Diffeormophic thread here in the forum, last night I actually outlined the steps in a post on how to do it. 

    Thanks, I'll have a look. 

  • benniewoodellbenniewoodell Posts: 1,999
    March 2021 edited March 2021

    I got the new character Shirley Lee today and the photo realism with her is crazy. This was rendered in Cycles transferred with Diffeomorphic, two point lights for lighting. The only thing that didn't transfer as well as I'd like that gives it away that she's not real is the teeth. But heck, if I wasn't looking for that kind of detail and just saw this scrolling through my newsfeed, I'd think she was real. 

    Shirley Lee Close Up.jpg
    1740 x 979 - 1M
    Post edited by benniewoodell on March 2021
  • PaintboxPaintbox Posts: 1,633
    March 2021 edited March 2021

    This may be basic stuff to others, but this is actually my first honest render made with Diffeomorphic to Blender. I am actually working on tutorials for the Diffeomorphic Plugin, this is my first attempt with an HDRI. Also, my first Blender render that doesn't look like a screenshot from Minecraft ;)

    I like the much more precise rendering of Blender Cycles, seems to bring out a lot more details and clarity.

    I'll probably have the tutorial up by the end of the week!
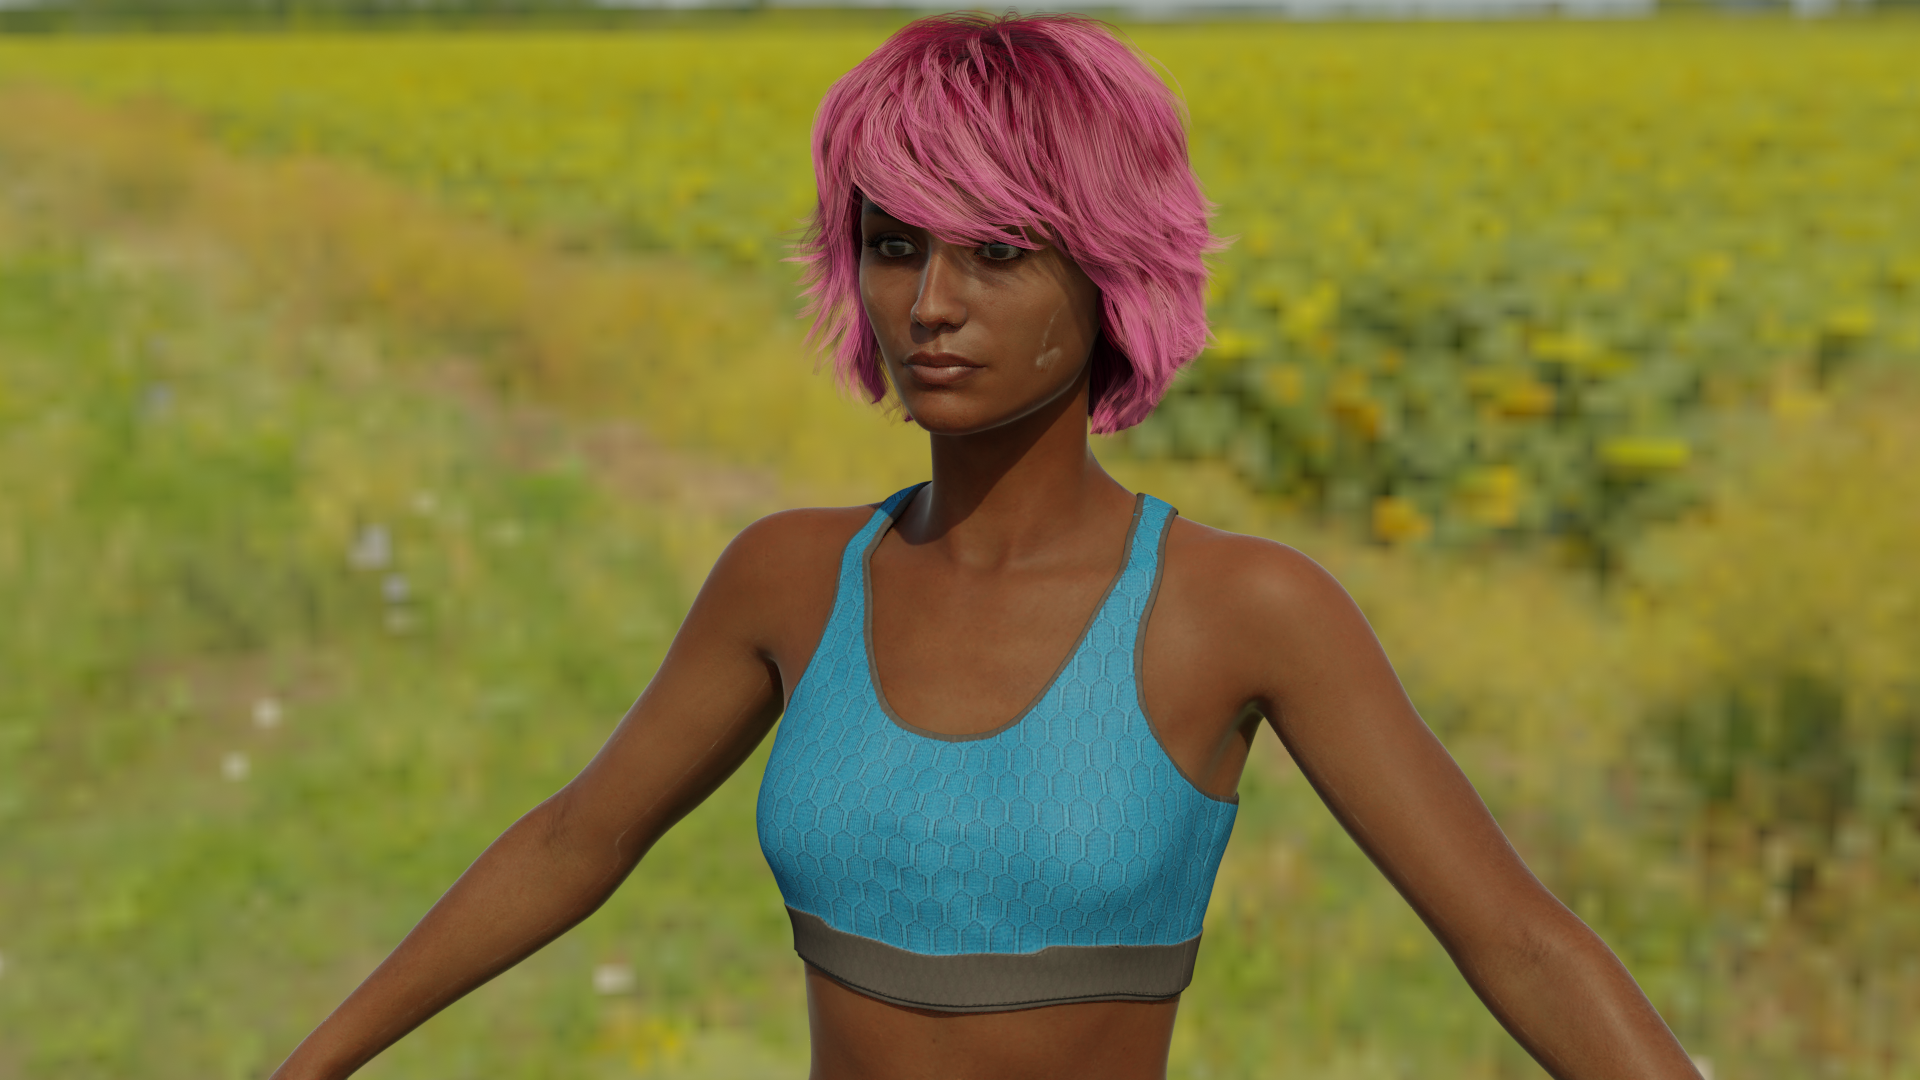
    sahira-blender-render-hdri.png
    1920 x 1080 - 3M
    Post edited by Paintbox on March 2021
  • jeff_someonejeff_someone Posts: 254
    March 2021 edited April 2021

    Some new renders:

    goober1


    goober2


    goober3


    goober4


    goober7


    goober10


    goober15


    goober15-smooth


    Post edited by Chohole on April 2021
  • CinusCinus Posts: 118
    March 2021

    @jeff_someone Amazing renders Jeff!! Is this Cycles or Eevee?

  • jeff_someonejeff_someone Posts: 254
    March 2021

    Cinus said:

    @jeff_someone Amazing renders Jeff!! Is this Cycles or Eevee?

    Thanks this is Cycles at 2048 samples; took ~10mins per image on my now old 2080 rtx.  If only EEVEE supported the Principled Hair Shader it'd be awesome.... 

«1…15161718192021…26»
Sign In or Register to comment.
Adding to Cart…

Daz 3D is part of Tafi

Connect

DAZ Productions, Inc.
7533 S Center View Ct #4664
West Jordan, UT 84084

HELP

Contact Us

Tutorials

Help Center

Sell Your 3D Content

Affiliate Program

Documentation Center

Open Source

Consent Preferences

JOIN DAZ

Memberships

Blog

About Us

Press

Careers

Bridges

Community

In the Studio

Gallery

Forum

DAZ STORE

Shop

Freebies

Published Artists

Licensing Agreement | Terms of Service | Privacy Policy | EULA

© 2025 Daz Productions Inc. All Rights Reserved.