[Solved] UV Maps changing during import/export
 ArkadySkies
Posts: 206
ArkadySkies
Posts: 206
I'm trying to refit a hair a hair model to G2F in Hexagon. Using "Send to Hexagon" then "Send to Daz" on a model seems to be altering or warping the UV map, even when I do NOTHING else to it in Hexagon. It also keeps sending models back with a new surface named "def_surf_mat."
Anyone know why this is happening? Is there a setting/preference that needs to be changed to stop this? The day before yesterday was the first time I tried Hexagon so yeah, total noob here.
This is what happens when I reapply the opacity map.
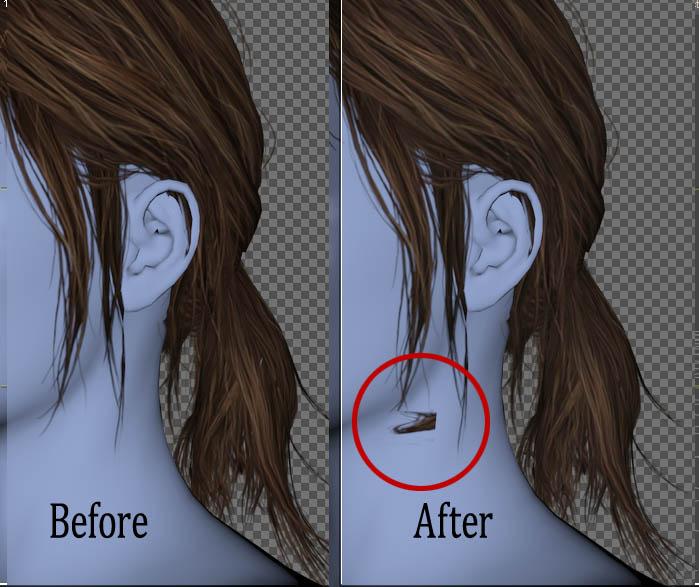
EDIT: I now know how to fix mat zone names with the geometry editor, so you can ignore that bit. Unless of course it happens to be relevant to the overall problem and you have any idea what it is and how to fix it.
Daz 3D is part of 
Connect
DAZ Productions, Inc.
7533 S Center View Ct #4664
West Jordan, UT 84084
Licensing Agreement | Terms of Service | Privacy Policy | EULA
© 2026 Daz Productions Inc. All Rights Reserved.
Comments
I have no expirience with the send to Hexagon plugin/brige so I can't tell you if this is a common issue.
As an alternative you could save an OBJ file with the morph you made with Hexagon and use the MorphLoaderPro to load it into DazStudio onto your hair. One advantage is the altered UV map and the surface name from Hexagon dosn't get read in by this just the pure shape (vertex position). Another advantage are the various extended options you have in the import process like the reverse deformation and things.
Thanks for responding, that worked, so I was finally able to use transfer utility to make it a functional conforming hair. Unfortunately, there are still a few unwelded vertices that need fixing so it's an imperfect solution for the model's other problems (it was originally a game model hair). I do have a mostly-usable conforming hair model now though, and overall that's the important part.
Hexagon's Daz bridge lets you specify sending it directly back as a morph so I didn't bother exporting it from Hex as an obj and then importing it with Morph Loader Pro (but yeah, Morph Loader Pro is great especially when you need the extra options).
I would still like to fix those unwelded vertices if at all possible (can't currently turn on smoothing or subd without ruining everything), so if anyone out there knows how to protect the original UVs when using Hexagon, it would still be very helpful.
It's the Daz/Hex Bridge that's causing this. The solution is seems to be only use the bridge for making morphs if you need the original uvs to function, otherwise manually export-import-export the .obj file between programs (instead of File->Send to Hexagon).
I know a way to fix those unwelded verices while possible keeping the UVs intact. But this would require to use Blender that also requires a complicated export-import-export obj process that is a bit challenging.
If you are interested I've talked about this here and there:
Why doesn't all the joints bend the same way?
I was able to weld the vertices easily enough in Hexagon without ruining the UV maps once I realized I just needed to stop using the Hexagon Bridge (except for creating morphs). Used to use Blender but I forgot nearly everything after not using it for a couple years. Despite its limitations Hexagon has a far more intuitive UI.
I'll still check out those tutorials later though - I'll get around to relearning Blender eventually.
@ArkadySkies (great avatar character!) Can I ask how you did that in Hex? I was under the impression that any such change in verticies in Hex requires a rebuild of the model's UV maps.
I do know how to export the objs and import them into Hex (without the bridge), but what magic do you speak of , once inside Hex that lets you weld things and re-export with the unscathed UVs? (I assume this works in both the new updated Hex and the long-time previous version?)
(BTW @Syrus_Dante, thanks for doing those tutorials and the links to them. There are a couple of places I've needed/wanted to 'sew' disconnected parts together in an existing UV-mapped clothing model, and so far, your method is the only way I've seen that addresses that with the fewest side-efffects/hassle. I also have the mentioned VWD tool, but was hoping to preserve the original model mesh if possible)
cheers/tnx,
--ms
Thanks @mindsong. The character is Ellie from the videogame The Last of Us, recreated with morphs and A LOT of texture work. The hair is from her in-game model (also featuring plenty of texture work and a lot reshaping).
Disclaimer: I'm a Hex noob and don't actually know what I'm doing - but I'm reasonably confident these are the steps I took and they worked for me:
-- Import .obj. I'd advise you to save before welding the vertices. Don't bother altering the material zones until after welding because you'll lose them.
-- Select mesh, go to the "Vertex Modeling" tab and select "Average Weld". There are other weld options, and I'd assume they'd probably work equally well but I've only used "Average Weld" in my limited experience welding Ellie's hair model together and her shirt model.
-- On the "Properties" sidebar, input a distance or leave the default value and press the [Enter] key to process it. You may need to experiment with different values to get the desired result, but lower is generally better. Weird things may happen if you use too high of a value.
-- Export as .obj without touching the "UV & Paint" tab. I believe I more or less used the default export options. I believe "Flip Textures" was unchecked, and "Export UVs" was checked, and everything exported fine without trashing the original UVs.
I'm running Hexagon Version 2.5.2.109. Everything I welded was mapped to one texture and I have not tested whether that makes a difference. I've added a scalp to the hair model but I didn't try welding that to the rest of the hair model.
Hey there - thanks!
Your work on Ellie was clearly worth the extensive effort, she's a masterpiece.
I've saved your wondefully detailed notes and will see what I can do with them during my next Hex adventure. I'm looking at the first step where you mention losing material-zones, and am thinking that's what I don't want, but perhaps the rest of the steps carefully re-establish those zones and by leaving the paint/UV options alone when re-saving/exporting perhaps we can successfully re-connect the original UVs to the now-welded model.
cheers, and I'll let you know how it goes!
--ms
Here's hoping it works for you.
Don't worry, losing or adding material zones won't mess up the UV map - the model's previous texture will still fit it correctly without any extra effort on our end. Losing material zones will only affect whether the model has multiple "Surfaces" in Daz that can be selected individually and assigned different textures or shaders (other programs often have their own terminology, such as Hexagon calling them "Shading Domains"). Losing material zones isn't a big deal as they can be recreated (as well as renamed deleted) with relative ease - it's just a annoying when you have to do it twice.
This can be done within Daz (use the "Geometry Editor" and go to the "Tool Options" tab (I think)), or in Hexagon with the "Shading Domains" tab.
Creating New or Recreating Lost Material Zones in Hexagon
-- Click "New" under the "Shading Domains" tab.
-- Optional: Rename it to make it recognizable (click the ">" to the left of the material zone/shading domain's name and select "Rename")
-- Select some faces and press the "+" icon to add them to the new material zone (this will also automatically remove those faces from their previous material zone). The circle or half circle icon next to the "+" can be used to hide or unhide all faces within that material zone. Half circle means they are currently hidden, full circle means they are currently unhidden.
-- Creating a New Shading Domain should also create a new Material in the "Material" tab, Renaming it will make it recognizable. While defining material zones it's easier if you assign them separate colors so the individual zones stand out even if you intend to apply the same texture to both zones in the final model (for each material, just click the name from inside the "Material" tab, scroll down to color and assign them different colors).
wow - thanks for the additional, and generously detailed description of the Hex shading/material domain controls. I'm (re)saving this page and will have it handy when I go in and play with some clothing I've got.
So, question (my mis-understanding of things): If the shading domains reflect on the DS selectable surfaces (e.g. the face, or lips), aren't those the same polygon areas that the UV images/masks map to, so by changing the related polygons in the shading domains wouldn't the maps then be out of sync? That was why I thought welding vertecies would change the related polygons in a way that the modelling apps wouldn't 'like', and the UV mapping would need to be re-done or edited as well.
It made sense that the same UVs *could* be used if:
- the welds only *joined* polygon points, but left the polygons (and counts) in place (minimal change to the mesh)
or
- the tool being used was smart enough to track and remap the UVs on the fly, regardless the changes you made to the mesh (I didn't think Hex could do that).
I know enough to be dangerous here, so...
Thoughts? (and again, thanks, this is really interesting for anyone interested in 'welding' seams for use in any dynamic clothing context, while not having to recreate the original UVs...
cheers,
--ms