Why doesn't all the joints bend the same way?
 Xade
Posts: 236
Xade
Posts: 236
I've been working on a 10-year-old model that I made as practice to create hair. After going over a few tutorials to refresh my memory, I quickly relearned how to adjust the joint parameters and refresh my memory. However, when I started bending different joints to check how far the bending effects were, I found a weird effect on the left and right ones. They are bent exactly the same but they go opposite directions. This is something I will have to learn how to fix if I want the left and right bangs, or ponytails to bend together. How can I get the left and right to bend together?
Also, I want to update it to groups instead of segments but I don't know how to transfer the joints from this version of an updated version. I would hate to have to redo the whole thing, so much that I would rather use this version. A lot of hard work went into this before Daz ate all my files 10 years ago so any time saving I can find would be perfect.
Anyhow, thanks for all your help in advance and have a great day.
Daz 3D is part of 
Connect
DAZ Productions, Inc.
7533 S Center View Ct #4664
West Jordan, UT 84084
Licensing Agreement | Terms of Service | Privacy Policy | EULA
© 2026 Daz Productions Inc. All Rights Reserved.
Comments
Is it a legacy rig or a weight-mapped rig? I guess the latter, but I'm not sure what you mean by going from segments to groups.
Yes, bend orientation varies - you will see this even on the Daz humans too. The only way I can think of to avoid it is to use a second proeprty to ERC control the real bend - you could then keep those consistent by switching the sign of the scalar multiplying the property value to get the bend value.
There are two things you can do:
1. rename the bones to include "left" and "right" in front of the labels - pose the joint on one side and use the Pose Symmetry shortcut Shift+Y - it will recognize the opposite joint by the prefix in the label
2. create yourself a Pose Control type of property like Richard suggested
Actualy it sounds more complicated than it is to create such Pose Controls like we see them with the genesis figures - have a look at the Arms Front-Back for example.
Just switch the Paramerters pane to Edit Mode right-click Create New Property - change Type to Pose thats all you dont have to change anything else there. Its common to use "pCtrl" as prefix in the name for those type of properties.
Now pose both joints like you want them then right-click the New Property and choose ERC-Freeze and make shure to select only those joint rotations if the ERC list includes other settings and values.
Save the Morph Asset to the library - done.
I'm not sure, Richard, the model was made and rigged about 9 years ago, soon after Genesis came out. I tried to convert it to TriAx and got a General weighted figure error message. I know I bought and used figure setup tools for it. (still grumbles about the waste of money for FST)
segments mean a divided mesh with each joint being independent of the others, while grouped model means they are connected yet in poly groups like so
Groups on left, Segments on right
(BTW can Daz handle poly groups like the Left?)
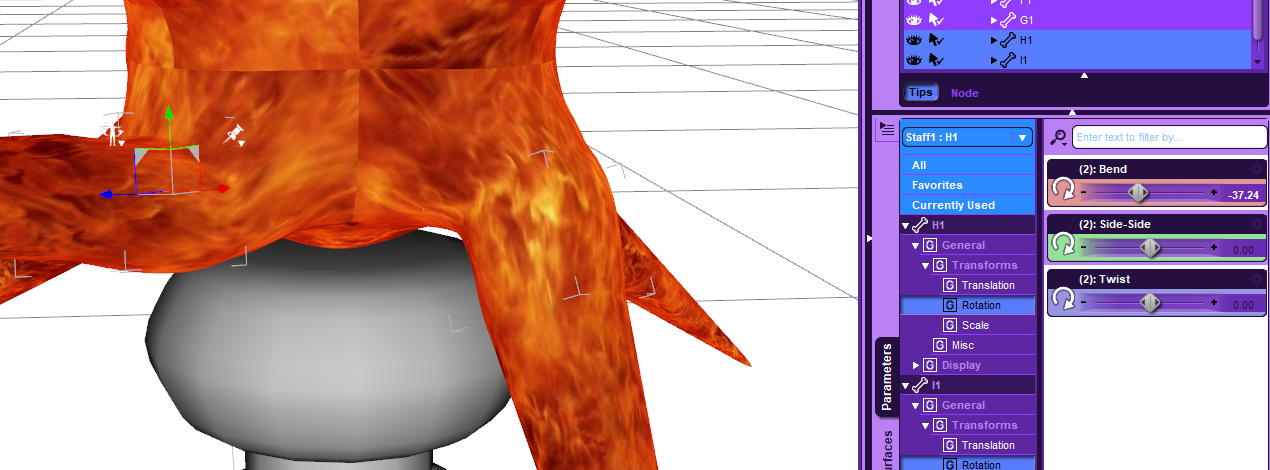
Thanks Syrus_Dante, I'll just make pose controls in the upper flame
OK seems like you followed the guidlines for creating a Poser compatible figure with those segmented mesh.
Thats rather easy to update just import the new "welded" one piece mesh OBJ into the DS scene with your current figure. The imported object should now be in the same position and of the same scale like your figure. Then open the Transfer Utility and select only the Weight Map option to transfer the existing rigging. If you already created morphs also select the Morphs option but I wouldn't try to transfer the Face Groups or anything else.
Sweet! thanks. He is up to date, all weilded and everything else, including the locked joints. Now to make all the poses and put them in the top band. I just have to redo his shaft morph, which is super easy to do. (yes the Staff is a he)
Does this mean I can rig in Poser then translate it over to Daz? That might make it easier in the long run :P
You can tell what type of rig it is by looking at the icon next to the figure name in the Scene pane - it will look like a stack of cubes, for a weight-mapped figure they will have only dotted lines between the cubes while a legacy rig will have solid lines.
Okay, I have solid, how can I update it?
Are you loading it from a CR2 file? If so, and assuming there are no morphs, just update the OBJ and save the new version over the old (after making a back-up copy).
As long as the group names are unchanged that should not happen - that is, the groups in the welded mesh are the same as the names for the separate mesh objects in the unwelded version (assuming it's a single OBJ, not an assemply of separate OBJ files).
ah, that was my problem, but I did the weight mapping and transfer tool and it seems up to date now. I'm not 100% sure. Here is a quick IK based render with my updated mesh. Did I manage to update it properly?
I also added a second layer to the flames, using PWghost and PWtoon to see how it came out, I think it came out pretty good, toony and a little like a flickering flame, while keeping the outline. It takes little time to render but transparent hair does the same, that's why I'm trying to make my own hair that doesn't need a transparency. You can see a sample here, which I posted on the forums to see if there was a market for it. Once I figure out how to rig quickly I'll make my comic hair then hair for the market to make a little spare money. I do have a lot of hair fitted to various other characters of mine, I just need to update them to all the Genesis models.
That is looking pretty awsome. Great to know you found a way to update the mesh and the rigging. I see this is a good practice finding a workflow to create rigged hair items and you getting closer to succes with this.
I've converted some clothing and hair as well by using the Bender toolset to weld the mesh. It's easy to select unconnected parts with pointing the mouse over it and pressing L (linked) - then pressing the Remove Doubles button in the toolshelf - you get a notification of the amount of welded vertices at top in the main title bar. You propably already know that.
As always while editing the mesh I would take take care of the UV layout. There is one thing I like to mention about.
I've seen that Blender dosn't show these red edges maked as UV seams in the 3D view automaticly after you have imported the mesh. You have to go to the UV-Image Editor once and execute the "Seams from Islands" menu entry to show the red marked seams in the 3D view. This will prevent unwanted results in the UV layout while using Remove Doubles if the UV seams are part of the edgeloop that gets welded.
In short without using "Seams from Islands" on an imported mesh with an existing UV-map Bender doesn't take care of the UV seams and in certain conditions it will weld UV points as well destroing the UV layout.
I terms of rigging in DazStudio if you start from scratch it's best to start with an OBJ with Face Groups for all the bones and use the Figure Setup pane to create the rig.
Thanks! (how could I have missed this great reply?) I actually learned to do all those steps to the uv map a long time ago, when I started importing objs to study them for my craft, which included some Daz studio models. it was one of the steps I learned from youtube. I also figured out how manually do the selection groups, including the aditional export option as groups to polygroups checkbox.
I am using the figure setup tool as a base, but I'm having minor trouble here and there on the length of the bones. I'll probably go back to Staff and adjust the bones some more. :) For now, I'm working on a hair model. if you want to help, here ya go :) https://www.daz3d.com/forums/discussion/268196/i-m-having-issues-with-rigging-my-ponytail