Daz 3D is part of 
Connect
DAZ Productions, Inc.
7533 S Center View Ct #4664
West Jordan, UT 84084
Licensing Agreement | Terms of Service | Privacy Policy | EULA
© 2026 Daz Productions Inc. All Rights Reserved.
Comments
Thanks for the help! It’s about 10 degrees outside here in the lou so if you get overheated and want to trade spots I’m game haha jkjk
I moved here from upstate New York. I'm in no hurry to experience winter at those temperatures again. lol
Tina, in case you weren't aware of it, please be sure to look at the thread dedicated to his memory, there are lots of messages and images there already. I hope that it is comforting to know that he made many friends here from all around the world and made a difference. He will be much missed.
https://www.daz3d.com/forums/discussion/224721/sad-news-passing-of-wgdjohn
I thought I'd finish a walker for John..
wow Stezza, I think he'd be stoked
How awesome! He would’ve loved that...wherever he is now I’m sure he is smiling down
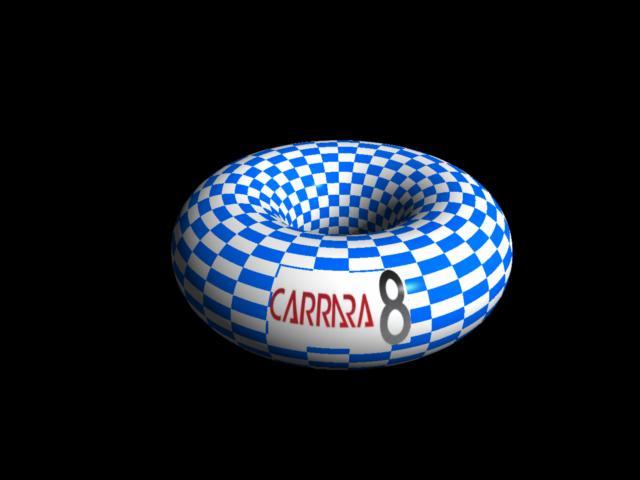
Formula Torus with Parameters
This modification of a preset on "that great French formula site" is a torus. You can use p1 and p2 to make the torus thicker/thinner and larger/smaller.
Insert a formula object to your scene.
Copy and paste the following formula to the properties tray box. Click parse. Save to your browser. Adjust p1 and p2 to taste.
d=1+p1;e=1+p2;
p=2*PI*(u-0.5);
q=2*PI*(v-0.5);
x=(d+e*cos(q))*cos(p);
y=(d+e*cos(q))*sin(p);
z=e*sin(q);
See pic for the p1 and p2 settings for that shaped torus.
Here is the torus with those p1 and p2 settings converted to a vertex object at 100% fidelity an then untriangulated.
Same formula but with different p1 and p2 settings, and a lower fidelity when converting to a vertex model.
Formula Model - Not UV Mapped -
.
Applying Procedural Shaders
.
Place Logo
.
.
how would you fill an oval with quads?
trying to avoid tris
did fill
ty
It depends on how many edges the oval has. Can you post a quick screencap of yours?
The aim is to get something like the image below, but how you go about it depends on the number of edges/points:
I would usually extrude once to get an inner line to brace the circle. That way any smoothing would tend to be more consistent. The inner area can be larger polygons.
Here are some examples for 12, 20 and 24 pointed ovals. Carrara's default oval is 20 points.
i'm doing the the eyedrop bottle. the bottom of bottle is ngon.
imo,, a clean model is all quads.
that first 1 you posted looks neatly
gordon, lathing, lofting, ixnay acute tris lol
I've just recorded a short video on the filling with quads etc. https://youtu.be/ENQIgt1lTh4
Speed is left intact.
Elegant modelling!
Phil, thank you very much! I've just updated the link.
Kewl!!
Wonderful videos, Veronika. Noticed a couple new ones, or maybe just ones I hadn't seen. Thank you.
Thank you so much for making this a sticky thread.
Stezza's Wacky vehicle modelling thread:-
https://www.daz3d.com/forums/discussion/235511/wacky-modeling-in-carrara/p1
Toon animal
Working on a toon saber tooth tiger
- started by creating simple shapes for the body and head
- threw in some legs
- of course some details for the head
- welded the major parts
-
- attach head and extrude in for the mouth
- Worked on details like claws and face
Haven't uvmapped it or rigged it yet, but here are some test renders
- again, intent is a toon saber tooth tiger
Fantastic work, as usual Diomede. Thanks for sharing!
Intent achieved I would say!
Thanks, guys.
This cat may feature prominently in an animation I am working on - as per Phil's animation tutorials.
I hope you've got a nice walk cycle for it then!
crouch and pounce!
saber tooth tigers don't waste energy merely walking.
Really wanted to enter it in the time travel challenge when Stezza said animations were eligible.
EDIT: The tiger is not even rigged yet.