Tutorial: How To Use Content Package Assist
 Novica
Posts: 23,925
Novica
Posts: 23,925
This tool is a lifesaver when you get freebies or purchase from other stores. Here's the steps I use and some tips. I would put this in my Art Studio thread but we're on page 92 of Thread 9 so it would get buried fairly quickly as we're headed toward Thread 10. If you have a different way of doing this (a better way) or have questions, jump right in! This is the way I do it, not necessarily how you HAVE to do it. The vendor has a very nice explanation in the Help section, conveniently located in the tool itself!
This assumes you already have the Content Package Assist installed. I installed mine a year ago so I don't recall what's involved with that.
Mine is also in my bottom toolbar.
Cathie/Novica
Getting Organized / Get The Main Image / Get The Folders
Step 1 So we're all referring to the same folders for the tutorial- Make a Content Pkg Downloads, Content Pkg Build, and Content Pkg Done folder. You put the downloaded files that you want to do in the Downloads, once you build them they go into Build (also known as Packages), and Done is when you move them from Build AFTER YOU TEST THEM / FIND THEM IN THE STUDIO.
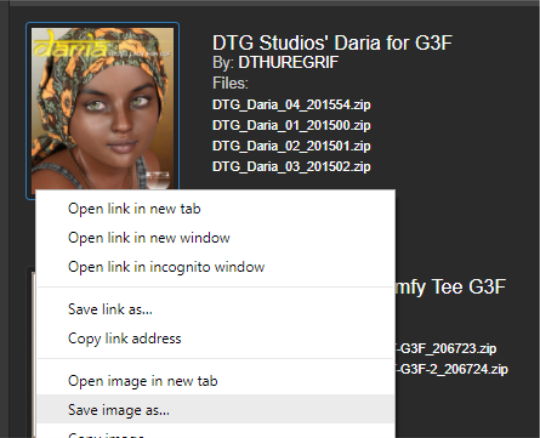
Step 2 Let's use Rendo as our example. Go to your orders and get the image. (Right click, save as) Instead of a jpg, for the file extension I use "All Files" and change the image name to a png extension. TIP: Go into a graphics program and lighten the dark characters quite a bit so they'll show up. I also lighten caucasians. SHARPEN you images. Now your thumbnails will show up beautifully. Put the image in your Content Pkg Downloads folder.
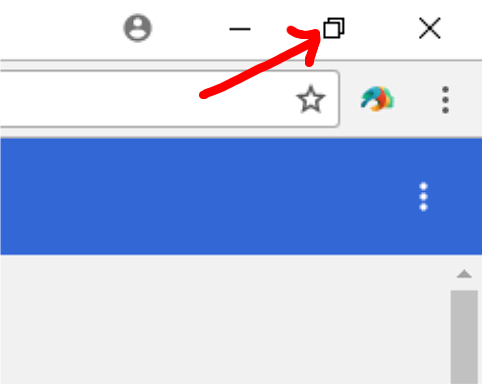
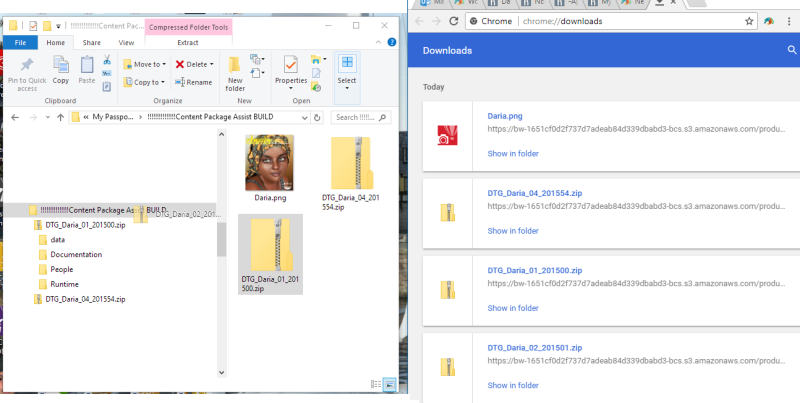
Step 3 Next, download all the files (do one product at a time, for simplicity's sake. One character (like my example) may have a lot of files. After you download them, put them in your Content Pkg Downloads folder. TIP: I use Chrome- the way I do this is to go to the upper right corner to the three vertical dots and click it, choosing Downloads.That opens up a new window. Then I then click the square in the upper right corner, so the window now "floats." It's important that this window does NOT overlap your folders window (which to have floating, you do the same thing. Click that square in the upper right.)
With the two floating windows side by side, you can simply drag the folder across by right clicking with your mouse and holding down/dragging, then releasing in the Content Package Downloads folder. Easy! Be sure and count your folders- do you have the same number as shown in Downloads? (Save yourself the frustration of missing files later!)
Daz 3D is part of 
Connect
DAZ Productions, Inc.
7533 S Center View Ct #4664
West Jordan, UT 84084
Licensing Agreement | Terms of Service | Privacy Policy | EULA
© 2026 Daz Productions Inc. All Rights Reserved.
Comments
Before we go any further, if you want to see what CPA looks like, this is it. It's an easy to use interface and the text boxes tell you information. Let's go ahead and set up the file paths, then we'll double check our files to make sure they are structurally ready.

Step 4 Settings. Click on the Settings icon.
For Directories:
Build: This is our Content Pkg Build folder.
Daz IM Download: Use this to specify your DIM Downloads file path. To find that, in DIM you click the Cog in the upper right corner then go to your downloads tab to see the file path.
Packages: This is where the complete package is sent. That would be our Content Pkg Build folder (or Packages. I just didn't like Pkg Packages, was confusing to me. Build tells me it's done, it's built. Remember, they go in here, then you move them AFTER you see if they are working, to the Done. Refer to Step 1.)
Daz IM Manager: Mine was in C:\Program Files (x86)\DAZ 3D\DAZ3DIM1
Step 5 THIS IS IMPORTANT. You are NOT ready to put your files in the CPA. You absolutely MUST check to see if the file structure is correct, that there are no nested files!!! Nested files may be a "Content" folder, which would be Content>Content>etc. Or "My Library"
Step 6 So now we have our Settings correct, and made sure the files structure is right. So let's put them in CPA. Using Batch Maker- Since our gal has multiple files, we'll use Batch Maker. In CPA, click on Batch Maker. It opens a new tab. At the bottom left, checkmark "Combine." (It's easy to miss.)
Then click the green + and using CTRL you can click on all your files at once and they will be added to the list.
Step 7 Fill out the Source Prefix (I use REN for Renderosity, you can do FREE or FREEBIE, etc)
Step 8 Next, for the Package SKU, you can use the product number, or the Order Number, or the date.
TIP: I use the date, then change the products to 01, 02, 03 as I do each one. I prefer the date it was purchased so I know which ones I have completed. My format is month, date, year with two digits for each. April (04) 13th (13) of 2017 (17) would be 041317-01 then the next product would be 041317-02. It's fast to find the orders that way, and you are limited to 8 characters. You'll never have a repeat number if you use this system due to the year! So Daria will be 110617-01 (November 6th, 2017)
Step 9 Product Name: It's up to you whether you want to keep vanity naming or just be straightforward, I usually just put the character name and generation(s) such as Daria for G3F (Instead of DTG Studios' and that ' is wrong anyway, it should be Studio's unless there's two studios contributing.) Click the Use Sanitized Product Name.
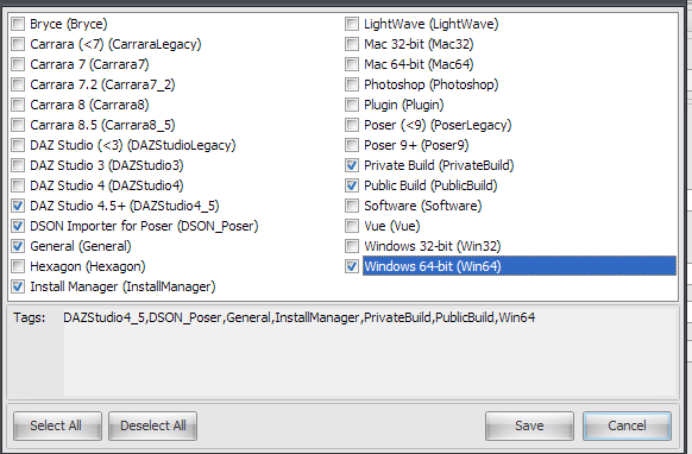
Step 10 Click to generate a Package GUID or do your own. I click to generate. For Compatibility Tags, click the Cog and select the programs. Some of these could use explanation, I wasn't really sure- for example DSON Poser files and Private Build, Public Build. It's better to have them checked than not, if they're not needed they won't hurt anything.
Make sure Install Manager is checked or you'll wonder why it's not showing up in DIM.
Step 11 Checkmark the Generate Manifest.dsx and the Generate Supplemental.dsx
Step 12 Let's load up the image. Go up to the Add Product Image>Add From Disc. Make sure everything is correct.
Here's what mine looks like for Daria.CLICK TO ENLARGE, I made it big for you.
Step 13 Go up to Make>Make in Package Folder (which is what we described in Step 4, our Content Pkg Build folder. (meaning it's the package, it's built.) You will get a popup saying "Operation Complete!" and there it is, in your folder. Here's why using the date is my preferred method-ALWAYS check to see if the package was made. All I had to do was zip down to the 11's (for November) and there she is. (If you're doing these when you buy them, you'd better know what month you're in! And if doing them later, you'll know what month you're working on, and they will all show up together instead of splattered around with different product numbers.)
While you don't HAVE to make a package to keep, why wouldn't you?
Step 14 Go up to Make>Make In Daz IM Download Folder. You'll see gray bars with blacks squares going across the bottom of the CPA as it's progressing and putting it in your Downloads for DIM. Then it's in DIM and ready to go. Click Open DAZ IM.
I've got to admit, the first time I saw a DIM package that I created, I almost broke my arm patting myself on the back. There it was, in DIM in Ready To Install! Checkmark your product, then Start Queue, and off it goes into your Studio. In DIM, go to Installed>Order Date: Recent First and your product will be on the top line.
Step 15 In your studio, let's say it isn't simple like Daria (who I know will be in Genesis 3 Females>Characters. This is why it's nice to have that first Content Pkg Downloads folder, so you can open that up and see the file path. So you've found it.
If this icon isn't showing (where you click Characters and all the icons show the group of men or women) you can right click and copy it from the folder (to the right of where you click Characters, just the folder names) and paste it back over in Characters.
Render and enjoy! (Then go to your Content Pkg Downloads, Content Pkg Build folders and clear those out. Put the Build in the Done folder. You don't have to keep the Downloads as you now have a ready to install package. I empty that out and start on the next product.)
BTW, the reason my image isn't showing up is because there was one in the file. Reading the Help, if you want to take out images use the "Cleanout Support Dir" WHICH WILL NOT SHOW UP WITH THE BATCH. Go back to your opening tab, for a single file. I was going nuts trying to find it. Don't know how to use it though, tbh.
The help states,"There may be instances where the zip you have loaded, contains an image in the "Runtime\Support" directories, and you want to use your own image. Use this option to clear out the loaded image."
You can also track the image by right clicking on it and browse to image. This one is daria.duf.djl which I haven't ever heard of. What's a djl ????
Great Tutorial.
These djl files are links to the original files, like Shortcuts or Aliases.
-----------------
I found a few Days ago another Tool, Custom DIM Designer Studio.
http://cdds-and-tools.forumotion.com/t67-cdds-1-0-6-1
Its a little better for DIM Creation, greatest feature i think is the Smart Content Creation direct from the App :)
@twlight76 Thanks for sharing! Hadn't heard of it. I've got this one down pat (and don't use Smart Content) but I'm sure others will want to try it out.
thanks for the tutorial Novica! I've been thinking of getting this product but wasn't sure how it worked, now I know
@rgcincy Sure, glad to help. Once you get the Settings set up (which takes maybe a minute or two) then most products take 2-5 minutes MAX to install, including getting the files from Rendo or wherever. Depends on your download speed of course. It's really zippy.
Thanks, this is a very useful tutorial. I appreciate you taking the time to share.
@diomede You're welcome. It certainly makes using products that aren't in the store a lot easier to put in the studio.
@Novica - Thank you so very much for this tutorial. I was finally able to get a character (with multiple zipped files) installed, thanks to you. Your screen shots and clear instructions were very helpful.
You have to set compatibility tags every time? Isn't that annoying?
I haven't used this product in awhile (I did a lot of packages, now I just do it when I need something) I don't know if the compatibility is set up that way.
I use this to package single products from other sites so I can easily load/unload when desired. I've never used the compatibility settings.When ready to create, I choose Make in DAZ IM Download Folder and it's ready to install next time I use DIM.
Anybody knows, if https://www.daz3d.com/content-package-assist still works with the current version of Daz Studio 4?
Just noticed, that there is a video tutorial on YouTube.
Yes, I've been using it for years. Works fine in DS 4.24.03. I make DIMs for everything I buy from Renderosity, Renderhub, etc.
Thanks for letting me know, @FrankTheTank