[Tutorial] From Map Transfer to Material Presets
 L'Adair
Posts: 9,479
L'Adair
Posts: 9,479
From Map Transfer to Material Presets
A step-by-step tutorial on how to use the DAZ "7" female figures' materials, with their unique UVs, on the new Genesis 8 Female.
This tutorial will show you exactly how to use the Map Transfer utility, introduce you to a free graphics utility I find invaluable and show you how to use a couple of very handy batch processing features of that program, walk you through the tedious process of changing all the correct maps for a figure, as well as the tedious process of saving your new material presets.
However, since this tutorial was published, RedzStudio released Genesis 3 Character UVs for Genesis 8 Female and Genesis 3 Character UVs for Genesis 8 Male. These products provide the DAZ "7" figures' unique UVs for Genesis 8, making the need to use the Map Transfer on the materials no longer necessary. I highly recommend both. If you don't have them yet and money is an issue, I urge you to add them to your wishlist, to pick up the next time their sale price fits your budget.
If you cannot yet afford these products, you can still use the materials by following this tutorial for the specific figure you wish to transfer.
Even if you have/get the RedzStudio products, if you're relatively new to Daz Studio, I believe following along with this tutorial will help you understand Daz Studio a little better: The more you know about Daz Studio, the easier it will be to learn other features you've yet to use. Understanding how to save material presets, for example, will help you with the dialog for saving any of the other presets.
Daz 3D is part of 
Connect
DAZ Productions, Inc.
7533 S Center View Ct #4664
West Jordan, UT 84084
Licensing Agreement | Terms of Service | Privacy Policy | EULA
© 2026 Daz Productions Inc. All Rights Reserved.
Comments
Genesis 8 Female (G8F) is being advertised as the most compatible Genesis yet. I have to agree. Among other things, G8F and Genesis 3 Female (G3F) share the same UVs. It is a simple matter to apply most G3F character material presets to G8F. However, all of the Daz "7" figures have their own, unique UVs which G8F does not have access to—at this time, anyway. Edit: RedzStudio has since released products for both the male and female Daz "7" figure UVs for their corresponding gender. See links above, in the OP.
The answer to using those materials on G8F is the Map Transfer utility. Yet there is vitually no official documentation on how to use this very useful tool, and most of what you can find via Google is old, and sometimes more confusing than helpful.
One of these models is Rune 7, the other is Genesis 8 Female. I followed Redz tutorial from the Morphs from G3 to G8 to create a shape morph of Rune for G8F and the Map Transfer utility to convert Rune's materials and created a complete set of presets from those materials. Pretty much the same steps as this tutorial. (I actually started the tutorial with Rune as the example, then decided more people were likely to have V7 than Rune 7.)
The Map Transfer utility is simple and easy to use. So simple, I think, that once a person knows how to use it, they forget how intimidating it can be to one wondering how in the bleep to set those grayed-out options! This tutorial provides simplified step-by-step instructions that will have newbies and not-so-newbies alike feeling like a Map Transfer expert in short order.
By the end of this tutorial, you will have a set of usable material presets* for the new Genesis 8 Female (G8F). I will be using Victoria 7 for this tutorial, but it doesn't matter which "7" female you use, it's the same proceedure. (Instructions are for computers running a Windows operating system as I don't have a Mac.)
This tutorial is broken up into parts, chapters if you like, focusing on specific steps to 1) convert the materials from one figure to another when the UVs are different, 2) apply the converted materials to the target figure, and 3) create presets for easy access to these materials for the target figure. These "chapters" are presented in separate comments below, making it easy to share a link to a specific chapter, or bookmark where you left off. There are also "Intermission" chapters to give you a mental breather, where I share some of my "secrets" to making all of this easier and faster.
Part One: The Map Transfer Utility
Intermission
Part Two: From Maps to Model
Intermission
Part Three: From Model to Presets
Nothing happens in a vacuum, and I'd like to thank Daz for the youtube video, (which made perfect sense after I figured out how the utility worked,) and Sickleyield for her excellent tutorial on transfering M4Gens to M5Gens. It made my eyes glaze over with information specific to the gens, but also pointed me in the right direction for puzzling out how to make the Map Transfer work.
*This tutorial does not cover the anatomical elements, as I do not have Victoria 8. Once you've completed the tutorial, if those materials are important to your art, you should have enough experience to work it out.
Reserved for Recommendations and Links
Part One: The Map Transfer Utility
Converting Maps from one UV to another using the built-in Map Transfer utility.
While we want to transfer the Victoria 7 materials for use on the Genesis 8 Female, we need to use the Genesis 3 Female as her stand-in for a number of reasons. In Part One, the Map Transfer Utility requires the object have both the source (Victoria 7) and target (Base Female) UVs. We'll also be working with Iray presets. Iray materials often include maps not used with 3Delight. This way, we'll convert all the maps for each template now.
The very first thing you need to do is decide where your images will go for your presets. Once you've created presets for a character, you really won't want to move those images. I've created a folder structure in "My Library" textures folder similar to that of the default My DAZ 3D Library: C:\Users\ladair\Documents\DAZ 3D\Studio\My Library\Runtime\textures\L'Adair\Characters\Base Female\G3F\Victoria 7. The parent "G3F" directory will eventually hold converted textures for all of my "7" female figures.
The second thing you need to decide is if you want to have an interim folder for your converted images and if so, where that temporary folder will be. I highly recommend the interim folder, and you'll see why in Part Two. You can always delete these copies later.
Your destination folder in Step 2, below, is your interim folder if you're using one. Otherwise, it's your texture folder.
Step-By-Step: The Map Transfer Utility
- Torso to Template 4
- Legs and Toenails to Template 3
- Arms and Fingernails to Template 2
- Ears, EyeSocket, Face and Lips to Template 1

Note: It isn't necessary to convert the Eyelashes, Mouth/Teeth, or Eye maps. I've checked the maps and UV templates, and the Victoria 7 UVs are virtually identical to the base female UVs for these maps. (This is probably true for any base "7" female UVs.)Note: The transfer process can take a long time on older/slower computers. The images are optimized, converted and then rendered to file using the 3Delight render engine. If this process is taking a long time on your computer, skip forward to the next chapter for "Intermission" and come back here when the Map Transfer has finished processing.
Note: Victoria 7 loads with Normal Maps. So do the makeup presets. As Map Transfer has already created the face Normal Map in Step 12, you can save a bit of time by also applying the Victoria 7 Normal Maps Off preset after you load each makeup option.
Note: I recommend doing all the makeup options at this time. You have the utility set up with all the right options. Just apply the makeup preset to G3F, (apply the Normals Off preset as well,) open the Map Transfer dialog and hit Accept. Compared to setting it all up again later, it's fast and easy.
And now... Time for Intermission.
Intermission
What? Intermission in a tutorial? Sure. Why not?
We are all prone to make more mistakes when we're tired, and Part Two is definitely going to need your full focus.
Besides, I want to tell you about a small graphics utility that is going to make some of this much easier on you. And it's free. I first discovered this little gem in the late 90s, and I haven't had a computer yet that it wasn't one of the first programs to get installed. What is it?
Irfanview. Irfanview started out as an image converter. Even when I first started using it, the program did much more than that. But it's still small, and it's fast, and it has a great screencapture feature, and for our purposes today, a batch conversion/rename feature.
The batch feature will let you rename the images from your Map Transfer, convert them to jpg with more control over the compression than you'll get from the Map Transfer—or from Photoshop—and move them to their final folder. All in a single operation. Of course, it can do even more than that, but you get to explore the other features on your own. Later. After you finish the tutorial.

So what other secrets should I divulge now?
► PNG is my preferred image format. I use it for renders, I use it for screencaptures, I use it so much, I often forget to convert to jpg to upload images to my Gallery pages! Why? Because JPEG uses "lossy-compression," which in the simplest of terms means compression is attained by throwing away some of the pixel data. The higher the compression, the more data that's lost. But PNG is a "lossless" compression format, so I get the best of both worlds... data intact, and some decent compression.
Most of the image maps you will be converting are in the JPEG format... already compressed, already with lost data to some extent. But some of the Normal Maps are TIF to begin with. So I recommend converting your images to PNG, rather than JPG, to get the cleanest images you can. You can even convert those normal maps back to TIF, with Irfanview. (And that's why I recommended PNG when going through the steps of Part One.)
As an added bonus, using the beta 4.9.4.117 in Windows 10 and the beta 4.9.3.166 in Windows 7 both, my PNG images have transparent backgrounds. That makes it real easy to add a matching color backgound, especially to the Normal Maps.
► You may have noticed the path to my destination folder ended with "Map Transfers/Temp". I use the same folder for all my conversions. When I've finished one figure, I create a folder with her name within the Temp folder, i.e. "Victoria 7", and move all the images into that folder. I then drop the new folder into another subfolder of "Map Transfers", in this case "G3F". To make finding the folder easy, I have a shortcut to it in my top-level Daz folder on that drive. (Along with a few other shortcuts.)
But I don't create my presets from these folders. These are my backup images. I may delete them after I have everything done, but if I mess up something, the renaming/conversion thing, for example, I can just delete my mistakes and start over.
And now that your eyes have glazed over, it's time to get up and walk around; grab a beverage, pet the cat, chase the dog, (how did he get out of the backyard?)
Meet me back here for Part Two in about ten minutes.

Part Two: From Maps to Model
Preparation, Organization, Application and Other Tedious Stuff
Welcome back.
After completing Part One, you should have, at least, all the images of Victoria 7's default maps for the Face_1001, Torso_1002, Legs_1003 and Arms_1004. Hopefully, you went on to convert the rest of the Face maps for the five makeup presets as well.
What you still need for your presets are all of the maps for the Mouth_1005, Eyelashes_1006, Eyes_1007 and EyeMoisture_1008. (Though not all characters include the EyeMoisture map, Victoria 7 does.) When applying images to your figure, you could reference the images in Victoria's texture folder. However, I prefer to keep all the textures together in a single folder, as if my converted character were a product, so that's how these instructions are set up. (I sometimes need/like to make changes to the maps for a specific render, and it's just easier for me to have all the images for a figure in one place.)
I also like to rename all of my maps, to distinguish the converted maps from the originals. Although our new maps will fit G3F, she can wear the original "7" materials without issue. So I'm adding G8 to the filename to tell me these are the images I converted to use with my G8 compatible material presets. For example, the original Victoria 7 images have filenames that begin with V7. I'll change those to start with V7_G8_.
Using Irfanview To Prepare Your Maps.
This section of the tutorial assumes you followed my suggestion and saved your converted maps to PNG format, that your system made the backgrounds transparent and that you downloaded and installed Irfanview during the break.
Preparing Your Maps With Another Conversion Utility
I like Irfanview and I've used it for a couple of decades. But if you've been using another program and are happy with it, you should use it. Basically, we are converting PNGs to JPGs, adding a white background color, and changing the name to include the G8 identifier. We are processing the normal maps separately, leaving them in the PNG format but adding a blue background, and adding the G8 identifier to the filename. (If you're not using Irfanview, I am assuming the above information is sufficient.)
Part Two: From Maps to Model, (Cont'd.)
Preparation, Organization, Application and Other Tedious Stuff
Using Your New Maps On The Figure.
In order to create Material Presets with the new images, we have to tell Daz Studio to use our image maps instead of the images provided by the vendor for the character; in this case, DAZ and Victoria 7.
You'll want to copy and paste the location of your new maps frequently, so open a window to your Victoria 7 textures folder.
1. In Daz Studio, load the base Genesis 3 Female and with G3F selected, apply the Victoria 7 All MAT option. It doesn't matter if you use Iray or 3Delight, the process is the same. (You may want to do both.) I'm going to use the Iray materials for this tutorial.
2. With the G3F figure still selected, in the Surfaces->Editor, select "Surfaces" in the left column, (this will select all the surfaces.) Scroll down to UV Set in the parameters column, on the right, and change the UVs from Victoria 7 to Base Female.
3. Save the file as a scene, somewhere easy to find. If Daz Studio crashes, you won't have to start over.
Now comes the tedious part. In the Surfaces->Editor, you need to replace all of the images in all of the Surfaces.
4. For every image in every Surface, you need to:
As you may recall from setting up templates in the Map Transfer utility, some of the maps are used for more than one surface. That means, in most cases, you can load the image for each parameter in all the related surfaces at once.
Surfaces that do not share maps are: Eyelashes, EyeMoisture, and Torso.
Maps that work for multiple surfaces are:
5. Select the EyeMoisture surface in the left column. Scroll down the parameters in the right column, looking for images. (As we are currently working with the Iray materials, there shouldn't be any images.)
6. Select EyeLashes. Scroll down to the Cutout Opacity parameter. Click on the image icon, scroll to the top and click on Browse. Paste the path of the window you opened in step one in the location bar of this window and hit Enter. Find the V7_G8_EyelashesMapT01_1006.jpg image and double-click to select. If you want to verify the image has changed, hover over the image icon and the popup will include the full path and filename of the image.
7. Select Torso. Beginning with Base Color in the right column, change the images for every parameter that has one: Click on the image icon, click on Browse, paste the path into the location and hit enter, double-click on the corresponding image from your converted maps.
Okay, by now you are an expert on changing images! Only "a few more" to go.
8. Select Mouth and Teeth, (click on one, ctrl+click on the other.) These two surfaces use the same image in both Base Color and Translucency Color. Change the image in Base Color, then you can click on the image for Translucency Color and select V7_G8_MouthMapD_1005 from the list of used images. Now scroll down to Base Bump and replace that image.
9. Select Cornea, Irises, Pupils and Sclera. Like the mouth surfaces, these four use the same image, V7_G8_EyeMapD01_1007, in both the Base Color and Translucency Color parameters. Scroll down to Base Bump and replace that image as well. Click on Cornea. Scroll up to Refraction Weight and replace the image.
10. Select Arms and Fingernails. Repeat the same procedure you used for the Torso, scrolling down and replacing images as you go, until you come to Top Coat Weight and Top Coat Color. These two surfaces use the same map here, but not the same parameter. Click on Arms. Change the Top Coat Weight image. As you used the same image for Glossy Layered Weight, find V7_G8_ArmsMapS_1004 in the list of used images. Now do the same for Fingernails in the Top Coat Color parameter.
11. Select Legs and Toenails. Repeat the procedure you used for Arms and Fingernails. When you get to the Top Coat parameters, select first Legs and then Toenails and plug the specular map already in the list, V7_G8_LegsMapS_1003, into the the Top Coat Weight and Top Coat Color parameters, respectively.
12. Select Ears, EyeSocket, Face, and Lips. Scroll down and replace images in each of the parameters. As with the other skin surfaces, Top Coat Weight will use the specular image also used in Glossy Layered Weight.
13. Save your scene.
And... you're done! Loading images, that is. For now.
Could you use a break? I know I could. Let's take a short Intermission and meet back here in ten. (Or whenever you're ready to start saving your presets. I'll be waiting here patiently. Virtually, of course.)
Intermission
In Part Three, we're going to save our material presets. However, there is an issue with G3F eye materials on G8F eyes I'd like to address first. The UVs are the same, but the geometry (mesh) is not.
On G3F, the EyeMoisture consists of two separate meshes, which were the "tear" and "EyeReflection" surfaces in Genesis 2. The second EyeMoisture mesh covers the Cornea and the rest of the eye. The Cornea and the Sclera are one mesh, with the Pupil and Iris both being separate meshes.
Much has changed on the G8F eye. For one, the EyeMoisture "tear" mesh is now part of the Eyelashes anatomy addon. The rest of the eye now consists of two meshes, one on top the other and fully enclosed. On the top, or outside, is the new EyeMoisture/Cornea mesh, and underneath, or inside, is the new Sclera/Irises/Pupils mesh. But more than that, the ridge in the mesh around the iris is different. On the G3F eye, the ridge had the outer edges of the eye color. On the G8F eye, the ridge is completely outside of the eye color.
With the Eye meshes so different, even using the same UVs and Surfaces, there are bound to be times when the G3F eye materials don't work right with the G8F eye. This is the case with the eyes for Victoria 7. Based on the numerous comments in The Commons about the "white ring" around the iris when G3F materials are used on Genesis 8, I suspect the problematic material presets for Victoria 7 are common throughout Genesis 3.
I believe I've figured out the source of the "white ring." The Sclera settings for Victoria 7 are too "shiny" for the new mesh: too much Glossy, too much Reflectivity and too much Top Coat Reflectivity. Victoria 7 sets both Glossy Layered Weight and Glossy Reflectivity at 1.0 and Glossy Roughness at a mere 0.010! It also uses Top Coat to add even more Reflectivity, at the maximum settings.
On the other hand, the Base G8F doesn't even use Top Coat, sets both Glossy Layered Weight and Glossy Reflectivity at .25, and Glossy Roughness at .40.
How you want to proceed where the Scleras are concerned will be the first order of business when you return from intermission. Don't worry. It's no more difficult than anything you've already done following along with me here.
Throughout this tutorial, we've been using the G3F figure instead of G8F. That's not going to change. As you already know, Daz has turned the G8F eyelashes into an anatomy addon. An assumption I've seen in the forums is you need a separate preset for the addon. But it isn't necessary.
► I've found applying the full/all mat preset to the addon will apply the correct settings and materials. That means you can select both the G8F figure and the G8F eyelashes and apply your G3F preset. In order to keep the Eyelashes with the full/all preset, we need to create those presets with the G3F figure. (The G8F preset that comes with the Starter Essential will apply settings to the eyelashes with only the figure selected, but I don't know how to do that, or if we even have the tools to do it that way, not being PAs.)
► And here's a tip for saving your new presets: Save your presets with the same names as the originals. This will allow you to copy the icon/tip images into your preset folder, delete the [filename].duf.png images and have great looking icons for your presets with minimal work.
That's it for intermission. Don't forget to get up and walk around a bit, take a few deep breaths and oxygenate your blood, look at something besides a monitor to give your eyes a rest. The usual stuff.
Part Three: From Model to Presets
Saving Presets And, Yes, More Tedious Stuff
Welcome back, again. This is the last chapter of the tutorial. (Go ahead. Breathe a sigh of relief. I did.)
By the end of Part Two, you had G3F loaded in Daz Studio with Victoria 7's All Mat preset settings and your converted image maps, with Base Female for the UV Set. Have you decided where to save your presets? If not, do that now. (You can move these later, if you change how you want to organize things.) I put mine under Presets->People->Female->Genesis 8->Victoria 7 in My Library. (C:\Users\ladair\Documents\DAZ 3D\Studio\My Library\Presets\People\Female\Genesis 8\Victoria 7)
Normally this is the point where you create your first preset. However...
As I mentioned in the last Intermission, there are some decisions to be made about the material settings for the Sclera. Do you go with the settings from the Victoria 7 presets? Or do you make changes to compensate for the change in the Eye mesh? If you'd rather stay with the V7 settings, skip to Saving Your Main Preset, below. If you want to modify the settings, keep reading.
Modifying The Eye Settings
What I propose is you create modified materials as your presets, with two additional presets. The first additional preset will change the Cornea to the same settings as the default Genesis 8 base uses. The second additional preset will change the Sclera settings to give you back the high reflectivity in the original Sclera settings.
To restore the your modified default eye settings, apply your new Victoria 7 Eyes 01 MAT preset. Now you're ready for...
Saving Your Main Preset
Saving Other Default Presets
Now we are going to create presets that use the default settings, but are only applied to part of the figure: Victoria 7 Eyes 01 MAT, Victoria 7 Face 01 MAT, Victoria 7 Eyelashes 00 MAT, (we're adding this one,) Victoria 7 Translucency Medium, Victoria 7 Teeth SSS OFF, and Victoria 7 Normal Maps On.
Creating any Material Preset starts the same way:
For the rest of the presets in this tutorial, you will always click on the Menu icon in the upper right hand corner and select Uncheck->Uncheck All.
For brevity, I will say, "Prepare your [filename] preset, Uncheck All, and..." followed by the specific settings for that preset. Believe me, after a couple of these, you'll have it down like a pro.
Ready?
The first preset is the default Eye 01. Skip to the second preset, if you've already saved Victoria 7 Eyes 01 MAT in Modifying The Eye Settings, above.
The next presets are a bit more work.
- Expand the surface, (click on the arrow, or double-click.)
- Expand Base
- Expand Diffuse
- Expand Translucency
- Expand Translucency Weight
- Select Value, by clicking in the box
Note: I recommend starting at the bottom of the properties and working your way up. Once expanded, the tree will go below the bottom edge of the dialog window. This way, you won't have to keep scrolling, which saves time.That takes care of all the presets based on the default character materials and settings. Now let's tackle the variations.
Saving Character Option Presets
Victoria 7 Iray presets include six makeup options, four eye color options, three eyelash options, two Translucency level options, as well as Normal Map On/Off, and Teeth SSS On/Off presets.
One of each is default, except for the eyelashes, but we created a default anyway.
Each of these presets will have identical settings in the Material(s) Preset Save Options dialog as their default counterparts. The changes are in the actual materials and/or settings on the figure.
At this point, we are combining what you learned in Part Two with what you've already learned in Part Three. One by one, you'll apply the Victoria 7 preset, replace the original images with your converted images, and then create the option preset.
First, to make it a lot easier on you, locate the Victoria 7 folder under the Surfaces->Presets. For Iray, that's Default->Iray->Feminine->Victoria 7. There are two columns, the folder structure on the left and the preset icons on the right. In the middle, there is a very small triangle pointing toward the left. Click on that to expand the right column. With only the icons showing, this column won't change when you go back to the Surfaces->Editor.
Second, open the folder with your converted images and copy the location. You'll need the path in several of the steps that follow.
Special Presets
Let's start with the easiest, the Victoria 7 Normal Maps Off preset, as it only removes the Normal Map from the Skin and Nail surfaces.
Eyelashes
Repeat the above steps using first Victoria 7 Eyelashes 02 MAT and then Victoria 7 Eyelashes 03 MAT.
Eyes
Repeat the above three steps for Victoria 7 Eyes 03 MAT and Victoria 7 Eyes 04 MAT.
Face/Makeup
Repeat the above five steps for Victoria 7 Face 03 MAT, Victoria 7 Face 04 MAT, Victoria 7 Face 04 MAT, Victoria 7 Face 05 MAT and Victoria 7 Face 06 MAT presets.
And now, believe it or not, you have finished the tutorial! (Feel free to celebrate. You've put in a lot of work to get here.)
Now that you have completed the tutorial, I think you will agree with me that the Transfer Map utility is quite simple and easy to use. And creating Material Presets is pretty easy, too. The bulk of the work comes when you have to apply the new images to the material settings on your figure. Also easy, but repetitive, boring, and tedious!
But the thing about repetition, boring or not, is you retain what you've learned. I suspect you can now convert another "7" figure to use with G8F with little or no need to refer back to the tutorial.
Bookmark this thread anyway. If you don't use the Map Transfer utility for several months, you may want to skim the tutorial to refresh your memory. And when you meet someone in the community who could benefit from the information here, I hope you will share the link.
Thank you for hanging out with me, putting up with my oddball sense of humor, and sticking it out for the entire tutorial!
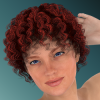
And here's a closeup of G8F wearing my new Victoria materials. She's also sporting V7's shape.
"Sophisticated Lady"
F.A.Q.
Q. Can I follow the steps in this tutorial to convert other generations to the G3F UVs for use with either Genesis 3 Female or Genesis 8 Female?
A. No. The differences between the unique UVs of the DAZ "7" figures and the G3 Base Female are relatively small. It's like taking a trapezoid, pulling the short ends out and pushing the long ends in to convert it to a rectangle. Or vice-versa. (Fig. A) But the UVs of generations before Genesis 3 are so dissimilar to G3, it's like trying to convert a square to a free-form shape. (Fig B)
Reserved Just Because... because if I don't, I'll find I need it! lol
Reserving this post to post my screams of horror, hair tearing and tears cos I am a dumpkopf when it comes to things like this.
Oh my gosh thank you, thank you thank you! lol. I'm assuming this will work for moving G2 up to G3 as well?
Unreserved praise to you, L'Adair. Thank you very much.
Wow. What an awful lot of work you must have put into this! I look forward to having a go at it when I can carve out a bit of time. Meanwhile, I can't wait to see everyone else's results. You're a very thorough teacher, L'Adair. Thank you :)
No, I'm afraid not. The UVs are too different. That was perhaps the biggest complaint DAZ got when they released G3, that the materials weren't compatible. Made quite the cottage industry for Cayman Studio's with his/their Legacy UVs products.
You can convert the "6" figures materials to base materials, though, and then they'll work with the corresponding version of Cayman's Legacy UVs.
And... you're welcome, you're welcome, you're welcome!
@jakiblue, I hope you plan on including a video... with audio!
@Diomede, you're welcome. Unreservedly.
@Astracadia, it was a labor of love: love of the art, love of the community... but I admit, I was getting eager to post long before I was finished! Thank you. And of course, you're welcome.

Eh, no big deal, I am sure I will scoop up the G2 to G3 at some point although I am perfectly happy with G2f as she is. although, if I could get her to G8 with those expressions.... lol. Thanks! I'm still super excited about this lol.
Thank you so very much for all your hard work on this! I've bookmarked and will try it when I've plucked up the courage. Haven't done a thing with maps and such yet...
Thanks for the detailed walkthrough. Can you explain what you mean with the above? By explain I of course mean create another comprehensive guide with intermissions. Basically I bought this thinking it would work with V8, what can one do other than buy V4?
Well, we mix characters and materials all the time. You can always create your G2F shape morphs for G8F, and then apply G3F materials. Otherwise, to use your G2F materials on G8F, you're going to need Cayman's Legacy UVs for Genesis 8: Genesis 2 Female. I think that's what you meant, above, but just to be on the safe side, (for anyone else reading this thread,) the Cayman product that makes G2F materials usable on G3F will not make materials that can then be applied to G8F.
You are most welcome, @Worlds_Edge. But please, don't let the length of this tutorial intimidate you. The Map Transfer utility is really very simple to use. There is only the one dialog page. Creating material presets is also quite simple. I am detailed in the instructions to try to ensure no one gets overwhelmed and gives up. (In fact, I expect some folks will think the instructions are too elementary!)
And when you do give it a go, feel free to come in here and post your questions. If something is unclear, I want to know, so I can revise it.

To use your V4 materials on G8/V8, I believe the best solution for you is to get Legacy UVs for Genesis 8: Victoria 4. Cayman's product provides "Victoria 4 legacy UV maps for Genesis 8 and the geografts" so you shouldn't need to have V4 in order to take advantage of the product.
The only other suggestion I have is to return Amy and get your money back so you can purchase a G3F that will meet your needs. If you're heart is set on Amy, you need the Legacy UVs.
You don't need another guide, you can use this one.
A "6" figure is any DAZ base figure for generation 6, aka Genesis 2. So Victoria 6, Gia 6, The Girl 6, and so. Each of these "base figures" has it's own, unique, UVs. Let's say you have Victoria 6 and Cayman's Legacy UVs for Genesis 8: Genesis 2 Female. You would follow along with this tutorial, using Victoria 6 everywhere it mentions Victoria 7, and Genesis 2 Female everywhere it mentions Genesis 3 Female or G3F. (There are some things specific to V7, like the issue with the eyes. But Cayman has a solution for the eyes so you can skip that bit.) When you are finished, you should have a folder of presets of V6 for G2F UVs. Those are the materials you'd use with Cayman's product.
I hope this answers your questions.
I think you do need V4 figure tho - the skins need to be in .duf format for them to work with Cayman Studios stuff....if the V4 Elite Amy isn't in duf format, you need to load it onto V4, then save as a material preset in the duf format.
SO much hard work to do a tutorial- thanks for sharing your expertise and for all the time this took to do it. Concise, to the point, and will help a LOT of people. Don't forget to add the link to your signature so more people will know about it. People sometimes forget we're here in the Art Studio!
Thanks, Jakiblue. I forgot about the file type issue, not using V4 much. I believe it's still possible without V4, if you have Victoria 4 for Genesis 2 Female and one of Draagonstorms's scripts. I just applied Amy to G2F without opening V4. I have the aforementioned product and the V4 Skins Auto Converter for Genesis 2 Female(s). I bought it about a month before her batch converter was released. (I could have returned it and got the batch converter, but I had no clue about the 30 day policy!) This script requires G2F be loaded in the scene, and it applies the materials to the figure. You then need to save them as a .duf material preset. I'd say saving an entire figure's presets would be as tedious as doing the same through my tutorial! lol
The V4 Skins Batch Converter to Genesis 2 Female(s) doesn't explicitly state it saves to .duf files, but I think it does, based on the statement: "... you can select one folder, and the script will convert all of the .DS, .DSA or .PZ2 files, that are Material Presets, in that folder and it's subfolders to Material Presets that will work seamlessly with Genesis 2. ... Then you just press the Process button and let the script do the rest."
The thing is, if you don't already have these utilities, you're looking at $36-$38. And that doesn't include the cost of Cayman's product. Another reason, perhaps, for @yakasyes to opt for returning Amy...
Thank you, @Novica. Once I get the all the images up, I'll be adding it to my signature. And to the Art Studio stickied List of links to useful tutorials. I'll also announce it in the Morphs for G3 to G8 thread. (While I know it can help anyone trying to figure out the Map Transfer tool, I wrote it with all those folks who are creating shape morphs for G8F in mind.)
ETA: I've shared the link a couple of places, so I went ahead and announced it in the morphs thread. I think I'll still wait until I've added all the images before I put the link in my signature, though...
Whoa, this is going to be hugely helpful! Thank you so much for the great tutorial and all your hard work, L'Adair! You are awesome!
You're welcome.
Wow, L'Adair. This is professional-looking. This comes from somebody who has written technical manuals.
Great job!