How to Use a Push Modifer: Making a Cave
 RGcincy
Posts: 2,862
RGcincy
Posts: 2,862
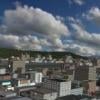
This is a tutorial on using a push modifier so that a primitive sphere can be converted into a cave in Daz Studio. I was a big caver in my teens and college years, so I have always liked the rocky enclosed atmosphere of a cave. I’ve made artificial caves in Bryce by painting a terrain height map, so this is similar, but better in that you can get horizontal displacements as well. Here’s a render of the finished result:
PDF version of this tutorial is here. For a previous tutorial on Push Modifiers, go here.
Step by Step Instructions:
1. From the main menu, click on Create/New Primitive and set the primary axis to X-positive (this makes the polygons form a ring vertically), diameter to 50 feet, segments to 100, and sides to 50.

2. Scale the sphere as follows: 200% Y, 50% Z, and 25% X. This gives a flattened cigar shape. I rotated it -7.3 degrees Z as most caves have a slope.
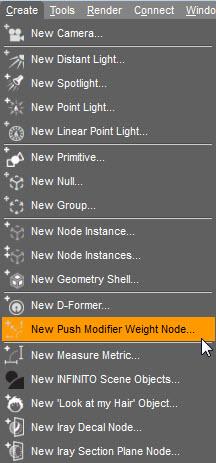
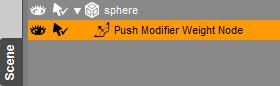
3. Select the in the Scene pane and go to the main menu and select Create/New Push Modifier Weight Node. You will now see the node added as a child to the sphere in the Scene pane.
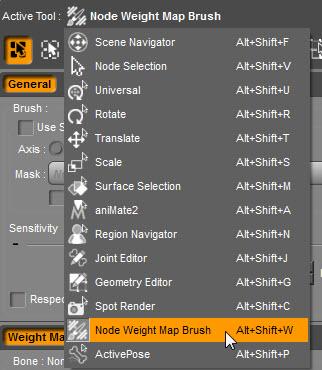
4. Go to the Tool Settings pane and from the drop down box at the top choose Node Weight Map Brush.
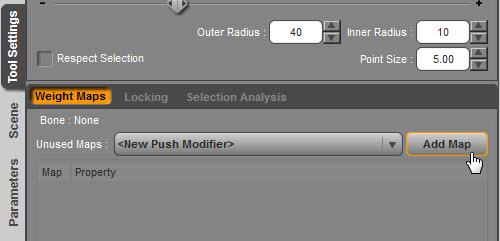
5. Half way down the weight map brush pane you will see a section titled Weight Maps. The Unused Maps box will show <New Push Modifier>. Click on the Add Map button.
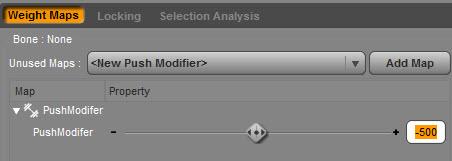
6. You will now see that a parameter slider has been added just below the button. This slider affects the amount (distance) of push that will be applied. The default value is 1. Set the value to -500 (which will cause the polygons to push into the sphere).
Daz 3D is part of 
Connect
DAZ Productions, Inc.
7533 S Center View Ct #4664
West Jordan, UT 84084
Licensing Agreement | Terms of Service | Privacy Policy | EULA
© 2026 Daz Productions Inc. All Rights Reserved.
Comments
continues in next post
7. The weight map will already be filled with a weight that needs to be removed (as indicated by the red color). Right click in the viewport and from the pop-up menu choose Geometry Selection/Select All.
8. Right click again and from the pop-up menu select Weight Editing/Fill Selected and type in a value of 0%. That removes all the weight. You are now ready to start painting the weight map.
9. At the top of the weight map brush pane, click on the Paint brush icon (upper right with the letter P). Go to the top of the sphere and start painting. The sphere will turn blue, then reddish, then red as you see the mesh deform inwards. Continue painting all over the top, sides, and bottom of the sphere. You may also want to change your brush sensitivity: keep it high for rough forming, lower for fine tuning.
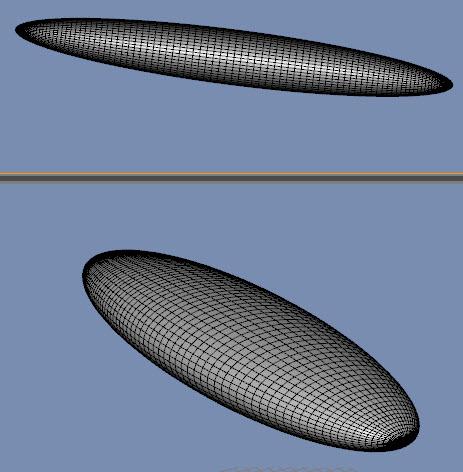
10. I have found it’s difficult to paint inside the sphere – usually you can’t see the concentric circles of the brush - so you’ll need to do most of your painting outside. You can set up a camera inside and use the Aux Viewport if you want to see how it is transforming (better to use 3DL rendering at this stage because it is faster to update).
11. You’ll want to add SubD to the sphere to make a finer mesh. Go to the main menu and select Edit/Object/Geometry/Convert to SubD. In the Parameter pane, set view and render to level 2.
12. After painting in the deformations, you’ll want to add some smoothing. At the top of the weight map brush pane, click on the Smooth brush icon (upper right with the letter S). Paint on the weight map and you’ll see the edges soften. If an area is too high, hold down the Alt key as you paint and it will push down the mesh. If an area gets too low, hold down Ctrl and paint and the mesh will grow higher.
13. I found it worthwhile to make several passes with the paint and smoothing brushes, pushing in, pulling out, pushing back in. That gives greater complexity of form. How much is up to you.
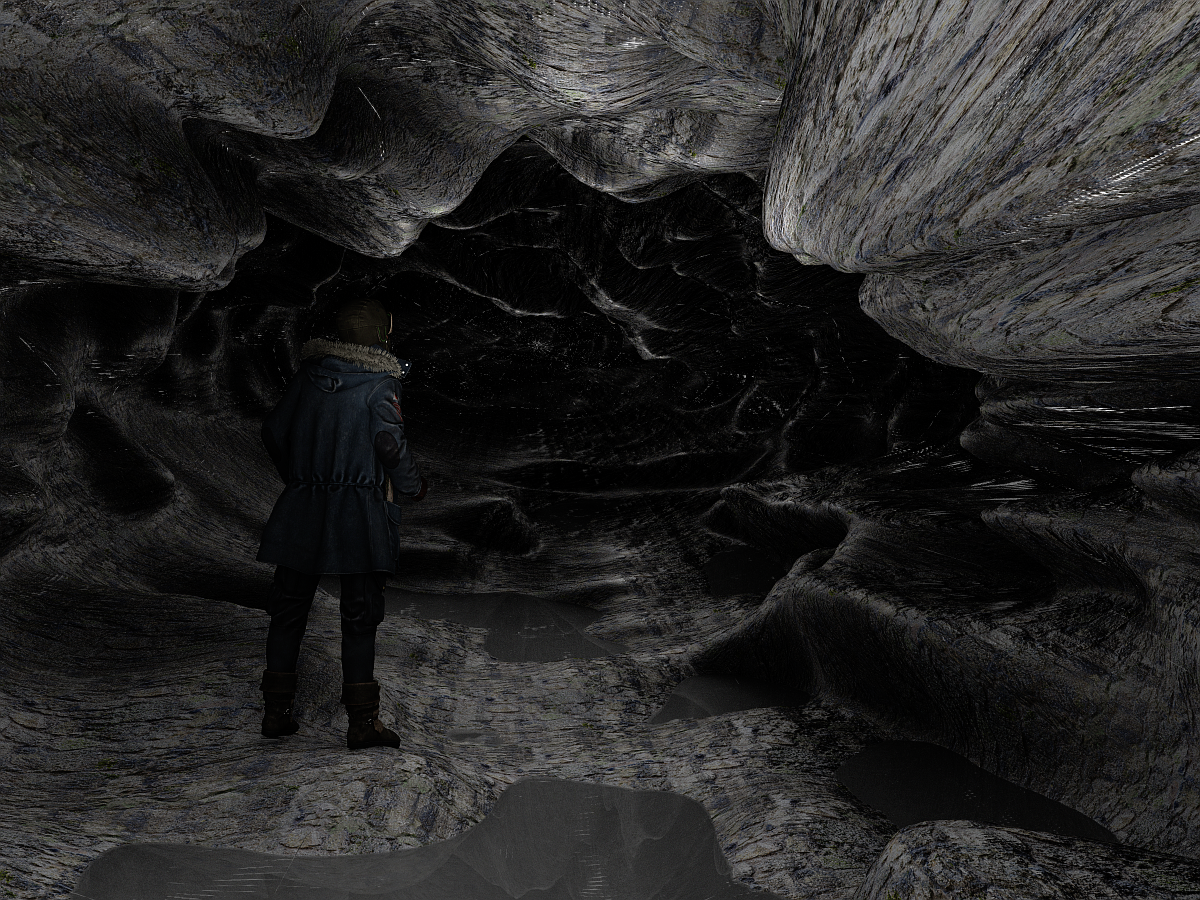
14. I only painted the front half of the sphere as you can see here. The figure in the finished render was positioned just in front of the smoothed portion of the sphere.
Here's what the mesh looks like from inside the cave with 2 levels of SubD applied:
Your tutorials are very helpful. Thank you very much for them.
You're very welcome
Well I didn't even know about this feature in Daz. Only been able to morph a volleyball using x,y,z to turn it into a cigar, flat disc, etc., shape. I've worked with something similar(but much simpler) in the past in the map editor for Command & Conquer Generals/Zero Hour for shaping the terrain. Just out of curiosity, does this feature work if you want to modify small portions of a character's face that are otherwise unavailable in the provided head morphs?
Never knew this was another purpose for "Create New Primitive" and assumed it was just for adding a light source with a basic shape and throwing on an emissive shader. Good stuff to know!
Wow Robert, this is really great information! Thanks so much. Something new to learn.
Very cool thanks for the info and screen shots I learned something new :)
Thanks for the tutorial! Here's what I did with it.
I like it, expecially the glass like texture