How to Use a Push Modifier: Creating a Blanket / Adjusting Clothing Fit and More
 RGcincy
Posts: 2,862
RGcincy
Posts: 2,862
This is a tutorial on using a push modifier so that a primitive plane can be converted into a draped sheet or blanket. The push modifier uses a weight map to deform the mesh, similar to how a map can be used to control a d-former. Unlike the d-former, there is no field or deformer tool to be positioned and adjusted.
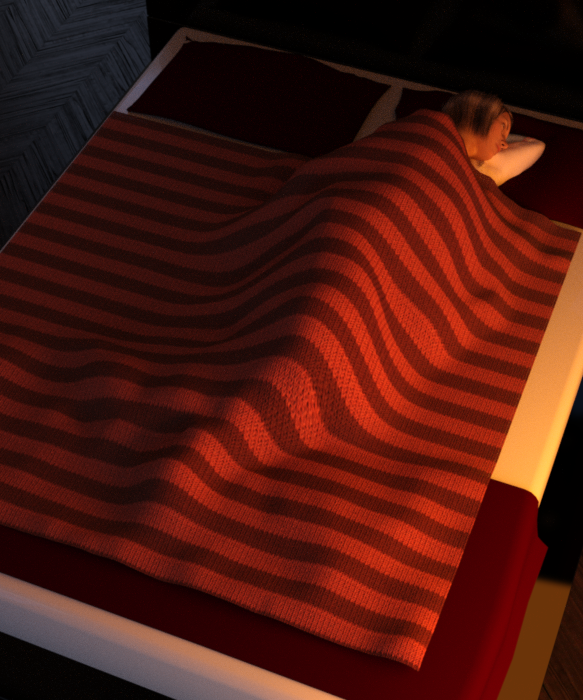
Here’s a render of the finished result:
Step by Step Instructions:
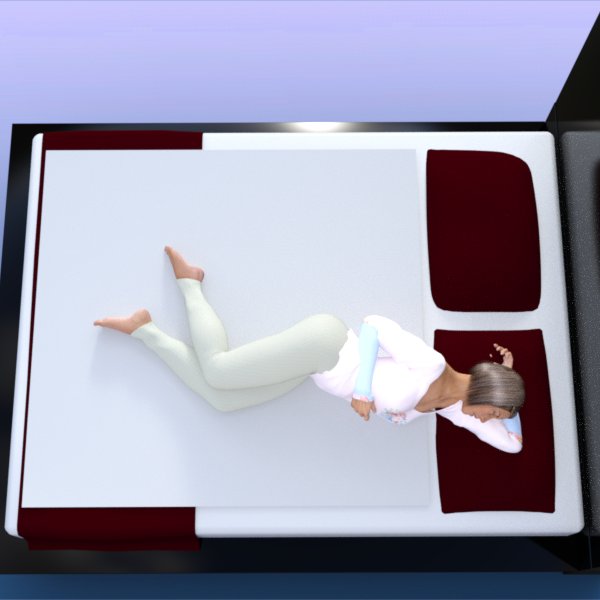
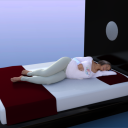
1. To setup the scene, we are going to use the bed from Modern Room Bedroom. It comes with a blanket at the foot of the bed and two pillows (combined as one prop) at the head of the bed. The actor is G3F in a sleeping pose with her left arm tucked behind her head. Originally her head and arm were flat with the bed, but I adjusted her chest side-to-side to lift her slightly so her arm is about half way into the pillow. Here’s how the scene looks to start:

2. Create a flat plane by going to the main menu and selecting Create/New Primitive… and set the primary axis to Y-positive, size to 5 feet, and divisions to 100. The more divisions, the smoother the draping.

3. Translate the plane so it is just above the sheet and blanket and covers most of the girl’s shoulder. I set Y-translate to 52, Z-translate to -27 and Z-scale to 105%.
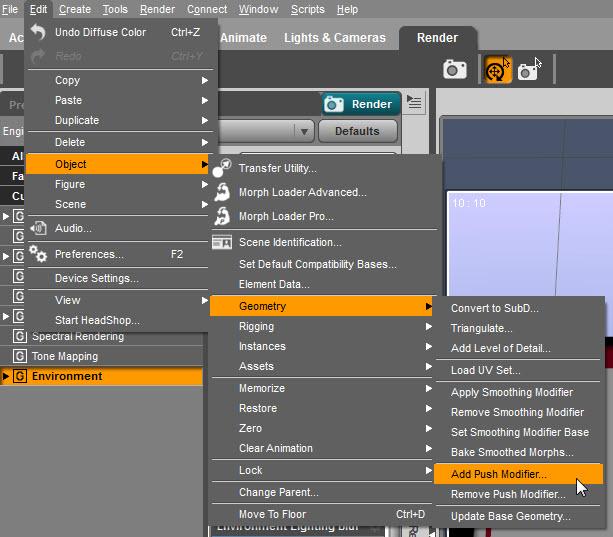
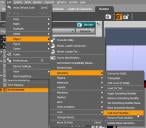
4. Select the plane in the Scene pane. Go to the main menu and select Edit/Object/Geometry/Add Push Modifier.
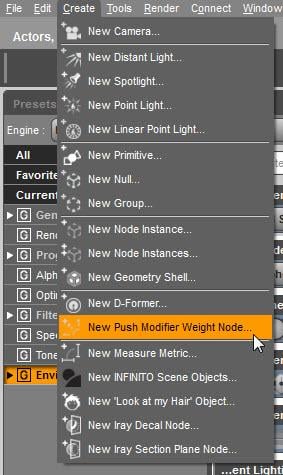
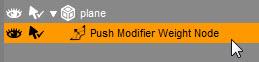
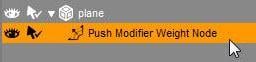
5. With the plane still selected in the Scene pane, go to the main menu and select Create/New Push Modifier Weight Node. You will now see those words as a child to the plane in the Scene pane.
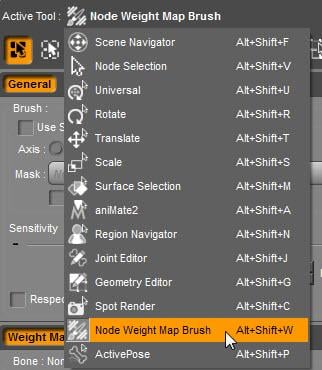
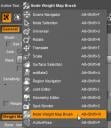
6. Select the Push Modifier Weight Node in the Scene pane.
Go to the Tool Settings pane and from the drop down box at the top choose Node Weight Map Brush.
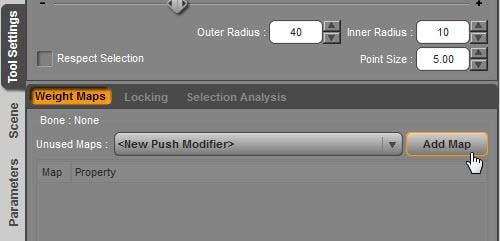
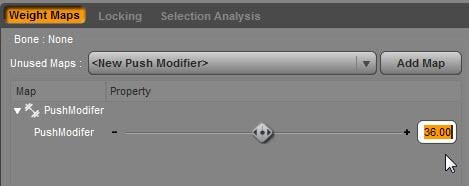
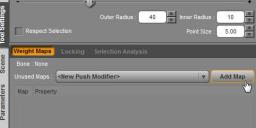
7. Half way down the weight map brush pane you will see a section titled Weight Maps. The Unused Maps box will show <New Push Modifier>. Click on the Add Map button.
You will now see that a parameter slider has been added just below the button. This slider affects the amount (distance) of push that will be applied. The default value is 1.
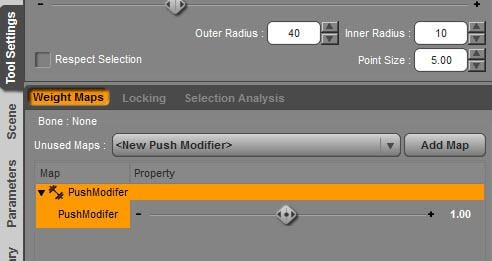
For now, set the slider to 36 which is a lot of push, as we need the blanket to cover the shoulders and hips. (The plane is at Y 52, the shoulders are around Y 86 for a difference of 34. The setting of 36 gives a little extra room and can later be adjusted up/down as needed.)
8. The weight map will already be filled with a weight that needs to be removed. Right click in the viewport and from the pop-up menu choose Geometry Selection/Select All. Right click again and from the pop-up menu select Weight Editing/Fill Selected and type in a value of 0%. That removes all the weight. You are now ready to start painting the weight map.
(Continued in next post)


Daz 3D is part of 
Connect
DAZ Productions, Inc.
7533 S Center View Ct #4664
West Jordan, UT 84084
Licensing Agreement | Terms of Service | Privacy Policy | EULA
© 2026 Daz Productions Inc. All Rights Reserved.
Comments
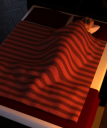
9. At the top of the weight map brush pane, click on the Paint brush icon (upper right with the letter P). Go to the shoulder area and start painting in a small area. The plane will turn blue, then reddish, then red and you will see the mesh deform upwards. Continue painting until the mesh is above the shoulder and forms a flat top like a plateau. It’s OK for now if the mesh is too flat and rough, as later we will smooth the mesh to get better draping. (If you don’t see the color change, right click in the viewport, and from the pop-up menu select Weight Display/Show Weighted Surfaces.)
10. Continue painting over the figure until the mesh covers the woman and her clothing. Increase the brush’s sensitivity if you want to deform the mesh faster (at this stage, it’s OK to overshoot some). Rotate the camera to be sure she’s covered from all sides.
Daz Studio has a bug where the paint brush icon (two concentric circles) can disappear and you’ll get a plain white arrow that no longer paints the mesh. If that happens, click on another object in the scene and then in the Scene pane reselect the push modifier child of the plane.
11. You can check to see if the push modifier property needs adjustment by moving the slider in the middle of the Node Weight Map pane back and forth. If you move it down to 33.2, the shoulder will still be covered but you’ll notice the hip is the high spot and is showing too much. Move it back to 36. The value you need to set for this slider will vary depending upon which pose you are using and the size of the character.
12. At the top of the weight map brush pane, click on the Smooth brush icon (upper right with the letter S). Paint on the weight map and you’ll see the edges soften. If an area is too high, hold down the Alt key as you paint and it will push down the mesh. If an area gets too low and skin or clothing is exposed, hold down Ctrl and paint and the mesh will grow higher. The plateau will disappear as you smooth and you'll end up with a rounded edge all around.
13. The painting of the map is a bit of an art. For the blanket, you want it to drape and not be form fitting, so paint/smooth further away from the figure, so the plane smoothly flows onto the bed’s surface.
14. As a shortcut, you can quickly smooth the entire plane by right clicking in the viewport and selecting from the pop-up menu Weight Editing/Smooth Selected and use a value of around 20% smoothing factor and 40 iterations. To smooth a smaller area, use the Geometry Selection tools from the pop-up menu to pick an area and then apply the Weight Editing/Smooth Selected.
15. You’ll find the most troublesome spots are points of the figure (shoulder, hip, hands, feet) which will tend to poke through. As you fine tune, I find it helpful to adjust brush sensitivity. For smoothing, I set it high (0.80) so it acts more aggressively. But if I have to add some height back (Ctrl key) or remove some height (Alt key), I set sensitivity low (like 0.05) so it changes slowly.
16. A blanket on a bed is not going to be totally smooth, so use the paint brush at a low sensitivity to paint in a few bumps and ridges in the flat sections.
17. Add a shader and you have a blanket.
(Continued in next post)
18. Next we are going to add a push modifier to the pillow. Repeat steps 4-7 except choose the pillows in the Scene pane and set the push modifier to a negative value (-3). You will see the pillows shrink in as you do so.
19. At the top of the weight map brush pane, click on the Paint brush icon (upper right with the letter P). Important Note: Because you have a negative push modifier parameter, the brush will act in reverse. Hold down the Alt key while painting to cause the pillow to fluff back out. Start with the left pillow which is not in use and paint until it becomes blue then maroon (because the pillow is red). I made it fully maroon, then used the brush without any key modifier to depress the center slightly (as a pillow would be if used recently).
20. You may find the pillow got pushed down into the mattress by the negative modifier setting. If so, change the pillow’s Y translate to move them back up.
21. Repeat step 19 for the right pillow, but mostly paint along the edges with the Alt key held down. You want the portion where the arm is located to remain sunked in, so you will want to see red in those areas.
22. I changed the pillow color to gray so you can better see the result. I also added sub-D to the pillows as they are a fairly coarse mesh and were showing a more jagged edge by the depressions.
23. Where else can you use push modifiers? To adjust clothing so it fits better. Here’s G3F wearing the Summer Trend shirt. The lower front edge of the shirt is embedded in the body at several spots (see left figure). If your clothing item doesn’t have useful adjustment morphs for that problem, create your own solution by adding a push modifier. Choose the shirt in the Scene pane and follow steps 4-9. Leave the parameter setting in step 7 at its default of 1.0. You paint right on the figure and can see the change in real time. Here’s a screen capture of the viewport after a map has been added to the shirt on the right. You can see the front and sides of the shirt have been lifted free of the pants.
Here’s the resulting render:
Below is another example of a shirt were a push modifier helps with the fit over the belt and loosens the fit around the arms and neck. Push modifiers don’t provide a complete solution like clothing modifiers (such as Fit Control) but they do offer a quick and easy way to make minor adjustments.
I wasn't aware of push modifiers until I stumbled across a reference to one yesterday in a forum reply by Richard Haseltine. Now that I know about them, I think they will be very useful. Hope you find them to be as well.
Attached is the tutorial in PDF format. Let me know if you spot any errors.
Wow! Great tutorials! Bookmarked! :D
Thank you for taking the time to create these tutorials for the community! That's very nice of you!
Thank you. One of the few things I miss about Poser is draping.
Thanks divamakeup. It's a helpful reference for me too since it's so easy to forget how to use some of these tools when you don;t use them all the time.
Thanks! I'm not a Poser user but I will say this type of draping is a bit unrealistic as it stretches the polygons and doesn't actually move the cloth as a physics engine would. But it can at least give the "look" of a draped object.
Thanks!
Wow thanks. There are all these old pretty skirts & dresses I always have to change G8 (or most DAZ characters) out of of because the skirts or dresses just won't drape nicely!
THANKS, RGcincy, for this tutorial. I wasn't familiar with Push Modifiers at all, just deformers and personally find using deformers pretty tricky and often unsatisfying for my pupose, but the push modifiers are quite useful and seem more easily directed -at least for me. Thanks for spreading the word and the how-to!!
-Gen
Bookmarked. Thanks!
Fantastic! Thank you :)
Laurie
Thanks for taking the time to make this excellent short tutorial. It reinforces my opinion that free tuts are always better than the paid for ones.
Nice tutorial, thanks. :)
It made me smile to read that you only stumbled upon push modifiers yesterday - I found them for the first time about three weeks ago and yet still hadn't managed to figure out a fraction of what you have :) Thanks for sharing!
Wow, what a brilliantly explained and illustrated tutorial. I always wondered how to apply push modifiers, especially when my characters were laying or leaning against pillows, or sitting on other soft furnishings, that didn't have included morphs.
Thank you RGcincy, I will now try this out. I have used Daz Studio for quite a few years but I'm guessing the program probably contains hundreds of 'gems' like this, that the program is capable of, which the casual hobby user like myself is unaware of.
Kind regards,
Bloody marvellous! I've used D-formers (even written a little tutorial on them), push modifiers and only seen the weight map option and never realised just what use it could be. This is just a touch eye-opening!
What a great tutorial! Thanks so much for taking the time to explain it so clearly.
Thanks for this, very helpful, nicely done!
Just got back into using Studio after several years, and was recently trying to use d-formers to adjust a blanket like this. So I am VERY grateful for this tutorial to both show me a new feature of the program and how to use it!
Awesome tutorial! Bookmarked and MAAFed!
Thank you so much for the tutorial. I knew about Push modifiers but I didn't know that you can use weight map on them too. This opens so many more possibilities...
Wonderful! The laying in bed one is awesome!
Great tutorial - thanks for it - well done.
Thank you very much for this great tutorial.
Great tutorial! I would have done it with a giant d-former and used the weight mapping on that, same concept but this is a couple less steps.
(Though for real, I would do it in Marvelous Designer.. or use a dynamic sheet, I think Optitex gave out a free one at some point)
This is terrific! Studio has so many capabilities but so little in the way of detailed documentation and more importantly, examples. Thank you for putting this together. I look forward to trying it out!
Thanks for all the kind comments!
I've played around a bit more with push modifiers. You can apply them to figures and hair. This first image shows a G2F with hair that's embedded into her left arm:
After applying push modifiers to the figure and the hair, and painting their respective maps, you get this. The hair has been pulled away from the arm and the face...well, you can see it's changed a lot.
The weight maps appear to be fairly coarse - you can get slightly smaller bumps but they appear to fit the size of the base resolution and the size is not affected by sub-D (but sub-D will affect how smooth it looks).
I also made a wrap from a primitive cylinder. I selected the top and bottom faces, made them into new surfaces, and hid them with opacity set to 0. I added a push modifier and 2 maps, one with negative push and one with positive push.
In hindsight, I think one map would be sufficient but I did see some interaction between the two that helps create creases as you can see in the image below.
Here is the PDF version of the tutorial.
Excellent. Thanks for the tutorial. Push modifiers were one of those things I wanted to figure out.
But promise me, next time, instead of spending so much time to drape a blanket like that, please just use VWD and drape it inside D|S...
Or just export the character and drape a mesh in Blender. So much quicker and easier
Just sayin'....
Comforter: http://www.optitex-dynamiccloth.com/FreebieDownload06.php
Square drape: http://www.optitex-dynamiccloth.com/FreebieDownload13.php