Daz 3D is part of 
Connect
DAZ Productions, Inc.
7533 S Center View Ct #4664
West Jordan, UT 84084
Licensing Agreement | Terms of Service | Privacy Policy | EULA
© 2026 Daz Productions Inc. All Rights Reserved.
Comments
If you have a bump map of cobbles, try using that as a map in the terrain editor, and if that gives you a decent but small section of cobbles, you can then use the grid replicator to make an area as large as you want.
The obj texture options are really only a way of copying the texture maps to some place you ultimately don't want them to be. Also it'll completely ignore procedural shaders (you'll need to use Baker to make the texture maps, or create new procedurals from scratch in DS).
My personal workflow is to create a DS texture folder for the project (Runtime/Textures/TangoAlpha/Project) , then build new shaders appropriate to the render engine, usually 3Delight first, then Iray. I've already "finished" the model in Carrara by this time, so I know there isn't going to be too much going back and forth for tweaking (although there's still bound to be some).
I will be coming back to ask questions about the uvmaps for the trunk and branches of exported trees. Any helpful hints would be appreciated.
Making sure there are morph zones in old Poser-style rigged figures
I have a figure that was rigged for the old style Poser cr2 bone hierarchy. Only some of the bodyparts have existing morphs. I want to be able to create correction morphs for all of the bodyarts. I used Poser as a plugin to aid Carrara. I loaded the figure in Poser, added a magnet set to affect all bodyparts, spawned morph targets for each bodypart, selected the figure body and created a full body morph for those bodypart morphs, and saved to the Runtime library. Then in Carrara, I loaded the figure with the FBM and confirmed that each bodypart now has at least one existing morph, and therefore more morphs can be created for each bodypart.
A bit tedious, so I am open for a better way, but this worked.
The figure is the baby penguin. It has existing morphs for the head and the eyes, but not for most of the body. You can see this by loading in Carrara, entering the modeling room, and trying to select by morph area. You can also confirm by selecting a boypart like the chest or abdomen and noticing that no current morphs exist, and Carrara will not let you add the first.
My version of Poser is 2014, so not the most current. But frankly, I think any version going back to at least Poser 4 has the necessary tools to spawn morph targets from magnets.
- in Poser, I loaded the baby penguin from the Poser runtime library.
- I created a magnet and made sure that each bodypart was selected to be changed by the magnet. Do this in magnet properties tab.
- Select the magnet and do a test change. I simply scaled up to 105%. I looked at the penguin to confirm that all bodyparts seemed to scale up.
- I then went through each bodypart and used the object menu to "spawn morph target." I gave each morph the same name (Test1)
- I then deleted the magnet. All of the new bodypart morph dials returned to zero.
- I returned to each bodypart and set the new Test1 morph to 1.
- I then selected the penguin body and used the figure menu to create a new full body morph.
- I then added the figure with the FBM to the Poser runtime library with a name indicating the existence of the FBM.
- I opened a new carrara scene and loaded the penguin with the FBM.
- I then confirmed that the bodyparts can now be given new morphs in Carrara.
Modeling Intended for Rigging in Studio, Even if Will Use in Carrara
I modeled a book in Carrara and rigged it in Poser using the cr2 format. I am now going to try to model a second book and rig it in Studio and save in DUF format. The key difference between rigging in Carrara and rigging in either Poser or Studio is that the latter two programs require the mesh to have polygon groups assigned that wil match the bone structure. In this case, I want to be able to animate the book, including turning the pages. I also want the option of a softcover book. Therefore, I want the limbs (pages and covers) to have many bones. The next couple of posts will describe the mesh, the shading domains, the uvmap, and the polygon groups. There will then be a pause in my posts as I curse and scream whle trying to set up te correct file structure and do the actual rigging.
The mesh
OK, I chose a very dense mesh because I want to be able to turn the pages relatively smoothly. I also want the option to increase the effective density in Studio even more with subD. I started with a vertex grid, added thickness, and extruded. Relatively simple operation, but tedious. I wanted the front and back cover to be slightly larger than the interior pages. I wanted three pages that could be rotated independently. That way, the book can lie open, and a middle page can be turned. I also wanted the pages to be at least 2 polygons wide so that I can morph the 1st and 3rd pages so that it will appear that the reader is near the beginning or end of a thick book. Also, different images can appear on the front and back side of the page when the page is turned. The book holds its shape when smoothing is turned on, even to level 3.
Shading Domains and UV Map.
I was undecided about the uvmap. The books dimensions are like an 8.5 x 11 piece of paper. I could have projected each page as a square covering the entire uvmap so that the user could apply any pic to it. However, the distortion would be pretty big if the user's pic was not also 8.5 x 11. Instead, I tried to keep the proportions on the uvmap relatively stable. The uvmaps completely overlap for the front and back cover and front and back of each page. These main pages are maximized on the uvmap. The spine of the book has its proportions maintained, but it is smaller relative to the uvmap. The edges are separated out.
In order to anticipate rigging, I selected and created polygon groups using the NAME menu. The base is the spine, which would correspond to the hip of a person. The covers and each page are then made up of 10 joints, each of which is 2 polygons wide. The polygons near the spine are much closer together than the middle.
I hope to be back Monday or Tuesday to give an update of my animatable book based on the following SickleYield tutorials.
SY - tutorials for rigging stuff


Rigging pliers pt1
.pt2
.Rigging a door
And this is why we need testing. Some of the interior shading domain uvmaps are inverted. See the left page.
Don't forget that texture maps don't have to be square . . .
If you make your page UVs square and fill the grid (don't forget to orient them top up & right way round ), you are then free to make your book any shape you want, so long as the image maps match it. Want a book 6" x 9"? Scale the object and then use any 6 x 9 image. Want it A4? Scale it to A4 and use an A4 image, and so on.
OK, ineresting suggestion, TA. With square pages (and covers), a rigged book would have to have the skeleton adjusted when morphed to different dimensions. Here is a SickleYield tutorial for FBMs when the skeleton has to be changed.
https://sickleyield.deviantart.com/journal/Tutorial-Making-an-Adjusted-FBM-367981844
I'll have to decide if I want to adapt my current mesh or if I want to start over.
Another hiccup with my current version. Some of the uvmaps are inverted. I rendered out a sample book cover and applied it to the cover and the spine. However, I will be starting over with a model designed for square uvmaps for the cover and inner pages.
Here is the new square mesh and uvmaps. The previous hiccups have been addressed; the uvs are no longer inverted on the back of interior pages. The covers and the front/back of pages all use the entire uvmap. The rest of the mesh (spine, edges, etc) fill one uvmap without overlapping with each other. Same strategy. Groups of polygons have been named to match the planned bone rigging. Will be saving in the folder structure recommended in MDO2010's notes for Studio content creation. Am in the process of generating some sample images to fill the pages and save them in the material folders.
following with interest
Being curious... what was causing the inverted pages textures?
User error. (That means that I screwed up).
.
I modeled it so that each page had thickness, so that the front and back could have different images when the page is turned. So far, so good.
For the square version, I used the planar uv projection preset instead of seam/unwrap. As a result, the back of the page was inverted. Not that big of a deal by itself, but my error was not checking earlier in the process.
Thanks... I understand now.
Update on book project. The mesh has been divided into assigned polygon groups corresponding to where I want the bones of the figure.
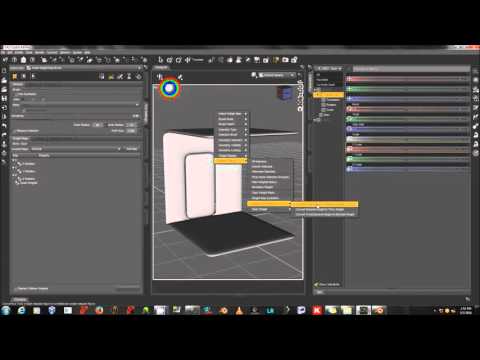
These are the Studio screenshots to load the obj and start the process to create a rigged DUF file.
And then here is the finished DUF file being loaded and posed in Carrara.
Ring of Fire - Johnny Cash
Simple replication of the fire primitive
For no particular reason, I was inspired by Johnny Cash to render a ring of fire. There are a couple ways to do it. I decided to model a simple vertex ring, and replicate the fire primitive all over its surface
- Modeled the ring from an oval. Applied smoothng.
- Inserted the fire primtive and replicated on the surface of the vertex ring.
- Turned off visibility and shadows for the vertex ring.
- Did a test render.
So here is my test render of a ring of fire.
.
.
And here is a link to Johnny singing about it.
could the book be a feature in the next Carrara Challenge I wonder?
thinking as I sing along with Johnny
Here is how to post a yutube music video to the forum. Simple, just search for your video, copy the url (link), then in the forum past in the text box.
Here I did it for Stevie Wonder's "Superstition"
1) google search for Stevie Wonder Superstition
.
2) Copy the url (location) from the youtube page
3) Paste the url in the forum text box.
4) People can now click on video box (below) to play the video
nice tip thanks
nice rof . we used to use Chilli Paste whose byline was that 'it was so good it 'burned you twice'
Fun with the Organic Tool in the Vertex Modeler
I took a break from my writing project to play with the organic tool in the vertex modeler. The results were not what I expected, but could still lead to fun. And by "took a break," I mean I procrastinated.
My intention was to use the organic tool to sketch out the basic profile of a human head that I could then use the vertex modeler tools to shape toon-ish. The result was monstrous. While a bad thing in this case, I could see using this for fun sometime.
- First, I outlined a humanoid head profile on a square tile in my image editor. I saved that as a jpg.
- I started a new Carrara scene, inserted a vertex object, and loaded the saved profile in the global tab left/right checkbox.
- I used the camera menu in the upper left of the vertex modeler to go to the left camera and see the reference image
- I used the polyline tool to trace the outline along the profile.
- I made sure that the last point of the polyline overlapped the first point and hit enter (unchecked the show reference image to see better)
- I filled the outline. Use Control-F or MODEL / FILL POLYGON
- I used the camera menu to return to the directors camera. The profle is on the side wall.
- I used the translate menu and set the x axis to zero to move the profile to the center
- I used the organic tool to make the flat profile three-dimensional . Use CONSTRUCT : ORGANIC
- The result was not what I expected, but could be fun in the future.
This
.
Became this