How to Rig a Prop: Magician's Staff
 RGcincy
Posts: 2,863
RGcincy
Posts: 2,863
I previously posted my notes on learning how to rig a cabinet door. This thread contains my notes on creating a slightly more complex rig. If anything isn’t clear in the instructions or if adding another image would be helpful, let me know. Since I’m new to this, there may be a more efficient ways to accomplish some tasks. If so, just post a comment and I’ll update my directions.
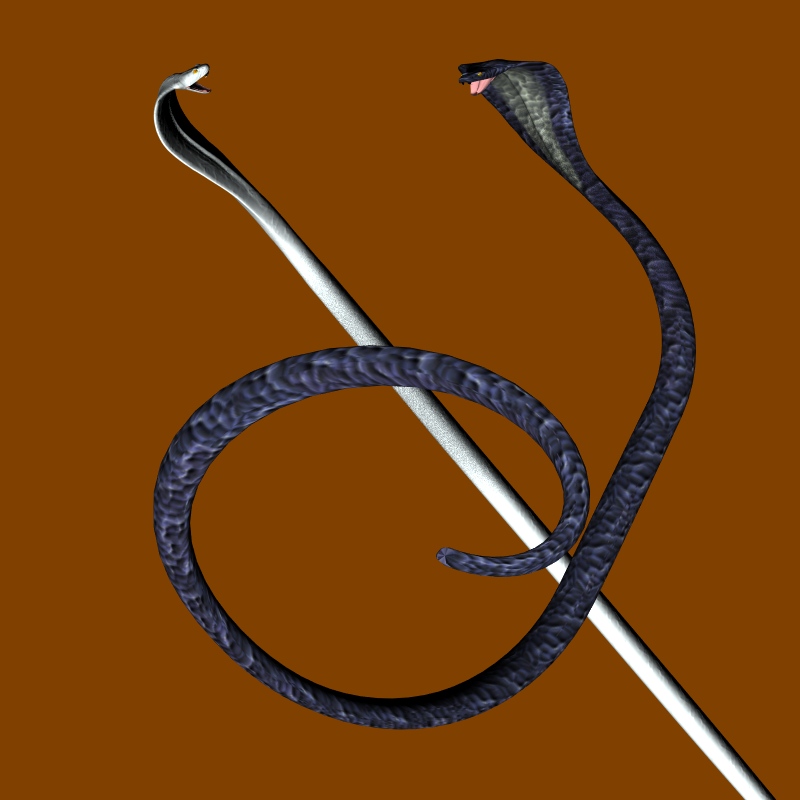
This uses the Snake Staff prop from the PC+ Staff Pack. This is more complex rigging than the cabinet doors I rigged in the previous thread as it is not a single piece of rigid geometry rotating around a single axis. On the other hand, it is less complex than trying to rig a humanoid figure.
We will be adding 8 bones to the staff. More could be used if you want to give the prop greater flexibility but 8 is sufficient to show how to accomplish the rigging.
I’ve broken the steps down into 5 main tasks:
- Guide Preparation
- Assign Polygons to Face Groups
- Convert to a Figure
- Position the Bones
- Adding Weight Maps

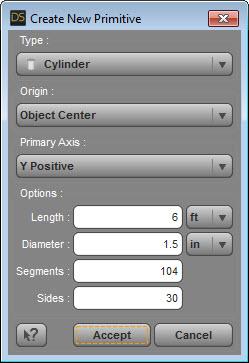
If you don’t own the snake staff, you can use any other staff you might have to follow along. Or you can create a staff by choosing Create/New Primitive from the main menu and making an elongated cylinder using the following parameters:
Daz 3D is part of 
Connect
DAZ Productions, Inc.
7533 S Center View Ct #4664
West Jordan, UT 84084
Licensing Agreement | Terms of Service | Privacy Policy | EULA
© 2026 Daz Productions Inc. All Rights Reserved.
Comments
Guide Preparation
This is an optional step but I did it to create a visual guide for selecting the polygons later in the rigging process.
1. To start, load the Snake Staff prop then type Ctrl+D to raise it slightly so it sits on the ground plane.
2. Switch the camera to Left View.
3. From the main menu, select Create/New Primitive of type Cube and size 0.24 m.
4. Select the cube in the Scene pane, then go to the Surfaces pane, select the default surface, and set Diffuse Color to something other than white. I used a medium green. This is just to make the cube more visible in the viewport.
5. With the cube still selected, go to the main menu and select Create/New Node Instances and give it a value of 7. You will now have a total of 8 cubes.
6. For ease of selection, drag the original cube and drop it on top of the Instances Group in the Scene pane.
7. Open the Align pane by choosing Windows/Panes/Align on the main menu.
8. Highlight all 8 cubes in the Scene pane. In the Align pane, set X-axis and Z-axis to Align-Centers. Set Y-axis to no change. Be sure neither of the To Grid boxes are checked. Hit Apply button. This will gather all the instances so they look like one.
9. On the Scene tab, select the first cube and drag it so its top surfaces is the same height as the staff. (You can also use the Align pane by setting Y-Axis to Align:Tops. Be sure to select the staff first before selecting the first cube.)
10. Set Y-axis on the Align pane to Distribute:Centers. Now the cubes are evenly spaced from bottom to the top of the staff.
11. You don't have to use cubes of equal height. You could make the ones by the head shorter so there's more movement in that region.
Assign Polygons to Face Groups
Next we are going to assign polygons to eight face groups to match up with the eight bones we will later create for the staff.
1. Select the top cube in the Scene pane and zoom in with the camera (still using Left View).
2. Use the Wire Shaded setting so you can see the polygon boundaries.
3. Go to the Tools Setting pane and select Geometry Editor from the Active Tool drop down box. (insert image)
4. In the viewport, right click and choose Selection Type/Polygon Selection and Selection Mode/Marquee Selection.
5. Be sure the staff is selected in the Scene pane.
6. In the viewport, drag a box that incorporates the top of the snake to the top of the next box.
7. Right click in the viewport and select Geometry Assignment/Create Face Group from Selected. In the dialog box, give it the name head.
8. You will notice that the first geometry selection did not capture the polygons in the gap between the two cubes. For the next selection, you will want to position your pointer just above the upper edge of those polygons and drag to the top of the third cube. Repeat step 7 assigning the name neck.
9. Repeat step 7-8 until you reach the bottom of the staff. I used the following name sequence: head, neck, handle, tail_1, tail_2, tail_3, tail_4, tail_5.
10. You’ll notice in the list of face groups that default now has 0 polygons. You can delete this group name by left-clicking on the name then right-clicking and choosing Remove Selected Group(s).
Convert to a Figure
Only figures have bones, so we need to convert the prop to a figure.
1. Select the staff in the Scene pane.
2. Select Edit/Object/Rigging/Convert Prop to Figure… from the main menu.
3. Select Triax Weight Mapping in the Convert Prop to Figure dialog box then click Accept. You now have a new figure.
4. Click on Window/Panes/Figure Setup on the main menu.
5. Click on the Figure Setup menu (icon at top with horizontal lines) and select Copy from Selected Figure.
6. Left-click on Figure Setup menu again and select Clear Hierarchy.
7. Click and drag the words geometry from the left column over th1e top of geometry in relationships panel.
8. You will now have nine bones, one default bone and one for each of the face groups.
9. Right click on the default bone name and select Remove Bone(s).
10. Click and drag the bones to create a parent-child hierarchy: handle-neck-head and handle-tail_1-tail_2-tail_3-tail_4-tail_5.
11. While holding down the Ctrl key, click on all the bones to select. Then right click on top of one of the XYZ labels and select YXZ. This will give all the bones this operation order.
12. Click on Create button to make a new figure with bones.
13. I noticed the newly created figure lost all its texture maps (not sure if that is typical or not). If that happens to you, select all the surfaces of the original figure in the Surfaces pane, click on Copy Selected Surfaces from the panes menu (icon with horizontal lines at upper right or left), then click on the new figure and Paste to Selected Surfaces.
Position the Bones
1. You will now have two copies of the staff in the Scene pane, one with a name starting with the words figure (has 1 bone) and a second version with multiple bones. Delete or hide the first one.
2. In the Scene pane, select the bone labeled handle. The viewport will show the selected bone in yellow.
3. Go to the Tools Setting pane and at the top, select Joint Editor in the Active Tool drop-down box. At the bottom of the Joint Editor pane set Visible Bones to Entire Figure.
4. You will now see the eight bones in a vertical arrangement with only the top bone offset to the side (see image above).
5. Move the bone center point of the top bone using the XYZ position sliders in the Joint Editor. Position it so its center point is at the same Z position as the bone below. Change the end point in the same manner.
6. Go to the Joint Editor menu (click on the icon with the horizontal lines at the top) and select Memorize/Memorize Figure Rigging.
Adding Weight Maps
Even though you have created the bones, they have no weight maps, so moving any bone other than the handle bone will have no effect. As we add weight maps, the individual bones will be able to operate on their respective mesh and also move any children bones.
1. In the Scene pane, select the handle bone.
2. Go to the Tools Setting pane and at the top, select Node Weight Map Brush in the Active Tool drop-down box.
3. Click on X-rotation in the weight map section. You will notice the entire staff will turn red. That shows the entire mesh is under the influence of the handle bone. If you rotate the handle, the entire figure will pivot around that bone’s center point. If you were to click on any other bone, you will see that there is no color, as there is no weight map created yet for those bones.
4. You will find there are 4 weight maps for the handle bone. Add a fifth one by having General Maps show in the Unused Map drop-down box then click on Add Map button. The general map lets you see the figure follow bone movements in the viewport.
5. There is no weight on the new general map, so right click on the X-rotation map, choose Copy Selected then right click on the General map and choose Paste Selected.
6. Repeat step 4 for the other seven bones to add a general map to each.
7. We are going to create the weight maps using the Directional Gradient mode. Click on the icon that looks like a dumbbell. The position of the two handles (a red and yellow circle) may be anywhere such as the bottom of the prop.
8. Select the neck bone in the scene pane, then select X-rotation on the Node Weight Map brush page. Switch to Perspective camera. You will see a red and yellow disk at the bottom (if you don’t see both, you may need to zoom out).
9. Click on Align to Bone (see image below). This will move the red-yellow handles up to the selected bone (in this case, the neck bone). One handle will be at the bone’s center point and the other will be higher.
10. If the lower handle is red, click on Flip Gradient button. If yellow, leave it as is.
11. If the upper handle is not at the top of the figure, select it with the mouse and drag it higher. It’s OK to be above the figure.
12. Click on Apply Gradient. You will see the upper part of the staff become yellow with blue at the bottom and red at the top.
13. You now have a map for X-rotation. Right click and choose Copy Selected then right click on the Y-rotation map and choose Paste Selected. Repeat for Z-rotation, General, and Scale maps.
14. You can check the movement of the newly rigged bone by going to the Parameter pane and changing Side-Side.
15. Repeat steps 8-14 for the head bone. Here’s what you’ll see if you change Side-Side for both the head and neck bones.
16. Select tail_1 bone and click on Align to Bone, You’ll find now that the red handle is lower than the yellow handle. Keep the red handle lower but drag it all the way to the below the bottom of the staff. Perform steps 12-14 for this bone.
17. Repeat step 16 for all the remaining tail bones.
18. Return to the Joint Editor and go to its menu (click on the icon with the horizontal lines at the top) and select Memorize/Memorize Figure Rigging.
19. All done! The first image is with the original straight staff. The second image is with the staff bent along many of the bones.
The movement interaction between the bones is a little unpredictable. There's probably a way to better design the weight maps to minimize that, but if you follow what I did here, you'll be able to make a stiff object moveable.
Awesome, thanks!
You know what would be nice? Downloadable pdf versions of your great tutorials. Just saying... :) Or I guess I could just bookmark them.
But either way, thanks again, this is top-notch.
@RGcincy This looks great, Rich. I'll have to give this a try myself soon when I'm not so busy. There's a sticky thread in the Art Studio for links to useful tutorials here. Any chance you can put the link to this one and the other tutorial for the door in there? We really need to use that thread more and I think it would be useful to be able to find this tutorial quickly for others who might want to try this in the future should the tutorial get buried.
And, before anyone says it, I know I'm bad about not posting my tutorials there either. I'll have to fix that error soon.
This is great! Definitely needed something like this.
Windows 10, CTRL-P Print, Microsoft Print to PDF as Printer.
PDF.
Also, a number of Browsers and/or PDF add-ins for browsers will also do Print to PDF.
Good idea. I didn't even realize it was there. I added links to the three I've done (two rigging and one shader).
Another good idea.
Actually I was planning to do just this. I assemble the tutorials in Word before I post them to the forums, as it's more convenient than using use the inline editor, so I can just export them from Word as a PDF. They need some formatting work on the images before I can do it, so for now, bookmark the threads and I'll add the links once I have them finished.
Thanks for taking the time to prepare this excellent tutorial. This is so much better then the commercial tutorials I've bought.
Hey, thanks a lot! That's actually useful AND easy to comprehend!
Thanks a lot! You solved my problem neatly. :)