Old Dog New Tricks
 deathbycanon
Posts: 1,227
deathbycanon
Posts: 1,227
I am 44 years old. Once upon a time I was a very, very successful portrait photographer. I was also, from the very start of my career, very, very sick. Chronic illness and work aholic is not a healthy combination. After several near death experiences and being told repeatedly by doctors that I had to give up my job I finally quit working. It was the hardest thing I have ever had to do, emotionally. Physically I couldn't lift my camera and I could barely walk thanks to a neurological reaction between two drugs interacting, in a bad way. so I couldn't work even if I wanted too. It took a long time to get my strength back, but it took a longer time, emotionally, to find joy in photography again. I just went back to where I started. Photographing my own children for composites. I ran into some trouble though. 1) I can't travel far and can't be away from my house for long periods of time 2) I can't be around anyone that might be contagious with anything. 3) it's almost imposable to find good dragons now days to photograph. :D
#3 led me to Daz studio. I downloaded it and wanted to smash my computer for a months just trying to figure things out. I once closed the working area and it took my two hours to figure out how to get it back again. When I got it back I could no longer move my figure by clicking on a part of them and dragging it, if I did that the whole area moved (like holding the space bar in photoshop) I got the window to stop moving around turned the program off, and left it off for a month. (I still can't click and hold to move part of my figure :) ) I spent that month doing nothing but watching video tutorials on you tube like most people watch netflix, I binged. Then, with dread, I opened Daz Studio back up, bought the millennium dragon, and rendered my 1st render to use in a composite with a photo of my daughter.
A week later I did my 1st full scene render.
I am so hooked. The way lighting works in Iray..... The camera settings..... It's almost like being able to travel and photograph whoever and whatever I want again. The downfall being I can shoot at 1/25th of a second and it takes me hours to render something. :D The upside though...Dragons! :D
Anyway I have been learning Daz now the same way I learned photography, the same way I learned photoshop, the same way I learned HTML... I give my self an assignment everyday. I can create whatever I want but in that creating I have to learn 1 new thing everyday. I just found this area of the forums, and I thought it might be helpful for myself and others struggling to learn to post what I'm learning. Feel free to jump in with advice everyone! CC doesn't bother me, I'm old enough and experienced enough to take what helps and ignore what I don't agree with - and I don't get offended. The only thing you can do to make me angry is PM me because you are a distributor to vitamins that will cure me - I will rip you a new one, you have been warned. :D
Daz 3D is part of 
Connect
DAZ Productions, Inc.
7533 S Center View Ct #4664
West Jordan, UT 84084
Licensing Agreement | Terms of Service | Privacy Policy | EULA
© 2026 Daz Productions Inc. All Rights Reserved.
Comments
#1
Wait! I forgot there was 1 render before the "Shelter from the Storm" dragon. It was what I was working on when I broke Daz and stopped trying to learn it for a month. The trauma of breaking Daz and taking hours to get it to work again must of made me black it out. The back half of the dragon isn't even posed at all and the front half wasn't done very well, but it worked for what I needed. So this one is actually the very 1st one I rendered. The one that caused me to put Daz away for a month and not touch it for a month. lol My goal for this one was just to get this dragon rendered so I could get the art work I had in mind done.
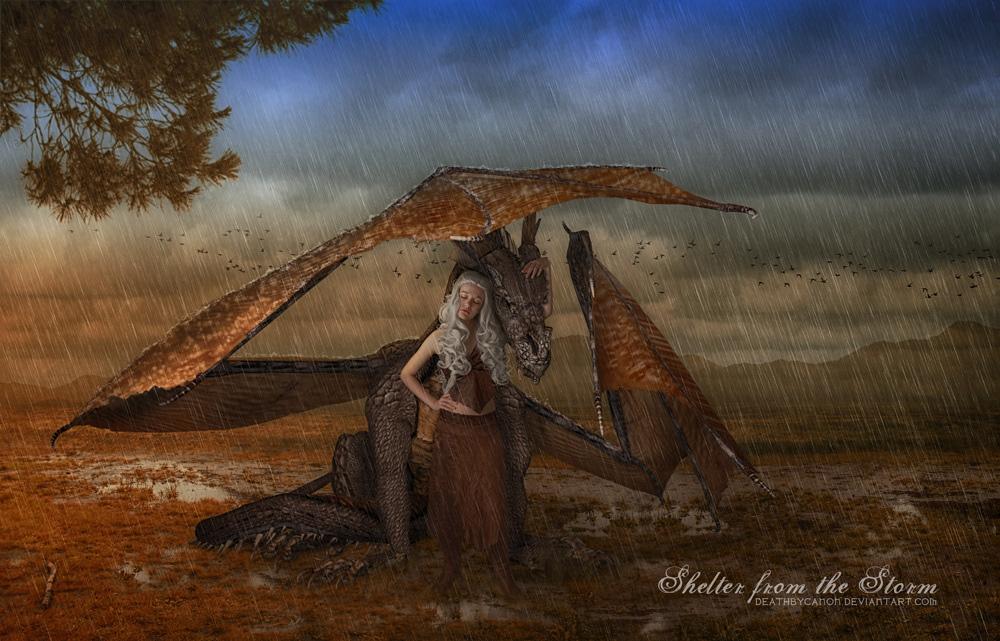
I finished "Dragon Fire" on Nov 26th and I finished "Shelter from the Storm" on Jan 11th, I had shot the photos of my daughter for the piece on Dec 4th. I had other photos from that shoot to do composites with and I saved this one for last, because the pose was done for a dragon & the dragon also had to be posed very specifically & I was scared of Daz. lol I'm not sure if the millennium dragon has more joints and is easier to pose then the LE dragon or if my binge watching of video tutorials paid off. Coming back into Daz I was able to pose the Mil dragon with very little problems and get him rendered out. I was so excited that I could do something in Daz finally without wanting to smash things. So here is how I started.
Goals:
#1 Dragon Fire - pose and render a character - although I got what I needed it could have been better because I got frustrated, broke Daz, and gave up.
#2 Shelter from the Storm - Pose and render a character - I feel I accomplished what I needed to learn with this one.
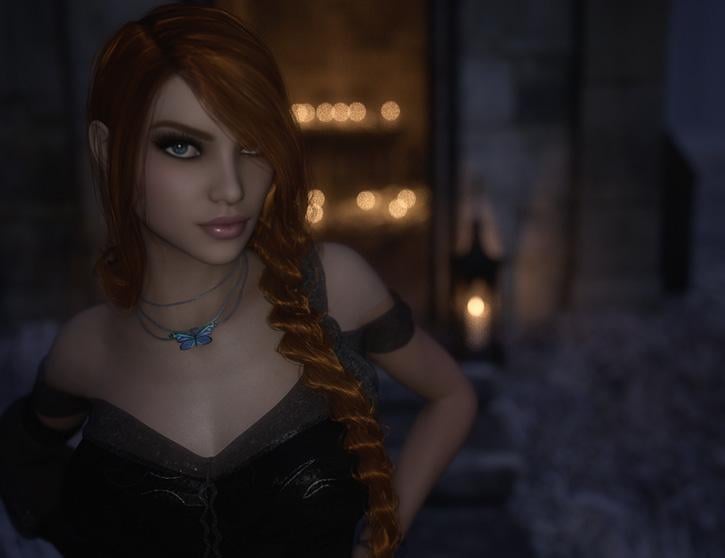
#3 Untitled - girl with the braid, done Jan 17th, It had multiple goals.
1. To create and render a full scene in Daz
2. To create a camera and learn how to use DOF
I think I met my goals on this one too
Dragon Fire is a very impressive image. Could easily be a bookcover.
Thank you, I thought so too, I actually made a mock up of it. :D
Goal #4
Lighting - using existing
I was really struggling with lighting. I hadn't discovered there was a difference between 3delight and Iray. In #3 I kept trying to use spotlights and getting pitch black renders. I had finally just adjusted the power of my headlamp on my camera and used it to light the girls face. I actually love the headlamp, it's just like on camera flash. Pro camera version, like a Canon speed light.
I really struggled with this, I filially took a step back and decided to experiment with the lighting that I already had in an environment. I went back to Forgotten Fane and decided to use just the candles already in the scene to play with light.
This was also my 1st dabble into texture maps as I needed the outfit to be dark fae and less summer fae
Welcome, and congratulations on getting hooked like the rest of us!
Love the renders, and I look forward to seeing more of your work. I think I'll learn a lot from seeing your composition and postwork as well.
I think you did a great job with the Iray lighting in Forgotten Fane.
Welcome to the dark side, err, I mean Daz Studio lol. I totally understand your frustration as I am sure everyone here does. You have some wonderful renders, and I look forward to seeing more of them. Also, if you get stuck, just ask, someone will usually come along in a bit to help out.
Thank you. The candles loaded into the scene already light. I moved them around and changed the intensity a little a little until I got the light and shadow effect I wanted. At this point I still didn't know how to get the light by myself! lol
I have been doing photoshop since PS 7 so if anyone needs help in that area I am more then happy to help, I am much better there then in daz!
Thank you, I have posted a few questions in the forums already. Everyone is great at helping although sometimes the answers are a little over my head. :)
There's an ongoing Book Cover forum discussion here, http://www.daz3d.com/forums/discussion/57390/book-covers/p1 ; Lots of information that might be of interest.
No worries things will slowly start to make sense lol. Its a steep learining curve for sure. I've been here about 18 months and every day I realize I have barely tapped into the potential of this program. Always more to learn and improve. Another great resource is the New User Contests & Events. It covers one aspect of studio every month. Those contests shortened my learing curve of the basics by at least half. HERE is the current one, on posing. Also, all of the threads in the forum have a bunch of links to tutorials etc. as well as just going through and reading the comments.
Spotlights still work in Iray, but it's not obvious how.
In 3Delight you get used to controlling the strength of a spotlight using its intensity. But in Iray, spotlight intensity has comparitively little effect. You need to scroll down the spotlight's properties till you get to "Luminous Flux (lumen)." Adjusting that value will allow you to create spots that do something in Iray.
Thank you so much!
Thanks for the tip with the spotlights. I still haven't played with them much, still on my list of things to try. :) I did start into iray lighting on my own it was Goal #5
I watched some videos and decided to try the create primitive - emissive shader way of lighting. It reminds of of studio soft boxes, which is why I choose it, it seemed the most familiar to me.
I'll post the pre post work on this one, because I sometimes cheat the lighting in PS. I used a primitive in front of the fairy, and a really tiny one behind her. Here's a question is there any way to make a primitive like that invisible, but still cast light? I'm always trying to make sure the white glowing square isn't showing. :)
The trick to make the emissive objects invisible is to set the opacity slider to something like .0000001.
There is also a product named Iray Ghost Light Kit that does the same thing, but has some additional features (like arrows that point out the emissive side so you can aim the lights, etc.)
I'm going to voice a second endorsement for the Ghost Lights. Super super useful and easy to use.
Thanks for the info, and the suggestion on the ghost lights! I'll check them out
My #6 goal was to see if I could get my favorite studio lighting using emissive lighting. In the studio I use a 4x6 softbox and a bright silver 4x6 reflector. I probably could have used some silver shader for the reflector right? Because iray bounces light just like in real life? I didn't though. The purpose of the reflector is to create fill light at a lower ratio then the main. So I just used another plane and emissive light but gave it less light power. I don't think I can post the image here because she is technically nude, even though nothing is showing. :)
Here's the link if anyone is interested. http://fav.me/dawze4v
I did a lot of pieces playing with lights. Things were coming out a little under exposed, so I started digging deeper into the render settings. I found tone mapping. Perfect! I already know what shutter speed, F/stop, and ISO do and how they work together to expose your image. The values are not the same as they are in real life, but the concept is the same. Here's one I did after finding "tone mapping"
I strongly suggest that you render out a 32-bit beauty canvas and tonemap in post. You'll have many more options (depending on the image editing software being used), and can try different things without having to re-render. Here's a link to some info about how to use canvases that was generously posted by Esemy:
http://www.daz3d.com/forums/discussion/62101/relighting-with-iray-canvases/p1
What you want is a "Beauty" Canvas. This is the full render (as opposed to individual lights, etc.), only 32-bit rather than an already tone-mapped 8-bit image.
Your images are great and I'm looking forward to seeing more of your work.
- Greg
Thanks Greg! I have no idea what any of that is or why it is needed but I am super excited to find out! lol Thank you so much for the link!
Ok I watched the video and read the tutorial, but it's going to take some time to wrap my head around it. I was a portrait photographer for 10 years so I understand the lighting. The lighting he is creating - 4 lights all with the same strength will create a lighting ratio of 1:1 - flat lighting in this case beings all the lights are set to light the subject individually then the combined power of the lights are too bright for the subject and "blows it out" I could do this same thing in the photography studio. I could set up my lighting for each light to light the subject equally, then photograph my subject with each light on individually - the others off and get the same sets of images you get by rendering each light then go to photoshop and make the photos work together to get the lighting we want. We don't do that - it would take us all day in real life lol. We set the lights to light each part of the subject. Your main light is set to correctly expose your main part of the image, your fill a set to a stop or two below that so that your subject still has shadow but not so dark you can't make out the detail. Rim lights are used to separate your subject from your background so are as bright as they need to create a "rim" of light around your subject. Can't this also be done in iray? Setting your lights to the power you want to get the light ratio you want on your subject? I haven't been using Daz long enough to know how it differs in light handling and rendering from the real world. I can only compare this to what I know as a photographer, so I don't understand the need, if you can get the light aspect ratio by just setting the lights to the proper power why not do that instead of the extra work?
Short form of beauty canvas:
It gives you way more color/brightness fidelity, which you can then massage more cleanly in Photoshop. With a regular 8 bit render, if you brighten or try to expand the range of dark/light, it can easily get really awful looking/blocky, because the color gradiations are simply not there. With 32 bit, it can take a LOT of adjustment.
This is particularly useful with dark rooms or things like naturally lit outdoor scenes with bright sunlight, so you can 'pull' the upper range down and lower range up and have it look crisp.
What I usually do in Photoshop is immediately convert 32 -> 16 bit, which helps do an initial pass and makes it look reasonable. It defaults to Local Adaptation, which sometimes works for what I'm doing and I fiddle with that. But often I go to straight exposure and set it to -13.76, or a little up or down so that nothing gets blown out (because I can 'pull' the floor up or down if needed).
Also, re: picking this up... while I did some CGI ~15 years ago, I picked this up seriously a few years ago, at the age of 43. So... yay 40-somethings!
The primary reason is time. If a full size high quality render takes 2 hours to complete, you may not want to be tweaking light levels all the time. In addition, I can edit the results in photoshop. For example, if I want to have a rim light on a subject but don't want the reflection off the floor, I can mask out just that light's impact on the floor. while still having all the other light sources affect the floor.
I have a set of posts on the various canvas types and some uses at http://www.daz3d.com/forums/discussion/comment/1992791/#Comment_1992791
With this explanation it sounds a bit like the same concept of HDR for photography. We take bracketed exposure photos to collect the most information for light, shadow, and color then merge the photos together - hence hdr images. I'm starting to understand... I had actually been thinking of doing a bracketed exposure render and running it though Photomatrix just to see how it looked. :D
& 40-somethings ROCK!
That also makes sense. I don't have as much control of the light in 3d as I do in a real studio. I can use gobos, snoots and hoods to stop light from going where I want it in the studio, it's a lot harder, at least for me to create these things in Daz. :D & thanks for the link, going to check it out now!
I have a set of posts on the various canvas types and some uses at http://www.daz3d.com/forums/discussion/comment/1992791/#Comment_199279
That link is fantastic, thank you Jack. I'm in the middle of a mixed media piece right now, but this is next on my learning list!
So after #6 I did a lot of playing around with light, and posing and such, here's one of my favorites from those pieces. The lightrays and everything outside the door was added in photoshop.
wow you certainly go the hang of this pretty fast, and it shows that you could carry over a lot of your knowledge from photography. Seems you are on a good way and this will be an interesting place to watch. So welcome to the art corner of this forum!
Goal 7
HDRi lighting
I was hearing a lot of people mentioning things about hdri and using it for lighting. Every photographer knows what hdr is and how much information those files store about light. I use HDR on most my landscape photos. I was fascinated by this. I'm actually still dazzled by the whole process, From creating the images then making them into something that can be used in a 3d program. Then the realism you get of a natural light environment just amazes me. Natural light photography, in the real world is something that many photographers struggle with. The consent changing conditions, the short time span for "golden hour" lighting. I love natural light photography. I still have a full studio in my basement but if the kids want photos taken 90% of the time I go outside.
So next my 1st image after I figured out how to use hdri files, dome rotation and all that fun stuff, and then a photo of my daughter when the natural lighting was amazing! Dusk, "golden hour" just before a storm.
Lots of great images in here! You're very talented and I can see the photographer in you coming out in your images. Very nice and you seem to be getting a handle on using DS very well.