HeadShop OneClick Test Run
 RGcincy
Posts: 2,863
RGcincy
Posts: 2,863
I took the plunge and got HeadShop OneClick Plugin. Note this is for Windows only and the author notes there is no plan for a Mac version. My first reactions were mixed, as some things appear very promising and other things seem not quite ready for prime time. But the more I’ve tested it, the better the results I’ve gotten so I’m inclined to keep it at this point.
1. You need to manually install the plugin. It will appear in your DIM but the author says to ignore that option as it will not work (so why is it there?). I had read about this issue before I got the product, so I never gave it a try and just went the manual download route.
2. Many people have reported installation problems if DAZ Studio is not installed on the C drive. The plugin by default expects it there. I have DAZ on my E drive and I chose that drive during the plugin’s installation as you have the option to do so. All worked fine for me. Later discussion seems to track the issue to the location of DAZ Studio’s temp file location which MUST BE on the C drive. Although I have DS on my E drive, the previous version was on C and I still have a directory structure for it on C. That’s probably why I had no installation problem and the plugin runs fine. If you have never put DS on your C drive, you’ll need to follow this discussion to create the right temp file setup.
3. The basic instructions to use OneClick are as follow:
a. Load a Genesis 2 or 3 male/female base figure. In my examples, I’m using a G3 male. If you’ve made any changes to shaping or posing morphs, reset them to zero; otherwise, Headshop will build on top of them and you’ll get distorted results. You may find you can create some interesting creatures if you don’t reset, so it might be something worth exploring in the future.
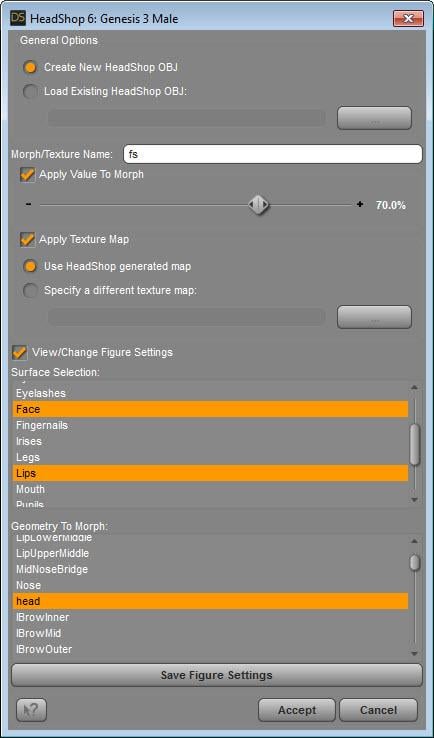
b. Select the figure in the scene tab and from the menu select Edit-Start Headshop. You’ll get a popup message saying “no surface configuration has been recorded”. Click OK. On the next dialog, choose Face and Lips in the Surface Selection box. In the Geometry to Morph box, choose Head. The order differs between G2 and G3 figures but the choices are easy to find. I do not know what any of the other choices do. Also in this dialog, you can give the morph a name, the default is “fs”.

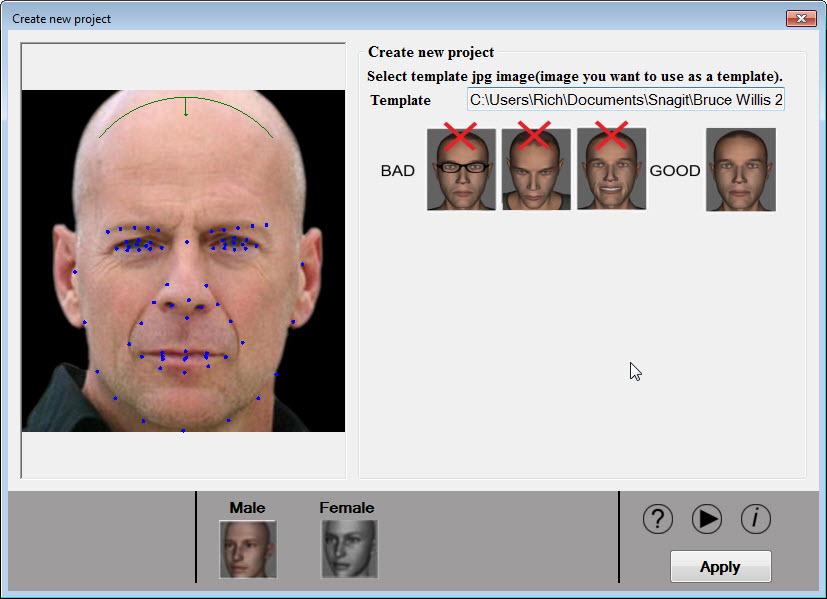
c. A new dialog box will open. Click on the big white space on the left and pick an image with a frontal view. For best results, it should be a dead-on front view. If the face is slightly angled, it seems OK but the farther offset it is (either facing up/down or right/left) you’ll introduce asymmetry into the results. I did my first testing with my own image but for this review I searched Google for front/side view portraits and one of the first was Bruce Willis, who will be familiar to many, so I worked with him.

d. The image will appear with automatically placed dots. I find this auto-detection works really well. In the image above, note the upper green curve at the top of the head, short of the top. I’m not sure if that indicates the hairline or the top of the skull. Click on the button Apply to proceed to the next step.
e. A new dialog box will appear showing the image on the left and the morphed head on the right. Click on the Autodots button in the upper left and the dots will appear on both.
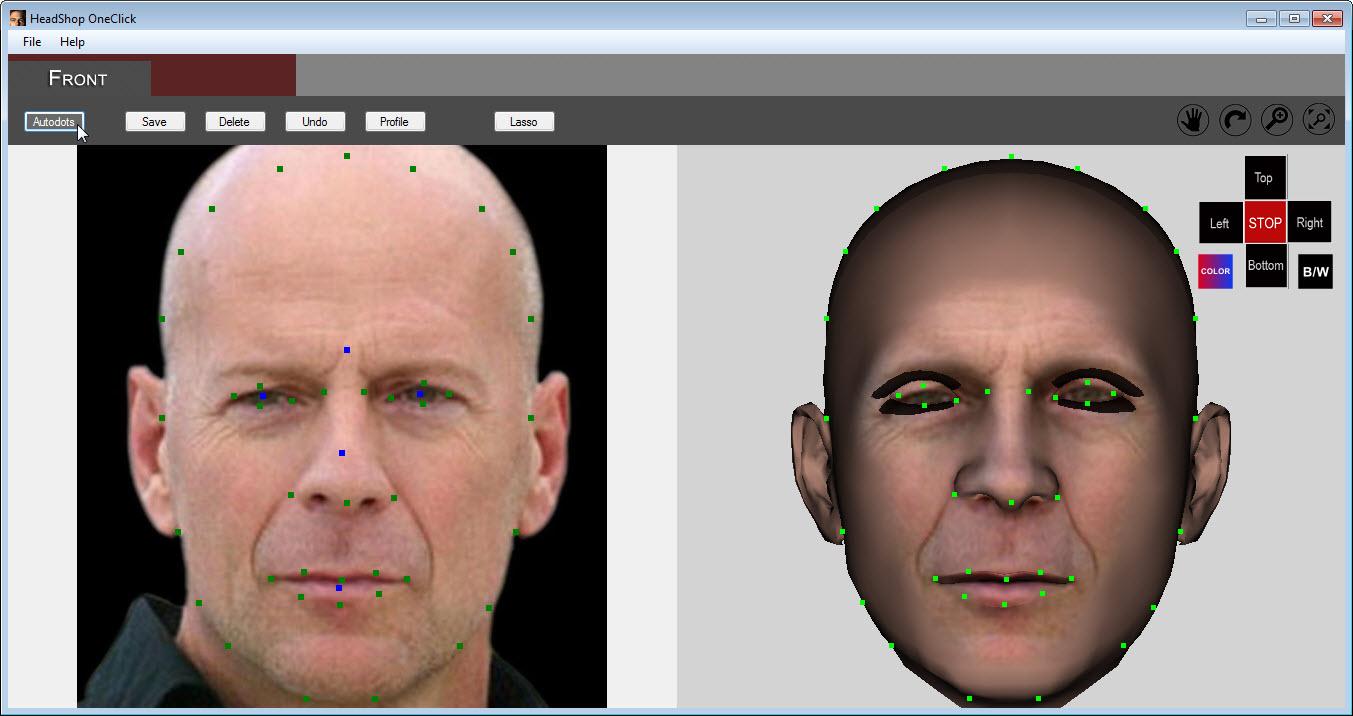
f. You will see 3 blue squares: one for the outer face structure, one for the nose and one for the mouth. You can click on any of these to edit the dot location. Move the cursor over the dot and when it turns into a hand, left-click and the green dots will become red. Hover over any of the red dots, hold down the left mouse button, and you can drag the group of red dots to a new location. If you click on a red dot, you will turn off all but that dot and can drag it to a new position. You’ll see the result on the morphed head at the right. Just to show you what happens, I dragged one dot way off to the side. Use the Undo button to go back if you make changes you don’t like or didn’t mean.
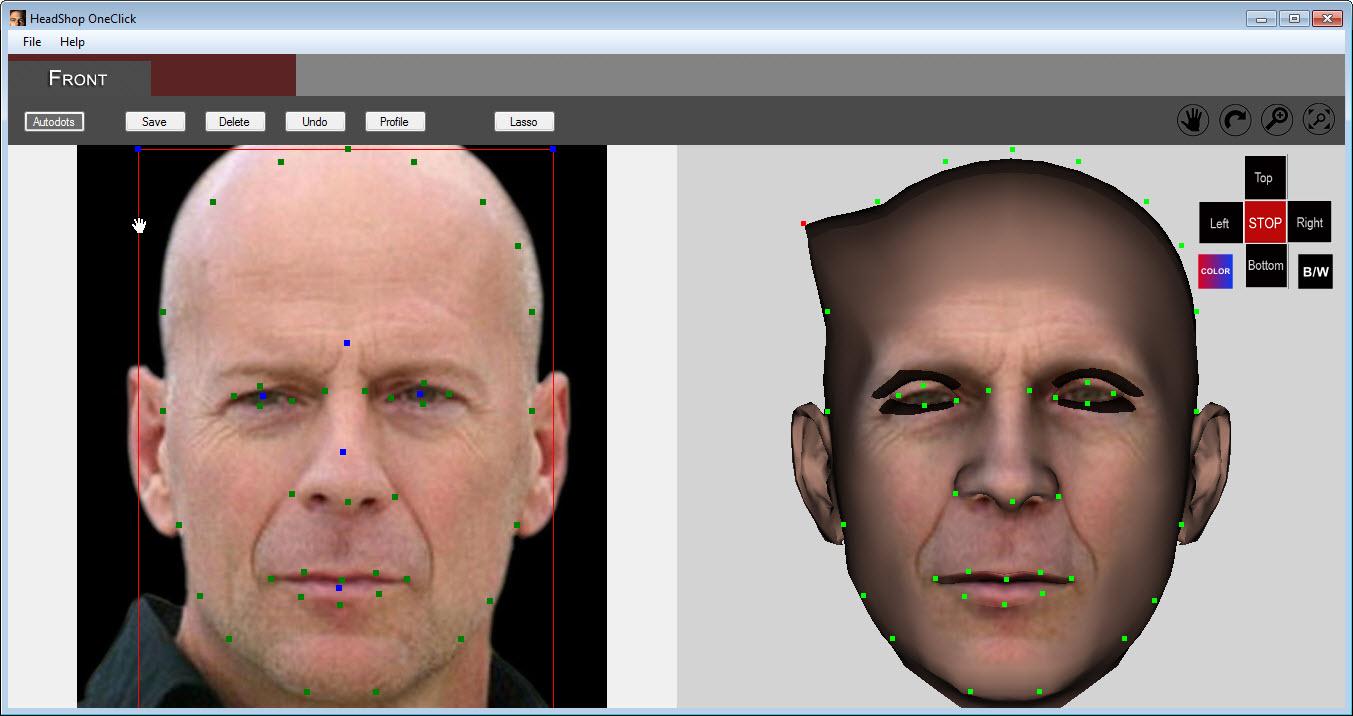
g. That’s it! On the menu, select File-Export and the plugin will close (don’t just click on the X box in the upper right – Headshop will close without exporting the figure.) You’ll return to Daz Studio with the modified morph added to the figure. There is just one morph labeled fs set at 70% (the default value in step b). All the changes are merged into this one morph and I have found changing it from 70% higher leads to distorted features so I leave it at the default value.
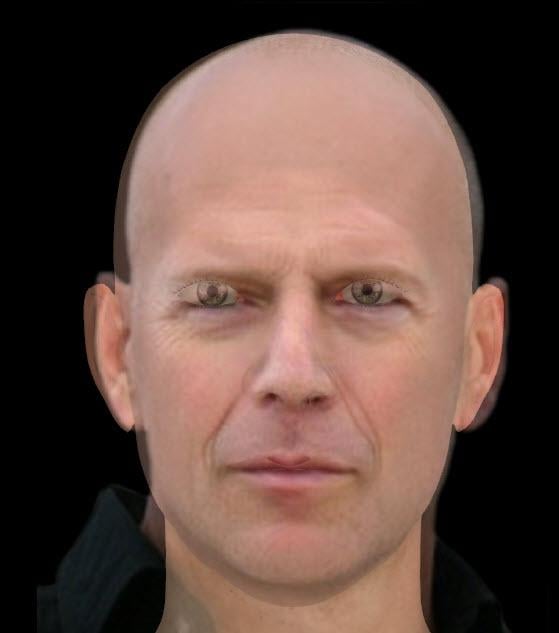
The results are shown below. One version has the image superimposed over the figure and the other has them side by side. I scaled the image so the eyes and lips are at the same level. There’s a family resemblance but not a match. I’ve consistently found the eyes, nose and mouth are in the right relationship but the ears are low and the top of the skull is too low. The eyes are too big and I also find the mouth is slightly open and the lips a bit fuller. Most of these can be manually adjusted but not all. For example, the teeth end up with rounded edges and small gaps between them and I don’t own any morphs to set them back to normal.


Remember the green line I mentioned in step d? That does appear to be the top of the skull. I redid all these steps, this time adjusting the green dots for the face outline so they enclose the entire skull. Now the result has a head whose size is a better match, the ears are at the right height, while the eyes and lips are only slightly too high. See image below.
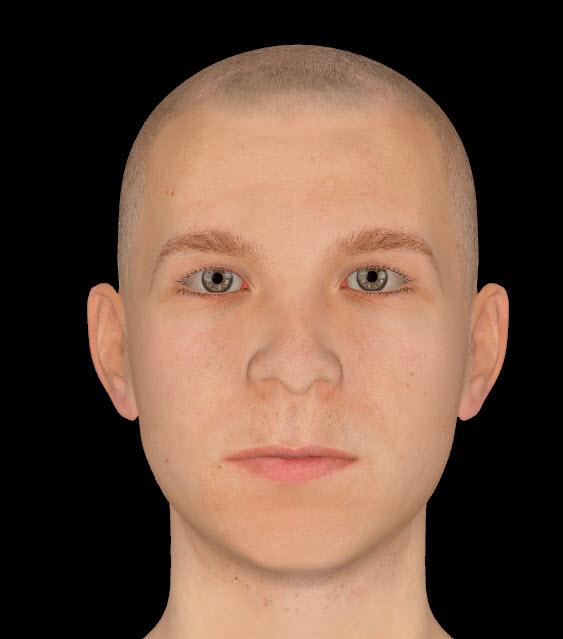
h. The biggest drawback to Headshop is that the generated texture leaves a lot to be desired. The problem is that it grabs from the original photo an oval centered on the eyes, nose and mouth with a bit of forehead, cheeks, and chin. The rest is filled in a with a solid-tone skin color. The result is a mix of reality and an untextured solid color. Even though the photo has more of the forehead, skin and chin textures, they are stripped away. What are we to do with this? Anything other than a straight on view looks ridiculous. The author says you can hide the seams with hair but that’s unrealistic. Someone knowledgeable with Photoshop could probably make something out of this but I don’t have those skills. You’ll probably just want to use a character texture – that’s OK but takes it further away from a model of an actual person. It will also show that the model is less of a match than it first appears. See image below. I purposefully picked a younger-looking character skin to show how important the texture is to the result.
Another issue with using the plugin-generated texture is any facial hair around the mouth, glasses, makeup, shadows, etc. become part of the texture. Not a problem if you can get a photo without any of that.
Daz 3D is part of 
Connect
DAZ Productions, Inc.
7533 S Center View Ct #4664
West Jordan, UT 84084
Licensing Agreement | Terms of Service | Privacy Policy | EULA
© 2026 Daz Productions Inc. All Rights Reserved.
Comments
4. I’ve found that although the front view looks similar to the person, the profile view usually doesn’t. You can modify the profile before you export by clicking on the Profile button.
a. A new dialog opens with two profile heads. Click on the left New Image.
b. A dialog pops up where you can choose a photo. Again, this should be a dead-on side view but it seems to work OK if it’s only slightly turned or tilted.
c. Your image will appear on the left. There will be two green dots you need to drag to the eye and the mouth. Click Apply and you will get a new dialog that zooms in on the face and lets you fine tune the placement of the two green dots.
d. The next dialog shows that your image has replaced the left hand profile head. There will be two blue dots, one at the top of the head and one down by the chin. Click on the N inside a square icon at the top center of the screen. On your image, there will be two blue dots, one at the top of the head and one down by the chin. You will now see a partial red outline on the right profile head. You will want to outline this same area on the left profile head.
e. To trace the profile of your photo, left-click near the top of the skull on the left head and a green dot will appear. Click further down the forehead and another dot appears. Keep going until you reach the chin area. There’s no guidance as to how many dots to use but I put them so I could capture transition curves, so for example, more at the tip of the nose than on the forehead. Note the modifed outline on the right head.
f. When done, hit the ENTER key. Wait a few minutes and you’ll see the right head flash out to follow your new outline. What confuses me, is the right head shrinks back to its old look, so did the profile change take or not? Select File-Export on the menu to take the model to Daz Studio. When I look at the exported model, there’s some change but not as much as I would have expected.
g. Here’s the profile image superimposed over the model. As you can see, the side view is much further off than the front view: eye and ears not as deep, chin not as defined, cheeks too shallow. This may be a result of the profile image being slightly turned but I got the exact same result using my own image. I also show the image and the model side by side and the model with the Eddie texture.
You can of course use various head morphs you own to modify the image to get a closer result. I’ve never tried to macth a person before, but by using the front and profile images on planes and using them in the superimposed and side-by-side mode, I adjusted a number of morphs for the ears, eyes, chin, cheek and forehead. For several, I had to undo the settings limit to get enough movement. I also used some pose controls like squinting and mouth close to adjust for eyes too big and the slightly open mouth. Here’s my results after making these adjustments.
A few final items:
Watch for interaction between morphs. If you have already exported a head for a particular figure and you want to rerun Headshop on that figure, set the first morph to zero (e.g., fs to zero) and be sure to name the new morph something else (like fs1) when you restart the plugin.
When I first started to write this I had more negatives to include, but for many of them, I have found they came about from my lack of experience using the program.
The documentation is scant but sufficient as the basic process is pretty straightforward. There is a more detailed HeadShop 10.2 manual available, but much of that doesn’t apply to this simplified plugin. Some of the icons in the plugin are not explained and I couldn’t get them to do anything at first, but ultimately I figured it out. I do think the creator could provide better documentation and tutorials to ease the learning the curve.
The biggest limitation is the auto-generated texture. It just isn't good enough for realistic renders and would require a lot of hand work to make it useful.
On the other hand, the auto-detection of facial features seems to work very well and the resulting morph a good starting point for your own fine-tuning. Also, if you don't care about a close match, you've at least increased the diversity in your Daz characters.
How well does HeadShop morph the eyes and teeth?
Do the eyeballs retain their original shape, or are they warped?
I would make the head invisible to get a better look.
Here you go. This is with just the front view modified, no profile changes. First image is G3 male base figure before HeadShop. Second image is afterwards. Eyes look fine but you can see the gaps in the teeth I mentioned. I don't have any teeth morphs to see if they can be adjusted back to original.
Wow- this type of tutorial takes an IMMENSE amount of work. Thanks for showing all this.
That side view really isn't close at all with the default. I think depending on the person it's being modeled after, someone might be able to get closer than the default result (edit, the rest got taken out by mistake!) by doing morphing by hand.
If you're interested in fine tuning- I think the fixes are: If you'd reduce the bulbous tip of the nose and nose width of the main section (keeping the wings the same) and reduce the size of the nostrils, that will make a big difference. The upper lip's inside curves (the ones that touch the bottom lip) needs more curve, and it's hard to tell about the peaks due to the skin texture- can't see if the peak width is okay or not. But heavens, I knew it was Bruce before you even said so, and that says it all!
I see what you mean about the filler around to the sides. I think you did a REMARKABLE job with it overall!!!
What do you actually plan on doing with that program, just curious?
thanks for that! This made a lot of things clearer to me.
Thanks for the screenshot. I've noticed that programs that create head morphs from photographs tend to warp the eyeballs or teeth.
Thanks for the input and the mini tutorial, but unfortunately this makes me want to purchase less (not your fault). The likeness you got does not look like the actor and I wouldn't recognize him unless you had posted the original image and that takes away from the selling point of this product IMO. Also the texture limitations are still an issue for me. I have yet to see a final result with this product that makes me want to purchase, As for just having it for diversity, I already have a randomizer which does great in creating diverse faces. IMO this is a novelty product, especially with the "oneclick" mentality. A serious product should give you much more options with the ability to fine tune every detail yourself.
I bought this product frankly for the cheapo Carrara 8.5 upgrade promotion. The same day I purchased Facegen pro based on a forum user's recommendation in the other Headshop Oneclick thread, because I'd read of the difficutlies installing the file, I decided to try FG first. The process with that software reminded me of the earlier version of Headshop which I purchased and ultimately returned, but the results, the results were fantastic (especially on G2) in that a decent texture was generated and the likeness was quite good on the first try. At that point, I decided not to even install and try Oneclick until the results it produces start looking better and the install pains are lessened.
Now, I need to be very care in how I word this. I really wish that QA rules would require a product install and work "no matter what drive" Daz Studio is installed on. It seems like a really, really old school limitation requiring things to be on the C: drive. Know what I mean, Vern?
Anyways, I am glad to see Faceshop/Headshop/Oneclick moving forward with another version. I think it's a good price point for a software of this kind and I really hope it grows into it's potential. Yeah, FG works a lot better than the results I've seen here in my experience, but at almost 5 times the cost.
I also bought this product and kept it in hope of more improvements in later version. However, before I buy a later version again that improves the quality of the morphs created from pictures the SW author must update the version I have such that it installs correctly via DIM and via the DAZ Content Manager (If it's allowed to install a plugin via the DAZ Content Manager - I have many plugins and have yet to see one listed as installable via the DAZ Content Manager).
As far as the morph results of the current version, it is not nearly accurate enough and some types of faces, even using pictures of high resolution, really break the algorithm the developer uses. The developer needs to use many more data points (not all visible as his software autofinds these points after the autodots have been detected and edited or not edited) and sharpen his algorithm.
I don't know. It sounded interesting and I like to try out and learn new tools and the cost was reasonable. I've actually learned a lot about the head morphs while testing this out. At this point, I'm going to keep it and test out a few other figures and settings to see what I can do.
Glad it was of help. My intention in putting this together was to share what I learned and show the good and the bad. I agree the texture output is a big issue. I also have the randomizer which I really like.
I've been hesitating about stepping on their toes, but one method I've used to copy faces is place a front shot as an image plane and place the plane through the head, possibly adjusting head opacity. The goal, obviously, is to have an overlay reference so you can tweak the face to your liking. Then possibly an additional profile shot turned 90o to adjust from the side. Not one click by any means, but I used this approach to improve a David Bowie free morph.
I second your approach. That's what I ended up doing when I started to hand morph. Pretty easy to set up and use.
I recognized him right away. Those squinty eyes and thin mouth were the give-aways for me.
I think the hardest thing about doing anyone is getting BOTH a good front, and good side view. Often the people are at a 3/4 turn or something other than a straight-on side view.
Something interesting I've been watching are the phone apps that are doing 3D modeling of food, with people next on their list. It's amazing.
I cant istall in my DazStudio 10
heh, after finally getting to using this utility, I've been scanning the forums for tips/tricks, especially the non-round eyes issue (anyone?), and found this *wonderful* tutorial!
@RGcincy, a huge thanks for doing this and for doing it so well.
@info_b3470fa520 (laslove, the HeadShop programmer) you should really take note of what's been done here. This is how documentation should be done.
FWIW, before I saw this, I made some notes that might be of interest (esp. to those thinking of using GenX2 to convert HeadShop OneClick morphs to Genesis1 and other figures):
https://www.daz3d.com/forums/discussion/comment/4047426/#Comment_4047426
Note that automatically saving the morph as a standalone morph asset is probably beyond the reasonable expectations of the HeadShop product, and that realization may not have come across in my notes. It creates a morph that can be saved as a scene or scene subset, but knowledgeable DS users can load that and save it like any morph asset - tutorials everywhere.
Thanks again RGcincy, and I hope this helps future users.
eta: eye and jaw fixer tool at sharecg (not an endorsement, just found it):
https://www.sharecg.com/v/88497/browse/10/Software-and-Tools/Eye-Jaw-Morph-Fixer-for-Face-Morphs
cheers,
--ms
thanks mindsong! also for the links to your notes and the fixer tool