V4 vs G2F: The eyes have it - same eyes different reflections
 Scavenger
Posts: 2,674
Scavenger
Posts: 2,674
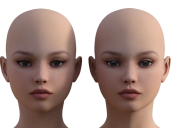
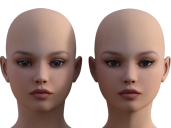
I was converting a v4 character to G2F and when I did a test render, I noticed something weird...
The v4 version has a reflection in the eye, while the g2F doesn't. They're using the exact same mat preset, so there's clearly a difference I don't know at play.
I exchanged their positions, and same thing, so it's not the light used (Iray default dome, no head lamp).
Can someone in the know explain?

Screenshot 2016-05-16 03.13.47.png
1553 x 1037 - 1M
ab1.png
800 x 600 - 592K
ab2.png
800 x 600 - 609K
Post edited by Scavenger on
Daz 3D is part of 
Connect
DAZ Productions, Inc.
7533 S Center View Ct #4664
West Jordan, UT 84084
Licensing Agreement | Terms of Service | Privacy Policy | EULA
© 2026 Daz Productions Inc. All Rights Reserved.
Comments
How did you convert the settings? If you applied V4 materials to Genesis (1) and then saved a Materials preset you will have lost the Eye Surface settings, which is probably where the fake reflections are. Save your .duf Materials presets from V4 and you should keep the reflection overlay.
it's V4 and G2F, no Genesis involved.
It's the EXACT same mat setting..as in clicking the same button in the v4 character area to put the material on both bodies. (and adjusting the UV).
Are the images for the reflections showing up in the surfaces tab on the converted product? If so, you might try copying the settings for that surface from the V4 version and pasting them on the G2F version.
I'm not trying to duplicate, I'm trying to understand the differences.
Applied the textures manually, or did it already have a .duf preset?
There's a Duf Preset.
Scavenger;
So that I understand you applied a V4 material to a G2F model and you didn't use a Skin converter, Correct?
If this is what you did, then here is a possible answer: (Sorry, it is going to get Geeky now)
The DUF File is like an XML file and keeping it simple (For everyone to understand).
Here is a bit of a .DUF so you can get the idea, for the Cornea of IG Iray Essentials for V6.
Under the Hood:
When you load a DUF, the Daz Studio read the list of parameters them to the model's parameter of same ID name. This is why when you apply a pose meant for V6 to Hair, it goes all wiggy, because it has Parameters with the same names, but no with the same movements. All Parameters which do not match up are ignored, like if there is no Cornea or it is misspelled Cornae. These are also Case Sensitive so eyeReflection is not the same parameter as EyeReflection.
This is why you can't load a Dress Texture to your Character's Hair, nothing happens; even though it goest through the motions. The surface names to not match, therefore everything is ignored. This is also why all Poser Material come into DAZ as Plastic as the Lighting Model. Poser Doesn't have that Parameter and the DAZ Default is Plastic.
So what is happening in your case:
The Reflection in G2F's eyes may not have the exact same name as the it is call in the V4 DUF, so the seeing there is no pigeon hole for the Reflection map, it is tossed out like yesterday's coffee.
To solve this issue, there are three things you can do:
1) Use a Skin Converter:
Mainly what the Skin Converters are doing is remapping the Parameters to their New Names. It reads in the Skin from V4 and Spits out a Skin for G2F or G3F. The reason Richard asked about Genesis, Studio will auto-magically map V4 to Genesis. And I believe it will also auto-magically map Genesis to either Genesis 2 Female or Genesis 2 Male.
2) Add the Reflection map manually:
Basically the easiest way to do this: Load Three Characters, V4 with the Skin you want to convert, G2F with the default Skin and a G2F with The Skin you are Converting. (BTW you will need to do this for each Skin Texture Base you want to end up with. 3Delight, Iray, Reality, SSS and the rest.) This will get you all the images in to Studio and the Default G2F is for a reference so you can find where it is placed to give the I the reflection.
One found, you look at V4 to know what the Reflection map is called.
Then you add the Reflection map to the proper location and your reflection is back.
3) Leave it as it is and enjoy real reflections:
Before you go to all that work and especially if you are going to use Iray; you might take a look at the image below.
In the Iray renders the Eyes are very reflective, it s why they sometimes look cloudy, and will do a Natural Reflection. In the image below the reflection is of the three softbox light illuminating the scene. So not having a reflection present can be useful, if you are building full scenes. you could do the whole find the Bad guy off the image reflected in G2F's eyes.
Hope this helped
Haslor
Did a test of a converted to a not converted...Using the conversion script, this skin set gets the wrong shader base (Daz defualt rather than the omniuber for some reason), so it's unusuable, but the first two pics are the G2F with the unconverted duf and the converted, and at this level, there is a reflection... the thrid is the v4 with the skin.
There is some reflection there in the g2f...
The 4th is the g2f with the corea layer copied from v4 and pasted into eye reflection....nothing like the v4 though.
Scavenger,
I have discovered your issue with the Reflections. The eyes you are looking at below are from International Beauties Maps and Morphs for Victoria 3 and Stephanie 3 (But they do work on Aiko also). Notice the bueatiful reflection of the Camera man in the eyes. (the White dot is from the Humanshader and is actually on the Cornea.
The reflection is on the Iris not on the Cornea, see the image below. I could several location where the Cronea was devoid of any Map and the Reflection was on the Iris, as the image below shows.
Due to the nature of Iray, or any physic based Render engine, the Cornea reflection is more dynamic, as you can see the Cornea is Fogged due to the Glossy Color set to 1/1/1.
Changing the Glossy Color to .54/.54/.54 will give you the eyes below. Notice the Six Lights I use in my test Light box.
I hope this helps you with your eyes.
Haslor
PS on Gen3 and below don't use Eye surface on the Whites, you will get the left eyes.