Daz 3D is part of 
Connect
DAZ Productions, Inc.
7533 S Center View Ct #4664
West Jordan, UT 84084
Licensing Agreement | Terms of Service | Privacy Policy | EULA
© 2026 Daz Productions Inc. All Rights Reserved.
Comments
I was installing some new stuff. While DS was busy, I decided to take my Victoria 7 render into Gimp 2.9 and try a little bit of postwork. It is amazing what a little bit of postwork can do to an image. The more I learn to do postwork, the more I like it. :)
Gallery Link
Wow! That is lovely!! Awesome work, KM! :D
And I totally agree, a little bit of post work goes a long way! :)
What a difference! Skin looks fantastic, and the glossiness/bumps on her lips looks particularly good.
Be sure to trap your process to make sure you can reliably duplicate it in the future!
- Greg
OH, good! I'm glad it helped. I'll pop over there later, too, and take a look around. :)
So awhile back I created a photo for Zev0's aging contest but I didn't get it finished before the deadline. I really liked the image and I played with some post work and showed it in this post back in October. I wasn't real happy with the post that I had done. I had a story in mind for the image and I wanted a kind of vintage look to the render as if it had been taken from a camera feed from the lab set. I've learned a few more tricks since I October. I'm not sure if I'm completely happy with the final result but it will have to do. Maybe I'll do the render completely over at some point but not right now. For now, I'm happy with it and I've finally put it in my gallery. The following text is the story I put in the description.
An old photo of a Lekkulion couple taken during the Sarsis incident when a deadly virus was released causing thousands of Lekkulions to be placed in quarantine. The survival rate of the deadly virus once infected was 15%. It was the worst known disaster to happen following the creation of the Intergalactic Council which now governs its member planets. The Lekkulions were the driving force behind the creation of the Intergalactic Council.
Sarsians continue to be a black plague on civilized races.
The portrait render looks fabulous! I am compiling a folder to put all the renders I want to postwork into so I can just go in and pull them up and be able to find them quicker. I realized I have more than I though I would.
The vibrant colors, volumetrics and blooms really add a lot to this image. The depth of field and lighting (dark shadows) help to keep the image from appearing too busy, even though there's a lot going on - great job!
Oh, and I like the story, too. I've purchased the Lekulion bundle, but haven't even touched it yet. Been thinking about doing a War Stars image lately, and I think you've pushed me over the edge . . . thanks for that!
- Greg
ETA: Forgot to ask, but I assume you used similar processing to the portrait you posted just before?
@Algovincian Thanks. Yeah, the first part of the process is similar to what I've been doing lately with my postwork. I added a couple of extra steps to try and make it look older. I've kind of gotten into a groove with the process and I'm consistently using the same basic steps over and over. I like the results. However, I still experiment just in case I come across something I think I might want to add to the process or start a whole new one.
I like the Lekkulions and I think @RawArt did a great job with them. I can see using them again and if I manage to get finish the stories I'm currently working on, I can see someday actually writing this story and possibly having them grace the cover of the book. I tend to dream big. :)
I really like this image. Well done.
@FirstBastion Thanks. I really struggled with how I wanted this image to look. Making a render look old or have a specific vintage look isn't all that easy. For this image, I had a specific look in mind and I think I pulled it off, mostly. At the moment, anyway, it is the best I can do with my current skillset. I still have SO much to learn! :)
I'm working on the next installment of the Gimp tutorials. Basics of the lasso tool. I should have it uploaded by tomorrow at the latest. It fits with what I've covered already and @Saphirewild and anyone else following along with @DarwinsMishap's skin texturing tutorial will need to know the basics if you are using Gimp to follow his tutorial which he is doing in Photoshop.
Yes I totally agree KM that is why I am so excited to learn the basics from you!!!
It didn't take me long to learn PSP7,8,and 9. so I am hoping I can grasp GIMP just as easy and start making my renders shine the way I want them to!!!
I love the alien sci-fi image, KM! It's kind of surreal and dream-like. Also a bit scary. Very cool!
Thanks, @Divamakeup. I'll take surreal and dream-like. :) Scary is good, too, given the storyline. It was a scary time for the aliens in the image.
Yeah, the Lekkulions are awesome. The head tails and alien extremities are the big draw, but I really like the overall body and face morph, too. Been playing with them on/off all night since I got home yesterday, and there's a render cookin as I sit here at work typin . . .
Looking forward to future renders of your story line!
- Greg
Well, I do have a few more scenes in mind. So, soon, maybe. :)
Well, the Free Selection Tool Tutorial took longer than I expected. Real life got in the way a little bit this week and I actually wasn't on the computer all that much. I've only even managed one render this week. I'll do a separate post about that.
I had to track down the answer to a question I had. It turned out to be a really easy, almost obvious answer, but it was one of those "everyone knows how to do so they don't specify how" kinds of answers. Turns out it's all in the BACKSPACE! You'll get that when you get to that section. I need to break this up into at least two parts. I may actually end up with three parts. We'll see. I'm still doing some research on that warp tool in Gimp. As soon as I've learned everything I can about it, I'll add a tutorial on Gimp's version of the warp tool.
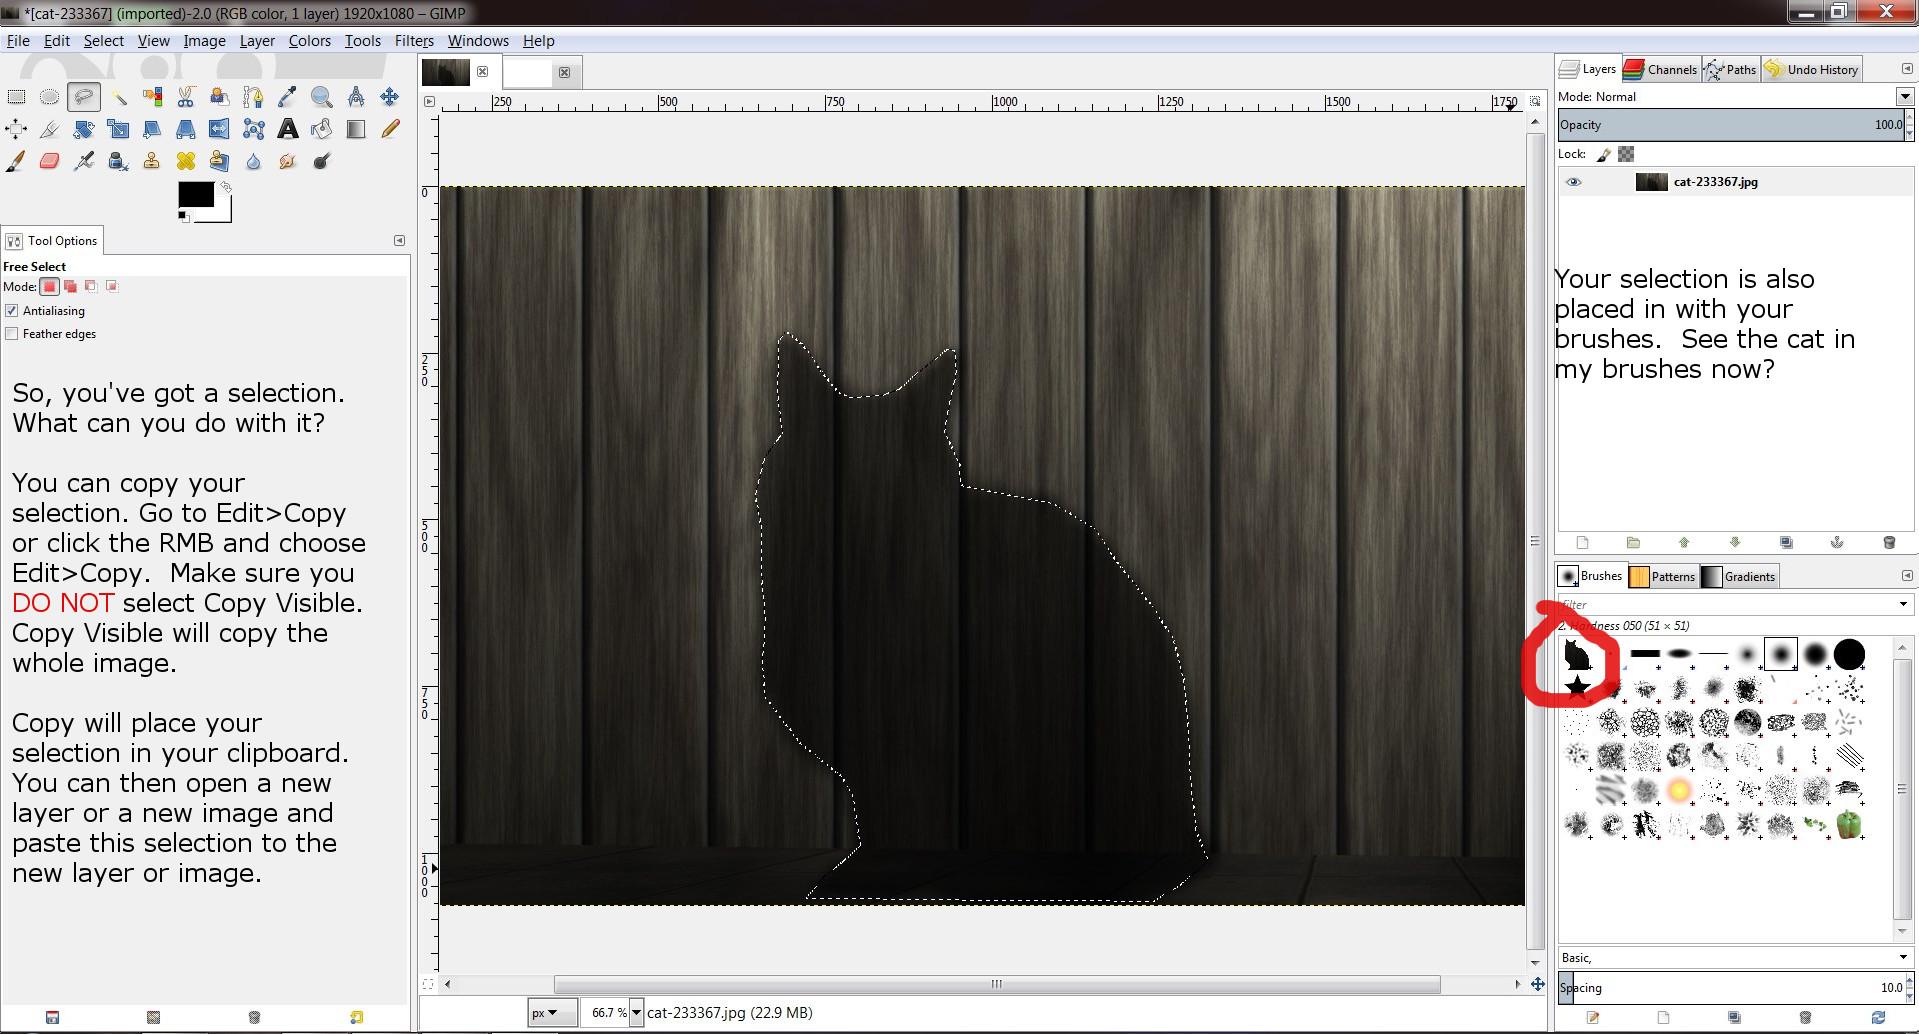
Gimp Tutorial Part 1 Free Selection Tool
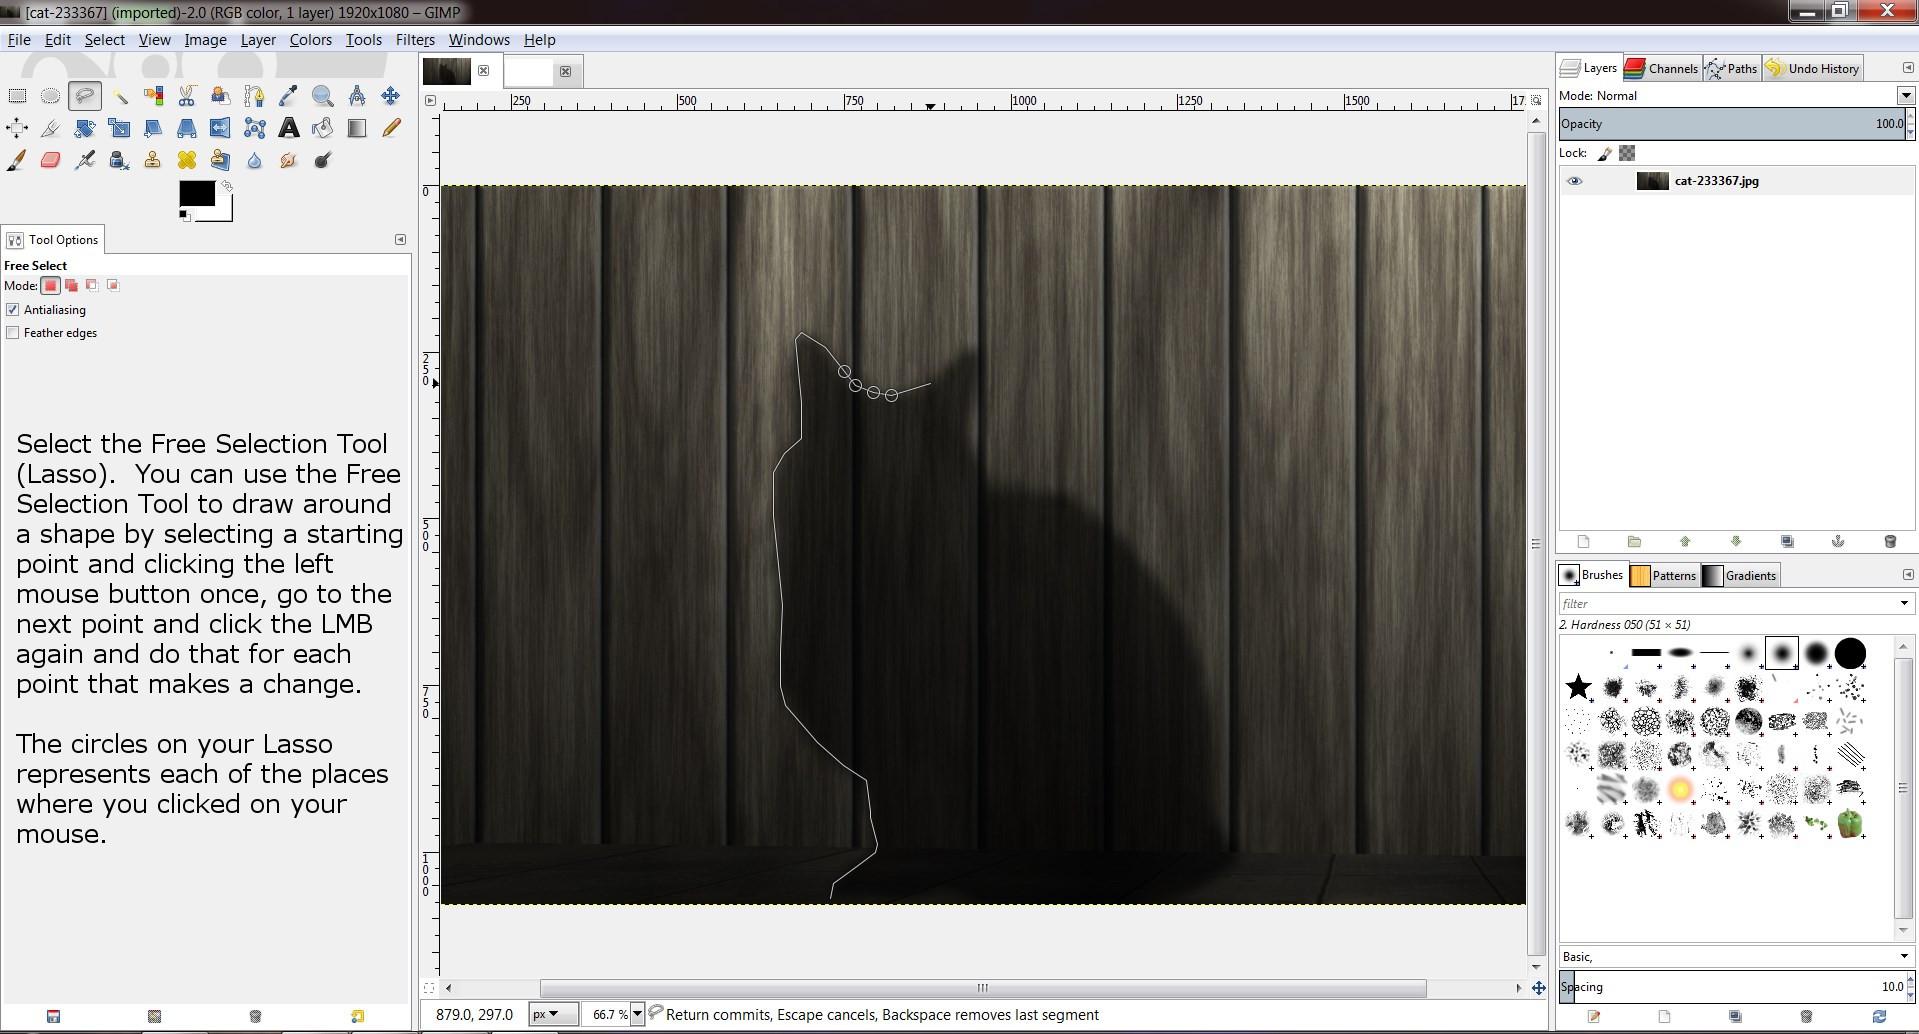
Gimp Tutorial Part 1 Free Selection Tool cont'd
I think I have them all in the right order. As always, if you find that something isn't clear or you need more information or you think I've made a mistake, please let me know so that I can be more clear, find more information or just fix any mistakes. Part 2 will be up soon. But, as always, real life with 3 boys comes first. For now, I have 20 plus pounds of brussel sprouts to get ready for the freezer thanks to those same 3 boys who don't even like brussel sprouts, but they knew that I love them and they brought them home to me yesterday.
I finally read through your thread Knittingmommy. Really nice renders too. :)
I am pretty much a Gimper from day one. I did not have the cash for Photoshop. I agree once a person has a pretty good grasp of Gimp you can use just about any photoshop tut to create similar results in Gimp. There are a few exceptions to the rules that a person might not be able to create. Gimp there are many free scripts and G'mic which also provides a lot of interesting things to play with. Another fav tool of mine that is similiar to the free select tool is the paths tool. I have worked now in Photoshop some, but I go to Gimp to do stuff quick because I am the most familiar with it.:)
@Liana I've used Gimp since I started using Linux way back when, long time. But I mostly just used it for resizing pictures and maybe trying to fix red eye. Occasionally, I would try to figure out what everything did. Fast forward a lot of years and I still didn't know a lot about how to use even some of the basic tools. After getting into using DAZ Studio, I tried using Photoshop and was even considering getting it, but then they went subscription and I decided to pass. Since I had Gimp and knew how to use it a little bit, I decided to dig in and try to get serious about using it. It hasn't been all that hard. I found that I could translate a lot of PS tutorials to Gimp fairly easily. I still haven't come across anything that I haven't been able to figure out how to do in Gimp from a PS tutorial yet. Then, Google came out with those free NIK Filters and I wanted them. I was so happy to see that I could get them to work with Gimp. My postworking skills have practically exploded since I picked those up and started getting serious about learning how to do it. My images have improved, too, I think.
So far, I haven't found any reason that would make me switch to Photoshop. I'm happy learning Gimp and it's fun sharing what I've learned with these tutorials. The great thing about doing them is that it helps to cement into my brain how to do things so I don't forget. As for the free scripts and G'mic, I'll be doing a tutorial on where to find those and how to add them and use them soon. I'll also be doing a tutorial on how to get the NIK Filters working in Gimp for those who want to give them a try.
Thanks for stopping in.
I have done all my texture work over the years, and those picture frames in my thread in Gimp. :) I am glad you are not having really any difficulties and passing on what you have learned from others. I have not heard about NIK filters what are those?
Awhile back, Google released the Google NIK Collection to the public for free soon after they acquired the company NIK Software which created the filters. It is a suite of seven desktop plug-ins for Photoshop that can be used for a variety of postwork on images. The filters can also be used as a standalone set of programs, but they do overwrite images so you should only use them as a standalone on copies of your images. Someone got the bright idea to try and get them to work in Gimp without using that pspi script.
I first started using them in the Gimp 2.9 Beta because there was a build that already had the paths for the filters all setup on Partha's website. You simply downloaded and installed the filters from the page I linked and Gimp 2.9 Beta knew where to look for the filters if they were installed to the default folders. I wanted to try out Gimp 2.9 Beta because it can read .exr files and I was just starting to figure out how to render with Iray Canvases which saves its final results as .exr file.
The filters can also be used with Gimp 2.8 for those who like to only use the latest stable version of programs. It takes a little bit of playing with a script to get them to work and not everyone is comfortable with that. There are some YouTube tutorials on getting the filters to work in Gimp and most of them are for Windows. I recently had to figure out how to get them to work with my copies of Gimp 2.8 and Gimp 2.9 Beta on my Linux drive. It was NOT easy. I can script a little bit, but it isn't something I do a lot of and it really taxed my skills to get it to work. I did manage it, though. On the little drive that I use for Windows 7 as a backup and to run anything I haven't gotten to work in Linux, yet, I do still run the Partha build of Gimp 2.9 Beta. I haven't gone to the trouble to see about getting them to work yet in Gimp 2.8 in Windows, but I do plan to do that and do a tutorial at the same time for those following along who would like to get the NIK Collection working in Gimp.
Oh, That would be cool of you to share. I have windows 10 64 bit and Gimp 2.8. I will have to check those filters out and see if it something I might be interested in. Thanks for sharing! :)
When I was learning how to use some of the filters that come with Gimp, before I started doing the tutorials, I ended up doing a lot of background images with the different filters and tools like the gradient tool. I put a lot of them up on the free background thread that Novica started. I'll probably be adding some more soon as I have a couple of tutorials in mind showing how to do some of the things I've learned. Making my own backgrounds was a fun way to implement what I learned. I have a couple of folders full of background images that I made but haven't gotten around to uploading yet.
I love the NIK filters. Most of the post I've been doing in Gimp on my images involve using the Color Efex Pro filter. I've kind of developed a look I like that combines 3 different filter outputs and then compositing them together. The Analog Efex Pro is good for getting a vintage look as it has all kinds of presets for all different styles of cameras. You can make something look like an old tintype or a polaroid. Very cool.
Thank you for the tutorials, KM. :D
That is cool . I think the G'mic add on has something similiar to that. I now I have to go look. Well, maybe later today now. :)
Just in case someone doesn´t know, G´mic is also available online as standalone without GIMP: https://gmicol.greyc.fr/
My favorite part of G´mic is the Film Emulation Section.
I REALLY like the NIK filters, though 99% of the time I'm using either Classical Soft Focus or Detail Extractor.
I've just started playing with that Classical Soft Focus and that's a cool filter. I like the effects with that. I haven't used Detail Extractor yet. I'll have to play with that one. There are so many cool filters in there. I can see why NIK Software charged around $500 when they originally sold the whole package. I can't imagine being able to afford that but I'm sure professionals did. When Google acquired them, they dropped the price to around $100 and then decided to give them away for free and anyone who bought them that year they did that got a refund which I thought was very nice of them. I'm very glad they are free now because they have really improved what I can do in postwork.
Nik filters are some of my favorites as well. LOVE them and so easy to use as well.