What went wrong?
 evilded777
Posts: 2,516
evilded777
Posts: 2,516
So, learning all this Blender stuff. Finally got something I was happy with. Did some minor post in PS then exported it and well, it looks like hot crap.
You'd think I was new. I'm used to high contrast, lots of shadow... my images never look like this when I'm done. Even the signature looks horrible. The raw render looks so much better, but even if I do no postwork and I try to post it somewhere it looks awful.
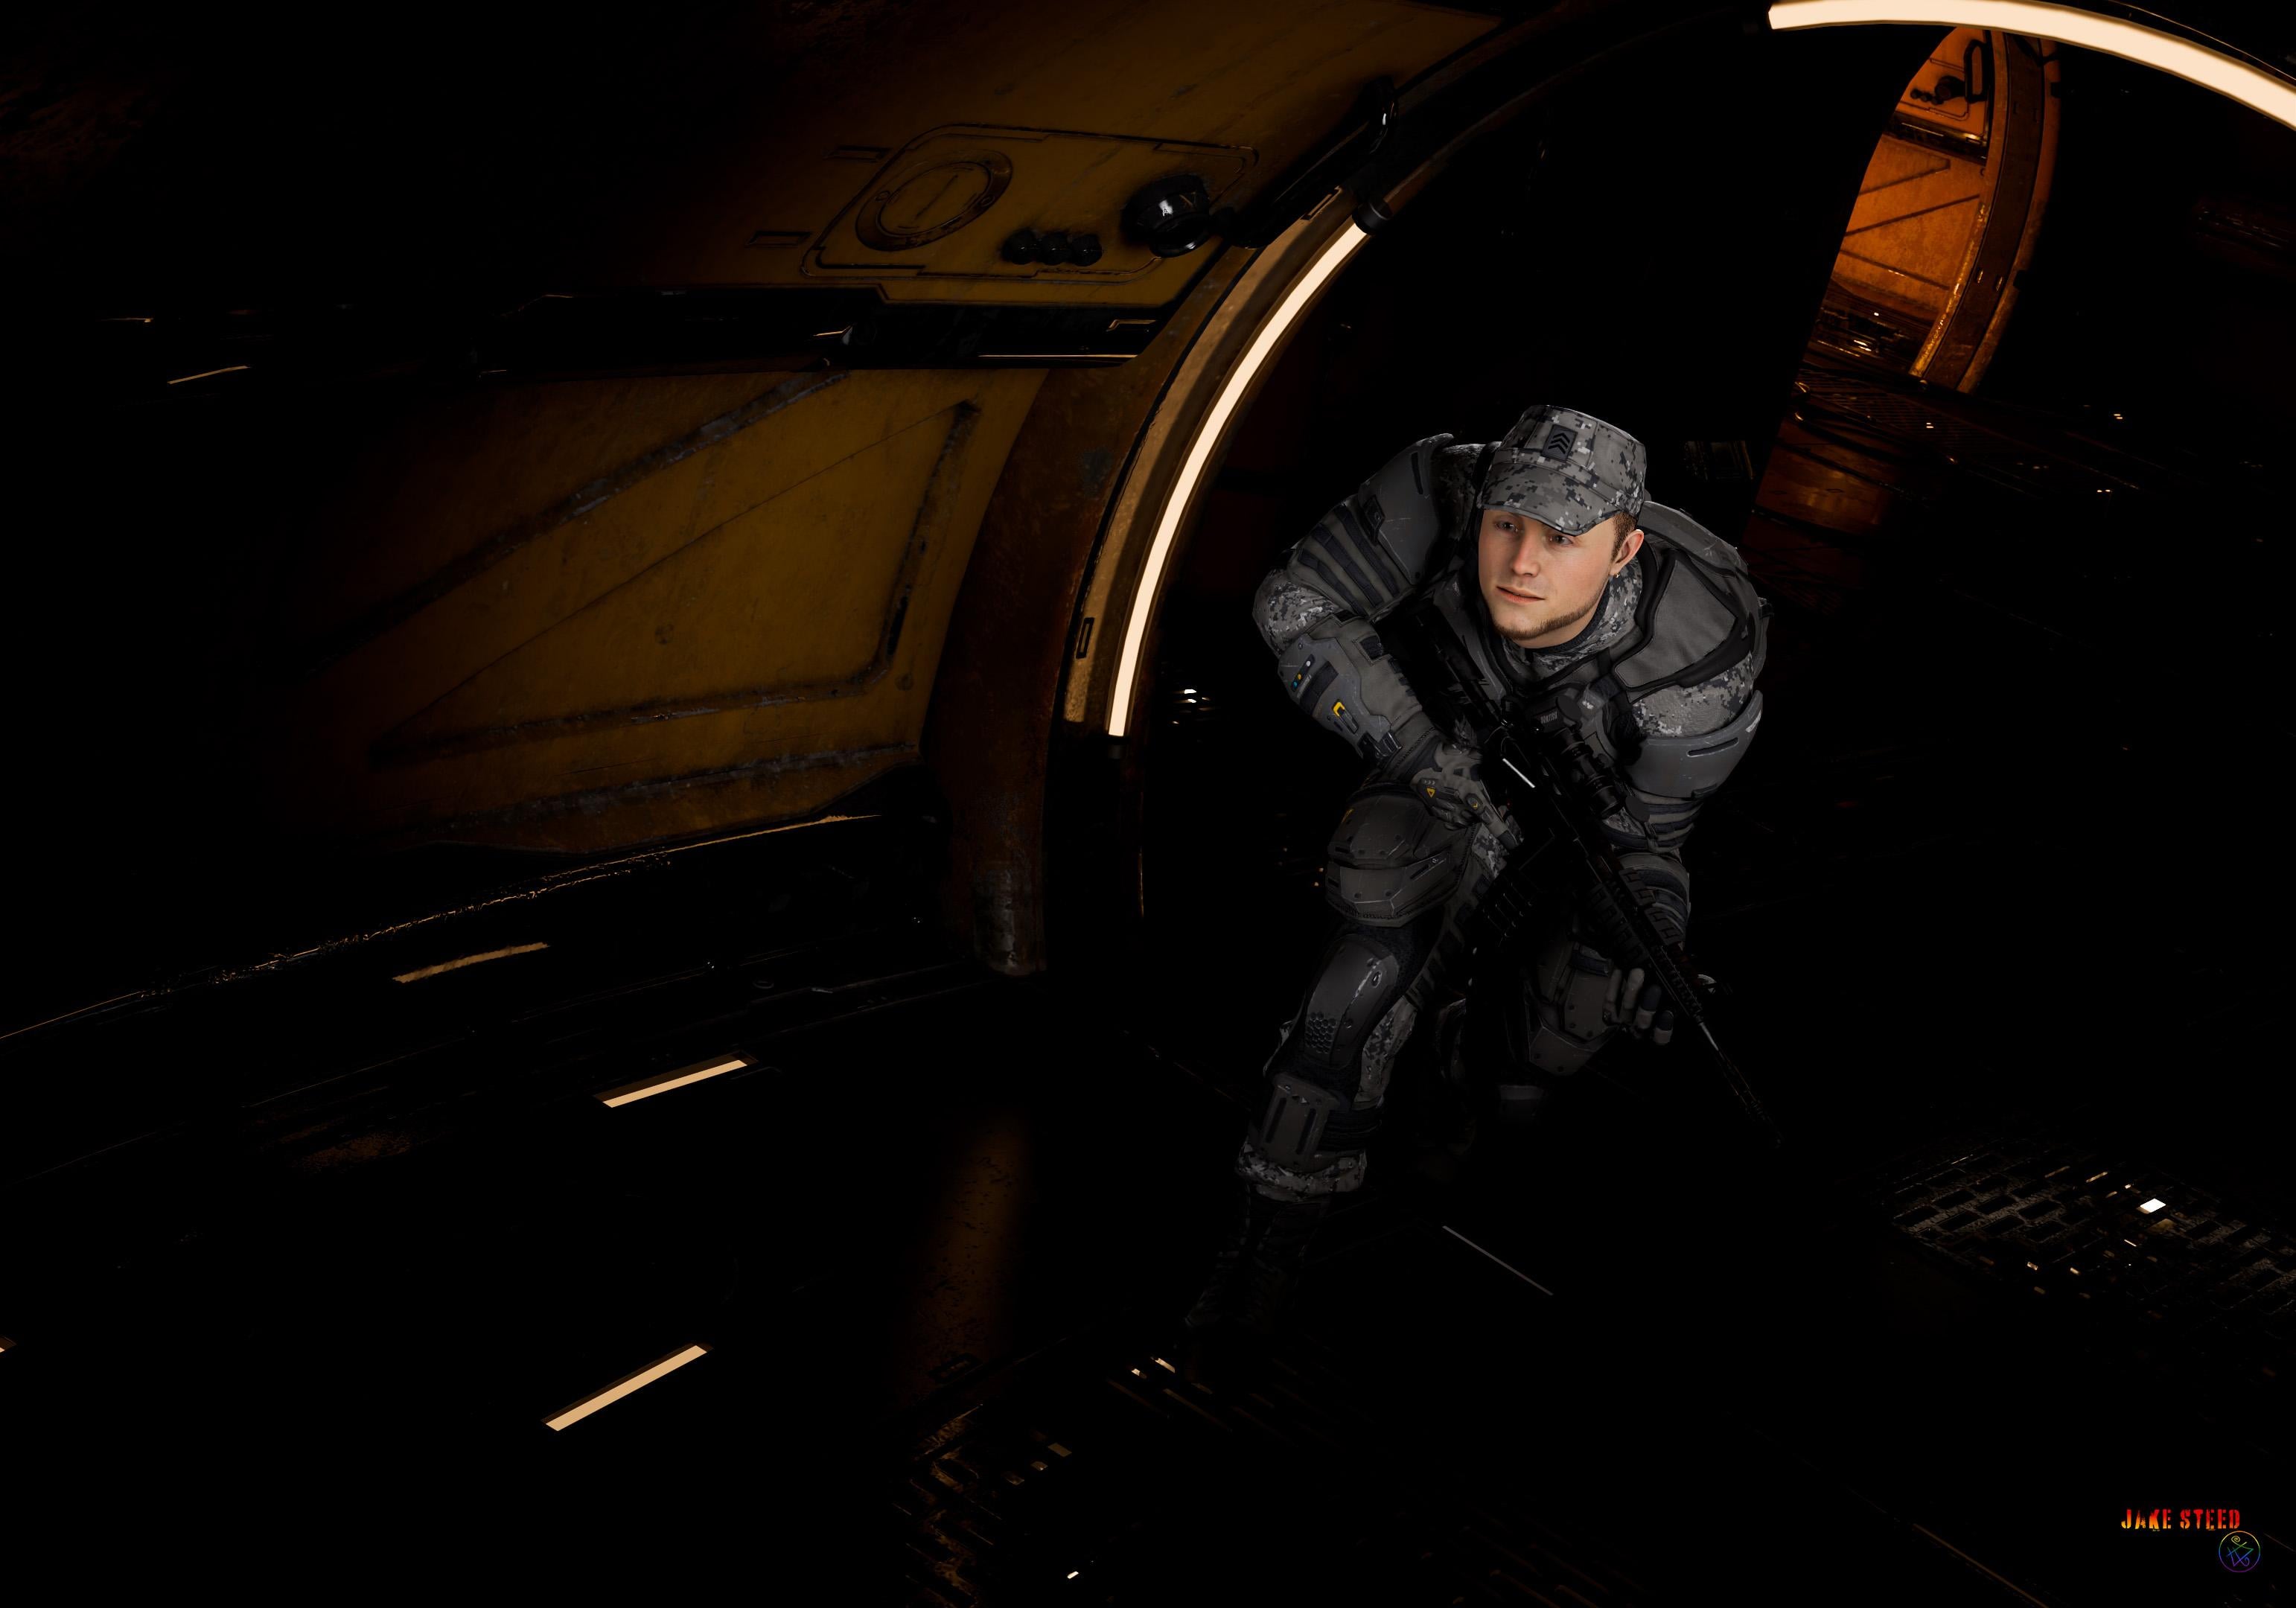

Cable Canyon 1.jpg
3084 x 2160 - 544K
Post edited by evilded777 on
Daz 3D is part of 
Connect
DAZ Productions, Inc.
7533 S Center View Ct #4664
West Jordan, UT 84084
Licensing Agreement | Terms of Service | Privacy Policy | EULA
© 2026 Daz Productions Inc. All Rights Reserved.
Comments
I'm not sure what you're asking for, nor what you consider awful or what you'd expect instead.
Fair enough. Let's start with the artifacting. That's not there in the original render. In fact, that's most of what is wrong here. I rendered roughly the same way I do in Studio, though there I do light passes and composite the whole thing (And I don't know how to do that in Blender, yet; or if I can).
I mean, I'm happy enough with the render. But for some reason it does not stand up to any sort of compression it seems. It's a little darker than if I were to do my normal process, but I rather liked it the way it stood with next to no post work. But I can't seem to share it because it just ends up looking like the dog threw up her breakfast.
This one is my normal process, out of Studio... and its a lot more artifacty than normal. So maybe the problem is more me. But it is clearer than the Blender version. I'm still coming to grips with rendering in Blender. Cycles is a very different beast. Maybe I need to feed it nearly as much, but not quite as much, light as Iray.
What format did you save in?
Again I'm not sure what you mean by "artifacting", as I don't see any apart the blender image is smaller so fo course gets less details. The skin needs some more sss, or use bsdf instead of principled. You may also want to try the color management, that's similar to tone mapping in iray, apart you don't have to re-render the whole scene to apply different settings. Then if you miss compositing there's plenty of tutorials, as for anything in blender.
https://github.com/Diffeomorphic/import_daz/wiki/Material_Methods
https://docs.blender.org/manual/en/5.1/render/color_management/index.html
p.s. Another thing that greatly affect the render quality for complex scenes and shaders is the max bounces, where you can use the "full global illumination" preset for best quality.
https://docs.blender.org/manual/en/latest/render/cycles/render_settings/light_paths.html
I can't see anything wrong personally
if both look poor in your opinion, it could be compression of the forum upload
It looks "ok" in the forum modified small version. If you click to see the full image, the artifcating is pretty obvious... isn't it? The barrel of the rifle, the floor in the background, his boots..
I may have dropped the light passes for speed, following some advice somewhere that rang true with something I learned a very long time (and is probably no longer relevant). Its funny that you mention subsurface, because I used Global Skin and I thought it was better than the Daz version (which to me has some overblown effects in certain areas and lacks overall effect in more subtle ways).
You've built a marvelous tool in Diffeomorphic and I wouldn't be where I am here, trying to learn this, without it. Just trying to understand the new workflow (like going from 3Delight to Iray, only by a factor of about 10).
Can anyone suggest a solid resource on learning to work with lights in Blender? Not lighting tutorials that teach you 3 Point Lighting or Rembrandt Lighting, or One Secret Trick to Lighting in Blender to Make Your Renders Fabulous! I'm so used to pointing lights with tools in Daz or looking through lights to position them where I want them. I'm lost not knowing how or if I can do these things in Blender (and so far none of the tutorials I've looked at have contained the knowlege I need, or much in the way of "Ahah!" moments). Has anyone approached the topic from the angle of DAZ users moving to Blender and how you might do common things that you are now having to learn all over again?
Yes you're right the rifle gets much more specularity in iray. As for the skin if we look at the ear there's much more sss in iray. Again if you're using principled this is expected as principled is approximated compared to iray, you have to use bsdf for a quality conversion.
Of course the lights must be the same, I'm assuming that. If you use different lights in daz and blender then we're talking of nothing. Diffeomorphic should import fine both the HDRI and standard iray lights and emissives. You may have problems with custom lights and ghost lights. Make sure world is "dome" in the global settings to import the HDRI.
edit. important. If the scene is using custom shaders or 3delight shaders then they are approximated in cycles, and will not look the same as iray. For 3delight shaders you can convert to uber before exporting, this sometime works with custom shaders too. You will receive a warning on import if there's custom shaders. The standard iray shaders as uber and pbrskin are converted fine.
https://github.com/Diffeomorphic/import_daz/wiki/Material_Methods
p.s. Eventually, if the scene doesn't use a huge lot of props and morphs or if you can simplify it, then you can upload the duf file with reference to the used assets, so I may be able to give it a look.
evilded777,
Years before I stumbled onto Daz Studio and Blender, I dabbled in studio photography. Because Daz and Blender mimicked real-world lighting system closely, it was easy to carry over any intuition and experience I already had. What I want to share are techniques I use with every new Blender scene I start with. I'm largely an Eevee user. I believe these settings are also relevant to Cycles. You may already know any of these; pardon me for repeating it as I don't really know what your Blender workflow is.
I use Diffeomorphic with Blender 4.5.4. I apply the following steps after I've imported assets from Daz Studio and deployed a few Blender lights to get me started.
[1.0] Scene Light and Color Spec
The goal here is to adjust or do away with any default light sources that Blender creates with every new scene. Here we also set the base contrast and the color scheme of the render camera.
[1.1] Render Properties -> Color Management
- Display Device: sRGB
- View Transform: Standard
- Look: Medium Contrast
[1.2] Viewport Shading
- Scene Lights: Enable
- Scene World: Enable
[1.3] Shader Editor -> World (Shader Type)
- Background Node
Color: FFFFFF
Strength: 0.00
I can't overemphasize the effect the Color Management properties have [1.1]. Together with the Curves and the White Balance panels in that section, Blender lets you adjust the tone and the intensity of the highlights, the midtones and the shades of the scene, wholesale, per R, G or B channel, if that's what you need.
Enabling Scene World [1.2] is somewhat counter-intuitive. It disables the Studio Lights. Checking it is also a requirement for controling the background lighting via the Shader panel [1.3].
[2.0] Light and Shadow Linking Property
Select particular light object
Object Properties -> Shading -> Light Linking or Shadow Linking
- Drag object from View Layer to link light or shadow
If there's one feature of the Blender lighting system that diverges from real-world studio lights, it's the light and shadow linking properties. The basic idea is that, to achieve creative effects, we'd like particular elements (objects) of the scene to be highlighted or to cast specific shadows, with the others excluded. In the real world we'd resort to gobos and reflectors to block, to channel or otherwise shape the light source. This Blender feature [2.0] achieves that goal, creating what I imagine are "virtual lighting groups" that interact with specific light sources, to the exclusion of others not part of the group. It really gives us great control over the lighting system.
Anyhow, that's all I've got. You probably know that shader configuration plays a big role in color and contrast; same with the Blender compositor. I'm no expert by any stretch of imagination, so the notes I've shared above may not be as precise as seasoned Blender users may prefer it to be.
Cheeers!
Here is a simple scene I used for comparison, similar in theme as a gunned fighter in a sci-fi room. I met two difficulties, first the DOF in blender is off, this is a bug now reported to Thomas. The f-stop in daz studio seems off compared to a real camera, while blender does it right. As a result we have to divide by ten, blender f-stop = daz f-stop / 10. The second issue is the default iray tone mapping is very different from the khronos blender view, so I used a standard view with mid-low contrast instead. Other than that the scene compares quite fine.
Test scene provided.
https://github.com/Diffeomorphic/import_daz/issues/43
steps:
https://www.daz3d.com/sci-fi-corridor-b
https://www.daz3d.com/monique-8
https://www.daz3d.com/pony-knots-for-genesis-8-females
https://www.daz3d.com/shadow-thief-outfit-for-genesis-8-female-s
https://www.daz3d.com/blade-weapons
I appreciate all your input and your work. The problem here is me not knowing how to render it properly so my finished product is presentable. You've given me much to think about and explore, thank you for that.
update. important. iray mesh smoothing aka cycles sharp edges.
In my images above you can notice some difference in reflections. This happened because I didn't check "sharp edges" in the global settings. That is especially important for environments and props as it mimics the iray mesh smoothing angle in blender. Below the difference with and without "sharp edges".