(Released) "Wayfinder Sign Generator" (Commercial)
 V3Digitimes
Posts: 3,432
V3Digitimes
Posts: 3,432
You can find it here : https://www.daz3d.com/wayfinder-sign-generator
Hi everyone! Happy to share my latest Daz product: Wayfinder Sign Generator, which will soon be released. As usual, this thread is here for any questions, feedback, or remarks you might have.
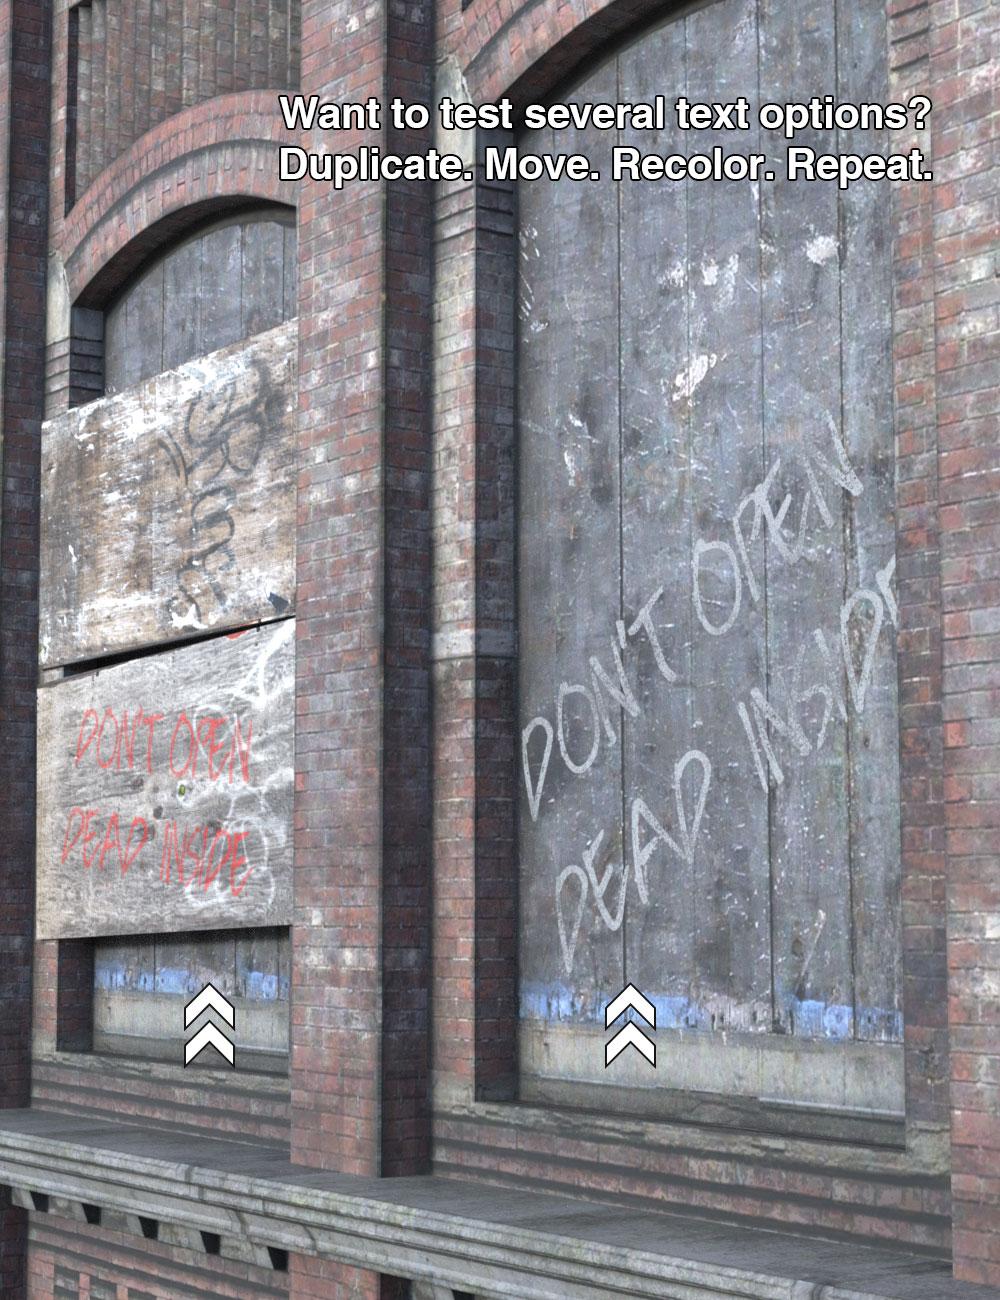
Design smarter. Render cleaner. Build signs with purpose. Pass the message!
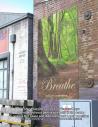
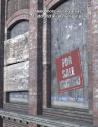
From grimy alley warnings to polished hotel room plaques, Wayfinder Sign Generator gives you total control over signage in your 3D worlds.
Modular, script-powered, and renderer-safe, this toolkit lets you write directly on your panel surfaces, layer grunge, customize frames, and mix pictograms — all with zero texture baking or LIE.
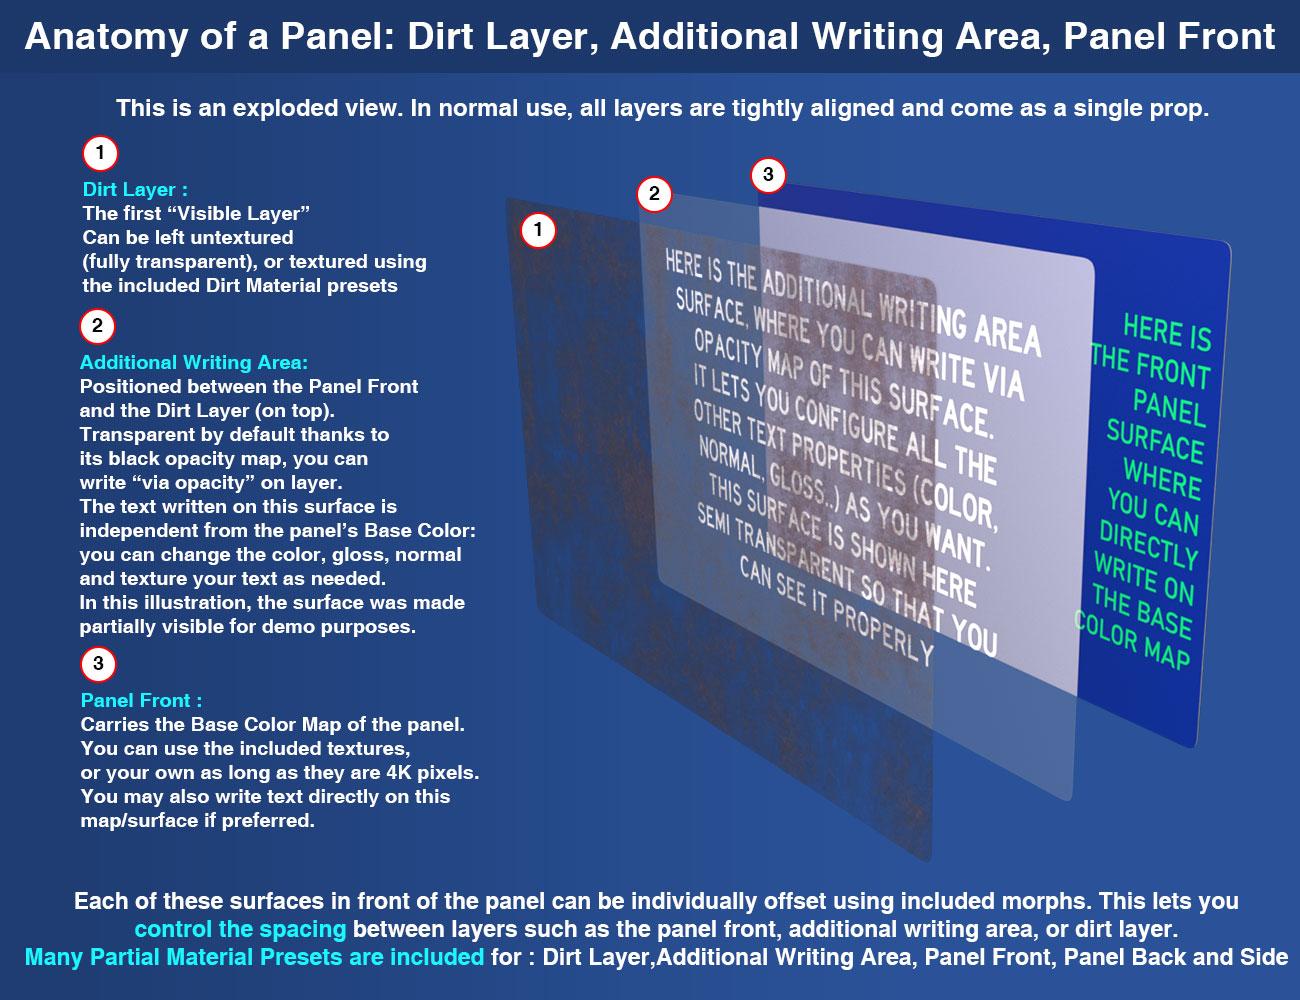
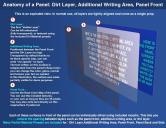
At the core of this flexibility is a smart surface architecture: each panel includes a Front Panel, an Additional Writing Area (used for text by transparency), and a Dirt Layer.
You can blend these independently for full control over visual style and material logic.
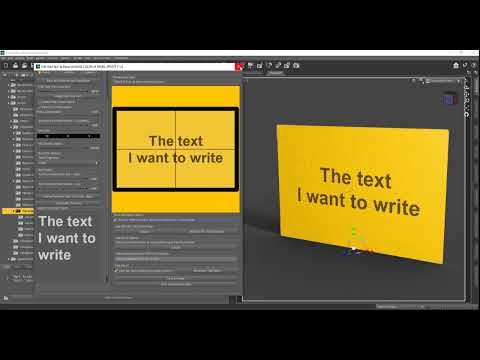
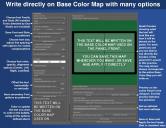
Write what you want, where you want:
Two very intuitive scripts are included, allowing you to write any text, in any font you own — either directly onto the Front Panel, or, for more flexibility, onto the transparent Additional Writing Area placed between the front and the dirt layer.
This second method offers advanced blending modes: solid, weathered, faded, or even textured. You can adjust these at any time after the text is added.
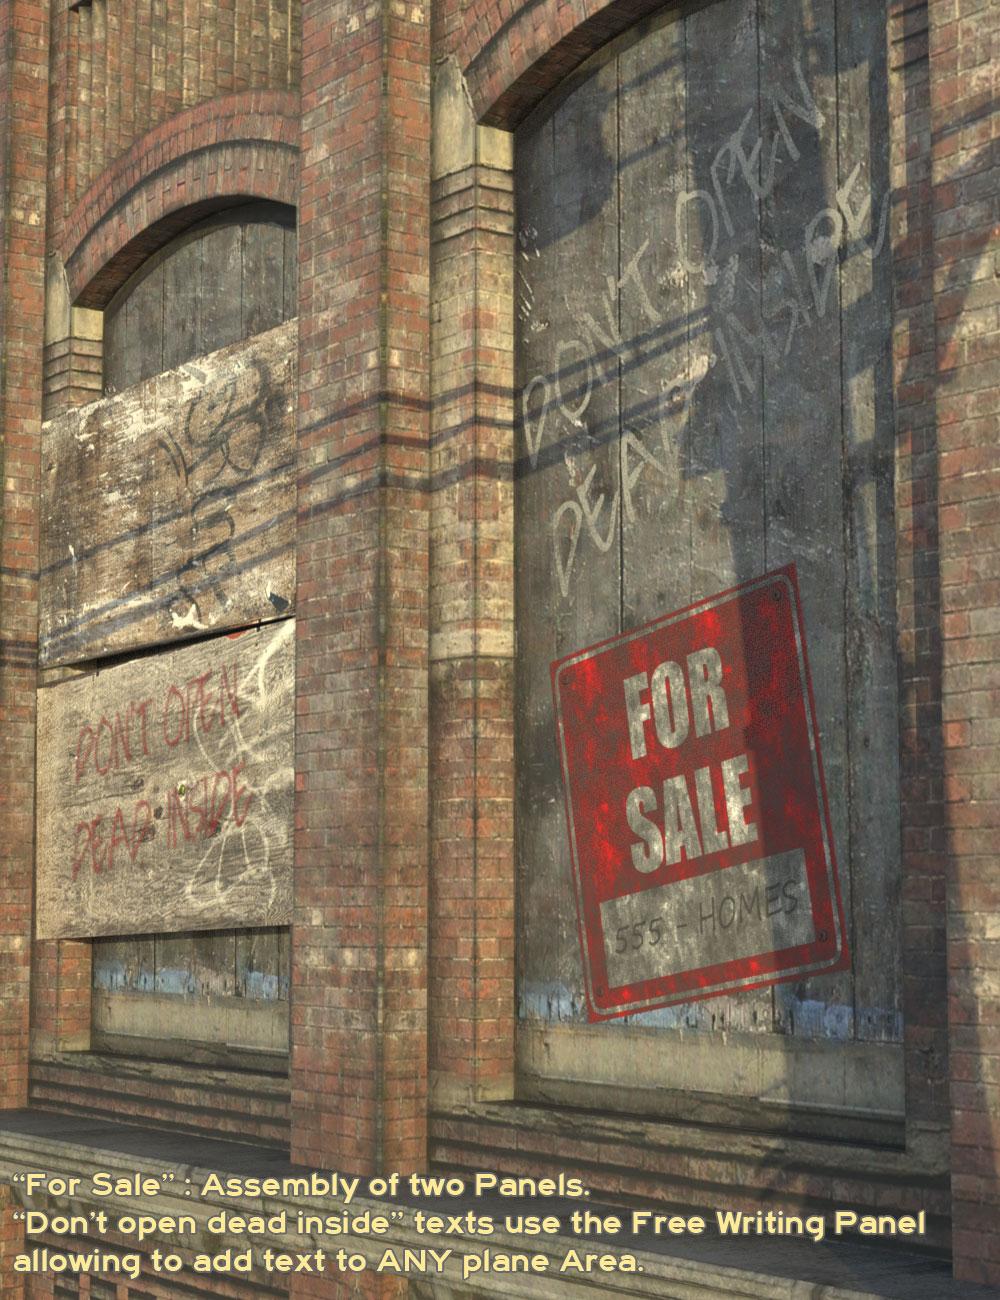
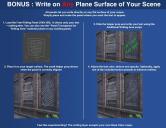
A unique feature lets you write on any flat surface in your scene, thanks to the included universal Free Writing Panel prop or to material presets.
And here’s the trick: you can make the panel itself completely transparent, so that only the text appears, as if it were painted or printed directly on the scene surface behind.
In both cases, just pick a font, adjust color and opacity, and your message is ready.
And because only the cutout opacity is driven by the text, all other material properties remain fully editable — so you can endlessly tweak the look and feel of your message without ever baking anything or rewriting it.
Build signs your way — fast or fine-tuned:
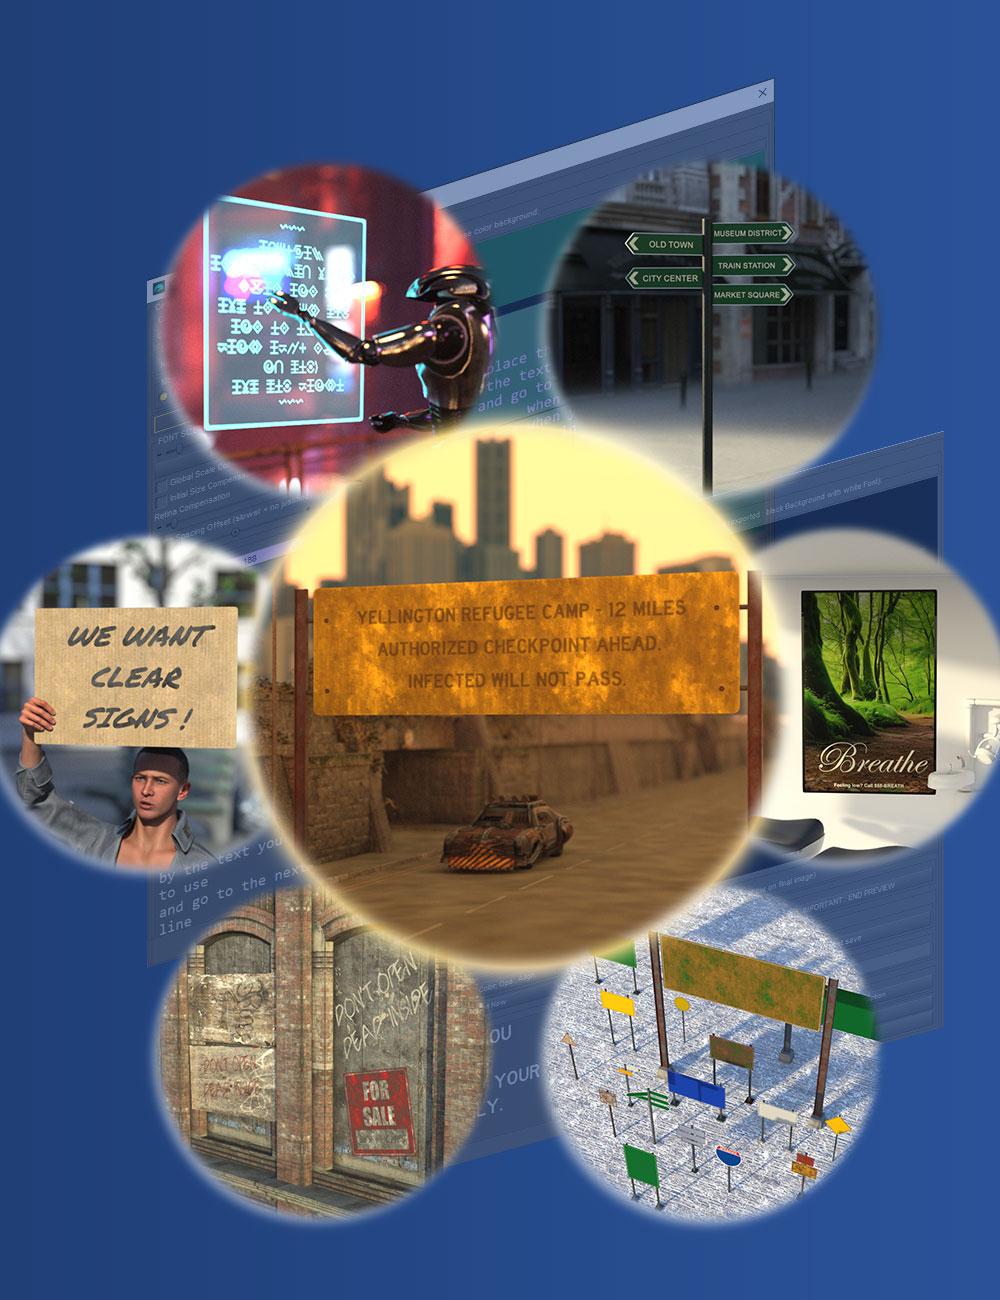
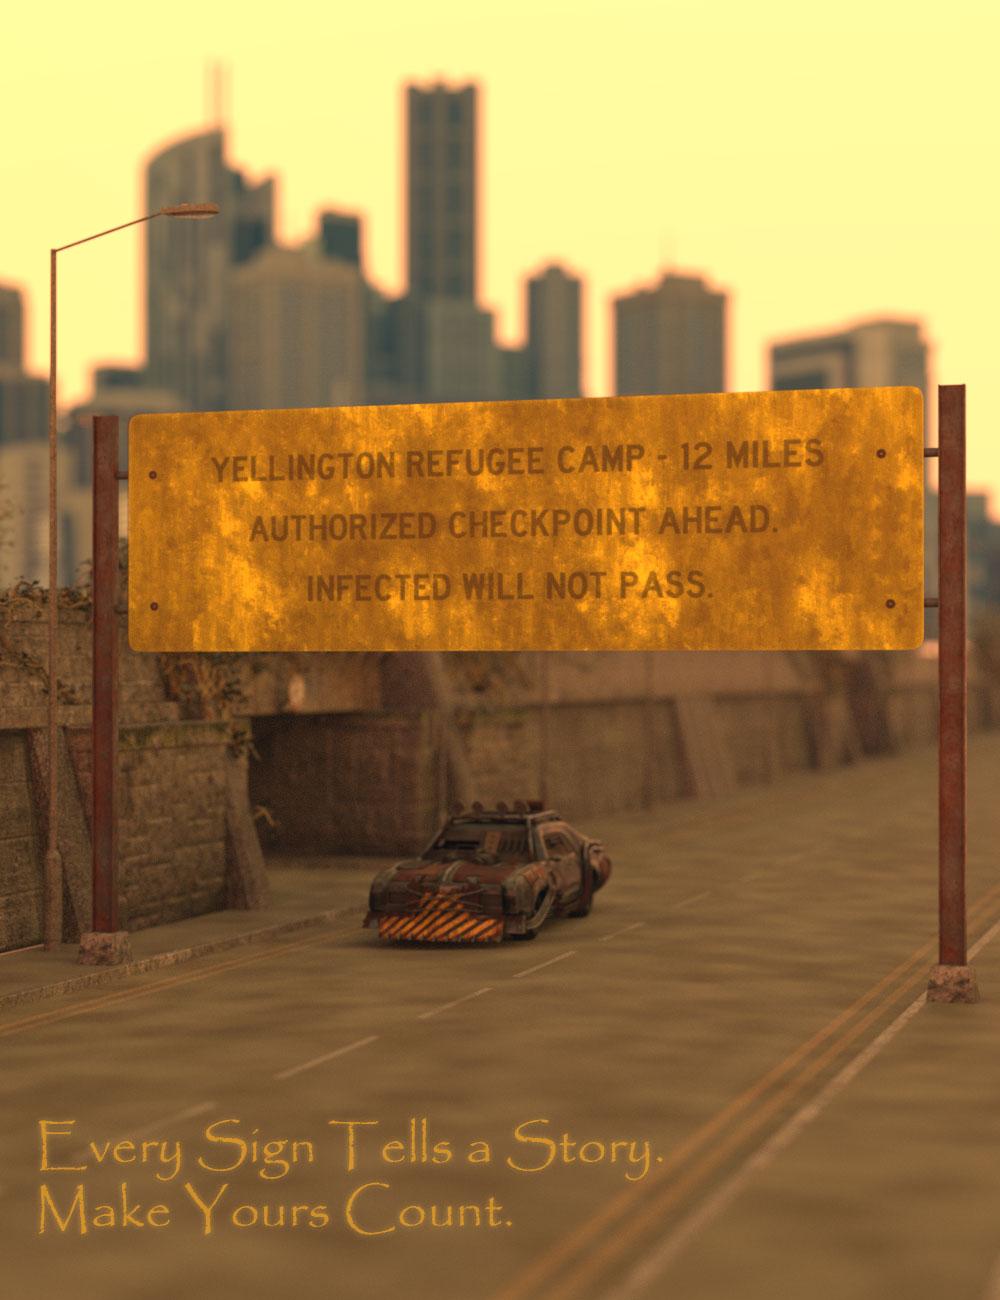
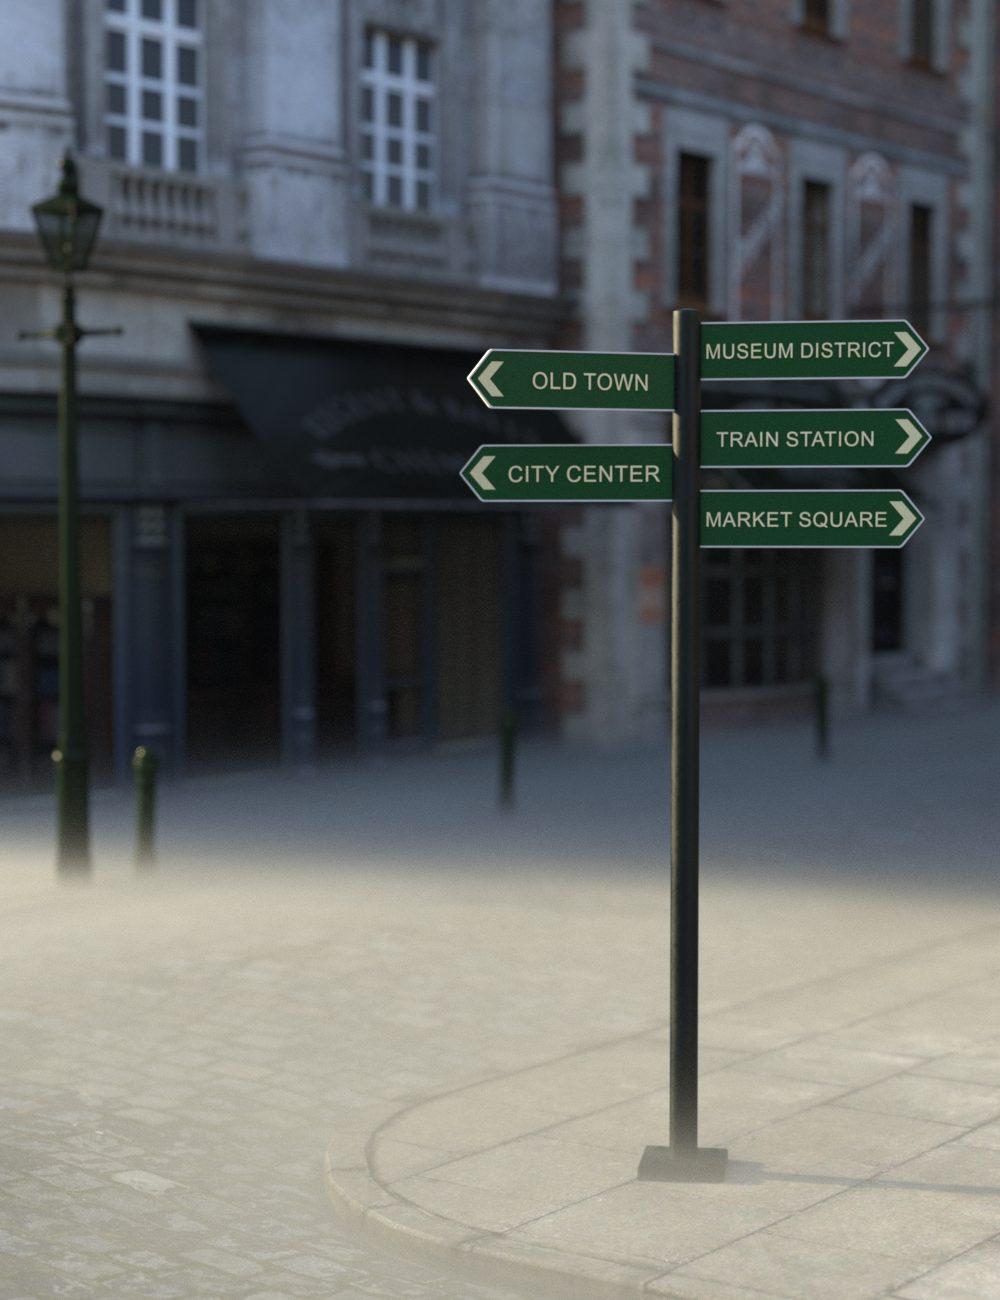
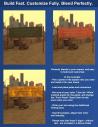
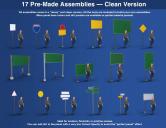
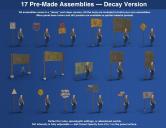
You can use the 17 preassembled signs, all provided in clean and decay versions, or build your own from scratch.
- Mix modular components: poles, screws, connectors, and panels. Over 100 individual props are included to let you build exactly what your scene requires.
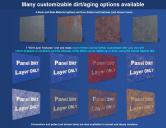
- Add dirt, rust, or weathering effects to the front, the back, or both, using 38 partial material presets designed for this purpose — fully customizable after load (color, opacity, etc.)
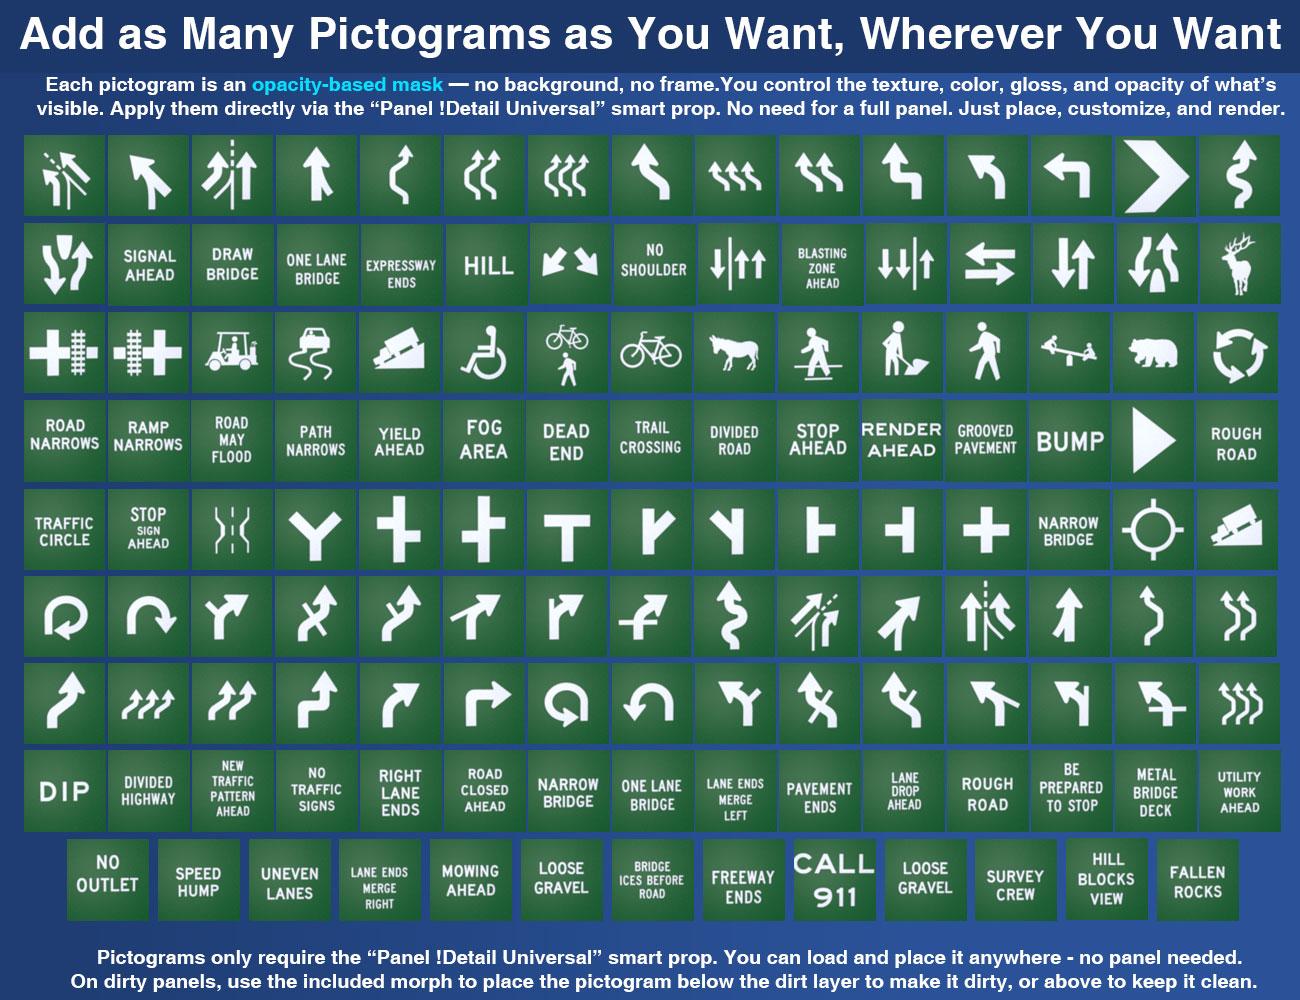
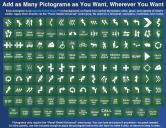
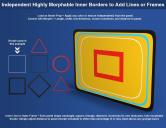
- Insert pictograms as smart props using opacity maps — more than 130 patterns included, clean or damaged, aligned or off-kilter.
(Note: pictograms don’t carry their own dirt layer, but if placed under the panel’s Dirt Layer, they’ll inherit its weathering naturally.)
Beyond the system — full freedom with individual props
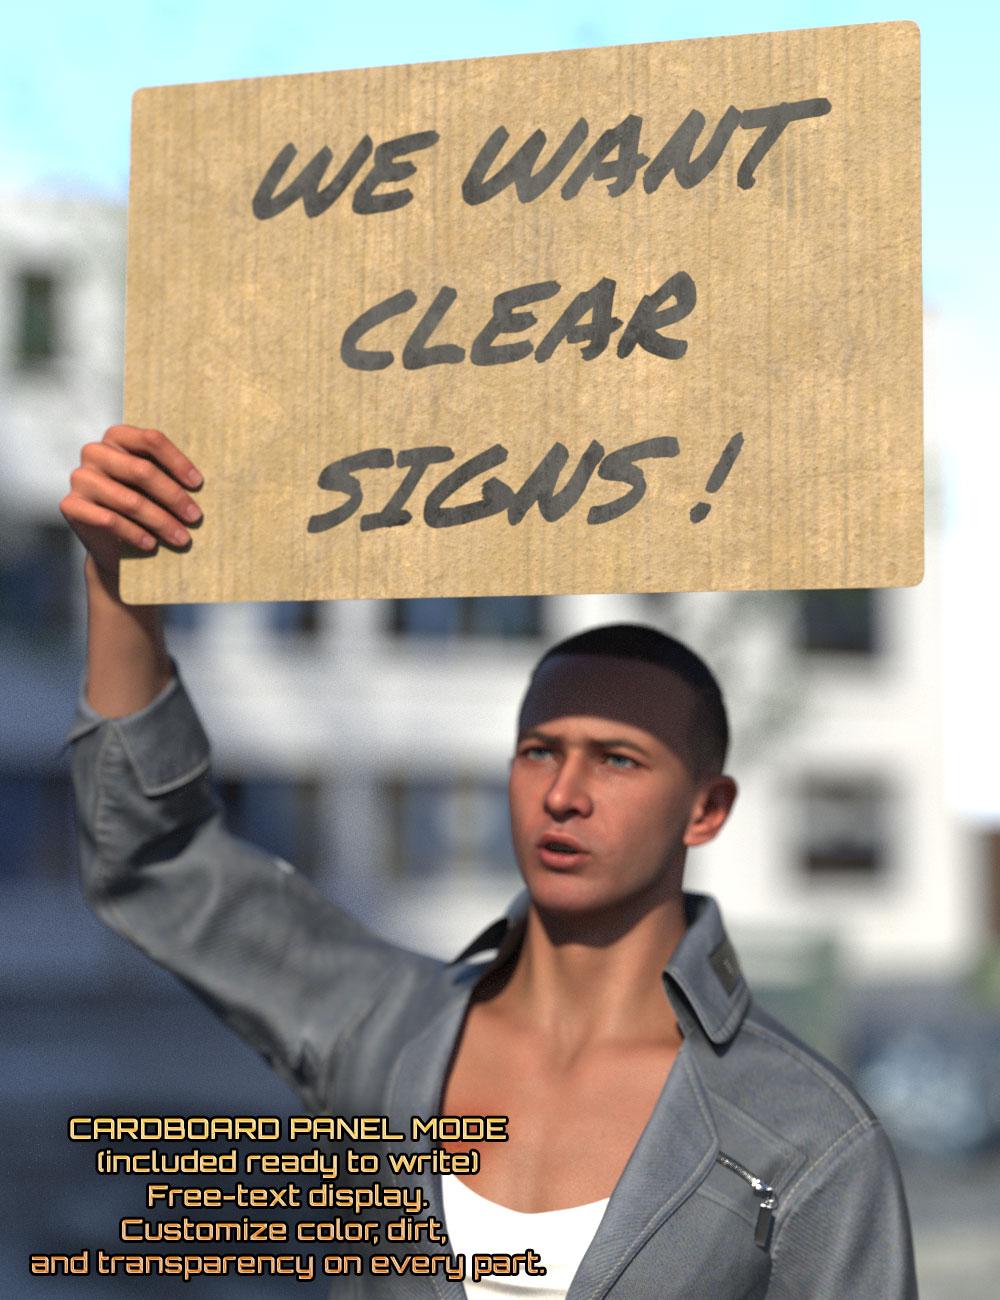
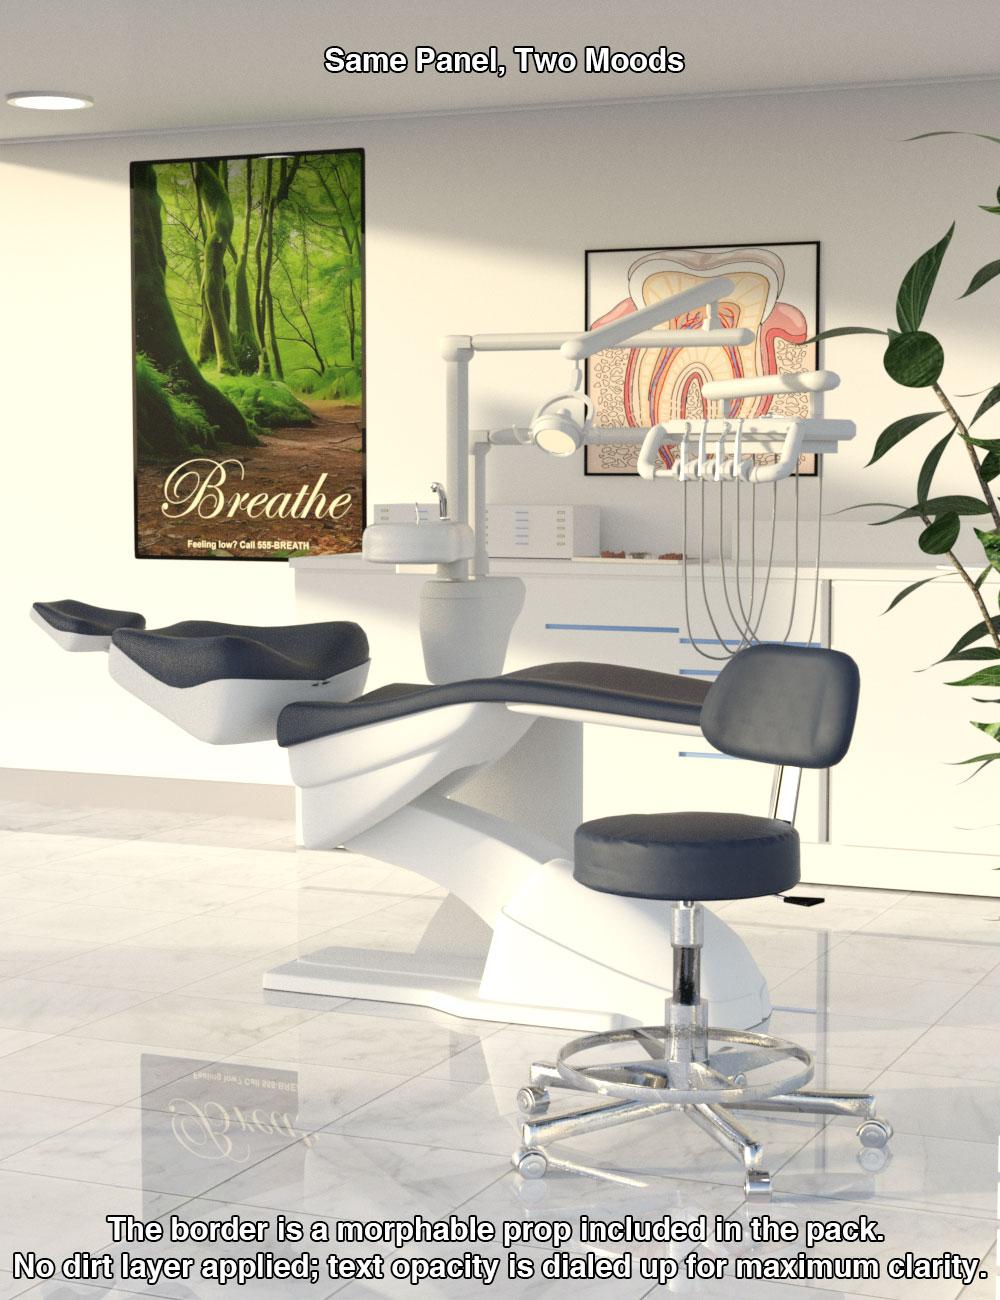
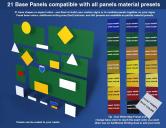
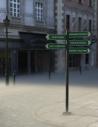
All panel shapes (rectangle, square, triangle, diamond, circle) are also available as standalone props, ready to use in any context. Resize them, rotate them, and place them wherever you want: on a mailbox, a fence, a doorframe, a wall...
Add house numbers, street names, locker or mailbox labels, “No Trespassing” signs, hotel door plaques, warehouse markers, zone IDs, public signage, sci-fi caution labels — or go large-scale with full billboards, dystopian alerts, or sprawling industrial ads.
The partial material presets and scripts work whether the panel is part of a full sign or used on its own. You keep full control over text, grunge, and style — no baking, no tricks, just direct feedback.
Anywhere a sign is flat — or if any flat surface in your scene calls for a message — Wayfinder Sign Generator is here for you.
You don’t need this tool… unless you care about quality, speed, and storytelling.
Warning: Not owning this product may cause existential discomfort and severe side-eye from your creative self.
Note:
This product is made for DS 4 and is also partially compatible with DS 2025 (tested on my current build). You may encounter in DS 2025 significant limitations when adjusting font styles—fingers crossed that Daz will sort this out soon!
You can find a full video presentation here :


Daz 3D is part of 
Connect
DAZ Productions, Inc.
7533 S Center View Ct #4664
West Jordan, UT 84084
Licensing Agreement | Terms of Service | Privacy Policy | EULA
© 2026 Daz Productions Inc. All Rights Reserved.
Comments
Oooh nice, and very useful it seems! Will be sure to get it once it's in the store.
Thanks for your support! I hope you'll love it!
@V3Digitimes - I have several of your script products and love them - most ntoably, Scene Optimizer and V3D HDR Master Bundle. I look forward to Wayfinder Sign Generator since I have been wanting to explore more about adding text to surfaces with other store products that I have but your new product sounds like it will be much easier.
Where has this been all my life??!! Can't wait to start putting this to good use!
Do I throw my cash at you now? Or wait until it's released?
OMG - I've been doing this in several steps for each sign/poster - can't wait!
Write Idea : Haha, I wasn’t ready for that level of enthusiasm — but I’ll take it! I wasn’t expecting flying money, but I’ve noted your gesture for the archives :) The product isn’t out yet, but it’s stretching, doing warm-up poses and checking its shaders. Stay tuned — it’s almost ready to step on stage!
I love this! But I got to the pictorgram image and my brain hit the brakes. I had my normal reaction of coming into a new location on the road at (35, 45, 55, 65, 70 mph) speed and have to interpret those signs and know what I needed to do in a split second. You did a great job with those selections. I need a reboot now. Going to look at pictures of kittens on You Tube with my cats.
Mary
Wow! The mind boggles at the possibilities!
Wow! V3Digitimes, you outdid yourself once again!
Looking forward to purchasing this - will surely save me much time - as I normally just create a primative and shoot & peck to fit my own jpg onto it.
Also, know that I am thumb 2 on your great tutorial/intro video on youtube.
Thank you
And it is released : find it here : https://www.daz3d.com/wayfinder-sign-generator
And purchased!
Cart bought, it's mine to use. Thank you so much.
Could not resist it either.
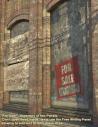
Below is a quick test.
Ahah @Artini! Thanks for sharing — I wonder how many times you’ve already been the very first to post an image on one of my threads XD
I hadn’t noticed the background panels at first — nicely done! I love how naturally they blend into your scene. I was too busy scanning for the Dino, of course.
If I may sneak in a tiny tip: the text on the Dino warning sign looks super clean, even with the dirt overlay. If your goal is photorealism and you used the additional writing area, you might consider going for a deeper red and lowering the cutout opacity just a bit (of the additional writing area surface). But if the goal is to make the panel stand out in the scene to save people's lives, then leave it as is — it definitely gets the message across. A solid, fair Dino warning !!! ;)
Thanks again for sharing!
So I guess the text itself can't be "aged"?
The text ITSELF CAN BE AGED.
For this : you have a simple way to achieve that :
1/ Write using the Additional Writing Area.
2/ Load one of the three material presets included to "texture" text on this area (adds a gray level "grunge" map to the base color of the text).
3/ Change the Base Color "Color" or its opacity.
2/ step 2 has a variation : load your own grunge map if you prefer on the Base Color of this layer.
You can even map the opacity of the text itself.
For this : 4/ (bonus tip) : Left click the Cutout Opacity Map(it's a black map with white text) in the surfaces editor. Choose Layered Image Editor. Layer a grunge map of your choice with the "text" cutout opacity map in a multiplicative blend mode.
Said differently :
--> You can age the text Base Color: Directly using the presets + recolor
--> you can even "grunge" the opacity of the text using a multiplicative LIE blend of any grunge map of your choice over the cutout opacity map.
No preset was included for that bonus /4 step because :
- I planned to mention it here (done!)
- Everybody is able to do it, and the product was already very complex in term of the amount of things which can be done.
Thanks for the comments and tips, @V3Digitimes
Just added a little blur to the generated Panel Image and below is the result.
Just wonder, if that makes it looks bettter...
@Artini : I clearly prefer the version with the blur (even if this method is not amongst the methods I recommended above, because I try to stay on a Daz Studio Only process). but feel free to try a lower opacity too. After writing litterally hundreds (if not more) panels during the development stages, I realised that adjusting the Cutout Opacity dial of the Additional Writing Area is really a game changer concerning all panels : new (a bit), and grunge (a lot). Plus if you're not happy, just undo, so no risk to try (if you followed my recommendation to use the additional writing area of course). But your image is cool this way, so if you like it, don't touch the panel any more.
Plus, I also like the global image better, the way it is framed, the elements added : the first Dino is easier to find . And the giant worm gives an intersting point of interest ;) ... Thanks for sharing once again!
Thank you!
Am I wrong in thinking that once a text image has been saved and applied, it can't be edited afterwards once the Write script has been closed?
@DoctorJellybean Here you are right: once saved — or saved and applied — the text cannot be edited anymore : it becomes an 'image with text'.
If you need to correct a typo or change a word, you have two simple options:
– Either undo, if it was your last action,
– Or just click the correct partial material preset: it will reset the panel.
If you wrote on the panel front, that simply means reloading the original material (the one with the partial texture).... Or reload your own custom map if you were working with custom maps.
If you wrote on the Additional Writing Area, use the V3D WFGzP Panel Addon Writing Area Text Remove preset (one of the first material presets): it gives you a fresh black opacity map to write on again.
If you want to add text instead of replacing it, my recommendation is to use the V3D WFGzP Free Writing Panel 100x100 prop located in the Bonus folder. (place it just in front of your panel, it also allows to mix font, font styles, font colors, etc. plus it is easy to move, scale, edit (color opacity gloss glow bump..)
One important tip: before closing the script, click the two “Set as Preferred” buttons. That way, the next time you open the script, it loads with the same settings — you just have to enter your new text.
(I personally write my text in Word first to check the spelling, and then copy-paste it into the text area.)
Already in my cart. gonna check out when I see my direct deposit in my bank account. Thank you Very much V3Digitimes!