Help Rendering Skin in iRay
 producerishmoney
Posts: 3
producerishmoney
Posts: 3
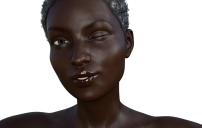
So I'm practicing creating new skin tones, mostly darker tones, for Genesis 3 Females as the are no avilable yet. I'm using the Eva 7 material and ONLY changing the Base Color and the Translucency settings.
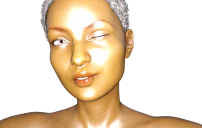
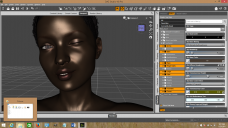
My first attempt was very succesful (first Image). Now here on my second attempt (second image), It should look similar to the first with a greener undertone. Here are the setting that I changed (third image). Perhaps something else is going on? I have absolutly no idea...
Daz 3D is part of 
Connect
DAZ Productions, Inc.
7533 S Center View Ct #4664
West Jordan, UT 84084
Licensing Agreement | Terms of Service | Privacy Policy | EULA
© 2026 Daz Productions Inc. All Rights Reserved.
Comments
Can you clarify a bit further? Your title says "3d Delight" which implies you want to use 3Delight as rendering engine. However, the surface properties pane in the third screen shot says "Iray Uber", which is generally not suitable for 3Delight rendering, but rather for Iray. Anyhow, the second image looks like an Iray render though (grainy) so I assume that for now and it looks way overexposed. It might be that there is a headlamp on, which usually overexposes an image if there are other light sources like an environment or so. You can also tune the tone mapping settings.
Any further information on render used, render settings, and light set-up would be of help.
My apologies. Someone told me that I wasn't using Iray. I'll change the title.
But no ma'am/sir there aren't any light sources. Generally what happens is it starts out rendering the correct color. Then somewhere down the line it "overexposes" it even affects the hair...Also it seems to only do this with my preset camera, pose, and hair added to the scene.
Thank you
By default there is an environment light on (this is in the render settings, not in the scene) and also by default there is a headlamp on (as the auto setting does not detect the environment light). The headlamp can be disabled in the render settings to aways disable all headlamps or in the camera settings. It definetely looks like a lighting/overexposure issue primarily and not a surface setting issue. Tone mapping settings are in the render settings (see attachment).
Thanks! Though it seems now I have to play with the light settings as the default is a bit dark. I don't know why the first render behaved normally and these are messing up...