• Daz 3D
  • Shop
  • 3D Software
    • Daz Studio Premier
    • Daz Studio
    • Install Manager
    • Partnerships
    • AI Training data
    • Exporters
    • Daz to Roblox
    • Daz to Maya
    • Daz to Blender
    • Daz to Unreal
    • Daz to Unity
    • Daz to 3ds Max
    • Daz to Cinema 4D
  • 3D Models
    • Genesis 9
    • Genesis 8.1
    • Free 3D Models
  • Community
    • Gallery
    • Forums
    • Blog
    • Press
    • Help
  • Memberships
    • Daz Premier
    • Daz Plus
    • Daz Base
    • Compare
  • Download Studio
ADVANCED SEARCH
  • Menu
  • Daz 3D
ADVANCED SEARCH
Add image
  • Shop
  • 3d Software
    • Daz Studio Premier
    • Daz Studio
    • Install Manager
    • Partnerships
    • AI Training data
    • Exporters
    • Daz to Roblox
    • Daz to Maya
    • Daz to Blender
    • Daz to Unreal
    • Daz to Unity
    • Daz to 3ds Max
    • Daz to Cinema 4D
  • 3D Models
    • Genesis 9
    • Genesis 8.1
    • Free 3D Models
  • Community
    • Our Community
    • Gallery
    • Forums
    • Blog
    • Press
    • Help
  • Memberships
    • Daz Premier
    • Daz Plus
    • Daz Base
    • Compare

Notifications

You currently have no notifications.

Loading...
    • Categories
    • Recent Discussions
Daz 3D Forums > 3rd Party Software > Blender Discussion

Transferring Vertex Groups (Hair Particle System workflow)

lilweeplilweep Posts: 2,746
September 2022 edited September 2022 in Blender Discussion

Goal

I made a particle system hair on one Diffeomorphic-imported figure and I want to use it on another Diffeomorphic-imported figure.

Problem

I have not had much success transferring the particle system hair across to different figures.

The actual Particle System itself (i.e., the style curve particles) can be transferred over easily enough by copying modifiers, but the corresponding Vertex Groups that define the hair density do not transfer properly from one mesh to another.   So only the particle strands show but none of the children strands show.

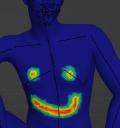
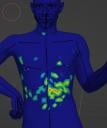
When I attempt to transfer the Vertex Groups by transferring mesh data (either by using Ctrl+L or ortherwise by using a Transfer Mesh modifier), the results are always the same.  The Vertex Group gets distorted as per pictures below.

Attached images

  • 1 = the vertex group i want to transfer
  • 2 = the result of using the transfer mesh modifier shown in 3
1.JPG
513 x 547 - 28K
2.JPG
601 x 722 - 39K
3.JPG
391 x 388 - 31K
Post edited by lilweep on September 2022

Comments

  • lilweeplilweep Posts: 2,746
    September 2022 edited September 2022

    I assume someone else has already worked out a functioning workflow for using Particle System hair and transferring between different meshes, so might help if someone outined that for me here, since that is my endgoal anyway.

    I already attempted a workaround.  Instead of using Vertex Groups, I'm trying Textures to drive the density and clumping and this approach is only somewhat functional.

    One of the problems is that it stops the Cycles render in viewport for some reason (and no I dont have pause preview render clicked). 

    In general Texture painting gives more finesse in describing the areas to grow hair but seems to be a lot laggier because I guess its culling the hair density after the fact rather than before?  I would much rather use Vertex Groups as the primary way to control the Density, and then maybe only use Texture to further refine it if needed.

    Post edited by lilweep on September 2022
  • lilweeplilweep Posts: 2,746
    September 2022

    So y'all are really out here remaking your particle hair every time you want to use it on another character huh?

  • andya_b341b7c5f5andya_b341b7c5f5 Posts: 694
    September 2022

    Have you tried the Copy Vertex Weight to Selected option in the Vertex Group Specials menu, or enabling the built-in Copy Attributes Menu add-on and using Ctrl-C?  Both work for me, with objects that are copies of one another so vertex number and order are identical.  I doubt it will work (well) by any method otherwise.


    Screenshot (116).jpg
    322 x 597 - 52K
    Screenshot (117).jpg
    1919 x 1021 - 319K
  • Krys KryngleKrys Kryngle Posts: 312
    September 2022

    Make your particle hair on a separate mesh and then wrap/parent that mesh to the character.  This is pretty common practice.  Many hair styles that you import will already have the hair attached to a separate mesh, often called the 'scalp' for head hair.  You can then import the 'scalp' mesh into another project and it will bring the particle system along.

  • PadonePadone Posts: 4,003
    September 2022

    If the figures are the same generation you don't need to transfer but just to copy because the vertex number and order will be the same.

  • lilweeplilweep Posts: 2,746
    September 2022

    andya_b341b7c5f5 said:

    Have you tried the Copy Vertex Weight to Selected option in the Vertex Group Specials menu, or enabling the built-in Copy Attributes Menu add-on and using Ctrl-C?  Both work for me, with objects that are copies of one another so vertex number and order are identical.  I doubt it will work (well) by any method otherwise.

    hmm tried both and neither worked:

    • Copying the Vertex Weight to Selected on Vertex Groups Specials menu
    • Copying using copy attributes add-on

    Maybe the topology hasnt been preserved

    Padone said:

    If the figures are the same generation you don't need to transfer but just to copy because the vertex number and order will be the same.

    Does merging geografts maintain vertex order (assuming the two figures are same generation and geografts are the same)?

  • PadonePadone Posts: 4,003
    September 2022

    @lilweep May be I don't know, but you better copy the maps before merging the geografts, or editing the geometry in any other way.

  • lilweeplilweep Posts: 2,746
    September 2022

    Okay, I did some experiments and confirmed that merging geografts does not conserve vertex order.

    Whatever happened to the Geometry Nodes option?

    Capture.JPG
    629 x 904 - 112K
  • lilweeplilweep Posts: 2,746
    September 2022 edited September 2022

    Krys Kryngle said:

    Make your particle hair on a separate mesh and then wrap/parent that mesh to the character. 

    how do i do this, by the way? (the wrapping/parenting part)

    Post edited by lilweep on September 2022
  • PadonePadone Posts: 4,003
    September 2022

    @lilweep The geometry node option is there as always, though I wouldn't advise to use it in production since geometry nodes are experimental yet.

  • lilweeplilweep Posts: 2,746
    September 2022

    Padone said:

    @lilweep The geometry node option is there as always, though I wouldn't advise to use it in production since geometry nodes are experimental yet.

    is it tho? (version 1.6)

    Capture.JPG
    497 x 337 - 27K
  • PadonePadone Posts: 4,003
    September 2022

    You're probably using an old version of the plugin, you need to get the dev version for the new features.

    version.jpg
    229 x 235 - 16K
  • lilweeplilweep Posts: 2,746
    September 2022

    oh

Sign In or Register to comment.
Adding to Cart…

Daz 3D is part of Tafi

Connect

DAZ Productions, Inc.
7533 S Center View Ct #4664
West Jordan, UT 84084

HELP

Contact Us

Tutorials

Help Center

Sell Your 3D Content

Affiliate Program

Documentation Center

Open Source

Consent Preferences

JOIN DAZ

Memberships

Blog

About Us

Press

Careers

Bridges

Community

In the Studio

Gallery

Forum

DAZ STORE

Shop

Freebies

Published Artists

Licensing Agreement | Terms of Service | Privacy Policy | EULA

© 2025 Daz Productions Inc. All Rights Reserved.