Iray - Tips and Tricks
 Dumor3D
Posts: 1,316
Dumor3D
Posts: 1,316
Thought this could be a good topic. :)
To kick things off, here is one method for using HDR sets with Iray. This avoids the washed out look on bright HDRs.
I downloaded the free Summi Set from http://hdrlabs.com/sibl/archive.html.
This is actually what is known as a sIBL set. sIBL sets have some parts that can't be used with Iray. Many sIBLs contain several files with unique purposes. In the Summi set you will find
Summi_Pool.ibl - an information file which can contain lights. We can't use this with Iray.
Summi_Pool_3k.hdr - this is the high dynamic range high quality panorama image. Many times these can be used in Iray as is to create a nice background/dome. I find that if the image is bright sun, it doesn't work really good but instead looks faded or washed out. Shady scenes generally work really good. I chose Summi to show a work around for a sunny scene.
Summi_Pool_8k.jpg - a high quality jpg panorama. This match the .hdr file above
Summi_Pool_Env.hdr - this is a fuzzy image, not meant to actually be seen, but instead meant to be used as the lighting in the scene.
The preview and thumb images are just a part of the packaging.
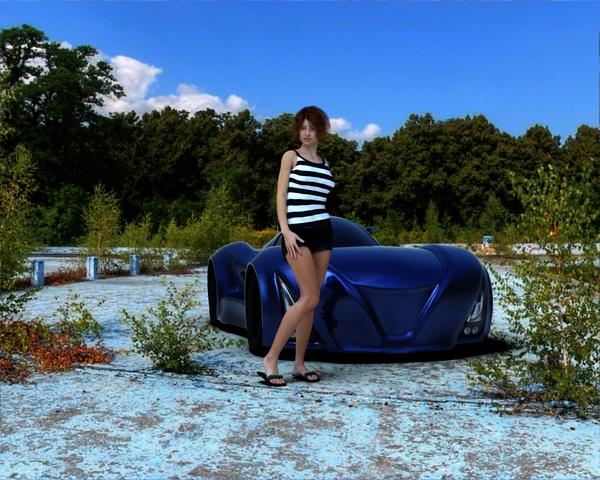
To get started, build your scene, I've added V6HD appling the Iray shaders while maintaining the skin images. And tossed on some clothes and a pose. Also, the GTX-R car, setting body paint and glass to Iray shaders. This gives a nice cross section of both hard and soft surfaces.
I then loaded the Summi_Pool_3k.hdr image into Render Settings -> Editor Tab -> Environment -> Environment Map. Also under Environment, I set the 'Dome Mode' to 'Finite Sphere' and the 'Dome Scale Multiplier' to '10'. This allows me to move the camera around a bit, zoom the scene in and out while V6 and the car remain in scale. Basically this is the point where I lay out the scene and the camera angle.
At this point, I turn off the camera headlamp under 'Parameters' -> 'Headlamp'. Then in the scene tab I hide everything in the scene. This leaves only the hdr map showing. I go back to 'Render Settings' -> 'Environment' and this time load Summi_Pool_8k.jpg. Now we need to adjust the exposure level of this image. This will vary by the image you use. For this one from the Summi set, I used:
Environment Map to 1.00
Under 'Tone Mapping', I set the F/Stop to 6.00. (you'll notice a change in Exposure Value when you do this... don't worry). I then set Gamma to 1.0. The preview in the Viewport in Nvidia mode looks pretty good to me now.
I then set the render size for what I want as my final output under General. All this time I make sure I haven't moved my camera. I then click render. This should render at break neck speed. :) Save out this image to a place where you can find it.
Now go to the 'Environment' tab... (not under Render Settings). In the pulldown choose 'Backdrop'. Load the image you just created in for the Background.
Now lets head back over to the 'Render Settings'. Under Tone Mapping, reset Gamma to 2.20 and F/Stop to 8. Under Environment, Reset the Environment Map to 2.00 and now load the Summi_Pool_Env.hdr (you won't see it due to the backdrop and it is a much smaller file size than the full .hdr image). Now it's time to turn everything back on in your scene. We now have a hdr image used as the light source, and since we have not rotated or zoomed the camera, the light from the hdr perfectly matches that of the backdrop. You can adjust the Environment intensity or Map or Tone Mapping for the final render. With this particular Summi set, I felt the lighting or exposure was about right without any further adjustments. With some images, I've added additional lights or even created a sun from a sphere primitive.
OK, so I'm not about to say this is a great render or anything, but the lighting on both the car and V6 matches the lighting of the enviroment/dome. To me it is believable. On my laptop with a GTX680M, the final render converged in about 6.5 minutes and around 2000 iterations.
Below is the backdrop image created and then the final render.

Daz 3D is part of 
Connect
DAZ Productions, Inc.
7533 S Center View Ct #4664
West Jordan, UT 84084
Licensing Agreement | Terms of Service | Privacy Policy | EULA
© 2026 Daz Productions Inc. All Rights Reserved.
Comments
The following shows the issue with using brightly lit HDRs in the Environment Map channel.
The first image has no backdrop and the jpg file was used as the Environment Map.
The Second image, again no backdorp and the ENV.hdr file was used. Again, files named ENV.hdr are normally meant to be used for the light source.
The Third image uses no backdrop and the .hdr file.
You can see that the background is not realistic.
The Fourth image uses the backdrop from the post above. A sphere was added and set emissive. It was positioned behind the camera and above and to the left. Basically an attempt to mimic the shadows cast on the concrete by the plants. I also toned down the metalflake effect on the car paint as I was getting some new shiney bits from the sphere/sun.
Thanks so much for this, Dumor3D.
I hope it is ok to ask a question on this beautiful, clean thread. :)
I am a little confused with what you are doing with the mats.
First you put in the .hdr then set up the scene and camera. Then you take the .hdr out and put in a jpeg? Are you rendering out an image between those two steps? Are you putting the jpeg in a different, secret slot?
Using the Jpg was so washed out when working with the viewport set to Nvidia mode, that I find it easier with most of these sets, to use the .hdr for the setup. As you can see in the second post, the .hdr image is second best to the ones using the backdrop. Well, LOL... one could argue the second best was the ENV.hdr... a nice clean look, but not what I was after here. :)
As for keeping this thread clean. That would be a good idea so things don't get totally buried, but certainly questions to clarify things are absolutely welcome. I do hope others will contribute their tips and tricks.
I'll add to this.
First, a simple thing that can get over looked. Both of the new lights can be turned into what are essentially mesh lights. In their settings panel change the light geometry to something other than point and adjust the height and width to a size you want. I find them much easier to control this way, rather than using a material with emission settings.
To add to the HDR discussion, not all HDRs are created equal. HDR's are created by combining images taken at multiple exposures so that essentially the whites are brighter than white. If you use an HDR of a clear sunny day or anywhere with strong light sources there should be defined shadows. There are a lot of HDR's out there (seriously I've collected so many) and some are good and some really aren't that much better than using a jpg. http://adaptivesamples.com/category/hdr-panos/ This guy has some really good free ones.
Oh, so THAT'S what that does! Thanks, Kamion, for the geometry note. That's going to save on some stupid lighting stuff on my part.
To expand a little on what Kamion99 said, there's basically two classes of HDRs. Those that are usable for just light information and those that are usable, also, as backgrounds. The problem is most of the HDRs that are/have been used in Studio are of the first group...they tend to be small in size (both pixel count and file size) and are often intentionally blurred. These can't be slapped up as a background and have any hope of clarity. The others are usually OVER 6000 x 3000 px and multi-megabytes in size. These are usually very clear and crisp...
A minimum for use as a background is probably 4K x 2K (8K x 4K is the minimum I like to use)...and then it wouldn't be a very detailed background. I've seen 'pro' grade HDRs in the 20K x 10K and weighing in at over 100MB.
Actually I'm talking about something different (Although the blurred mini-textures also don't create good shadows). Number of exposures used to create HDRs rather than just their resolution. You can have a 6000 x 3000 resolution HDR and your figures will still look out of place because while all the objects in the background texture have crisp shadows and your figure is standing on a blur. Unfortunately most people creating and (even worse) selling HDRs don't mention how many exposures they combined so it can be hard to tell.
I added 2 examples below the first one is lower resolution, but the objects fit better their lighting and shadows match the scene. The second uses a higher resolution HDR, but if you look the objects don't match the scene whigh has sharp shadows. To make it work you'd have to add in a sun. The only difference is the HDRs
There are a couple of places that do...and yeah exposures are another factor to consider.
Here's an article talking about that (yeah it's specifically for Vray and it is from someone who sells HDRIs for use with Vray...but )
http://www.aversis.be/tutorials/vray/vray-high-dynamic-range-hdri.htm
The free HDR site I linked is for sIBLs. They have an extra file in them that allows you to create lights within them. So, for softwares that support sIBL, and if the sIBL is a good one, there are extra lights in the scene which combined with the HDR, the ENV.hdr, there is a lot more information and the scene should look good or great.
I've spent a good bit of time on using HDRs with Iray and so far the only truly successful renders included using the backdrop in combination with the HDR. Some HDRs do work pretty good on their own. What I've found is the central portion, where you figures would be are in a shaded area and not bright sun. Of course use of a HDR for indirect lighting into a room works very good as long as there is not a super clear view to the outdoors through a window or opening.
The number 11 hdr in the second Yosemite set works really good as a standalone in Environment Map as it is a shaded scene.
My two favorites from there are Malibu Overlook and Ditch River...also any of the DutchSkies ones are pretty nice.
Now here's a quickie I did last night. Just the HDR...but it was a big one with a pretty good ev (over 20, if I remember correctly). I made sure the headlamp was OFF and that's about it...yeah, it could 'cook' a little longer, but I went with default values so it quit at 95% in about 30 mins on my 1 GB 430GT and dual core 3 GB HTPC....
Thank you for this great tutorial! I have been trying to muddle my way through the use of HDR images with Iray, with limited success and quite a bit of frustration. This has helped a lot.
I do have one issue. You suggest using the Summi_Pool_Env.hdr file on the dome for the final render. The problem with that is, you don't get good reflections of the sky, clouds, and other environment elements like the trees surrounding the scene. I realized this after testing your procedure, yielding this result: (Summi Pool test render 1 - using Env file for IBL)
Then I loaded the Summi_Pool_3k.hdr file onto the dome and rendered this: (Summi Pool test render 2 - using full HDR file for IBL)
I think it is a much better result. The render time did increase, from about 37 minutes to around 45 minutes, on my iMac system.
Regards,
~ Russ
Here's the second render.