UV mis-assignment/pile-up on export to Hexagon
 vlarge
Posts: 0
vlarge
Posts: 0
I've help-requested Daz about this and searched the web and forums high and low for a solution, but I haven't found an answer or directly related topic, which leads me to believe that I am (or my computer is) doing something very stupid, but also unusual. Great.
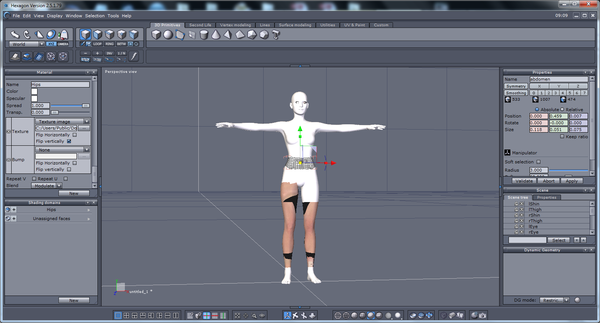
When I export G2F or other figures to Hexagon, the materials don’t load to the right parts, showing hand skin on their face or eyeball skin patterns (sclera and iris) on their legs or just a solid white where the material JPEG is blank. I also get a lot of “JPEG: Couldn’t load - file is probably corrupted.” on loading, but inconsistently: sometime a figure loads all blank (with the message) while other times some materials will load, but in the incorrect orientation or on an incorrect surface. What happened?! Is there a way to export to Hexagon and not have it look like a Picaso zombie?
Context: I'm trying to geograft a second thumb onto the other side of G2F's hand (the first of several increasingly complex geografts), and to this end I am trying to find the easiest way to do this, making UV mapping and rigging as simple as possible. I would think there would be a way to just copy-paste the thumb to the other hand and have that thumb UV remain associated with it, but I can't even get the materials to show on the normal figure, much less some part I cut-off and paste-on. It does seem like it should be relatively intuitive... but its not.
Note: Over the last week (and umpteen hours) I've already tried a wide variety of import/export setting adjustments (bridge v export v save as, import v open), import preferences-menu options in Hex, exporting with poser or hex settings or scales, different figures and material presets, flip textures on import/export, and res/subD changes, to no avail. I’ve also tried rearranging (reassigning) textures manually (a tedious and time-consuming process) that I know are not corrupt, but that only seems to more “JPEG: Couldn’t load - file is probably corrupted.” messages, the same as when I flip textures on importing the figure. In addition, when I flip textures manually (a fix that theoretically looks like it should work only for the few parts that aren’t misassigned) the material just disappears from the figure and UV-view, sometimes from surfaces I haven’t even selected.
All this stated, if ANYONE has a suggestion, I’m game. I am now right on the edge of throwing in the towel with Hex. It is buggy as ****. Often I have to go through ridiculous means to even get the material palette itself to load.
Note2:
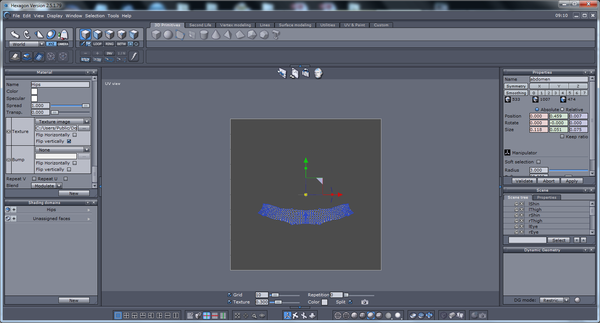
In the some of the pictures I’ve attached, in the UVs the material can be seen in the background, but for some reason the JPEG background color is dark. Whatever…
Also, for some reason all the UV’s are piled up on top of each other by Hex in one image, though I think that must just have been due to the random choice of settings in that load (not writing groups), or perhaps to a selection of the whole figure…
I've attached several screenshots (though its limiting me to five).
Daz 3D is part of 
Connect
DAZ Productions, Inc.
7533 S Center View Ct #4664
West Jordan, UT 84084
Licensing Agreement | Terms of Service | Privacy Policy | EULA
© 2026 Daz Productions Inc. All Rights Reserved.
Comments
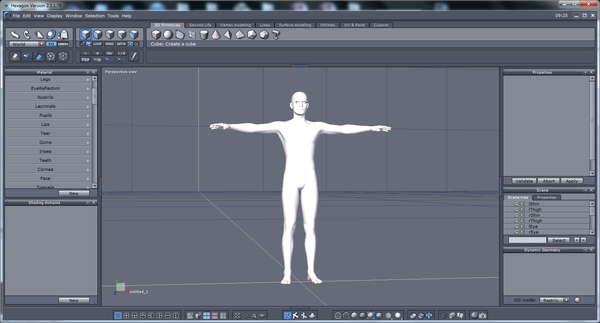
You don't mention how you went about getting your figure into the .obj state - the simplest I've found is to export from Daz Studio. The figure needs to be in the base resolution, not the default high definition. Use the Daz Studio default settings - see my first screencap for settings.
Import into Hex at the default 1.00 setting, with "merge groups" and "flip textures" selected. See second screencap.
with these settings, it comes in perfectly for me - see screencap 3.
If you do any cutting/pasting the UV map will be destroyed - that is normal for any application.
I've not done any geografing, but have done some reading on this preparatory to having a go. It seems to me that the most effective method would be to look at the part of the figure on which the graft will go, select the edges that will form the join between the graft and the figure, extract and use that as a base to form the part that will be grafted.
i'm looking forward to seeing how you get on - can't recall anyone on this forum showing any geografting, but it does look like an interesting exercise :)
Hexagon "flips" the textures. Can re-flip them from the material tab. But [if I recall correctly] don't flip textures on export.
Flipping on import has always worked for me - here is the result of not flipping :)
EDIT: Just a thought - why would you need textures on the model? I personally find it easier to work on a model without textures, so I can better see what I'm doing.
The textures on G2M are high resolution, so slow down the computer when working. At the end of the modelling, you are going to have to delete the figure, and all the textures and shading domains one-by-one, or they'll be included in the final product. This is a huge amount of unnecessary work.
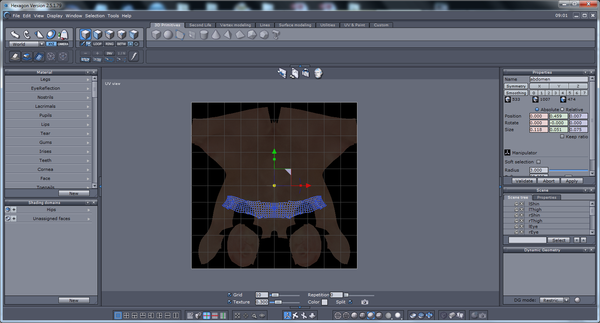
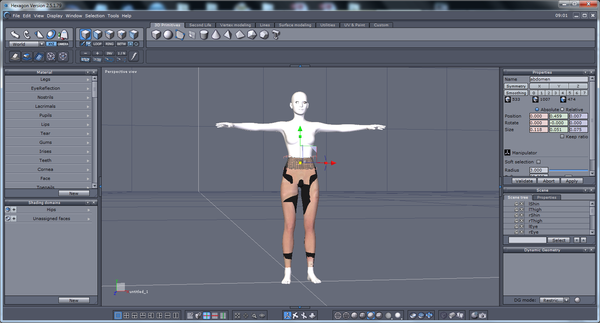
I followed your settings Roygee (Thank you very much btw), but these are the results and images of them.
I didn’t get any error messages, so that is a plus. In addition, I think the legs are right, for whatever reason.
I’ve used base res in most of my attempts, but I also usually use 0 subD, which I didn’t here, per your screenshot. I don’t even know what makes a difference and what doesn’t (N00b) so I’m just listing anything I can think of.
I also got the usual scale deformation inherent in using Hexagon’s scaling factor on export, which many tutorials have said not to do (using Poser presets instead). How did you get yours to scale normal? Do you have some changes to your ‘import preferences’ options?
I did notice that without writing the groups on export, along with merging them on import, that there are no groups. Is that likely to be characteristic of successfully imported materials/figures?
I appreciate your tip on the cutting/pasting destroying the UV-map—thank you—though on the experimental tail geoGrafts I did last week, I did have the textures (incorrect though they were) remain on the polygons taken from genesis.
Patience55- Thank you for your comment as well. Though I can flip the textures manually from the materials tab (when I am able to get its buggy a** to load) the results aren’t correct, as shown in my above post if you zoom in on the materials tab in the last images. I’ve tried both flipping and not flipping them on export from Hex, with a fairly side variety of increasingly random other settings, but without success. On flipping, I almost always get that error message I mentioned above, and without flipping, of course, they are flipped.
Both- what operating systems are you running, which versions of Daz, and which of Hex? Mine are:
Windows 7 Home Premium, sp1, 64-bit, i5, Intel HD Graphics 3000
Daz 4.6.3.52
Hexagon 2.5.1.79
I’m just wondering (kind of at my wit’s end) if it could somehow be something about version incompatibilities or system incompatibilities or even just how slow my computer is.
Pictures use up memory fast in Hexagon which is 32bit.
When working with the figures in Hexagon, i normally remove all texture images first, then send them over to Hexagon to morph or whatever.
For making clothing, I use a "clothing dummy' created from an .obj export from D/S. Instructions should be in one or more of my tutorials over at DA, user name patience55anotherone.
I find Hexagon gets rather goofy with figures larger than the grid space playground. The export/import settings I use are also in the tutorials. [sorry, day was too long and memory not reliable atm]
W7Pro.
....
I don't "merge groups" on import or export. When one welds groups together, the uvmap is zapped.
The uvmaps can be fixed up as desired without applying texture images to the figure save for the "texture checker". It's usually b/w but sometimes green/red. Or one can manually apply a "CheckerT" as I call them. These are small images that the program created and they don't case any issues. Hexagon will forget where it puts things, but that's a different matter.
Seeing as you are new to this, maybe a bit of history can put size/scale into perspective.
Way back when, Poser was made for the specific purpose of posing and rendering humanoids. It was exclusive in this respect and used a tiny scale. Daz (the company - not the software)was created specifically to make figures for use in Poser. Then came a time when the future of Poser was at stake - before being acquired by Smith Micro - so Daz created Studio as a poor man's imitation of Poser. Daz conformed to the tiny poser scale, but when importing a Poser style character, it scales it up 24384% to get what you see on screen.
In the bad old days before the Studio-Hexagon bridge and before Studio could export .obj, when we wanted to import a Poser /Daz figure into Hex to make clothing, morphs or whatever, we would import directly from the Runtime at 500% to get a workable figure, and export
the product at 0.002% (being the reciprocal of 500). Then import to Studio to rig and Studio scaled it up to Studio scale.
If, for instance, I was making clothing for a pre-Genesis figure, I would still follow that torturous route!
What this all comes down to is that size, as such, does not matter - scale is important. Every 3D application has its own scale and, as long as you export and import at the reciprocal scale, it will come in at the right size. Why I export from and import to Studio at a scale of 100% is because the reciprocal of 1 is 1. Same with importing and exporting in Hex. You could export from Studio at 200%, or 500%, as long as you remember to import it back in at the reciprocal scale, you will be fine. 1, or 100%, is simply easier to remember! No, I don't have any scaling factor settings changed.
As for flipping textures, Hex does this. Why? I have no idea! When you import and export from Hex, you need to have flipping selected, so you are, in effect, doing a double-flip to get the textures correct.
Is there any particular reason you need the textures to show? As both Patience and I have pointed out, in general, you should work without textures.
Merging groups is not the same thing as welding and has no effect on the UV map. The size of the model on the grid makes no difference to performance - the grid is there as a guideline. Of course, the UV map must fit on the UV grid - anything off the grid will not receive texture.
The reason you still had some sort of texture on the tail after cutting is that, although the UV map was messed up, the texture stayed on the map, but was messed up because the information to tell the computer where to put each pixel was scrambled.
The software I am using is identical to yours and my PC specs the same, excepting that I have a 1Gig Nvidea graphics card. That should make no difference. One thing I have done is to make Hex LAA to give it and extra Gig or so to play with.
hmmm ... I shall have to "address the equipment" again one day. Once when I tried the merging groups it was disastrous.