ShaderMixer, light/atmosphere interaction - how to do it ?
 3dcheapskate
Posts: 2,732
3dcheapskate
Posts: 2,732
I've got a simple setup - a scene with a single point light (a simple DIY ShaderMixer one that I just knocked up) and a ShaderMixer camera with a Simple Fog* volume effect (ditto).
My guess is that I somehow need to make the Light Density input of the Smoke* brick dependent on the actual light. But I have no idea how to do that.
(The last time I looked at ShaderMixer was way back in 2013)
Cross-reference to the post that triggered this
*N.B. The render uses a Simple Fog brick, whereas the shader network shows a Smoke brick. I was playing with both (and the Depth Cue brick too). For my purposes in this thread they do the same sort of thing, and the problems I'm having apply to any of the three.
Daz 3D is part of 
Connect
DAZ Productions, Inc.
7533 S Center View Ct #4664
West Jordan, UT 84084
Licensing Agreement | Terms of Service | Privacy Policy | EULA
© 2026 Daz Productions Inc. All Rights Reserved.
Comments
Are the light and the camera outside the fog volume?
Search me !
I just did what it said in the Smoke example (found via the link from the Brickyard within SM in DS4.12 as mentioned in the other thread), i.e. plug a Smoke brick into a Volume brick and 'hey presto!', a volumetric camera.
But I have absolutely no idea what the volume of the Volume actually encompasses.
I'd guess that the volume is everything within the camera's field of view. So that'd perhaps include the light, but exclude the camera itself ?
Ah, sorry - I thought the volume was being applied to a separate prop.
Pray, do continue !
I could do it that way - indeed it would be along the lines of the second, "In A Material" example on that same page about the Smoke brick that I linked to above.
So I assume that I'd need to create, say, a simple cube to fill the room, and apply the Volume brick to that ? And I assume that camera and/or light being inside/outside the volume is important in some way ?
As a test I tried adding a 1 metre cube to the scene, and used an ordinary point light and an ordinary camera. Here it is with default materials, i.e. a bog standard solid grey cube (note: I was actually still using my DIY point light with blur for this render. I changed that for the rest of the renders)
The Volume brick (root) page of the online documentation luckily explains how to use a Volume brick for a standard material, i.e.:
"In a material, it goes alongside the Surface root brick, and is not connected to it. You must also include a Surface Root with both Color and Opacity set to Black to create a volumetric effect in a Material."
Unfortunately that's just about the only useful thing on the page.
But the Smoke brick page shows how you simply plug a Smoke brick into a Volume brick, and mentions that "It can also be used to make a material shader that makes an object appear as a volume, using the “interior” option"
So with fingers tightly crossed I simply add the Smoke and Volume bricks to the existing shader for the cube, leaving all settings at default values (except Volume Type and the Opacity/Color of the Surface brick)...
...hit the blue 'Apply' button bottom right of the ShaderMixer pane, and render...
Hmmm...
Buggerall difference
~ ~ ~ ~ ~ ~ ~ ~ ~ ~ ~ ~ ~ ~ ~
If I use a Simple Fog or Depth Cue brick instead of the Smoke one I get exactly the same.
If I scale up the cube so the point light is inside it but the camera's outside it just renders totally black.
If I scale up the cube further so the camera's inside it as well then it renders as if the cube wasn't there,
Probably a very stoopid question but did you remember to set opacity to 0 on the cube?
In a roundabout way that was the problem !
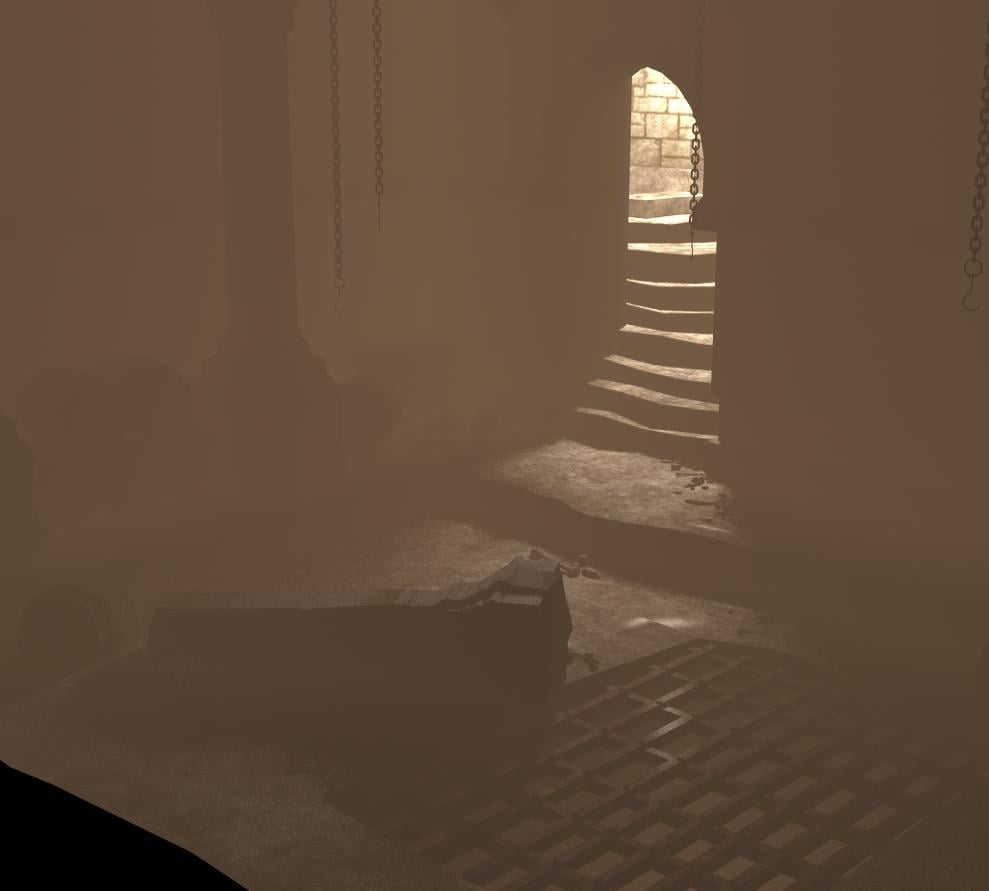
Three new renders using (left to right) Simple Fog, Smoke, and Depth Cue bricks plugged into the Volume brick. (the green is the shadow colour - see comments at the end of this post)
What I did was to look at the opacity values on the Surfaces tab of the cube. There was no Opacity Value, Just an Opacity Color, which was set to white. So I set it to black and rendered, and that did the trick. I then re-read the bit in the Volume brick documentation where it says "In a material, it goes alongside the Surface root brick, and is not connected to it. You must also include a Surface Root with both Color and Opacity set to Black to create a volumetric effect in a Material."
Just a Surface brick, nothing about a DAZ Default Material that's usually plugged into a Surface brick. So I deleted it. Here's the resulting network (all three volume-driving bricks are shown, although only one is used at a time)
(N.B. The green colour in the renders is the Shadow Colour of the point light on the staircase, which would usually be set to black, but I wanted to be able to see how the volume and light/shadow were interacting.)
To me it looks as if the Depth Cue totally ignores the shadow, which sort of makes sense, but that the other two are affected by the shadow. And with the Simple Fog I think I can make out the geometry of the cube, so positioning/orientation/size of the volume prop with respect to the camera may be important.
More playing required.
Nice! Following your progress with Great Interest:) Haven't played with the volume bricks for a long time so a bit rusty. I just started a new thread trying to gather all 3DL-related bits and pieces in one place, feel free to post this stuff there when you get things sorted out. Or a link to this thread...whatever...so people can find it;)
Interesting thread, and a great idea. I think back in 2013 there was a freebie PDF by one of the vendors here summarizing how to use each brick, and that was really all there was to go on.
The caustics is (are?) new to me, so I'll have to play with that (them?). The UE2* unfortunately made be lose faith in anything with the term "uber" in the title, and indirectly made me stop using DAZ Studio. The shadowcatcher is something I used in my Simple DAZ Studio Worldball.
*Regarding your post about using an HDR with UE2, don't forget that UE2 had a major problem back in 2013, which I don't think was ever fixed - uberEnvironment2 IBL map axis is wrong and UberEnvironment2 - Can Anybody Explain The Result Of This Simple Test? [UE2 problems/fixes].
Assuming that the problem's still there (a good bet) then to get correct lighting from the UE2 you need to use one of the fixes mentioned in those threads - the IBL transformer or "kethrove's fix" ? Or use something else that works properly, like the IBL Master for Daz Studio by Parris here in the DAZ stare.
Well, I'm getting nowhere with this.
First I tried expanding the cube so both camera, light and scene were inside it. So the cubes just an ordinary box and everythings inside it. Here's the render - as expected. Green is the Shadow Color of the DS point light.
I then applied the same volume shader as before to the cub, with a red Simple Fog
Tried with the Smoke and Depth Cue. Same sort of thing..
Move the cube so the light was inside but the camera outside. Same thing.
Moved the cube again so th light was outside and the camera inside. Same thing
~ ~ ~ ~ ~ ~ ~ ~ ~ ~ ~ ~
Then I changed the setup slightly so that the camera is in shadow - here's the top view. The brown rectangle is the stretched cube with the volume shader applied. Point light top left, camera bottom right.
Same shader as my last but one post applied to the cube, i.e.
Left to rignt below - Simple Fog, Smoke, and Depth Cue. The green is the Shadow Colour of the DS point light. The front face of the cube cuts through the fallen pillar bottom left of the renders.
STILL EDITING....
Yeah the problem is still there obviously...and always will:)) Tks for the links to those discussions, I remember reading about it back then, but never bothered to use any fixes, I simply don't use the UE2 for still renders:) I'll read through that stuff sometime when I'm exceptionally bored, or if someone mentions about the issues and needs help. (added the links to the UE2 tut, tks)
IBLM is nice and works properly, still there is no true color bounce...it's basically a nice light shader with good old ambient occlusion. AweSurface has it all and that's what I use, proper bounce light and endless tonemapping possibilities:)
As far as I know the camera and light need to be outside the volume. Did you try the ray marcher brick?
Camera and light outside the volume is my main approach. I didn't try the Ray Marcher brick, because apparently "The Smoke brick implements the Ray Marcher algorithm in a wrapper, making it easier to use". But I'll give it a try.
I was really hoping that Richard Haseltine would pop in again to (hopefully) expand on his...
...and...
...since that's the way I'm approaching this now. A separate volume prop, with the camera and light outside it (although because I don't really have a clue what I'm doing thanks to the lack of documentation I'm also trying with camera and/or light inside the volume)
It's the last image on the Smoke page , under the "In a material" heading, that gives me hope, because there seems to be a shadow within the volume under spuggles right arm.
And just in case it isn't clear, this is the sort of effect I'm trying to get (Poser render with the built-in Poser atmosphere)...
Ray Marcher using default settings, except Smoke Color set to pink.
I cancelled the render after about half an hour because I can see it's not going anywhere (the horizontal line at the bottom of the pink arch is as far down as it had got)
No idea what to try next. Do I try adjusting parameters ? Do I need extra bricks ? Do I just give up again ?
One thing springs to mind regarding the Poser atmosphere - it was very sensitive to certain parameters, and it was only because of a thread by Connatic over on Renderosity (i'll try to find the link) that I eventually got values that actually caused the atmosphere to do something noticeable. I've circled them in the screenshot below. I'm guessing that perhaps the Smoke / Ray Marcher bricks may be similarly sensitive, and you need just the right combination of values to actually see any atmospheric effect ? They both have density and step size parameters, so I assume they work in a similar manner to the Poser atmosphere. But if so what are a good set of values to start with ? Random guesses aren't the best way, as I learnt when I was first trying the Poser atmosphere !
I wonder - your comment on the original thread that " I think the only option for true volumetric smoke/fog in 3DL (well the DS version) is the OmUber volume shader applied to some suitable geometry with "accept shadows" enabled" ...
Maybe I should try with Shadow Pass = On in the volume brick ?
...
I tried it, and it doesn't seem to make any difference. Shame, because that seemed a logical solution.
(Edit: clearly from Sven Dullah's post below I'd already forgotten - the last thing I said in the previous post about getting the right combination of values)
Well I have it working now, using the smoke brick and shadow pass on for the volume. It just takes some fiddling around with integration start/end and light/opacity density. But it is slooow . I'll try to clean up the shader a bit and do some more testing before posting my settings. Meanwhile, try using very low numbers for the opacity and light density, such as 0.001-0.01.
Thanks, that helps a lot !
I'm getting somewhere now - not very good but it's actually giving me a volume effect for the first time (I think I had densitys rather high for thia one)
It seems that render speed depends mainly on this:
(Integration End - Integration Start) / Step Size
The smaller the value the faster the render (but the lower the volume effect quality), and vice versa.
I used start = 0, end = 1000, step = 100 for the attached, which took just 20 seconds to render.
Also just tried it alongside my crappy DIY point light as per the OP -
Yes ! I now have a point light with soft shadows, and atmospheric fog.
Two 20 second renders, with only the Opacity/Light Density settings changed, both within your suggested 0.001 to 0.01 range. integration/step stuff as per my previous post. Scene changed slightly - camera moved and cube stretched to include part of the stairway.
Lots more work required, and I'm awaiting your results/settings with great interest.
Yeah I learned that the hard way, first test render aborted at 75% after 2h . And increasing step size also speeds up rendering. My most recent test took about 10 min.
That looks great, I doubt you will need my settings but I'll put them here after a good night's sleep;) I made a simple fog camera with included indirect light that seems quite useful in this context. Could work well with your indoor scene to bounce the light around a bit?
Here I used a single distant (sun)light, a volume cube and an indirect light camera for ambient light. Got a bit of grain on the floor, upping the indirect light samples to 128 would probably fix that. And the indirect light intensity is probably a tad over the top, keeping it at the default 1 would have been more physically plausible.
The volume settings used:
Apparently setting opacity density to 0 makes it render a bit quicker, you can replace the fog effect lost (in areas not directly lit) using a simple fog camera.
The Indirect Light camera settings:
IL max distance was at the default 1000000;)
...and testing creating a light beam using a spotlight...(Beam me up to the mothership LOL)
I found out that including the default surface in the volume shader makes it possible to set visibility for the viewport using opacity color and ambient strength/color. Just need to remember to zero them out before hitting render:)
And here's how I set up the Indirect Light - Fog camera:
Just added an IDL camera (just an Indirect Light (Camera) root brick, nothing else) and twiddled a few things to speed up the render - ended up with Samples=2, Max Distance=1000, and Illumination=Diffuse only. Also added a large wall out of camera frame to give something for the IDL to bounce back from.
I absolutely LOVE the graininess of the image in the bits that were just black before ! To me that's similar to the way things actually look if you try and look at things in the shadows...
(on my main monitor all I see in the shadow is a few random bright pixels, but on the built-in laptop monitor I see a distinct grainy image of the walls of the room)
500x450, 22 second render.
I played with the Intensity and Indirect Tint to try and brighten the shadowed parts while keeping the really bright spots to a minimum, and came up with this, which I really love too...
And if I create a camera with both Smoke and Indirect Light and use the sttings I had before which gave me quick renders, I get this rather grainy result, but it's definitely working nicely.
Only 1m45s to render 500x450
I accidentally did a render with everything the same as above except Step Size =25 instead of 100, Opacity/Light Densities both lower, and Smoke Color different.
Took a bit longer - 3m45