Showing a little SKIN
 murph101
Posts: 68
murph101
Posts: 68
This is a texturing question, specifically for facial skin. But it has an unusual set up.
I've used FaceGen to create a face. Works great! I export it using the FaceGen Exporter module with the target app of DAZ 4.6. I follow the instructions. I start the figure with Michael 5, modify the head parameters, then apply the skin from what FaceGen created in the Surfaces tab (and I'm only interested in the face, not the rest of the body) and voila, I now have my FaceGen face in DAZ. I save it, then bring it up in Carrara. I load the figure. It looks good. I tweak the features a bit, now I'm happy.
Now, because I started with a Michael 5 figure, then affixed an externally generated face, I have to make adjustments to the skin tones of the head and neck. I get that done. Apply a G-Suit, then hair. Almost perfect at this point.
The problem I'm running into is that the facial skin looks too matte. It has the right colors, blemishes, etc. from the FaceGen app. However, I'm not getting the texture, so the facial skin looks fake. I have tried taking the face map into Photoshop, making it black and white, then increasing the contrast a lot. I go back into Carrara, pull up the face texture, go to the Bump tab, and set it to my BW texture map. It doesn't seem to have any affect.
In contrast, in previous experimentations, I went straight from FaceGen, exporting to an OBJ file, brought it into Carrara, did the Bump texture map, and it was fantastic. I could see pores, nicks and scrapes, etc. The problem with using that is it's just a free-floating head. I'd really like to use the Genesis figure for posing and animation, without having to worry about manipulating the free-floating head.
Any idea of how to get the bump texture map to take? What am I doing wrong?
Daz 3D is part of 
Connect
DAZ Productions, Inc.
7533 S Center View Ct #4664
West Jordan, UT 84084
Licensing Agreement | Terms of Service | Privacy Policy | EULA
© 2026 Daz Productions Inc. All Rights Reserved.
Comments
We need to see the shader that your using with the head. In carrara, select the head, then go to the texture room. Open the texture that you are using for the head so we can see what settings you have. Expand collapsed sections of the shader so we can see what is inside of them. :)
Boojum the brown bunny
Does the generated face map have the pores and stuff that you need?
One thing you may wish to try, is to use an existing M5 bump map, and then to help really bring out that bump, use the matching specular highlight map as well. Knowing that you have Carrara 8.5, since you're using M5 (great choice of figure, by the way), I know that you own a Carrara M5 skin shader set. Three of them if you've bought 8.5 Pro.
So, here's an experiment to try, if you're game:
Select Actor of your character and go to the texture room. Double-click the face domain to open the shader in the window.
Now go to the browser: Shaders > Skin > Genesis > M5
Pick out a shader to apply. If you'd like to see what they look like a bit before picking one, go to the Content tab: People > Genesis > and find the DS product thumbnails. I do this all the time to reference MATs. ;)
Once you pick a suitable shader (don't worry about the body, just the face), drag the file onto the big multi-colored ball on the top right of the texture room. Give it a moment as it does take some time to apply.
Now copy just the image map from the shader that you've opened earlier, and paste it into the image map of the color channel of what was just applied to the face.
This process will leave you with a specular map in the highlight channel, bump map in the bump channel, possibly a SSS setting, which you may change to 'none' to turn off sss, if you want.
I use this process as a fun learning exercise toward learning new ways to work with shaders - as all shader artists do at least something differently. If it turns out that I don't like what I've come up with in the experiment, I've still learned something.
More to the experiment:
Try adjusting the bump intensity level. This is only available if you select the top shader of the shader window, then go to the bump area in the right main panel of the shader window and use the slider, or type the number into the box. Sometimes higher bump can really look nice - depending upon what we're looking for. Sometimes it's the other way around.
Try adjusting the brightness of the highlight channel. More bright for more shine, or more wetness. Sometimes the shader will just be using a map that is dark enough that it doesn't need an additional modifier. In this case, try changing the texture map setting to a mixer (Operators > Mixer) in the blue button, place the bump map into the second source, and set the mixer shader to a value 1-100 slider. '0' will show only source 1, '100' will show only source 2, so lower setting will be what we're looking for to add subtle increases in specular highlight. Other times, the spec map has been multiplied or otherwise mixed with a value or color. To brighten the highlights, just make the value a little higher or the color a little brighter. In either case, just know that very small changes in highlight can make a big difference sometimes.
Along with the highlight channel is the shininess channel. Zero will give a nice, soft spread of light for very soft, dry skin. 6 will bring out a lot of highlights and start to make them look a little less dry. 10 will start making the surface look wet while 16, 18, and 20, etc., will really start to make a wet gloss effect, but to get really wet, you'd need a certain level of brightness in the highlight channel first. Note that with no highlight, there is no shininess.
Try experimenting with these differences so that your hero can be put through many situations - and you'll be more comfortable with how to make him sweat, get wet, and show up spiffy when he needs to :)
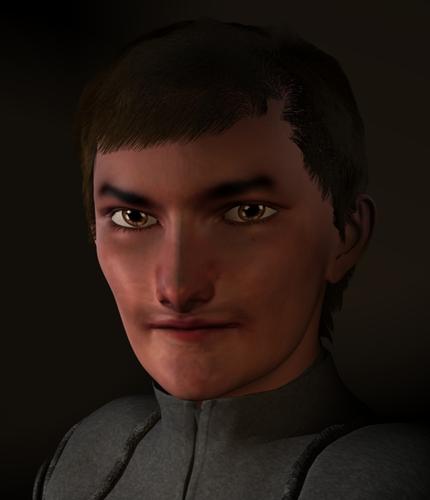
BTW, looking great!
I use a mixer channel on my facegen diffuse and a Genesis skin map with 0-100 value in mixer I can adjust to blend them
use the bump for the genesis map
I followed Dartanbeck's points, step-by-step, and it worked out really well.
I have since learned that I can use one of the purchased character skin textures on any of the figures I create in FaceGen, then amp up the bump value percentage. Looks fantastic!
Thanks to all who have helped me with this. I truly appreciate the amount of time you spend answering.
Cool. He looks great! A super hero!