April 2020 - Daz 3D New User Challenge - Open Render Challenge
 L'Adair
Posts: 9,479
L'Adair
Posts: 9,479
New User's Challenge - April 2020
Sponsored by DAZ 3D
Are you new to the 3D World? Are you at the beginning stages of learning 3D rendering? Have you been around for a little bit but feel you could benefit from some feedback or instruction? Have you been around awhile and would like to help other members start their creative journey? Well then come and join the fun as we host our newest render challenge.
New this year, we are breaking down each month into 2 different challenges. A Beginner Challenge and then also an Intermediate Challenge.
So which "Challenge" should you choose?
Follow the Beginner Challenge if you are:
- New to the New User Challenges
- New to Daz Studio
- Newer to 3D Rendering in General
Follow the Intermediate Challenge if you have:
- Participated in the New User Challenge for awhile
- Know the basics of Daz Studio and would like to learn more in depth topics
- Been using 3D Rendering Applications for awhile and feel comfortable with learning Intermediate Topics
"Open Render Challenge"
The Open Render Challenge is also referred to as a "free" month, where you can concentrate on using and combining the skills you learned in the past few challenges.
If you would like to review the previous topics and information you can find the topics/threads here:
Beginner/Intermediate: Composition/Instancing, & Duplication
Beginner/Intermediate:Lighting/Light Effects
Beginner/Intermediate:Posing/Posing II
I will be checking in as will the rest of the Community Volunteers to try and help with anything you all may need.
For a list of the current challenge rules, please see this thread: Challenge Rules
Closing Date: April 30th, 2020
Daz 3D is part of 
Connect
DAZ Productions, Inc.
7533 S Center View Ct #4664
West Jordan, UT 84084
Licensing Agreement | Terms of Service | Privacy Policy | EULA
© 2026 Daz Productions Inc. All Rights Reserved.
Comments
Here's a look at the environment that I'm planning to work with this month
I am unclear about how i could divide this challenge into beginner and intermediate and how many entries can i submit?
How do i tag people?
@TristanQEverett, We originally planned on something a bit more structured for the intermediate challenge this month, but it was decided to save that for another time. The point behind having "free" months to the challenge is allowing people the opportunity to use newly acquired skills before moving on, so it makes sense that any image for either level use skills learned in the first three months for that level.
I recommend letting us know whether the image is beginner or intermediate, and mention which of your new skill set(s) is/are used creating that image. That said, Ann has the final say, so if she wants something else, I'll revise my recommendation.
Heyo again folks. After working up the nerve to enter the December contest, I disappeared for awhile due to a bit of embarassment when I saw how well everyone's renders were compared to my own. Well, I'm a bit sleep deprived at the moment, and seeing how this is a "Open Render" challenge with nothing particularly being focused on, I figured I'd put something together using a handful of tid bits I've picked up since then. I know it's nothing fancy, and uses a lot of older genesis stuff and whatnot (as much as I like mixing and matching outfits, I keep forgetting to buy new hair!), but here it is. I almost forgot. As for being beginner or intermediate, I didn't really do anything too fancy aside from using an HDRI and with a little bit of DOF, though I did use blender to denoise the image and save myself a whole lot of render time (My old PC doesn't get along with the one that's included with Daz).
Version b here, starting to add characters, as well as some texture work and toning the initial lighting settings down a little to see the affect of some of the texture changes (making some screens out of view emissive.)
Welcome back, Wicked Whomp. Cute image. Well done.
I'm so sorry you felt any embarassment here. We all start somewhere, which usually is nowhere close to the vision in our heads, but only because we haven't learned the ins and outs of our tools. And the rules state: "YOU MAY: … 2. Use any 3D program you choose to create your image." If you feel more proficient in Blender, then do your work in Blender.
Here's a link to one of my very first published renders, (from 2015.) I was really proud of it at the time, as I should have been. I learned how to use dForms just for this image: Not Too Old To Play With Dolls. I look back and see how far I've come. I look forward and see how very much further I need to go, with the end always moving as Daz adds one new feature after another. In a year or two, (or five,) you'll do the same. It's a journey, and one well worth the effort.
Be proud of your work now. Those are your "baby steps" and worthy efforts, in and of themselves.
I'm looking forward to more images from you.

This Challenge, i`ll be a bit faster. ;)

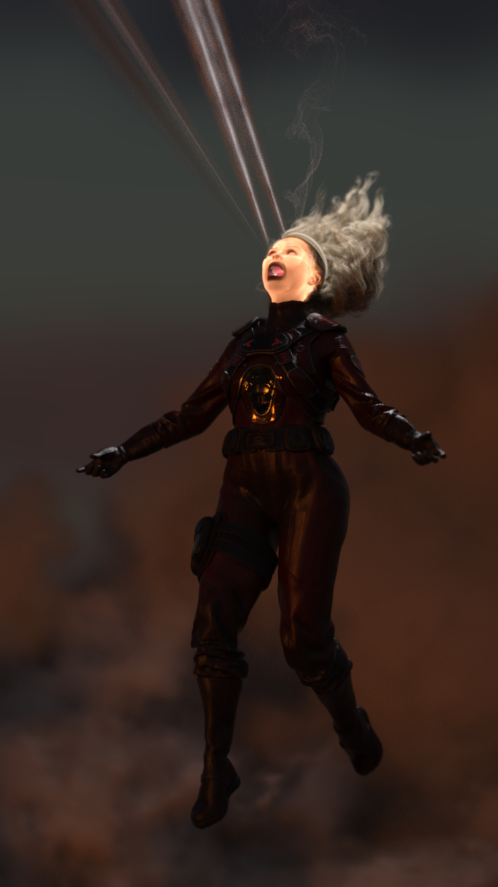
When i read "open render" i wasn't sure what to do, so i had a little peak in the other challenge groups. In the PC group there is a competion that starts with "It's always sunny in...". And immediately "head" came in my mind (or head ;)).
But i'd like to stay here for tips, hints, suggestions and criticism (reviews?). I count myself as a advanced beginner, and i fits to the last 2 month (posing, lighting).
So here a little (viewport render) pic.
Looks amazing. How do you create those smoke and volumetric lights coming from mouth?
Hello. Thank you.
For the smoke I used :https://www.daz3d.com/mmx-smoke-trails-for-iray
And the volumetric light is: https://www.daz3d.com/iray-ghost-light-kit-3
In this version there're six ghost lights.
1. God ray light in front of the mouth
2. Simple volume light in each eye
3. two Sphere light in the head
4. one square light above the head
And all rounded with a HDRI from Denki Gaka.
Yesterday i played with the viewport I ray settings and i switched the caustics on. And then it was bright like the sun.
It seems, if i keep it switched on and set the lumen on the lights down massively (from ~8000 to 500 kcd/m²) its smoother and less dark edges appear.
I noticed that emissive lights on a plane are dark at the edges and no light will emit on and through the skin.
Here is a preversion of the first picture with causics on:
Maybe i'm able to spare one or two lights with causics on. And the mouth and eye lights are in the head not outside. (So the beams starts in the eyes.)
And the gutz needs a better place.
Hello all! Here is my little contribution to this month's contest. It's from a series of images that I'm working on. It's pretty simple but I hope you like it. The character is XIA for Genesis 8 and I'm using the Iray ghost light kit 3 along with some falling leaves to give it (I hope) a dreamy feel. I"m also working on my posing and of course trying to get the best render I can in the shortest amount of time which is difficult since I'm on an old computer. Let me know what you think.
I feel like I am the only person who has not improved after seeing these renders.
Is there any solution to long render times?
Yesterday I made 3 scenes to render and from then on to now they are still rendering. This is very troublesome cause I am unable to use Daz Studio while they are rendering.
Don't let yourself get dragged down, sometimes it's hard to find what makes the render look better and then suddenly one makes several jumps of improvement in a short time. important is to keep going and enjoying it. and the best thing is to tackle another topic within the progrma onr your knowledge about art in general. Go out to the net and look at images you like (not just 3d) and ask yourself why you like them, what makjes them special, which technical aspects can you find. maybe even try to reproduce such an image.
About speeding up render times, when you are using Iray, have a lot of light! remove items that are not within your camera angle (if thes still affect part of the image like casting a shadow, you might remove the maps. look at subdivisions. things that are far away don't need a lot of subdivision. For character that wear clothes you can make a lot of bones invisible (close the eye icon in the scene tab) check which hair you use, strand based hair used a lot of gpu space.
For complex scenes as I often have them, I like to use the scene optimiser, because a lot of detail gets lost in the depth of field anyway. For test renders use small formats and reduced render times or spot renders.
All that helps but the mean truth is, that when I set a scene to render the final version I wont be able to use my computer for an hour or two.
my Render times routinely go to the 3 day maximum. Sometimes I don't NEED all that time. many times I need longer. In some case it depends on the lighting, Dim lighting take a longer time for IRAY to render (I hear), in that case upping the exposure time would help. If you are using render quality, the default 1 is usually good enough, I only up it if I am doing work with A LOT of fine detail or close ups on skin. For the latter BTW if the skin look like it has 50 miles of mad road way behind it, you need to drop the bump down...
I leave the render settings nearly basic.
Bzw.. i have a lowend Xeon from 2016 and a Radeon (RT 480?) GPU. So no real benefits for DAZ Studio.It's not the polygones that count that much, its more the shaders with large textures in combination with light, bouncing light and all that stuff. Also all that things you put in a scene that isn't seen in the render.
I think.
I think discussing render settings fits quite nicely into a "free" month. Iray has progressed significantly since it was introduced to Daz Studio in 2015. The code has also increased sginificantly. The version of Iray in 4.12 will accomplish more in a single iteration than previous versions of Iray, but each iteration takes longer. I have found I don't need to render as many samples to get the same quality, so the total time to render is actually less.
One of the default Render Settings > Progressive Rendering is Rendering Quality Enable: On. With Quality enabled, the render algorithm uses the Rendering Quality and Rendering Converged Ratio parameters to determine when to stop the render. To do that, the code needs to test the iterations to see if convergence is met. I'm guessing the code is sophisticated enough that it uses the early iterations to project how many samples it needs to get close to Convergence. I do know that as the render gets close, rendering slows, reporting the number of iterations more frequently.
Of course, there are two other conditions that can stop a render besides convergence, Max Time and Max Samples. If you reach either of these limits, it doesn't matter what the convergence is, the render will stop.
It took me way too long to try rendering with Rendering Quality Enable set to Off, but since then, I rarely render with it on. When you turn off the Quality parameter, the code no longer tests the samples for convergence. If you're rendering CPU Only, as I was way back when, cutting out this step may speed up your renders noticably. I doubt if it's noticable if you're system has an Nvidia card. However, once you disable the Quality settings, the only parameters that will stop your render are Max Time and Max Samples.
Max Time can be turned off by setting the value to zero, (0). You cannot turn Max Samples off. But with both the Quality and Time settings off, you can control the length of the render with the Max Samples setting. Doing a test render? Set Max Samples to something low, like 100. Doing a final render? Set Max Samples to something higher. (My default is 15000, though with the latest version of Iray, I seldom go that long. I just haven't revised my default scene or presets.) The render finished, but you think it needs more time? Increase Max Samples without closing the render window and click on the Resume button.
Here's an image of my default Progressive Rendering settings, with my changes highlighted, (something to break up the "wall-o-text" of this post!)

One of the advantages of this set up is with spot rendering. Inevitably, I find something I want to change after rendering the final scene. Rather than fixing it and rendering the full scene again, I'll select the Spot Rendering tool, change the option to New Window in the Tool Settings, and render a section with my fix. Because I render to a specified number of samples, I can render the spot to the same number of samples. (I then layer the images in my image editor.)
Using Spot Renders instead of rendering a full image again is a great way to save render time, too.
And finally, I generally set the image to render as I'm heading to bed, because then it doesn't matter that my computer has allocated all of it's resources to the render.
I hope some of you find this information useful. Happy rendering!
@L'Adair That was very helpful. I was oblivious to resuming render after it finished and spot rendering. This will be of great help in future renders. Anyway is there a method to automate renders? what I am asking is that if I had like 5 scene files ready to render but I needed to sleep and I knew if I put 1 to render overnight it will finish before I wake up and my pc will be idle. If there was a method to let pc render, save, change the scene, and render again. That could have been of great help.
Also, how do I tag a person properly?
foliage
@TristanQEverett, I have just tagged you properly.

First, type the "@" character, followed by the username. However, it won't work with usernames that contain a "stop" character, such as an apostrophe like I have in my username. Stop characters include spaces and hypens, too. Underscores work, though.
As for something to render multiple scenes while you sleep, ManFriday has a script in the store: Render Queue. I have it, though I've never tried to render more than one scene with it. I love that it will shut down the computer when it's finished rendering the last scene. You can learn more about it on the Commercial Thread.
And I'm glad my tome was useful for you.

This is the first version of my image. I've been working on my lighting skills. I've managed to get the woman's reflection in the mirror, but I would like to make it clearer. Also I would like to get the coloured rays of light coming through the stained glass window. Is this possible using 3Delight? There is another window on the opposite side of the image. I will try putting stained glass in there too.
Unfortunately, I already spent all my money on march madness which I gained from selling my old music equipments. XD
Could you tell me about DOF as well? I enter the values in the DOF manually and the problem with that is the numbers are randomly incremented each time until I get Decent DOF. Now, this method wastes lot of time. I have stopped using DOF cause of this but if there is a better method to calculate DOF or a script then that will help me a lot. While I am asking help I might as well ask if there is a script for making eyes focus on the center of the camera. If possible a script that could make eye center objects as well? I remember reading about it somewhere. Sorry for all the trouble.
RiversoftArt has the Look At Me II Pose Control that includes a script to look at the active camera.
I have a tutorial on using DOF. I've since learned a better way of doing things, but it does explain what some of the controls do. And at the end, it links to two video tutorials that show you the better way. You could just scroll to the end of the post, and watch one or both of the videos. My post is here. And then there is a post on DOF from Fishtales in Novica's latest review thread that may also help you make sense of the settings, here.
Once you figure it out, once the settings makes sense to you, DOF is actually pretty easy.
One thing that can help is setting the camera focus where you need it. If you select an object, then click on the 'plus sign' icon in the upper right of the viewport, That object will be centered in the viewport and become the focal point. Unfortunately, that may also change a number of other things, like how far the camera is from the object. I prefer to use a similar function, Ctrl+A, that usually centers the object without changing the distance of the camera. Also, both will work on the bones, as well as the full object. You can select the Head bone, for example, and have the head of your character centered in the viewport.
Once you have used either of these, moving the camera around will not change the focal point. If you focused on the left eye, moving the camera down to move the face up in the viewport, or moving the camera back, the focal distance will adjust so that the left eye is still the focal point of the camera. (My apologiies to any photographers if I've worded this poorly.)
Thank you very much for all the help. I will try these out when I work on my Open Render Challenge Entry.
Version b here, starting to add characters
Nice start @_AL1vE_, nice start.I have a great idea for this month's render but I have some interaction with water and not sure how to proceed.
Can anyone guide me to some ripples and splashes in the water guides? It's for someone walking on a thin film of water.
I know of these products : https://www.daz3d.com/fluidos-ii-for-daz-studio, https://www.daz3d.com/ripples-and-wakes-iray but not sure which one to choose and how far they can take me.
Working with water is a challenge but worthwhile. From the two products you're looking at I can tell you that Fluidos is a very lovely addon which offers you a lot of possibilities but it has some learning to do in the process and takes time to generate what you want (one from the learning and two from the processing).
For more immediate results I guess you will have good success with Sickleyields product. I don't own that one but knowing from her others, I'm sure you will have good results with this.
Besides all that there is the option to create ripples on a simple plane primitive (give it enough divisions) using a d-former or the weight map brush. I remember there was a tutorial for the first somewhere back in time. I see if I can dig it up for you.
Here's version 2 of my image. I have moved the camera to show the candlelabra and changed the floor to polished stone to get more reflections. I would like some feedback and advice on how to get coloured rays coming through the stained glass window if that's possible with 3Delight.