Put this on the fridge, mum!
 middle_watch
Posts: 69
middle_watch
Posts: 69
Hoping to provoke tech talk and ideas for Daz without the snide superior comments. just us amateur wannabe's
4.11 and 4.12 gave us some interesting add ons, for me the curve editor in animator is the real bonus and I hope to produce some work shortly with it. Dforce for hair I have not attempted yet but I have been playing with Strand Based Hair. It is getting a lot of flack for the lack of it's own Dforce, but I figure that will come.
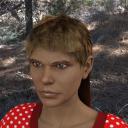
It is a great tool for short hair, here the eyebrows were the work of short minutes, and allowed me to produce untrimmed eyebrows as I required for my character. Pubic hair was just as easy, sadly I am struggling with longer hair as you can see!
Daz 3D is part of 
Connect
DAZ Productions, Inc.
7533 S Center View Ct #4664
West Jordan, UT 84084
Licensing Agreement | Terms of Service | Privacy Policy | EULA
© 2026 Daz Productions Inc. All Rights Reserved.
Comments
This is a draft using Strand Based Hair, it is hugely resource hungry and tested my machine, but there is real potential here I think, the image is of a G8F being transformed into a Werewolf.
A quick sketch with Strand based hair, slightly spoiled as it took two hours to render against ten mins to make. Droid hair.
And still exploring strand based hair....
That SBH you done is getting there. And the first post looks like Harrison Ford to me, not that that's bad.
She is a hard bitten character I am working on, self destructive, extremely violent, nicknamed the Beast of Bethlehem (not that Bethlehem, the one in the Sigma Draconis System), bit closer to home with this attempt, might as well face it, I am addicted to Daz!
And here is my short SBH in action, well static action, the render time scuppered my plan to produce a short animation, that SBH gobbles up resources!
Drum kit is Z Drum Kit, shoes adapted from Abigail outfit, models G8, rest is pretty much me. Need to revisit the guitar straps, will try using Dforce to get them to hang better.
I am always reluctant to look a gift horse in the mouth, and that counts as criticizing a free program, my view is we accept it is going to have glitches and we are the Bet testers, just hope to get a good run before we have to start paying for it (Red Hat anyone?)
BUT, if I was going to feed-back I would like to see an easier method of customizing the User Interface, in particular removing stuff, there is a lot of legacy stuff which I presume is kept for those who are comfortable with it and do not want to move to the new gizmo. I have followed several tutorials on trimming menus only to end up with a mess or the whole thing getting reverted next time I start up. Could be me being a total numpty, granted, but I manage with other programs I use. A case in point is the Tools Pane, which I use a lot, and can never get to stay docked, or if it does it is only part displayed or obscures other panes. No doubt it can be done, my point is it is not inuitive.
On a similar issue, there is a puzzle to the logic of the layouts. I love DForce, like my wife, great to have but I scream at both of them a lot, my wife when she hides the TV remote (must be her, kids have left home) and at DForce when after an hour of simulation the ruddy thing turns into Bikini Atol, 2 seconds after ignition. Browsing tutorials and forums I hunted for ages for what I was sure must exist, but could not find: a weight control similar to Node Weight Map Brush. I spent long nights exploring the huge options on the DForce menus, puzzling over the difference between the Dynamic Surface and the Add-On (still not sure).
It was sheer chance I spotted a DForce option on the CREATE menu, right under the Wind Node that I was exploring, the DForce Modifier Weight Node, at first it appeared to do nothing obvious until I happened to accidentally add it to an object with DForce already applied. Oh my gosh! There it is! Now I could finally remove DForce from areas I knew were causing problems and keep it where I wanted it, in this case the straps and buckles on the sleeves, but I could get the hem of the dress to act naturally.
Love it, super! But why on Earth was it not grouped with the other DForce controls? Never Mind, I answered that in the first line.
First attempt at my own water in Daz, will give myself an E for effort. The surface ripples were easy, but the vortices have too many artifacts and do not fade as intended, likewise the cone shower. The other nozzle is supposed to be producing a fine mist, trouble is it is too fine! In 3DS or Maya I would use particle systems but those do not transfer as objects into DAZ, or rather I cannot figure out how! Back to the drawing board.
Think I have the main water body fixed, added noise and a smoothing filter, seems to have given me the required result, no obvious artefacts and a softening of the boarders of the vortex plumes.
The shower cone is a different matter, still struggling with that. Meantime I noticed that DAZ render by default leaves off Caustics, in 3DS Max that makes a huge difference to any image with reflections and transparencies, so I am setting off a caustics render overnight to see what the difference is....
Here is the comparison with Caustics on, that is the bottom one. I do not notice much difference other than increased reflections as marked. But then I cannot tell the dfference between HDTV and Regular. Since I am turning down the reflectivity of the Jacuzzi tub anyway, as I think the reflections distractive, I see no point in the extra render time.
Re-work of the cone shower, just the core at the moment, I will add a droplet element next, not happy with the results but the best I have been able to produce. Leaving it alone for now to concentrate on Christmas themed stuff, including my usual rude digital Christmas card to annoy my sisters.
WIP, some slow progress on developing my own characters, this is Red Saunders again, with "Flirty Hair" I have just about got the shaping how I want her, the next task is a custom skin, at the moment she is wearing Base G8 skin. As a basis I hired a model I thought would suit my battle scared veteran (did not tell her that) and got her to pose in yoga positions to get the skin close ups from all angles. I will over-write the G8 textures in Photoshop for the first attempt, already done a bit of that, the eyes of "Red" have been doctored to make it look as though she is staring at the Orion Nebula for instance. The next step will be to attempt to produce my own UV maps, but as the alien said to Jodie in Contact: "Small Steps!"
Red is a deeply flawed anti-hero, pictured here in Patrol Battle Dress, a lightweight spacesuit with self sealing cuffs and a collar fitted flexible flip-over breathing bubble. Gloves are stored in cuff pockets. The boots have switchable magnetic grips, armoured toe caps and very un-regulation heels.
Oops, wrong image, this is Red, she has had a hard paper round!