Texture mapping issues
 deslea
Posts: 27
deslea
Posts: 27
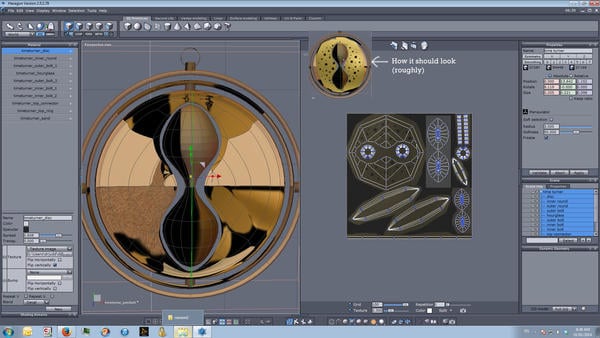
I have a model with a nicely unwrapped and positioned UV map, a corresponding texture map done in Photoshop, and materials defined. The texture lines up (after vertical flipping in Materials) with the UV map in UV view, as shown on the right. However, as shown on the left, the texture is applied almost randomly. It isn't even clearly flipped in a particular direction - the various flip options (and no flip) just scramble it differently.
I also tried exporting to Daz anyway to see if it was just a Hexagon display thing, because I've noticed when working with imported V4/Genesis in the past that the textures sometimes get scrambled on the way in but still work fine in Daz. But the scrambling follows the .OBJ in exactly as shown in Hex.
What am I doing wrong? Any guidance greatly appreciated. Hell, at this rate I'd welcome snake oil, lucky talismans, and dark rituals.
(PS - ignore the dodgy polygons in the main disc segment; it's just proof of concept at the moment. The problem occurs on the less visible clean elements as well).
Daz 3D is part of 
Connect
DAZ Productions, Inc.
7533 S Center View Ct #4664
West Jordan, UT 84084
Licensing Agreement | Terms of Service | Privacy Policy | EULA
© 2026 Daz Productions Inc. All Rights Reserved.
Comments
Hi there
Difficult to state definitively without seeing the mesh because I can't relate some of the islands to the model. Some information on how you went about getting the map into Photoshop and what resolution you used and whether you layered a picture onto the map or whether it was painted on would also help :)
From what little I can make out, it seems to be a combination of a too-low resolution and UV's not pinned.
Just as an example, the torus in my first pic has been unwrapped without pinning U'V's - this somewhat resembles some of the islands in your unwrap which are pinched at the ends. Some of the islands also seem to need the UV's to be relaxed. This would not give a good basis for mapping a texture. In the second pic, the UV's have been pinned - they run parallel and can be mapped more precisely.
Looking at the screengrab does not really tell me what has gone wrong, if you could send me the HXN file I can hopefully give you a better answer.
One thing that does look wrong is the center piece (the bit with the hourglass cut-out) it seems not to have any thickness ?
Sorry, when i ask, but how do I pin the UV's? Unfortunetely there is not much to find about texturing in Hexagon.
Copied & Pasted reply -
An Ex Hexagon user called Gary Miller did some great tutorials, here are the links to a tree stump project which will help you sort out the texture problem.
Step 1- http://www.youtube.com/watch?v=MTXdEJOFp5c#t=25
Step 2 - http://www.youtube.com/watch?v=QSkrjrN__Lg#t=12
Step 3- http://www.youtube.com/watch?v=EpF2R7l9ewA
Other video tutorials by Gary can be found at GeekAtPlay.com.
To find your way around Hexagon I recommend watching Daniel's Intro set -
http://daniel-ripley.co.uk/hexagon.html
Wow - that is a really loaded question! UV and texture mapping is a whole subject and art in it's own right.
Personally, i don't see the point in texture mapping in a modeling application - rather do it in the rendering app. Having said that, the principles of UV and texture mapping are universal to all applications - just some of the tools and efficiency are different.
Hexagon is pretty good at both, but I only use it for simple tasks - not because it sucks, but it has two failings which are show-stoppers for me. Firstly, it does not save seams and pins, so this has to be a single-session job and secondly, it has no concept of proportions - it will sometimes make an insignificant UV island large and a large part of the map tiny. For complex meshes, i prefer a dedicated mapper, such as UU3D, which gives a lot more options for unwrapping.
As for actual mapping, Hex, like most apps, gives options of projection mapping or unwrapping with seams and pins. Projection mapping is OK for simple shapes, such as those depicted on the UV mapping panel - cube, sphere, cylinder and plane. For more complex shapes, you need to unwrap, using cut seams and sometimes pins.
To unwrap, you need to visualize how you would cut it up so as to lay it out flat and cut the seams accordingly. Pins are placed where you need the map to unwrap symmetrically. There is no hard and fast rule to these actions - it all depends on the shape and complexity of the mesh and how you are going to apply the texture.
To give a very simple example of a torus in an earlier post - I cut a seam along the inside of the torus, along a centre edge. Then cut a transverse seam around the circumference. To get it to unwrap flat and symmetrically, I placed two pins, one on each vert on the outside, opposite the inner cut, one vert away from the transverse cut.
Think of it as cutting a hoola-hoop and nailing it down so as to make it flat so you can paint on it:)
There are some tuts on UV and texture mapping in Hex at Geekatplay which are worth taking a look at. The main thing is to get to understand the principles and practice, practice, practice - starting simply and progressing to more complex shapes :)