When I apply a face or body section from the Victoria 6 Hd Smart Content the body part looks black.
 jlthorne
Posts: 0
jlthorne
Posts: 0
When I apply a face or body section from the Victoria 6 Hd Smart Content the body part looks black. I am very very new to Carrara and 3D but the standard V6 characters do not do this. I have no I idea what I am doing wrong. Can someone please help?
Thanks Jeff
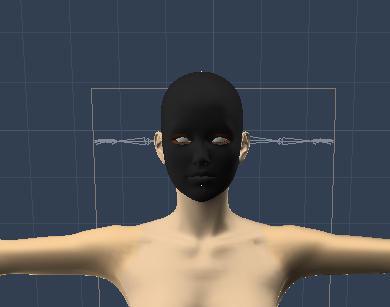
Black_Face.jpg
390 x 307 - 58K
Daz 3D is part of 
Connect
DAZ Productions, Inc.
224 S 200 W, Suite #250
Salt Lake City, UT 84101
Licensing Agreement | Terms of Service | Privacy Policy | EULA
© 2024 Daz Productions Inc. All Rights Reserved.
Comments
You may want us to move this thread to the Carrara forums where you can get your specific issue looked in to. The don't travel out of their forum very much
Thank you, could you please move this for me, again. I have never posted in a forum before. I was in the Carrara forum and clicked new post. But I have no I idea where the post goes. Please direct me to some instructions so I can do it correctly the first time. Thank you
Thanks
Jeff
The same thing happens to me in Carrara--I don't think the HD stuff works perfectly in Carrara.
I have noticed that if the Mats you are applying have both an SSS and non-SSS version, the non-SSS version works (for me anyway). You can also try applying all the Mats you want in DS, save it, and open it in Carrara---that usually works.
Moved to the Carrara forum at OP request
I'm fairly certain that it's a matter of the material file not being compatible in several ways - making it largely corrupt as far as Carrara sees it. DS and Carrara 'see' materials in different ways. I have a feeling that, when a duf file of a character is loaded in Carrara performs some sort of translation method, so that they come in with a fair appearance - yet even those instances - the shaders are not what they should be for Carrara. That's where Ringo Monfort comes in a optimizes the texture files included with that character for Carrara use. This is all stuff you can do yourself, and becomes quite an excellent part of character creation in Carrara. That, too, is where Ringo's shader packs are great to have - as he demonstrates professional setting for the image files provided, as well as the rest of the channels of the shaders.
Anyways, once you get a good technique of basic skin shader settings that you like and know, then applying new textures is easy. You can also do this with less optimal shaders, just to get them to show up as something instead of black... here's how.
When you load in the base or character figure, prior to applying the new materials, consolidate the duplicate shaders so that you won't have too many shaders to fix. Do this by going: Edit > Remove Unused Masters > Consolidate Duplicate Shaders.
Now select "Actor" and click the paint brush icon in the upper right of the window to go into the Texture Room.
Here you'll see a whole list of all of the material zone (also called Shader Domains) for that actor. By using Consolidate Duplicates, you can see that several material zones use the same shader. Sometimes I like to rename those shaders at this point, to avoid any confusion. The one in the Feet place is the same for all limbs and the hands too, so I name that one "Limbs". Be mindful that "Head" uses the Torso shader, not the one for the Face! So then I find the Hip and see what shader it uses, and name that one "Torso", then I find the Face domain and rename that shader to "Face"
Sometimes everything on the inside of the mouth uses the same shader, other times some will have subtle differences, often the teeth.
Now that you cave relatively few shaders to worry about, start at the top. I also just focus on the skin shaders at first. This would be Limbs, Face, Torso and possibly another or two, depending upon the character. There are probably image maps in two channels of each of the shaders; Color and Bump. We want to add another map, too. So for now, Ctrl Drag (Cmd Drag on Mac) the Bump channel from the list on the far left of that shader window up to Highlight channel. Now click on the Highlight channel so that you now see the bump map in the main shader window. Adjust the 'Brightness' slider (below the image file) down to, say... 15. Now click on "Top Channel" to get the main view of the shader again. Here is where you'll need to know where the texture files ar located for the character maps you want to use, instead of the maps that are used now. The one's you tried to add through the browser, but it all turned black. To find the texture maps, go into the location where you installed the new character, and go to the 'runtime' folder. You want to look through the 'Textures' folder found inside 'Runtime'. If it's a DAZ Original, it's likely in a folder within the DAZ folder. Otherwise, look at the artists name that made the character pack. The folder you're looking for is likely the last name of the artist. This is where saving the zip files come in handy - all you have to do is open the zip, and find the textures folder inside the runtime - the folder that's in there is the one that contains your files.
Now that (hopefully) you've found the maps, go through each shader used in the figure and replace these maps with the ones replacing them from the folder you've just found:
Color - This map usually either just uses the name of the part like, Torso, Face, Limbs, Iris, etc., or it might even say _Tx after the part name. If you use thumbnail view in folders, it will be a color image (not gray scale)
Highlight - The is what is called the 'specular' map, so it will often have a suffix of _S or _SP
Shininess (no map) - go ahead and drag this slider down to anywhere between zero and four.
Bump - Often bearing the _B or _BUM suffix. This channel has a strength slider. Try it with the current setting, and then adjust your bump preferences to your liking.
There plenty of other shader tweaks - but this will at least get you started.
NOTE: You may run across times when there is a color chip or a value slider "Multiplied" by the texture map in one or more of the channels. To use the pure map without the multiplier, which is completely necessary with V4, Just drag the source channel with the texture in it onto the channel it's in, which will get rid of the multiplier. Some models that you run across work very nicely with color or values being multiplied into the map - so play around a little.
Let me know if you need any more help.
Also, the HD Morphs, themselves, are not supported in Carrara at all. At least not yet. Folks have been using then in Carrara 8.5, but they won't show any of the HD part, as that will require some form of developmental add-on to Carrara, either official or by plugin - not sure which.
Displacement maps and such works. But they require experimentation within Carrara, as they work differently in Carrara than they do for DS and/or Poser. Also, Carrara has displacement painting, which is very powerful, like the HD morphs - but as a Carrara's own feature, if anyone wants to make and share or sell this sort of thing. Take the figure you wish to displace into the model room, or enter edit mode within the assembly room, and use the Displacement Painting tool. For really high definition, turn the smoothing (which is Sub D in Carrara) up to three or more. I think that the higher end HD Morphs are done at 3 on Genesis 2. 4 is really high and will likely slow your system to a crawl, but is also probably a higher resolution than you need. I guess that depends upon the model in question.
For example, you could make add on Carrara products for Predatron's LoRez figures if you wish. Simply use the displacement tool to carve out higher resolution details and save them out as displacement maps, then optimize the shaders to get the results you were intending on. I used those only as an example, as they might allow for smoothing levels higher than others. But you can use this technique for any model, really. And if the model is your own, you wouldn't have to worry about distributing copy-protected data, so you could model at a lower resolution, and model the detail in using displacement with Sub D Smoothing turned up. Then just share or sell the model in displaced form. Then folks could opt to speed up their renders using lower levels of smoothing if the figure was to be far enough away from the camera, or run in mobs etc.,
So Carrara truly does have the capabilities for the HD process on it's own. But the new DAZ HD Morphs are using a new technology via Pixar to get what they have done - which is super cool, and I hope Carrara gets compatibility for it.
Well I guess I should release the HD shader versions. I already have Michael 6 HD shaders just need to do the Victoria HD shaders.
Here is Michael 6 HD version.
I truly want to thank everyone for their responses. I have owned Carrara for approx. 3 weeks now, so I do not understand most of what is posted. But I have copied the information, and I will study the program until I do. I have watched the Carrara 5 videos on Lynda.com and bought another set of training classes on Carrara 8. I have subscribed to some of the Carrara tutorials on YouTube but like everything, it always just takes time and working on it. If there is any YouTube videos on Shaders or any other training courses please let me know. Again thanks for all of the info and support.
Jeff
jlthorne, I hope you have checked out this excellent Carrara website.
http://carraracafe.com/
What is the best way to change skin tongue, lip color or eye color? Would one of the Carrara Shader programs be the best and easiest to get started?
Thanks
Jeff
Well I do have a rather loose "Babble session" set of two videos that might help some:
Carrara 8.5 Pro - First Look
Carrara 8.5 Pro - First Look Part 2
I get complaints from running a bunch of background noise in the background... but I have this annoying hum coming from my recordings, I think due to the horrible grounding in this 1800's house I'm living in. So I try to cover that up. Anyways, they're free so...
I don't recall if I get into substituting texture maps in there, though. So I would like to help you with that, right here.
I am assuming that you're using the DIM to install stuff to the default "My DAZ 3D Library", when it comes to Genesis stuff. If not, and you have a hard time figuring out where I'm finding stuff, let me know and we'll get through this... okay?
Now. When you load in a character from the DAZ library you should get a reasonable texture already applied. Am I right?
Does Olympia come with different lip colors? I have the builder files that DAZ gave me, so I don't have those - at least not as a separate map image. So let's just look at V6 for now, since I have all of those texture maps.
Load in Victoria 6
On the right side of the screen, you'll see a list of all of her parts that move - this is called the Hierarchy.
The second line from the top is called Actor. Select that and then look at the very top of the screen to the far right, where you'll see five white icons. Select the paint brush as seen in the picture below. This will take you to the Texture Room in Carrara:
In the above picture (2), you can see that there are several shader domains on the right of the window. There are quite a few for any detailed character figure like Victoria or Michael. You can also see that at first, each domain has it's own separate shader allocated to it. In most models, this is unnecessary since several domains will share the same map and shader settings. So before we make any changes, let's do some house cleaning.
Go back to the Assembly Room (the main working room that your in when Carrara opens - which is the Hand icon in the upper right of the window) See the below image (3) where I use Edit > Remove Unused Masters. You'll see four options, one of which is grayed out. I like to keep my working file clean and free from unnecessary RAM usage, so I almost always perform all three of these in this order:
Remove unused Objects
Consolidate Duplicate Shaders
Remove Unused Shaders
In the other image (4) above you'll see how few shaders we have in the scene now :) If you look at this window before consolidating, you'll see a lot more shaders in here. Get too many and you'll start to slow down or even crash the application.
I often take this opportunity to rename the shaders to something more recognizable, but that's not necessary either. In this situation, I've found that "AoA_Subsurface 1" is the name of the shader for the face. To change only the lips, I know I'll need a second shader so that my changes don't affect the whole face. So while I'm looking at image (4) Above, I'll select the shader named AoA_Subsurface 1, and go Ctrl C (copy) then Ctrl V (paste). The newly pasted shader was called AoA_Subsurface 13. I would normally just rename it "Lips" and rename AoA_Subsurface 1 "Face", etc., but let's make those lips, shall we?
The image below I have the new face shader open in the Texture Room. You open shaders by double-clicking them from the list on the right.
I want you to look at several things in this image.
On the left edge of the shader window you'll see the list of channels that you get in a multi-shader in Carrara. This short list can be super simple, extraordinarily complex, and anywhere in between. Just for this excercise, we're going to stay as simple as possible. When even you feel like going further with this, let me know.
To keep this shader consistent with the rest of the ones used on the figure, you only have one change to make, and that's in the color channel. I have the color channel selected in the image, but you don't need to. Just head to the uppermost folder icon to the left of the word "Texture Map" and click it.
This allows you to load a different image map.
Where?
In the image, I have an image of where you may find the texture maps for V6.
What?
In the image, "A" is a selection of makeup options for V6 in this particular folder. You may use these image maps to choose the lip color you want. You may do the same thing with the other Face shader to select a make up option, without changing the color you've chosen for the lips. Cool? I know! :)
One final word before I close for now:
Where I have marked "B" on the image, this is a Bump map. If you want to work some optimization into your shaders, add this map to the "Bump" channel. This is an easy process, especially since Carrara will remember the last folder you've gone to for images. Bump maps usually end with "B" or BUM, etc.,
So you click the little arrows to the right of the Bump channel and select "Texture Map" from the list, then add the image that I've labeled B on the image.
Now click on "Top Shader" on the left of the shader window, to see the whole list of channels in the main window. Set the bump strenth to something fairly low, like 6 or even less.
"C" that I've labeled in the image ends in "S", indicating that this is a specular map. Specular maps help the software to determine where highlights will occur. So you can place these in the Highlight channel of each of your skin shaders. If you do, I suggest setting the Shininess channel below it to 0.00 or perhaps a little higher, but not over 4.
If this turns out to be too glossy, go into the highlight channel and turn the image brightness down until you get the effect you want. Using full brightness in the highlight image and a shininess of 16 or 18 will make your figure to appear wet.
That's enough (possibly too much) for now. Let me know if you have any questions
Ringo Monfort and GKDantas each have some great shader sets for people. I am collecting all products from both stores as a way to learn new techniques - starting from the ones I need most.
Another thing to note:
Figures made before Genesis, like V4, V3, M3 and M4, etc., that have Poser MAT files in the runtime folder apply the maps for you by double clicking in the browser. But due to Carrara using different channels (or nodes) not all maps will be applied - like I explain above about specular maps in the highlight channel.
A great, free resource for helping to learn human shaders in Carrara is Indigone's V4 Skin Shader Kit & Lights available at Share CG. You need a free account to downbload, but there's so much free Poser and Carrara and DAZ Studio stuff that you can use for Carrara in there, you'll want that account anyways. Besides, they also carry the awesome Carrara 3D Expo (C3DE) Magazine!
Even though the free kit I mention above is called V4... it works for any figure. It uses Carrara shaders that don't require maps. But the instructions are excellent and include how to apply your texture maps, if you want to.
I went through your tutorial and it was fantastic. I have a much better understanding of how things work. Thanks for taking the time to make that tutorial for me and other beginners.
I tried using the Cornea shader and setting the Color to texture map and set the texture map to Rybelle_eyes01.jpg that appears to be brown. I left the color and Alpha radio button on. But when I look at the model she still has blue eyes. What am I doing wrong?
Thanks for all your your help.
Jeff
I think you need to place the texture map in three places: Lacrimals, Pupils, and Sclera.
I loaded V6 and applied an eye color option in Carrara. Then I went to the list of shaders and these three were black. They were named subsurface 63, subsurface 64, and subsurface 65. Interestingly, the Cornea shader was empty for me. I did get brown eyes, though.
Thanks for the response. I have posted a picture showing black eyes and the sub shaders 13, 14, 15 were black also but so were the eyes. I used V6 Belie Eye Color 2 and placed it on Victoria 6. When I try to place it on Actor or either eye it doesn't do anything and the color doesn't change. Then I deleted Victoria and started over with the same results. Again thanks for your help
Thanks Jeff
Follow Dartenbeck's steps in his tutorial, but the three shaders that you need to manually apply the texture map to will be black. If you corrected the one labeled "Cornea" you would see no effect. Here is what I see after loading V6, selecting the eye color in Carrara, consolidating shaders, and getting the "black eye" look. The bottom pic is what I did to correct the problem. Because I consolidated the shaders after applying the eye color in Carrara, I only had to manually fix one of the black shaders (they all share the same shader name, now).
Guys,
Slosh just posted UV switchers for G2 over in:
http://www.daz3d.com/forums/discussion/33957/
They are presets to swap the uv templates. Just tried in C8.5 and it let me load a Gia texture on the GF2 base. Only tried once, but it seems to work.
ncamp
I followed the procedure about combining the 3 black shaders and placing the texture map on the combined shader and it worked great. Thanks for everyones help. I have brown eyes! Thanks for everyones input. It was a fantastic learning experience. I understand Shaders a lot better. How does everyone find out what shader is assigned to what body part. Is there a map?
Now I am really struggling with sizing clothing to fit the model, especially Olympia 6. Can I take clothing and give the a dress size before I apply? Is it possible to have loose fitting clothing like in real life? I have attached pictures on Olympia 6 with the Winston Dress (same on on the store) and here is how it starts. I do not know where to begin. I tried selecting the different section of the dress and rotating or expanding but it just seemed to move the blank areas and I cannot get the dress to cover the body. And I use the fit to Genesis 2 Female already.
Sorry to keep bothering everyone, but thanks for the help.
Jeff
I think the problem is the dress is "nested" at the wrong level---it's under the G2 Female node but it should be at the same level (under the Olympia 6 node). You can move the item by clicking on the 1950 Dress in the Scene tree, hold the mouse down, and drag it so it is between Olympia 6 and G2 Female nodes (for a PC user). It's a little tricky at first.
You could also delete the dress, and add it back but have Olympia 6 selected in the Scene tree. Once the dress loads, fit it to G2 Female.
Thanks!
Wow, that was awesome, just changed the nesting level and that fixed it. That was to easy. I spent hours trying to figure this out. Thanks a lot to everyone.
Jeff