CPU Denoising on a Mac
 jimbradley
Posts: 2
jimbradley
Posts: 2
Apologies if this has been discussed. A quick search didn't show it.
Here's how to denoise your images on a Mac ... But you will need some familiarity with Terminal
At the end, you can open Terminal, navigate to the folder that contains the file, and type "denoise my-file.png" and get a nice denoised image with "_denoised.png" at the end. Thus denoising "awesomeRender.png" will result in "awesomeRender_denoised.png" . It should work with tiff, jpg, bmp also.
Download the following, using the Mac version oidn-0.9.0.x86_64.macos.tar.gz
from:
https://github.com/OpenImageDenoise/oidn/releases/
Choose a folder to save the file in, and double-click the file to expand it
The executable is in folder-you-chose-for-oidn/bin/denoise
Opening Terminal, navigating to folder-you-chose-for-oid. Typing "bin/denoise" will give a list of options for using the tool.
To use the denoiser, you will first need to convert your image to "pfm" (portable floatmap image format - see more at http://www.pauldebevec.com/Research/HDR/PFM/) or radiance format (.hdr). It also must be saved in Least Significant Byte order (i.e. little endian). As far as I know (even holding down the option key when clicking on File and then the same when clicking on the drop down to choose the file type), running Mac OS 10.12.6, there is no way to save to either format from Preview.
However, that can be achieved by opening your output file from Daz Studio and saving in .pfm (or .hdr) format using Photoshop or other 2d program such as Affinity Photo (neither have been tested by me, though; pretty sure Photoshop can do it, but the file extension may be different as "pfm" is also used by Adobe for something else).
I prefer to automate it. If you've a package manager, use it to install ImageMagick version 7, or install homebrew as the "missing package manager" for Mac OS, which allows a user to install many missing or un-upgraded items into the OS (including ImageMagick). See https://brew.sh/ to get started.
After installing brew (if necessary), then at the terminal type "brew install imagemagick@7"
This will install imageMagick version 7 at /usr/local/Cellar/imagemagick/7.0.8-46/ (and dependencies) with an executable called convert in subfolder bin. There may be better options (less dependencies) with another tool, but this worked for me. It may take some time, as many dependencies exist. (Looking at the "formulae" from brew at this time -- 6 days later, it may install to imagemagick/7.0.8-47 as the sub-version bumped ... so make a note of that and alter the instructions below as needed).
Once that is done, here is the procedure to denoise a .png file. It works for other file formats as well.
Create a file called "/usr/local/bin/denoise" (make sure a file doesn't exist with this name already! If it does, just use another name, such as denoise99, and substitute that in the instructions below): type ">/usr/local/bin/denoise" to create the file
type "chmod 755 /usr/local/bin/denoise" (this will make the file editable for you only, executable for you and everyone).
Using a text editor, cut and paste the following into the file, making changes to the paths (for Intel Image Denoiser and ImageMagick converter program) where needed. "#!/bin/bash" must be the first line. Save the file.
#!bin/bash
# Intel Open Image Denoiser -- modify this path as needed to point to where you placed the denoise program
denoise_exe="$HOME/install_bin/Mac/Daz/oidn-0.9.0.x86_64.macos/bin/denoise"
# ImageMagick converter program, this is standard path used by Homebrew package manager
# Change if newer version of ImageMagick is installed, of course
convert_exe="/usr/local/Cellar/imagemagick/7.0.8-46/bin/convert"
temp_pfm=temp_denoise_190524.pfm
temp_out=temp_denoise_out_190524.pfm
outfile="${1%.*}_denoised.${1##*.}"
"$convert_exe" "$1" -endian LSB $temp_pfm
"$denoise_exe" -ldr $temp_pfm -srgb -o $temp_out
"$convert_exe" $temp_out "$outfile"
rm $temp_pfm $temp_out
open "$outfile"
open "$1"
I used the -hdr option also, which has been working well with a few glitches (it is faster), though technically the pfm file is really not hdr, so I left in the -ldr option above and included the srbg.
Now render and save your image to the folder of choice. (Would be nice if the image could be saved in some HDR format such as EXR as then the color information wouldn't be lost by saving to tiff, png, bmp, or jpg -- as those file formats cannot hold the orders-of-magnitude color difference necessary for good color information and exposure adjustment in post. EXR can hold this information, and so can HDR).
Now as long as /usr/local/bin is on your path (it should be if homebrew was installed or you can modify your search path), typing "denoise xxx.png" will yield a new file "xxx_denoised.png" in the same folder.
Denoising isn't a cure-all (it also tends to flatten the image -- which is why AOV output is important), but in all, it is a nice help. These images have also been shrunk, which serves to reduce the noise effect in the original image. White backgrounds disappear, and using this abbreviated method (without AOVs), transparency cannot be carried to the new file (meaning this method is a last step).
Happy Rendering.
-- Jim.


Daz 3D is part of 
Connect
DAZ Productions, Inc.
7533 S Center View Ct #4664
West Jordan, UT 84084
Licensing Agreement | Terms of Service | Privacy Policy | EULA
© 2026 Daz Productions Inc. All Rights Reserved.
Comments
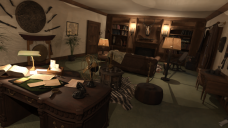
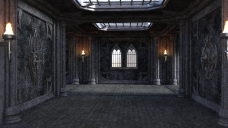
Here's the Silverthorne denoised...
Also, note the first line in the cut/paste script should read "#!/bin/bash"
It won't work otherwise.
Very helpful, thanks!
Have you used the mcjDenoise script? I have not yet tried following your instructions, previously had problems when trying to use oi denoise compiling all of the necessary parts. Things seems to be going smoothly setting everything up to use mcasual's script, but the script won't let me select the files for imagemagick and oi denoise, even after switching the browser tab from "exe" to all files. If I could get it to work, seems like it would really be useful.