Lettering on Frosted Glass - Solved
 Chelle_Schock
Posts: 30
Chelle_Schock
Posts: 30
So, I'm trying to make a frosted glass door with simple black lettering on it. The sort of thing you'd see before going into Sam Spade's office. Frosted glass shader is spot on, and adding a texmap with the lettering I want to the glass' colour channel seems to almost get the effect I want, but I can't seem to get the lettering centered. See images below. Any ideas are welcome.
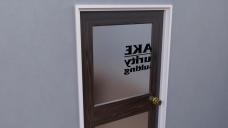
TexIssue.jpg
1280 x 720 - 572K
TexIssue2.jpg
659 x 434 - 55K
Post edited by Chelle_Schock on
Daz 3D is part of 
Connect
DAZ Productions, Inc.
7533 S Center View Ct #4664
West Jordan, UT 84084
Licensing Agreement | Terms of Service | Privacy Policy | EULA
© 2026 Daz Productions Inc. All Rights Reserved.
Comments
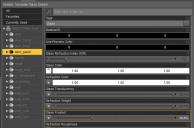
The texture you've made probably isn't lining up with the uv mapping of the door. You would need a template of the glass to do that. However, a much easier way is to use the Horizontal Offset value. Select the material and drag the slider to see the effect.
Edit - I seem to recognise that style of door. Is it one of mine?
I tried setting the Horizontal Offset, but just got a black texture when I did. I'll play with it a little more and see if that helps.
Sure is! Room Creator 2 is one of the best and most versatile products I've bought. In this instance, I'm using it to build a set that will be a small office. I applied a frosted glass shader to the central door panel of the basic interior door and that's what I'm working with. I'd like to make the lower half wood, but it works for my purposes. If there was a Room Creator 3 or just an expansion to 2 with a more office/commercial theme, I know at least one person that would snap it up in a heartbeat!
I just looked at the glass template in DS (Camera Menu> UV View) and I see that offset may not work, since it's a tall thin shape.
I'm attaching a screenshot of the template. Your text will have to fit in the rectangle width, and be placed in the upper half of it.
Hope that helps.
Edit - You can make the lower half wood, but you'd need to use the main door figure. You'd do it by switching on the lower_plain or lower2 body parts. The frame, door, divider and lower door parts all have separate materials, so they can be changed to suit.
Thank you so much! I'll give the template a shot and let you know. I didn't even notice there were other parts I could switch on. That level of detail just makes me appreciate the work you put into it that much more. Thank you!
Create an Iray Decal Node with the door selected. Raise the Iray Decal Node up to where you want the text to be. If you turn on the Iray preview you will see a white square. Add your text as the diffuse map. In your image editor, invert the colors of the text image (so the letters are white and the rest of the image is black) and save this as a new image. Add the newly created image to the Iray Decal's Cutout Opacity.
I haven't had much chance to come back to this in a while due to moving house, but I've finally been able to sit down and try things out. The template worked great, though applying it directly to the glass texture also fuzzed the edges, which makes sense given the frosted glass texture. The decal gave me the nice, crisp edge to the letters that I was looking for. Thanks for your help, both of you!
Thanks for letting us know. Glad you got it working!