tips) Sculpt genesis head morph by blender (mult -resolution modifier)
 kitakoredaz
Posts: 3,526
kitakoredaz
Posts: 3,526
Sorry,this is not step by step tutoriall how to use blender and make head morph for genesis^^:
and Making normal map from sculpted high resolution mesh then apply non sub-D mesh
is different matter ^^;
but tips we may need to know, when use blender sculpting to make morph by multi resolution modifier.
Maybe blender user know well, when sculpt daz figure with multi-resolution modifier to make morph,
there is one problem.
It will move all vertexes which not expected to move (not sculpted) slightly.
eg If I try to make head morph by blender sculpting with multi resolution modifier,
The shape can not be head only moprh. (other body part vertex which I have not tweaked move slightly too)
I do not know about z-brush, but I think if it may happen too.
Anyway In blender, we usually apply multi resolution modifier, then set subdivision level to high resolution.
to Sculpt . But to make moprh we need to remove current resolution level.
we need Apply base to freeze the sculpted shape on base resolution mesh.
then return resolution level to zero (no-subD).
These step can keep vertex counts for base resolution genesis.
so that the sculpted shape can be morph. there seems no problem. (usually)
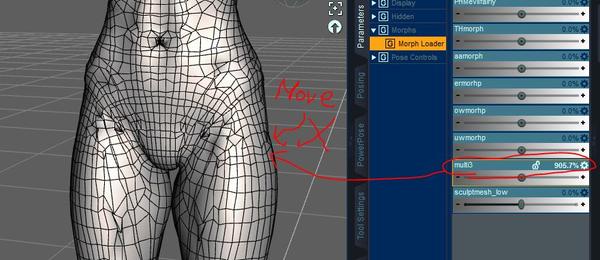
But when import the sculpted head morph in daz studio, it move slightly full vertexs of body too.
I have not sculpted body mesh , only tweak head vertex. but it actually move all vertices slightly.
(pic 1. I set high value about "multi3" parameter (controller), to clear show the problem)
I have thought the way to remove this problem. because using sculpt to make morph must be handy.
So that,, I tried musk paint etc, but they can not work.
THere is One way to correct them. I needed to mix base body shape by shape key after sculpting head.
(but it can not be perfect answer to restrict all vertices movements which we have not sculpted)
Now, I found simple basic way to sculpt morph, not to move the vertex which I did not sculpt
with using multi resolution modifier.
(so that we can sculpt and make morph shape with high resolution mesh for genesis (and 2F, 2M? etc)
It is simple but if someone try to make genesis morph by blender sculpting, and find same problem,
about multi resolution modifier, (maybe you hope to use the modifier)
I think this way will help you.
==================================================================
1. lmport genesis obj , in blender.
2. set multi resolution modifier. then set sub-division. I set 2 or 3.
keep it in mind,
the sub-division value of resolution modifier is important .
once you decide the value, you can not change them (to make morph)
if you set 2, you must sculpt the 2 subdivison value.
if you set 3, you may nee sculpt the 3 subidivison value.
change obj name to "sculpt-gen.obj"
3. Shift + D, then duplicate "sculpt-gen.obj"
and move the duplicated obj to another layer (2).
name it , "multi-resolution.obj"
4 On the layer 2, without sculpting,
use "Apply Base" on the "multi-resolution.obj"
when you Apply Base, the obj olearedy move all vertices slightly.
Remove "multi resolution modifier", so that now resolution level turn to base.
export current genesis shape (slightly all body vertex moved) and keep it as "delta-resolution.obj"
5 select Layer one, then start sculpting on "sculpt-gen.obj" to make morph which you want.
after sculpting, "Apply Base" then bake the sculpted shape on base mesh.
6 remove multi resolution modifier to turn resolution level to base (zero) .
export it as "sculpted-morph.obj"
7 after these step, you have two obj which are deformed from genesis base mesh.
one is "sculpted-morph.obj" another is "delta-resolution.obj"
(if you know well about morph loader pro option and how to make "delta morph" from "current shape",
you may understand what you need. and may understand easy what I plan)
8 In daz studio, first load delta-resolution.obj as morph for genesis,
by morph loader pro.
it make morph (controller) which n change genesis shape to the, "slightly moved full body parts vertex".
(apply the delta-resolution morph to 100%)
Though the shape is not sculpted at all, all vertex may slightly move, you can clearly see the effect.
9 keep the current shape, (keep the delta-resolution morph value 100%)
and use morph loader pro again, to load "sculpted morph.obj"
you must need to set option, Reverse Defomation = Yes.
It make sculpted morph, without moving vertex which you have not sculpted.
to check the morph, you need to turn the "delta resolution" morph value to zero.
then change value of the "sculpted morph". it should only move vertices which you sculpted,
keep another vertexes positon.
10 save the "sculpted moprh" as morph for genesis.
you need not to save "delta-resolution " morph (controller)
but for future use, you can save it too.
(may better save as 2multi or 3multi to record the sub-division level which you want to use when slucpt morph in blender)
Daz 3D is part of 
Connect
DAZ Productions, Inc.
7533 S Center View Ct #4664
West Jordan, UT 84084
Licensing Agreement | Terms of Service | Privacy Policy | EULA
© 2026 Daz Productions Inc. All Rights Reserved.