Daz 3D is part of 
Connect
DAZ Productions, Inc.
7533 S Center View Ct #4664
West Jordan, UT 84084
Licensing Agreement | Terms of Service | Privacy Policy | EULA
© 2026 Daz Productions Inc. All Rights Reserved.
Comments
I hope to have two entries for this month. I have been so busy with the second one that I completely forgot to introduce the first one after uploading it...
I hope I will manage to finish the second one in time, I am having a lot of fun with trying all the things a good render needs.
The first one is called Mummy's Boy
That is AWESOME Fisherman_B!
The pose is totally natural, and my particular favorite detail is the paint on the front quarter panel. Did you photoshop the figure onto a photograph or is that a rendered background?
~ Novbre
Thank you Novbre.
The pose and the mudguard are indeed the most prominent aspects, so I spent most hours on both of them. I actually always spend hours on adjusting the pose whenever I use a figure - I would never accept a pose in a render that does not look natural. I always ask myself if it is me or the posing tools in DS that make this such a tedious task ;)
The mudwing is hand painted on the car model. I am happy whenever I can use my Wacom Intuos Pro. I used to do drawings and paintings (before there were computers, hehe) and I still like this step most.
The background is a high resolution photograph that I used as a backplate in Iray. I did some experiments with alpha masks to be able to use photoshop to blend the foreground and background, but the render of the figure and the car turned out so well that there was absolutely no need to do it in a separate step. And of course the backplate in DS is required to adjust the objects in the scene and the camera settings to match the perspective. I used a matching environment HDRI as the only light source. As a final step in photoshop I adjusted only the overall brightness and darnkess of the shadows. The sun is almost fully perpendicular, so the figure's face is only indirectly lit. During my test renders I tried mesh / area lights to lighten this area up a bit, like it's done for professional photographs, but as this would have destroyed the natural lighting and realism of the whole arrangement, I decided to keep only the sun light as a light source. Realism is king! :)
When I see such renders, I alway think, that I will never reach that level of realism and craftsmanship.
Title for my image is: Monster Hunter
I have used d-former in this image because there wasn't dforce on the free cloth I put on her.
Nice job! dFormers can be a bear to work with, but most of the time they are what you have to use to ge things pushed exactly where you want them.
@ daybird
You will! Just compare your first ever render to what you are doing now! It's harder to see your growth when you experience it slowly over time, but if you compare your earliest work to the work you are doing now, the difference is much easier to see!
@Fisherman_B
I am the same way, posing is far an away the most time consuming part of creating a render. The Winter Fae image I did for this month took roughly 25 hours to pose! I don't know about you, but for me the problem with posing taking so long is me. 1) I may use a purchased pose to get the figure in the rough prosition I want, but I always do the bulk of the posing myself in the parameter tab with thebend/twist/side to side dials. I have heard a couple of people, including DAZ vendors say they wouldn't be able to do their scenes/promos quickly enough to make money if it weren't for the daz posing tools. I have looked into a few of them, the most promising of which is the pin tool and IK, and I always tell myself one day I will sit down and get seriously about learning how to use them...and then find myself back at the perameter taby tweaking a bend dial because it's familiar lol!
I'm familiar with photoshop, but self taught. I know about alphs and masks but not an alpha mask, how do you use them as a mask to blend the foreground and the background? That sounds like it would be really handy to know how to do lol.
~ Novbre
Haha Novbre, that’s exactly how I see myself working on poses in DS :)
I have done some modeling, rigging and animating of game characters for the Unity3D game engine in Maya and I am by far no expert in this field, but I am having a hard time to achieve comparable results in a comparable time frame in DS. In General, IK is a blessing and a curse at the same time. I am sure there is a lot to learn about good workflows in DS, I am still in my DS beginner months so I need to spend more time.
I guess my wording was a bit imprecise, I meant alpha channel masks. Nothing new or special ;)
Hi madsemil, interesting start but two things disturb me a little...
She blends in to much in the rocks. Maybe it helps when you put brightness the light a little higher.
You should also move her a little out of the center of the frame. I find there is to much empty space around her and to avoid that, you should put something beside her, that she can protect ( A victim, some treasure or a child)...or just simple change the frame. :)
I'm still a bit confused on how you would use the the alpha channel to blend a forground to a background. I have only really used the alpha channel to save selections in when I was a making UIs for EQ and WoW lol.
~ Nov
I don't understand a word of what your both talking about? Any tutorials about this stuff?
Thanks for the advice DigitalSteam I discovered that the tree and presents were floating in mid air! When I lowered them I found I had to adjust the younger girl's pose and move the older girl. I don't think I'll have any time to do any more work on this until after Christmas now. Hope you all have a enjoyable Christmas
Posing is a struggle for me too since I started. Even when I would pin individual bones they would still sometimes shift when I don't want them to and it got tedious pinning/unpinning repeatedly. (I'm not familiar with animating yet). I don't know if anyone else uses V3Digitimes "Ultimate Pose Mixer" tool. I grabbed it when it was on sale for almost nothing. It's designed to quickly/easily select partial segments of pose presets and apply only those parts of the preset to your figure. I rarely use it for that though, my main use is locking all the figure's bones in one click then fiddling with the region of the figure i want, often just by grabbing and pulling or using the universal tool or activepose tool without any shifting to the rest of the body. I know there's other ways to lock/unlock parts of the body but the workflow is so much more streamlined with this tool and it works perfectly in my opinion. I have it installed as it's own top menu tab so it's always right there to use. I still of course use dials for closeup fine tuning.
Also btw these renders from you guys are looking fantastic...
@Novbre the amount of care you put into your posing really shows and made that Winter Fae render come out perfect.
@Fisherman_B that level of gritty realism is mind-blowing.
I really hope to dig deeper into Daz and it's capabilities. I'm not yet familiar with much when it comes to postwork either but I hope to keep learning from all you on here.
And @Daybird, speaking of difficulties with posing, I just was looking at your b&w "Dance Couple" image from earlier this year and clearly you have a ton to offer with your advice. That's one of the most stylish examples of posing I've seen.
@Novbre, @testingtesterson35. and @Fisherman_B, I'm not sure if you are already using PowerPose (DS> Window | Panes(Tabs) | PowerPose) (It's built into DazStudio, but hidden by default) but I just found it a couple weeks ago and it is super useful for getting poses "nearly there" quickly. Then some fine tuning and blam! (except you can pose things on characters faces I didn't even know were posable, so that got me off on a side tangent for a bit).
@daybird, I know the feeling you are talking about when looking at really good renders, but don't let it get you down (totally hypocrital advice, I go through the gallery every day and get depressed.) Instead let it inspire you by seeing what these programs are capable of. Focus on learning one thing really good, then work on the next thing that you want to be good at. Most things take a while to get good at...
An example of this:
A couple months ago I was getting REALLY frustrated because I couldn't make a sidewalk look like concrete, no matter what I did to the material settings:
At first I thought it had something to do with the topology of my models (triangles instead of quads). After about two months of trying everything to retopo and looking into it further, I found the .stl files converted to .obj files didn't have any UV maps, so anything with a map wouldn't work. I tried fixing it in zBrush, found out I cannot get things back out of Zbrush at the same size or position that I put them in, and that I SUCK at zBrush. I tried a bunch of other programs still no success. Literally yesterday, I finally got UV maps on a model, and it came out with the same size and position as it went in with. (3DCoat, if anyone is wondering).
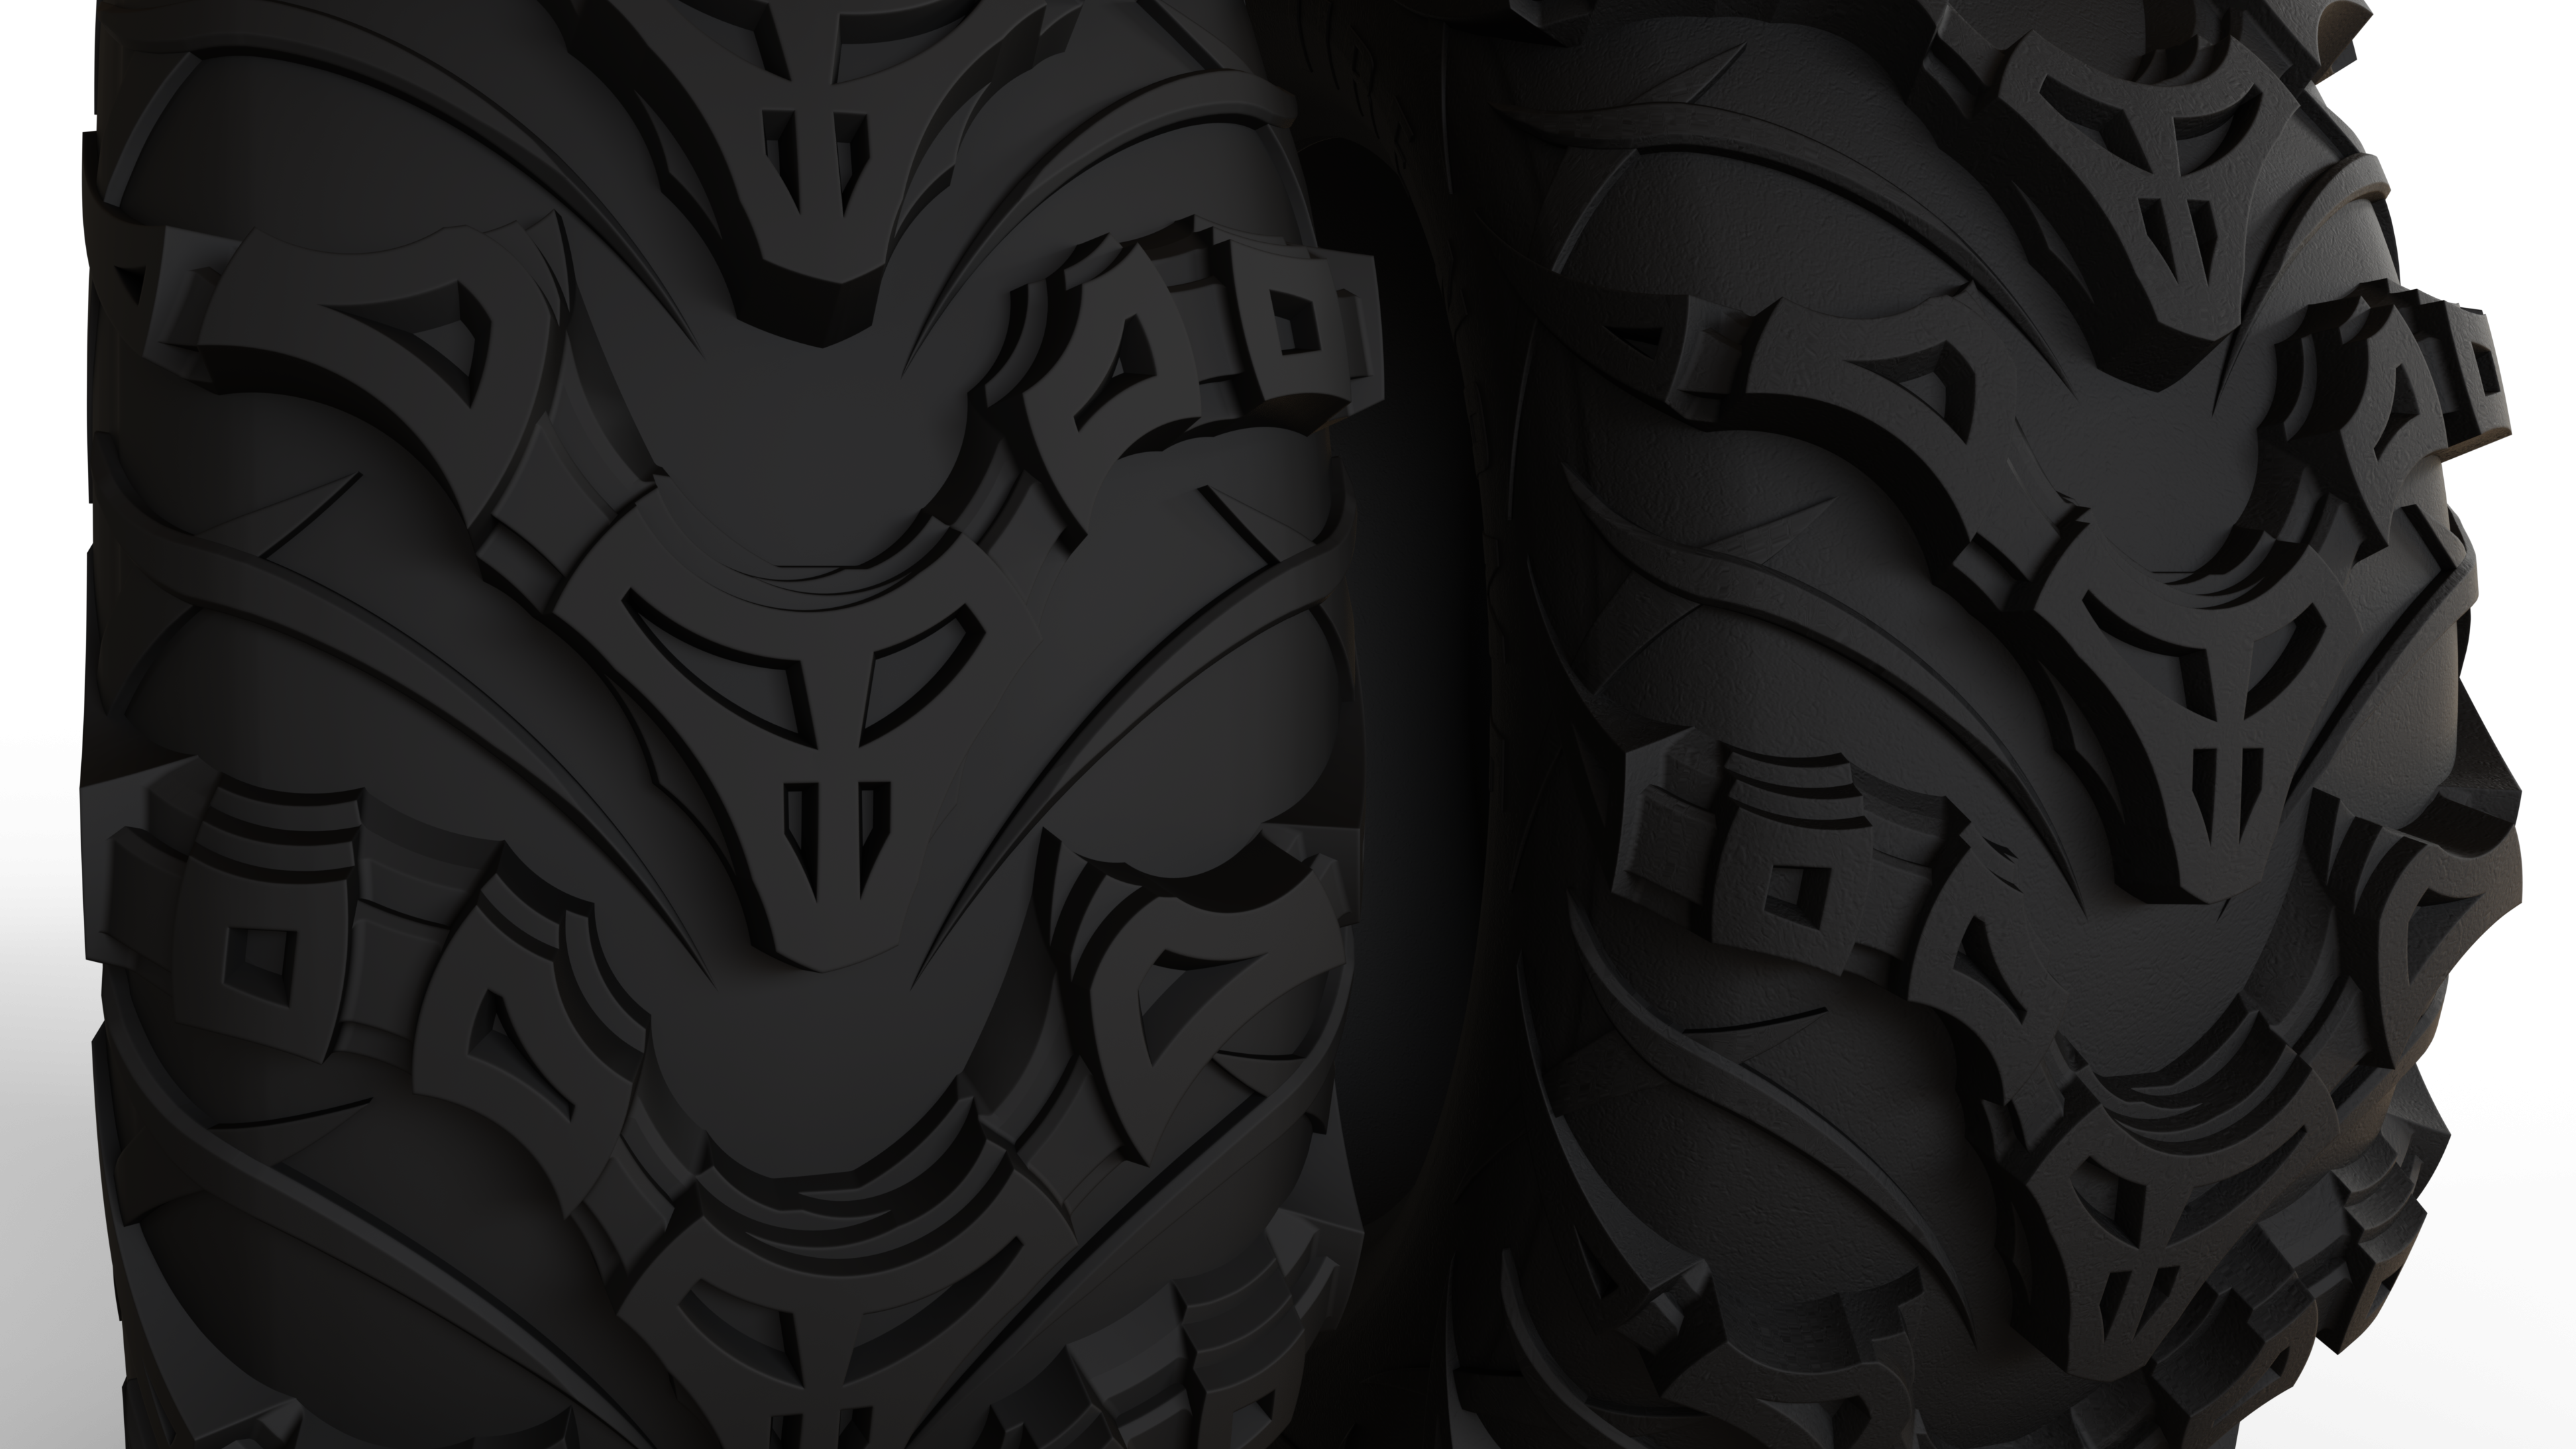
Both of these tires are the same model, materials, everything. The one on the right just has a (really shoddy) UV map. Only difference. But the amount of difference that one little thing makes is massive. Now there's a whole new level of rendering possibilities open that I'm dying to play around with! (And I needed it for work, they didn't like how flat the surface of the tires looked in the animation I'm making for the video dept.)
It is on my wish list, so I have looked at it, unfortunately about the time I saw it, RiverSoft Art and Sickleyield put out several clothing converters. I am nearing the end of this MASSIVE two year converstion project to convert all of my characters,clothes,morphs, expressions and poses over to Genesis 8, and the clothing converters could save me months of manual convertions so I had to re-prioritize my wishlist lol.
@ Tycide
I have tried zBrush trails a number of times over the years, and I just can't figure out how to do anything in it. The UI is a complete nightmare for me, so I have a lot of respect for anyone who can do ANYTHING using that program. I am trying to decide if I want to to commit to learning 3D Coat or Headus for my UV tinkering. I'm not really gun-ho to learn brand new program atm thought which is why I've avoided making a decision lol. How intuitive is the UI for 3D Coat?
~ Novbre
@Novbre, 3DCoat is setup to make more sense (to me at least) than zBrush, it has descriptions when you hover over most things, and it starts up with a really great menu that has a bunch of automated wizards for what you want to do like retopo or UV meshing. Those are the only two I've used so far. It also does voxel sculpting and texture painting, but I haven't actually tried those. I think it does full-on 3D modelling... but I use SolidWorks for that.
It has a demo, and after the demo it still runs, you just can't export. So I've been using the post-trial version to keep seeing what it can do and saving the files. Once christmas is past, I'll buy a copy, then I can export my saved files. (It's on sale for $79 for personal / $279 for commercial until Jan 8th)
It also has a bunch of short video tutorials on its website that have helped a bunch.
To be honest, it took me tonnes of time to get that right. I am the same old school posing maker like you describe.

The main problem was, to find the right height for both figures and at some point, it was a lot of try and error with the smooth modifier in the region where their arms wrapped around each other.
@ Tycide
OMG! I had tinkered with poser pose a while back and thought it was neat but not something I would use for posing. When you said it could be used on faces though I opened up Daz and checked it out because I only remember poser pose working on the eyes before.
I spent a couple hours playing with expressions last night using power pose and I was completely blown away lol! Thank you so much for mentioning it! It's definately what I will be using in the future for expressions. It's SOOOOO much faster using that then scrolling through hundreds of dials to create an expression. Love love LOVE it!
~ Novbre
Just a couple quick progression renders, hopefully Santa leaves me some mad 3D skills under the tree tonight. (I could use them, not sure how he would box that though.)
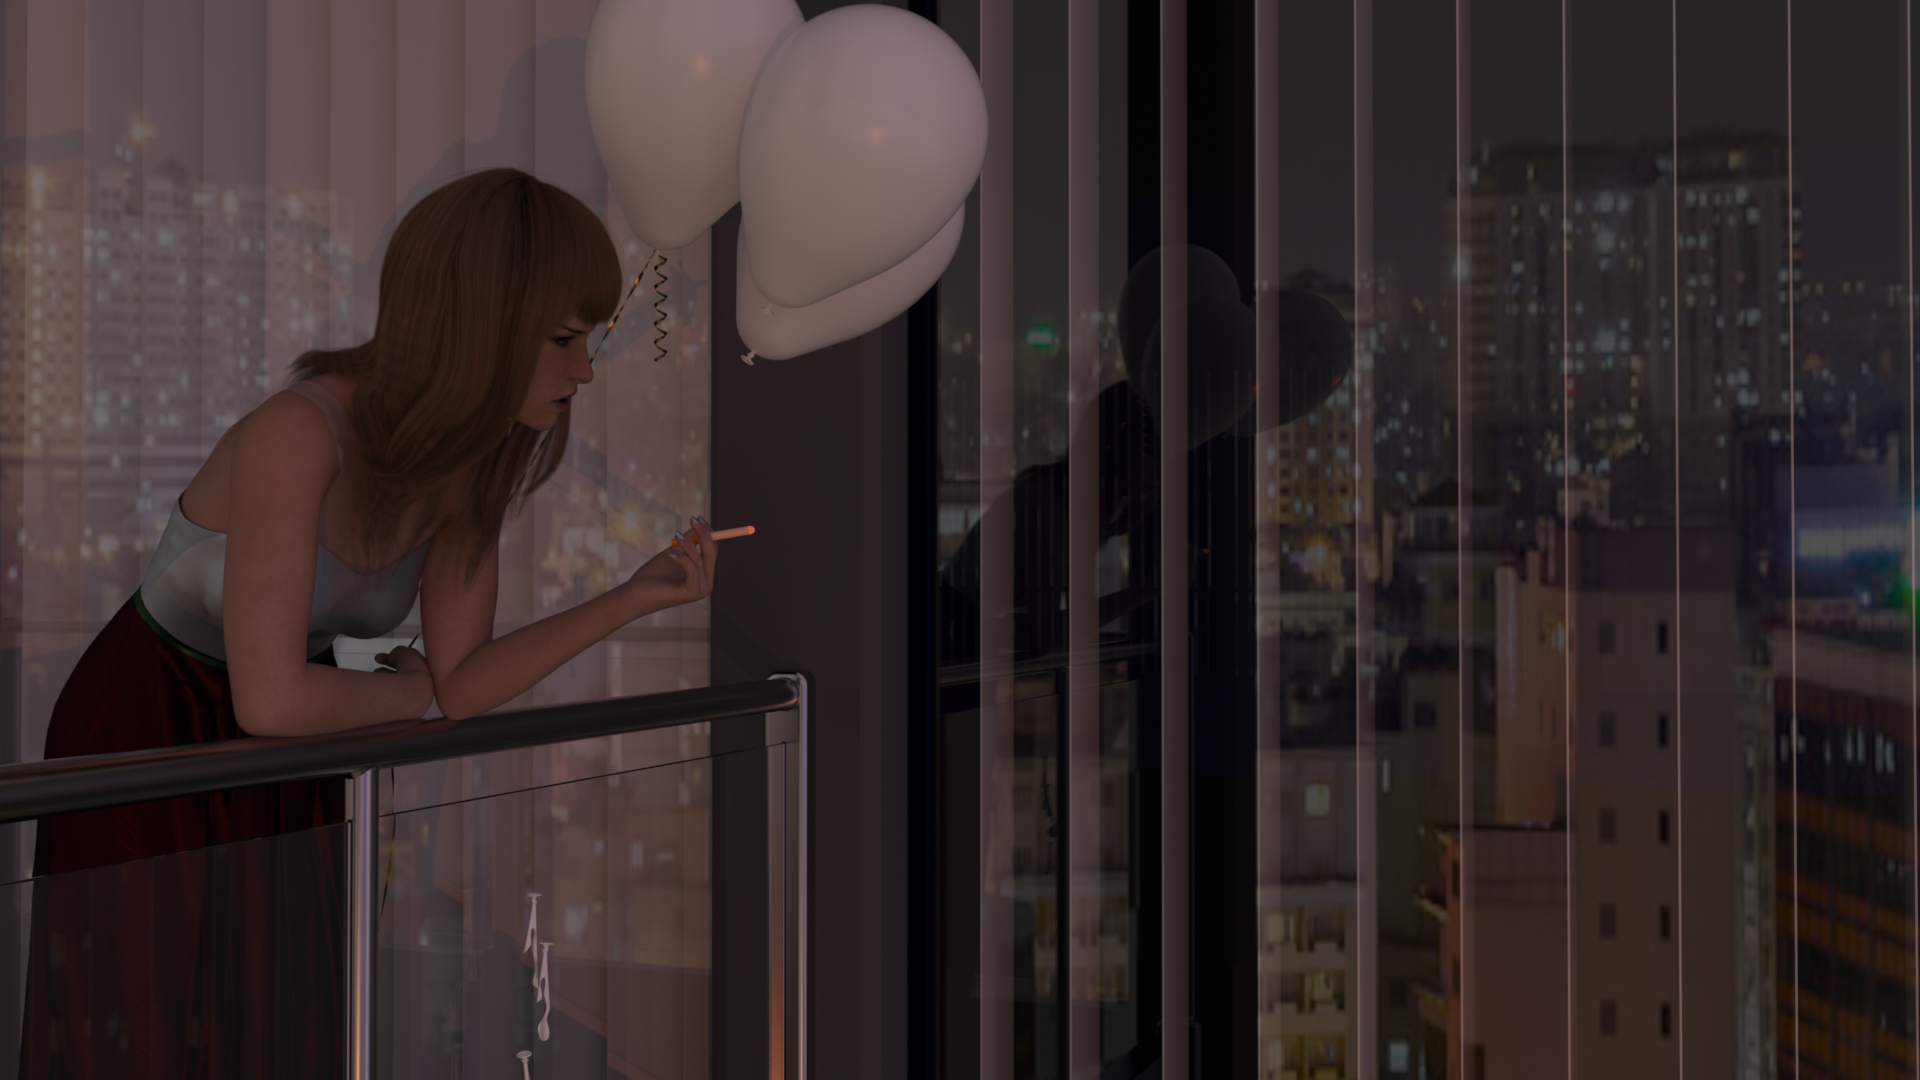
Still working on a plan for the interior party... Other than that things are moving in the directions I hoped, mostly.
Making the stupid strings for the balloons is a bit more intensive than I expected. Somehow I just thought I'd be like, "string!" and it would appear. But no matter how many times I said it, or however much I waved my arms at the screen... strings just wouldn't magically appear routed from the balloons to her hand and trailing off towards the floor. Technology still has a ways to go I guess. Thanks for nothing Alexa. (Just kiddding Alexa, I love you... She can't read what I'm typing can she? I don't know, I don't even have Alexa.)
Anyway, here are the renders, don't mind me, I'll just be over here drawing strings for the next few days...
*Ok, just one render, it won't let me attach the other...
Inhale. Feel foggy humidity fill your lungs, leaving traces of blends of smells in your senses - firs, resin, earthy soil, while the wind whispers softly in the forest. Let the cool and pale moonlight penetrate your eye and your mind, let it seize your thoughts, until you fear tomorrow's trials and tribulations...
Dreading Tomorrow
This was my most challenging render so far (in DS, not in general). I usually use the render engine that suits the requirements of the project. In this case this would have been Vray with its creamy light and shadows and the great volumetrics handling. But I insisted on finishing this in DS / Iray. Many tricks were necessary, VRAM issues, millions of polygons just from the "hero" trees in the fore- and background, fog, smoke, DOF, bloom, a mixture of HDRI, distant light, spot light, point lights and volumetric light effects, a lot of noise due to the dark environment, DS crashing, graphics cards "disappearing" during the render. I am happy with the results though.
@Fisherman_B
Epic render, the closer I look the more I like. The warm glow from deep inside the hall, the weathered wood finishes, the hero trees in the foreground. Looks like it was worth the effort.
The girl on the right is still floating above the floor. Look at the foot shadow which is at the bottom of the blue box but her foot is at the top of it.
@sueya
There is something wrong with the lights/shadows in your scene. I can't say what it is, but as Fishtales noticed, shadow and geometry of the right girl don't match. But I don't think that the figure is still hovering above the ground after you corrected that. The perspective looks correct, so even if something is still hovering, it should not be more than a centimeter or two, but the shadows are completely off. Something else is wrong. Let's check the left girl's shadow. One bright light illuminates her face and front. The light must be coming from the direction of the camera or from a slight angle to the right (from the viewer's perspective). But there is no matching shadow. This can be the result of another, brighter light that wipes out the weaker shadow. But what I can't explain: There is a shadow of one of the girls on the small wall projection on the left side of the picture. But how can this shadow wrap around the wall corner so that it shows up on the front of this wall projection? Both girls (possible shadow casters) would not produce this shadow around the corner. It looks like the shadow of a third person, invisble but casting a shadow. I attached a quick sketch trying to demonstrate this. Furthermore, the right girl's shadow on the ground seems to be a meter or more too far in the camera's negative Z axis. Sorry if my words sometimes don't make sense, I am not a native english speaker so my wording may sometimes be imprecise.
Edit: Did you move the scene or parts of it while keeping the already rendered shadows? That's the only thing I can think of that could explain what I see.
@tycide
Thanks for your comment, I am glad it was worth the effort.
@sueya
Try selecting all the objects, tree, figures, presents etc. and use Ctrl/d on them to drop them to the floor.
@Fishtales
I think the objects are on or almost on the floor now. Their perspectives matches the floor perspective quite well. For example, check the tree's stand, in relation to the position of her foot. I tried to explain in my previous post that the problem must be a "horizontal issue", not a "vertical issue" ;)
I attached another sketch, showing the discrepancy between where the foot is (red) and where it should be (blue), according to its shadow. I am pretty sure that this dicrepancy is not vertical. The objects and their shadows are displaced horizontally in relation to each other.
it is a vertical problem. The tree and the parcels are on the ground, the people are not in her previous attempt she said the tree and presents were floating, so she lowered the, In fact everything was floating and lowering the objects and repostioning the people horizontally has just made the shadow problem worse. It would have been easier to have raised the floor. If you look closely you can see the other person is also floating so that the shadow is in front of her on the screen.
I like this detective work, and sharing and discussing our observations :)
Yeah, I see now that my mistake was to believe that the girls are on the floor now, as she wrote. The explanation for the shadow on the left wall projection is - the left girl is not only hovering above the floor a bit, she is really flying half way up to the ceiling :) A faked perspective that creates literally unbelievable shadows.
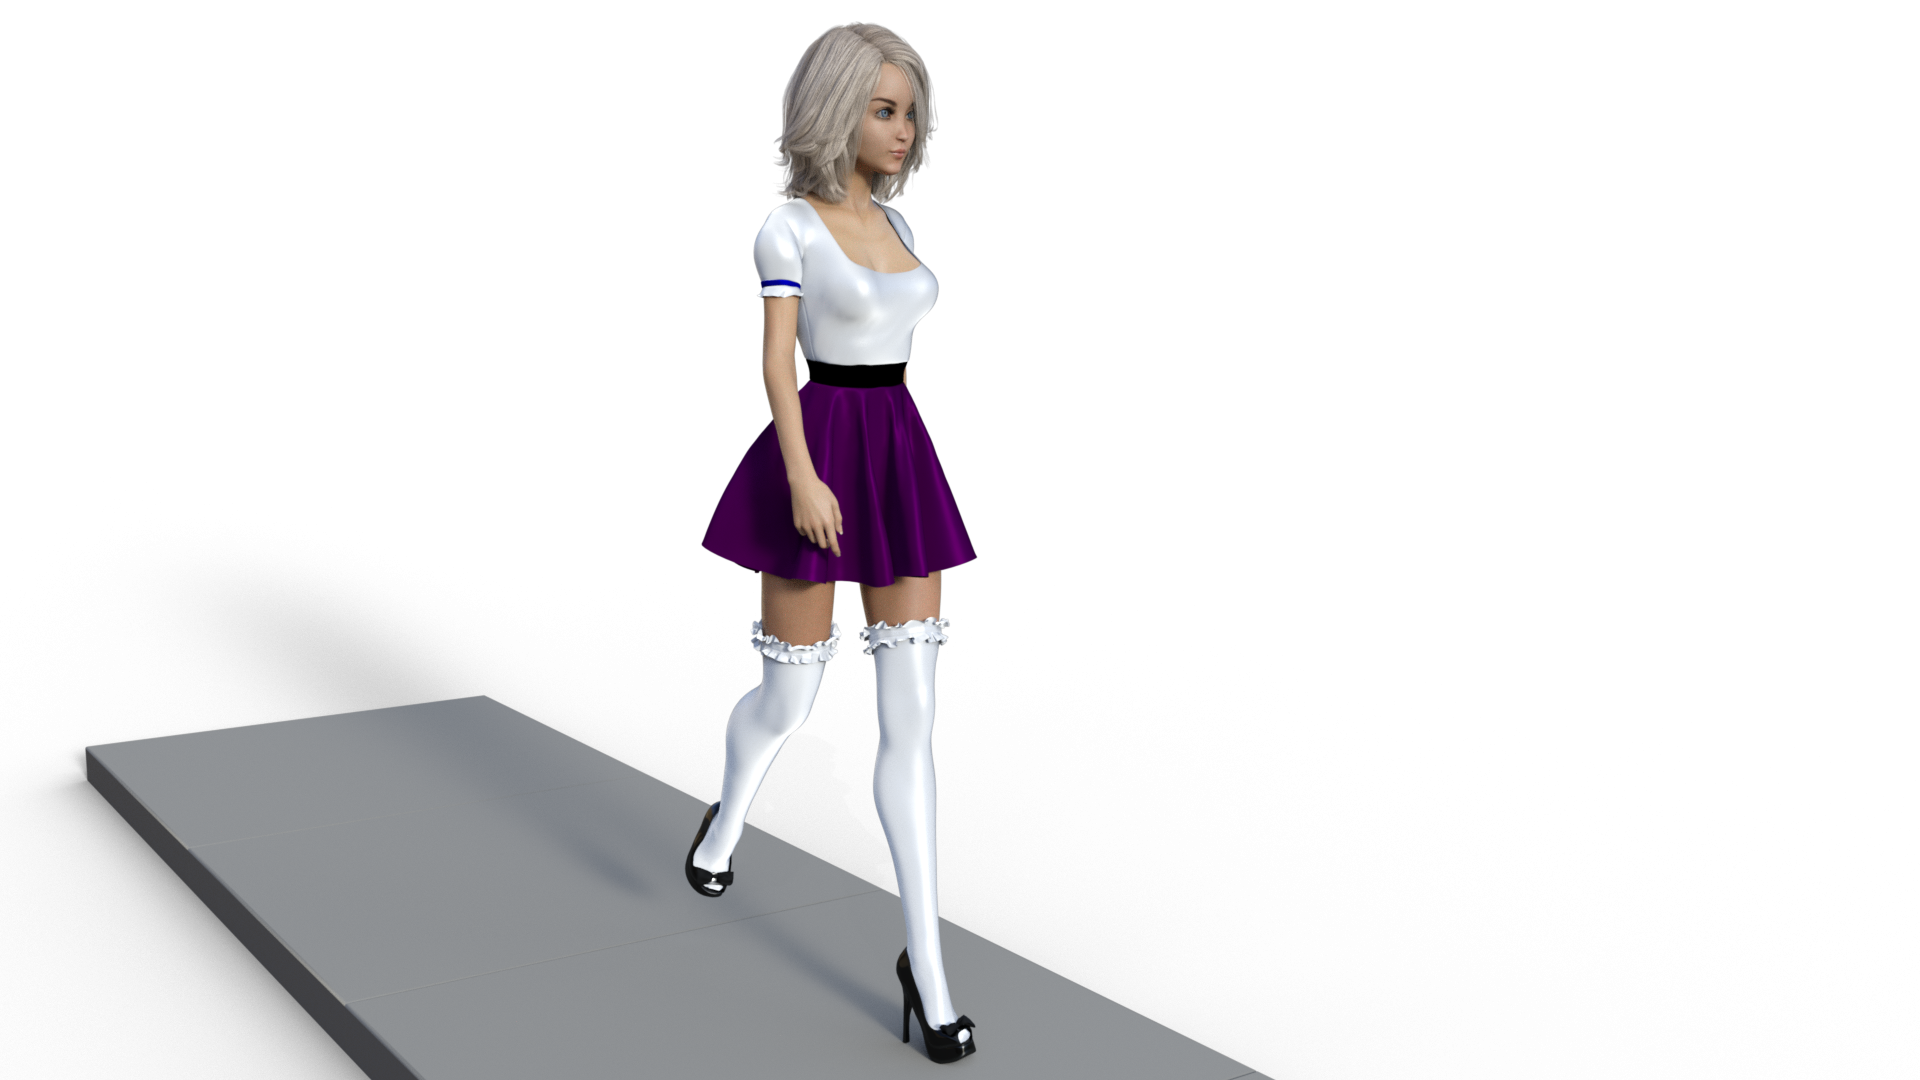
I like the scene and the materials. I don't know what your plan for this is, so I will just write what I personally would do next.
To add some "drama" and suspense, I would play with the intensity of the reflections / lights on the glass. I would also bring in some different surface "consistencies" (textures). The window is a huge glassy and sterile surface (good for reflections, but no real texture). The metal is very clean as well. Even if this is not the concept you're after, the girl's skin and hair could be more natural and less sterile, more detailed, less reflective etc. The pillar in the front of the building is also a good candidate for some more detail. You could even push this further to create a real contrast - Girl <-> Environment, using lights, reflections, roughness...
Another option is to make the girl more sterile as well to make it one with the environment. I personally like to accent things, so I would take the first route.
That's the great thing about digital arts - the number of options is practically limitless - boone and bane :)
Edit: I forgot to mention - more strings :)
Once again, thanks for all the advice. I found I couldn't use Ctrl & d to drop figures to the floor as this scene is on first floor of building . Using ctrl & D dropped them to ground floor. However I think I've succeeded in getting the two girls' feet on the floor (on same level as boxes) I have also moved them slightly and rotated the tree as some branches were hiding their faces. It still hasn't completely removed shadow on left and I now have shadow of branch on face of girl on right which is a bit annoying.