Experimenting with dForce on older hair
 grinch2901
Posts: 1,247
grinch2901
Posts: 1,247
I wanted to experiment with taking some older hairs and dynamizing them for dForce. This ammounts to adding the dForce modifier and painting a weight map but I thought I'd lay out the process here for myself to recall as well as for others interested to follow along.
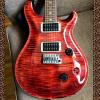
So first we have the hair, fitted to G3F. As you can see it aint pretty. I intentionally used morphs to move the hair a bit away from the body so its less likely to explode.

Then I selected a surface on the hair and added a dForce dynamic surface modifier via the Simulation tab. Same as any other dForce item. But since it's hair I know it will all just fall apart if I simulate at this point so I need to glue the hair down somehow. In most cases (but not all) I've found that the hair strands all start around the part and the crown. So if I can take that region and make it immune to dForce, the rest should just hang okay. Sounds like a weight map is needed!
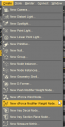
So to do that you need to select the hair, go to the Create drop down menu and select "New dForce Modifier Weight Node." I made a little screen grab of that but the picture is too small to put in my gallery so I can't link it in the body of this post but below it is attached.
This creates a node parented to the hair. The second pic below shows how that item looks. Select that node and go to the tools menu. Select the weight map brush which looks like a paintbrush on a barbell (see icon below).. Inside the Tools pane that now opens up a menu where you can add a weight map (see the fourth picture below). Finally you are ready to paint. The whole model turns red by default, that mean it is all going to be 100% simulated. The more blue it is, the less it is simulated. If it's grey, it won't be simulate at all, that's what were going for. At this point the cursor should be a big circle, clicking and dragging it around will paint the map. But since it's already all 100% it needs to be painted in reverse. Or unpainted. Or something like that. So hold ALT and now when you drag it makes it more blue (i.e. less simulation). Select whaver verts you want and paint them to your liking. Here's what mine looked like:


Note that I made the whole part line gray and put some blue around major structural things so that it didn't all just turn into flat ribbons. Wanted it to drape but still look like it was the same hair. This is tough and the map often needs to be tweaked to see what works best. We'll see how this does when I simulate.
Before I simulate though I want to make absolute sure that the scalp / skullcap is not part of the simulation. Whenever it is, it causes the whole thing to explode. I can't easily paint away just that but fortunately it's a seperate material so in the Materials tab I select that material and zero out the Dynamic Strength. Okay, now that that's done it's time to simulate. After 2 minutes it looked like this:

Tha'ts good but not perfect. From this angle it looks okay BUT there's a big tendril right over her left shoulder that is actually point pretty much straight out towards the camera. Maybe more time is needed? Let's let it run for 6 minutes. That takes it to 96 percent complete. Any better?

Hmm. It never gets better? Weird. The weight map was all 100% red on that part of the hair so I'm not sure why it did that. Here's a more complete render:
You can still notice that one tendril over the left shoulder if you know to look for it. This wouldnt work too well from a total front angle.
Here's another pose, same hair.

In this instance I needed to tweak the weight map because where I put the blue before (the hair around the face) was making it too stiff to hang down well for this particular pose. It's a balancing act.
Anyway, it does drape. Looks a bit messy though. probably need to play more with the dynamic strength (in the materials pane) or the weight map to get it to look more natural and less like it went from a perfectly styled do in the static case to am uncombed mess when she bends over. Still gottal experiment with that.


Daz 3D is part of 
Connect
DAZ Productions, Inc.
7533 S Center View Ct #4664
West Jordan, UT 84084
Licensing Agreement | Terms of Service | Privacy Policy | EULA
© 2026 Daz Productions Inc. All Rights Reserved.
Comments
One thing I forget to mention: I added a geoshell to the hair and gave it all the same materials. Then I turned ot invisble in the Scene tab before simming so it wouldnt interfere. When it was done, I turned it back on. I do this because the simulated hair tends to look a bit stringy, the geoshell give it an illusion of a bit of depth.
I haven't played much with using dForce on hair, but did you turn off Self collision? I've found that sometimes (though they've fixed it to a certain extent in a recent update) that is the culprit when an object with dForce doesn't behave as you think it should.
I didn't turn off self collision. Maybe I'll try again. Unfortunately I changed the scene to that second pose and then saved so I don't have the ability to recreate the exact first sim with that weird tendril that wont fall. But I'll see what affect it has anyway.
I've been doing this too - many of the older hairs have great potential in dForce as many have fewer layers and are less complex than some of the newer hairs - I'm finding that helpful when it comes to the weight mapping.
So far I've made five of the older hair that I own into dForce hair. Here are some renders of a couple of them:
It definitely helps to turn the dynamic strength down on the wavy hair and to also make sure that when weight mapping hair that the weight map is completely gray where the hair meets the "cap" (otherwise the hair can fall apart - it's not pretty when that happens lol).
..would be interesting to see this on Osean and Bolina hair (don't have the horsepower on my system to handle it).
Great work Diva. This technique can work. I don't know how to save a weight map so I don't know how to make the hair permanently "dForce compatible" but that's my next learning experience.
I took DaWaterRat's suggestion and turned self-collision off and made ramped the sim strength down, at first I made sim strength 85% and the hair just floated there, albeit more naturally looking than the pre-simulation version (whatever "floated more naturally in definance of gravity" means). I turned up back up to 95% and let 'er rip. Two things: it draped much faster, got good results in a minute. Second thing, the left turn by that one tendril was gone but since I was working on a recreated scene (I overwrote the original so I reposed and attempted to set the hair morphs similarly) I can't be sure I didn't solve it inadvertently by not morphing it exactly the same. Anyway, doesn't seem self-collision is a problem for hair, worked fine without it. The result of this iteration is below. As I noted previously, the geo-shell I added give the hair some much needed depth because after simulation it looks very fine and flat. So that's turned on in the render below too.
Kyoto Kid, I don't think I have those hairs, but my runtime is huge and if they are, for example, old V4 ones then it's possible that I have them and forgot. If I have either I'll see what I can do in another experiment.
By they way, the dforce sim runs on CPU, not GPU. Not sure why you couldn't run it on your system. Yeah, it's CPU intensive but not system isn't that high end and it sims mst things within a minute or so. Even if it took 4 minutes, it wouldnt seem that bad for old timers who remember what it was like to render 10 years ago!
I save it as a "Figure" - that saves the weight map to the hair permanently, I think. I'm not sure if that's the "right" way, but it works for quickly reloading the hair with the weight map already applied and all that (just make sure you name it something you'll remember like "SassyPants hair with dForce". Then you can go into the saved figures folder and categorize the hair into your hair folder for easy access later. The only downside of saving it as a figure is that you can't (as far as I can tell) further edit the weight map on the hair "figure" later. So I make sure to save it as a figure only after I'm totally happy with the weight mapping.
Thanks very much, that was very helpful. Maybe I'll be brave enought to try it soon.
I though though that since dForce needs openCL 1.2 at a minimum that it worked sort of like an nVidia iRay render - first it tried a GPU, in this case any GPU that supports openCL 1.2 or newer would work and if that failed, it would fall back to run openCL via software only on the CPU.
Kyoto, I was mistaken. My machine can use either GPU or CPU. It used to use CPU and I forgot a couple of weeks ago I switched it to GPU. I'll have to do some time tests to see what the difference is. In the meantime I didn't have the hairs you mentioned BUT it looks like you're interested in hair with some curl to it. I did have the old Marisandra hair for V4 so let's see how that works.
Marisandra hair, shown in the first pic, is curly but has a defined part where all the strands come together. Or most of them, as we'll see. I painted the weight map shown in the second pic nd set the sliders as shown in the third. Sim gave me the hot mess of the fourth pic. Nope, that won't do. More to try...
Okay so I modified the weight map a bit to trry to keep some body in the curls. Also, a few strands fell out of the hair. While they were out, I stopped the sim and un-painted their now-conveniently accessible ends so that when I cleared sim, they will now be stuck. Wow, that actually worked! Resultant weight map is the first pic.
I simulated it and it held it's shape pretty well (second pic). In the thirs pic, I added the geometry shell. Then I bent V4's neck back and simulated (pic 4). Whoa. It sort of just stays there. Apparantly that little bit of blue (in this case) cant really be tolerated. So I re-painted everything red (except the ends) but now I know it will look like a bunch of loose string with no curl if I just sim it this way. So I need to play with setttings a bit to find a way to keep the curl. But which ones? Stay tuned...
Here are the efforts, in picture order:
So my takeaway is that if you have a hair with curls, you can indeed tweak settings to keep them from de-curling. Takes a bit of experimenting though.
For the record, in the pics in my last post, this was the weight map used. You can see it's basically full sim except for the roots along the part (not shown). I had to use the paramaters to get the look I wanted, weight map seemed to be too "all or nothing" to get the job done.
I find that what you can do with hair that just has curls in part of the hair is to hit the curls up with a little bit of "alt" in the weight mapping - paint in a little purple or blue to keep the curls a bit tighter than the straight part of the hair.
Well, I did that initially and the curls didn't even sim. You can see the map I used initially a few posts up, when I simmed the curls held their shape BUT ... when I moved the head they didn't actually hang with gravity. Since that was what I wanted, I had to blow away the blue in the curls (as you can see in the final weight map I posted) and then play with the settings, most of which I don't really understand so I went with random tweaks. But somehow it worked, the curls stayed and the hair hung with gravity. I could experiment more with doing it all in the weight map though, that seems easier (in principle) than trying like crazy to find the right combo of random stiffness settings.
Oh yeah, if the hair has far to move, then the curls don't seem to sim enough with the lower weight map in the curls. I like your way better. :) It turned out nice. Looks like she used a lot of hairspray but then you'd expect that with that style of hair. :)
Is the weight map saying that, eg, the blue parts of the map are heavier than the red parts of the map?
The red parts are going to have the most dynamic strength. Then purple, then blue, and then the gray will have zero dynamic strength.
Thanks
NP. :) It starts out full red - so full dynamic strength. You'll need to hold down Alt to "paint away" some of the dynamic strength in parts that you don't want to be as affected by dForce. Like at the hair "part" that's usually where most of the hair is attached to the cap- so you'll want to paint away the red until it's gray at the part to keep the hair strands attached to the cap. :)
I wish it would start out blue or that there was an option for that, but I haven't foung one yet. Would make it easier to paint just the parts you want to be dynamic as opposed to the whole thing starting out that way.
Yeah, I found myself wishing for the same thing on a project I'm working on (not hair). If there was a way to get it to start out blue or even gray and then paint in the dynamic strength from 0%, that would be really helpful for different types of projects. I'm very new to weight mapping, so there might be a way that I just don't know about.
For now though, the easiest way I know of is to zoom way out so that the brush is really big and the object you're working on is really small, then use ALT to paint all of the dynamic strength out. Then you can zoom back in and start painting in the dynamic strength where you need it.
With the Weight Map Editing tool active and the item you want to zero out selected and the vertices selected, right click on the item in the view port, Weight Editing --> Fill Selected... Enter 0 in the dialog box.
Awesome, will try that out.
EDIT - Just tried this and when it was all red, I selected the option you mentioned and nothing changed to blue, only red
In the Node Weight Brush tool settings,
Even though I have no idea what the "hamburger button" is, LOL I managed to get it working. Thanks for that.
Lol, great. I think you can right click on the hair to access most of the options needed too.
LOL, yep, that is what I did and probably why I got it working. I am used to that option since I use it often with the geometry editor. Thanks again.
...old first generation 8 thread i7 and ~10.7 GB of available DDR3 1366 memory (After Windows + system utilities and before subtracting the load of the scene and Daz). The last time I did a 5 frame motion blur (in 3DL using an HDRI and a single character plus a motorcycle as the only geometry) it took 16.5 hours to render. Anything that involves an animation sim takes forever on my system.
...so basically as Bolina hair has tight curls it would be a real pain to work with since either I'd lose them, or they wouldn't respond to gravity.
May just have to keep working with Garibaldi Express to do hair for my Merida character (which means no rendering in Iray if I don't want my system to melt down), Don't like the way the strands stretch and deform when using the hair's built in morphs/movements (and I have to use two instances to get the desired thickness).