Advanced Iray Node Properties - "Iray Handle" & Light Path Expressions
 linvanchene
Posts: 1,386
linvanchene
Posts: 1,386
Update/Edt:
In the content library you can find a script to Create Advanced Iray Node Properties.
DAZ Studio Formats > My DAZ 3D Library > Scripts > Utilities > Create Advanced Iray Node Properties
While the use of "Iray Matte" is explained on the forum I was not able to find information about the "Iray Handle" parameter.
I put together an example how you can use the Iray Handle parameter in combination with the Iray Light Path Expressions:
https://www.daz3d.com/forums/discussion/comment/3436956/#Comment_3436956
I leave the first few posts of this thread as they are so you can track the progress of the discussion...
- - -
You can also find the script in the "Default Resources" Product:

- - -
"Enable Iray Matte"
I was able to follow the tutorials how to create "matte" objects to catch shadows in Iray.
compare:
Video: Matte Function in Iray DAZ Studio - Shadow Catcher #2
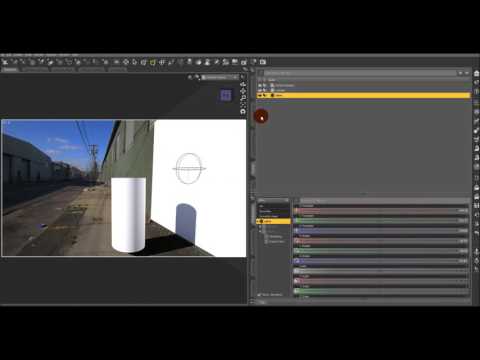
Related Forum post:
https://www.daz3d.com/forums/discussion/57051/how-do-you-create-a-shadow-catcher-in-iray
- - -
Iray Handle
When using the script to
Create Advanced Iray Node Properties
there is also an entry created called "Iray Handle"
- - -
Observations:
It seems you can enter a name.
In the example I entered "ground plane".
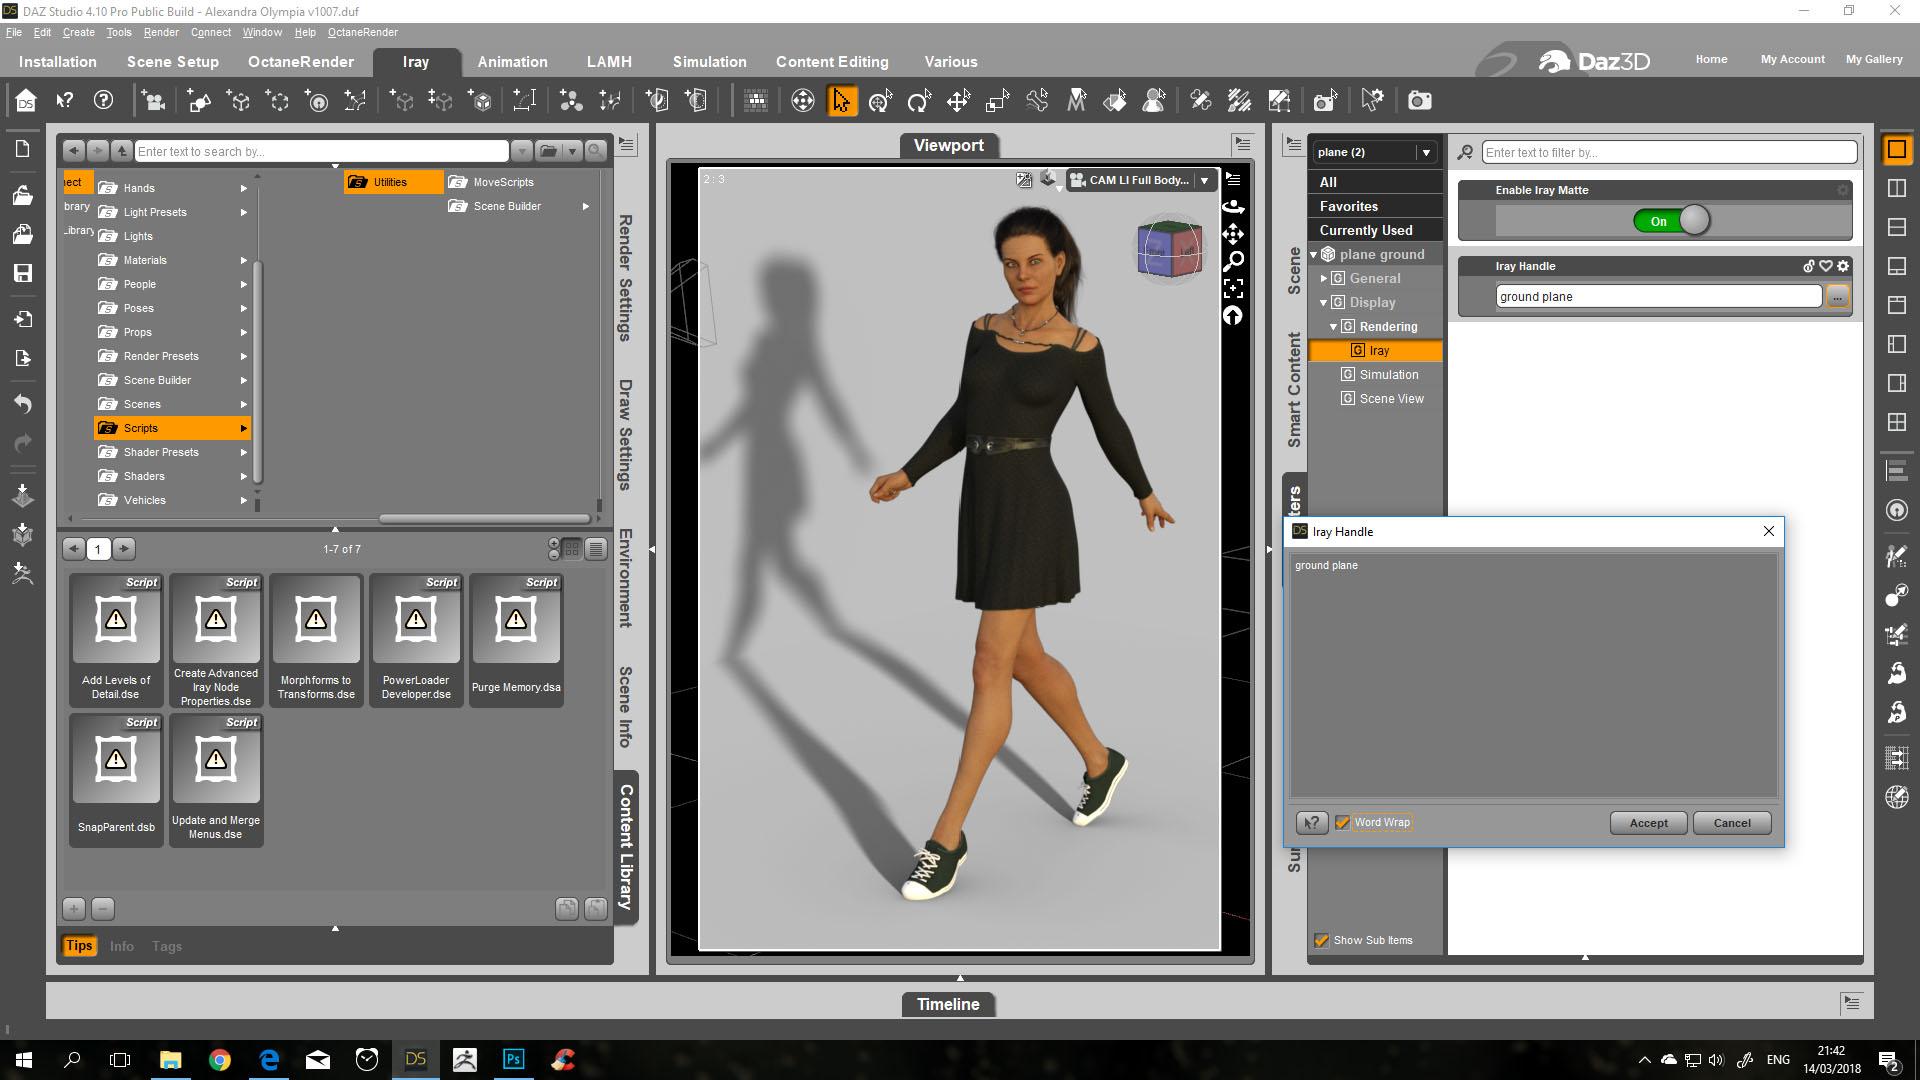
A handle may be something like an "object id" that then can be used to call that object in some other functions.
But I was not able to find any information how it is used in the Iray integration for DAZ Studio.
- - -
Questions:
1) How is this "Iray Handle" used in DAZ Studio?
2) Why do users have to run a script to show the parameters "Enable Iray Matte" and "Iray Handle"?
Can users break any functionality if they experiment with those settings without knowing what exactly to do?
Why are those settings not shown by default?
Daz 3D is part of 
Connect
DAZ Productions, Inc.
7533 S Center View Ct #4664
West Jordan, UT 84084
Licensing Agreement | Terms of Service | Privacy Policy | EULA
© 2026 Daz Productions Inc. All Rights Reserved.
Comments
Not sure, but perhaps http://blog.irayrender.com/post/75582593845/get-a-grip-1-separating-objects-using-lpe
Thank you for this link. This leads to some very interesting options how to composite with Iray.
I did not know that Iray supports "Light Path Expressions" LPE that offer ways to split off the render into several images each containing specific elements.
The images could be exported as .exr files and then could be composited in photoshop.
- - -
"An LPE is a regular expression that matches some light transport paths that iray generates, but not others. Each result buffer can be associated with a LPE so that only paths which match the expression end up contributing to that buffer. Iray also allows you to render several buffers with different LPEs at the same time at almost no additional runtime cost. LPEs can distinguish between different surface properties such as diffuse or glossy, reflection or refraction, types of light sources, and names."
Source:
http://blog.irayrender.com/post/37260056351/instant-relighting-nonphysical-effects
Regular Expressions:
https://en.wikipedia.org/wiki/Regular_expression
About Light Path Expressions:
http://blog.irayrender.com/post/76948894710/compositing-with-light-path-expressions
The get a grip series:
http://blog.irayrender.com/post/75582593845/get-a-grip-1-separating-objects-using-lpe
http://blog.irayrender.com/post/77365439434/get-a-grip-2-instant-color-change
http://blog.irayrender.com/post/78094420163/get-a-grip-3-more-complex-color-changes
- - -
Update / Edit 2018-03-15
I split off the information about Light Path Expressions into another thread.
https://www.daz3d.com/forums/discussion/239301/iray-daz-studio-light-path-expressions
- - -
I am not yet sure either if the Iray handles are related to the Light Path Expressions.
Maybe the "Iray handles" are the "names" and can be used with LPE to indicate witch objects or surfaces should be included in the canvases.
- - -
- - -
After some more testing the short version:
You can use the "Iray handles" under the "Advanced Iray Node Properties" to set up Light Path Expressions.
Basically the Iray handles give an id or name to an object that then can be used to reference to it when using Iray specific commands (expressions)
This post will follow an example of the Iray Dev Blog and show how the same can be done in DAZ Studio:
http://blog.irayrender.com/post/76948894710/compositing-with-light-path-expressions
- - -
If you are not yet familiar with Iray Light Path Expressions in DAZ Studio please also have a look at those threads:
https://www.daz3d.com/forums/discussion/239301/iray-daz-studio-light-path-expressions-for-compositing-in-photoshop
https://www.daz3d.com/forums/discussion/205886/light-path-expressions-iray
- - -
Iray Handles & Light Path Expressions used to "Compositing per light"
In this example the idea is to separate the interaction of each light with objects in the scene into its own image.
In photoshop you can then adjust the strenght of each image in postproduction.
Step 01
Set up a test scene with three lights:
You can find version 1004 of the test scene in its basic state as .zip file with size 83.2KB here:
https://www.daz3d.com/forums/uploads/FileUpload/37/e250143130073afaa0105279edaa9c.zip
This version of the scene has materials set up but the Light Path Expressions are not yet set so you can follow along.
- - -
Step 02
Before any work with canvases and Light Path Expressions open the Iray Render settings and make sure the tone mapping parameters are adjusted to be "linear"
- - -
Step 03
Select your first emissive light object in the scene and apply the script to
Create Advanced Iray Node Properties
- - -
Step 04
Now open the Parameters tab - Rendering - Iray and give your light a name in the box "Iray Handle"
light_front
light_left
light_right
- - -
Step 05
Now that you have set up the handles you can set up the Light Path Expressions LPE in the Iray Render Settings - Advanced - Canvases
<L'light_front'>.*E
<L'light_left'>.*E
<L'light_right'>.*E
To get a basic idea how those expressions are put together
L = light emitted by the environment (
Le) that bounces from any type of surface any number of timesE = then hits the eye (
E). = the dot character matches any interaction
* = the star operator means “repeat any number of times"
You just add the Iray handle after "L" into the brackets
<L'lightname'>
Create a canvas with a Light Path Expression for each light in the scene.
- - -
Version 1005 of the test scene has everything set up and is ready to render:
https://www.daz3d.com/forums/uploads/FileUpload/56/246fbc67a801c1620b116f8e38dbf3.zip
- - -
Step 06
When your goal is to export to .exr files then you do not need to worry which canvas is active.
You can just render out any canvas as .png
In this example something "odd" happened. The png for the LPE <L'light_front'>.*E just rendered blank.
But as it turned out in the .exr all information was available.
When you save the .png all the other canvases seem to be automatically written to a folder as .exr.
- - -
Now it is time to put the rendered out .exr together in photoshop.
Step 7
Create a new 32 bit image with the same dimensions as your rendered images.
If there is no black solid background create one and leave its blending mode at normal.
- Use File - Place Embedded to import your first .exr.
In this example the first image placed was light_front
Do not worry that your image may look either very bright or very black.
- Change the blending mode to Linear Dodge (Add)
- place an Exposure adjustment layer
With the default settings adjustment layers affect all the layers below them.
While setting this up the idea is to have the same exposure values affect all the images in the different layers.
Now you can change the exposure until a level in which the image of the first light looks about right to you.
- embed the .exr of your next light and also set it to blend mode "Linear Dodge - Add"
Now you can see the result of light_front and light_left.
- Now add the .exr of your third light and also set it to blend mode "Linear Dodge - Add"
At this stage you have now added all the indiviudal light layers that create the original image.
The photoshop document should now look excactly the same as if you would have rendered out a single .png without any canvases.
The benefit is that you can adjust the strenght of each light without having to rerender the whole image.
You can fine tune the lights by adjusting each individual layer.
Instead of one adjustment layer affecting all images you may want to work with individual adjustment layers that just affect one layer and not the others.
In this example another Exposure Adjustment Layer was applied to just the "right_light" layer.
By changing the offset value the right red light is now stronger.
If you want you can now also deceide to keep one light away completly by hiding it.
Or if you want you can just tint one light.
You could also apply masks to specific areas of individual layers...
- - -
Thanks to everyone who helped out, provided links and filled in missing pieces of information in this and the related threads.
- - -
There is an easier way to do all this that does not require LPE.
I'm wondering if one can use LPE to have a light ignore a certain object, like say a volume based environment? Right now, LPE makes my head spin.
This is awesome information @linvanchene! I love understanding the workings of the rendering engine and how to tweak it to get the best results. The canvas idea was very clever. I've written tutorials on using a standard 3-light studio setup and talked about making multiple renders, each with a single light turned on, but this method is even more flexible.
The idea of selectively lighting objects with certain lights is interesting too. Renderman based engines (like 3Delight) can do this as well. It can be helpful for complex lighting situations.
I'm still wondering, over a year later, if I can use LPE to ignore a volume based environment.
Anyone?
Is there an update for this script? It does not seem to add some elements to shaders that others seem to have in similar posts.
On a specific case, I am not seeing any settings that others have when selecting "Use Matte". The shader values are the same as before and there are no lighting options. (I was trying to create a "Mask" material. But the other examples were for creating invisible "shadow catcher" surfaces.)
I am trying to make the eyes ALPHA, without any shadows or reflections on them. So I can place my own animated pre-renderd, eyes behind the face-shell that has the eyes cut-out. (I have devised another method for the moment, but having an "Alpha" mask, which could potentially have a UV mapped image, would be a lot easier.)
Attached is a sample of what I ended-up with, as a work-around. (Using the canvas and replacement spheres for the eyeballs.)