Metadata tutorial - Adding new items to your smart content
 Herald of Fire
Posts: 3,505
Herald of Fire
Posts: 3,505
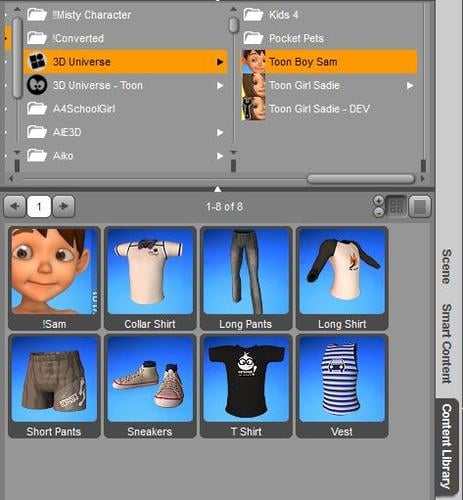
I originally posted this in the new user forum, but I decided to tidy it up a little and give it its own thread. Here I'll run through an example where I took 3D Universes' Toon Boy Sam and added metadata so that both he and his wardrobe appear in the smart content tab similar to most newer items for Genesis and beyond.
What is Metadata?
Simply put, metadata is information which Daz loads from its database telling it where to find items and what those items are compatible with. Click on Genesis, for example, and the Smart Content pane will change to list the items compatible with it. This can be anything from skins to clothes, hair and accessories. Hairstyles might have different materials to choose from, all of which can be displayed in the Smart Content pane when you select the item you want.
Metadata allows us to control what is listed, where it is listed and what items it's compatible with.
What items can use Metadata?
Anything that Daz can load can have associated metadata. It doesn't matter if it's a paid legacy item or a freebie downloaded from ShareCG. As long as the item can be found in your content library, you can add metadata to it so that Daz can find it and add it to the Smart Content pane.
User made morphs designed for Genesis can be added too, but bear in mind that Genesis will already have a compatibility base set for it, so be sure not to make alterations to the Genesis metadata or other content may not function properly.
Getting Started
As stated earlier, I'll be going step by step to taking Sam and adding metadata for both the character, his wardrobe and hair. To illustrate the workflow I like to use, we'll start at the upper level, which in most cases is the figure itself, and work down through the hierarchy.
1) First, browse to the content library and find the character you want to add metadata for.
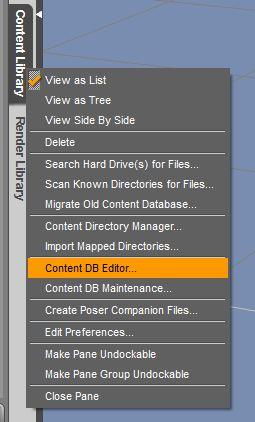
2) Right-Click the tab where it says "Content Library" and choose "Content DB Editor"
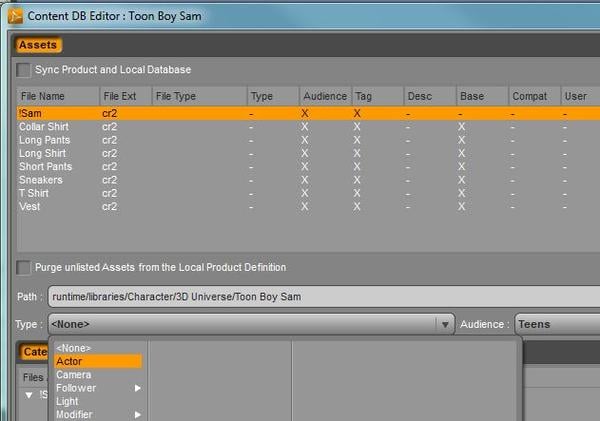
3) In the window that appears click on your character in the top section and in the ‘Type’ drop down, choose ‘Actor’
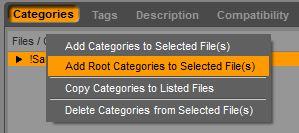
4) In the bottom section, click on ‘Categories’ and then right-click !Sam and then go to “Add Root Categories to Selected Files”
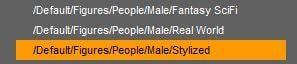
5) Look in the list which follows for the category which most suits your character. In the case of Sam I chose Default/Figures/People/Male/Stylized.
Your character is now available to find in the Smart Content pane, but won't have any compatibilities set yet.
Setting up character compatibility
1) Assuming you still have the Content DB Editor up, look in the bottom pane for "Compatibility" and click on it.
2) Select your character from the list and then click on the dropdown box where it says "Not declared". Change it to "Declared As"
3) Your figure needs an identifier. There are two ways to do this. You can either manually type in an identifier in the box supplied, or you add it by clicking on the Database button to the right. The latter brings up a window where you can click the icon in the top-right to add a new compatibility base. In my case, Sam was added to "3D Universe/Toon Boy Sam".
4) Click Accept and close the Content DB Editor and then load your figure into the scene. Click on your figure in the Scene tab.
5) Guide your mouse cursor to the options icon near the edge of the pane. Click on it and go to Edit ->Scene Identification.
6) In the box which follows you can now tell Daz to set his compatibility base to the identifier you set earlier. In my case, again, it's "3D Universe/Toon Boy Sam"
You're now prepared to add in items for his wardrobe.
Daz 3D is part of 
Connect
DAZ Productions, Inc.
7533 S Center View Ct #4664
West Jordan, UT 84084
Licensing Agreement | Terms of Service | Privacy Policy | EULA
© 2026 Daz Productions Inc. All Rights Reserved.
Comments
Here are the screenshots for the remainder of the above tutorial. Next up we're adding Sams wardrobe so that it will appear when Sam is clicked on!
Now we need to add Sams wardrobe to this growing list so he doesn't catch a cold. To do this, we'll be following a similar route as shown earlier. That is, to set up his clothing items with their own declarations and make them compatible with Sam.
Adding the wardrobe
1) Once again we're browsing through our Content Library to find the content we want to add the metadata to. In my case, it's the same folder as Sam, but yours may vary.
2) Select a number of like objects. For example, if there are lots of shirts, as in my case, select them all. You might have a number of dresses, or pants or skirts.
3) In the Type dropdown box, make an appropriate selection. Most clothes are listed under "Follower", so my shirts end up as Follower -> Wardrobe -> Shirt. This does not affect where the item will be shown in the Smart Content tab. This gives a tab of 'Wardrobe' to the item and has the effect of offering to replace any similar items placed on your character if one is already being worn in that slot.
4) Again, in the bottom pane we want to set a category for the items to appear in. This is where they will appear in the Smart Content pane. Choose to add a new Root Compatibility Base and choose the appropriate wardrobe category. In my case this is Default/Wardrobe/Shirts.
6) Click on the Compatibility tab and then right click an item. Choose to add compatibilities to selected files. Here we want to select the figure the wardrobe item is for. In my case this is '3D Universe/Toon Boy Sam'
7) Repeat the process for the remaining items, categorizing each one depending on their type.
At this point you're done as far as a compatible wardrobe is concerned. However, if you have materials for the wardrobe items you might want to add compatibility settings for the individual items, which we'll cover next.
Material settings
1) As with the figure, the first step is to edit the data for the root item, in this case the item or character we have materials for. Bring up the Content DB Editor for it.
2) Click on the item in the top pane you're want to work on. For this example I'll use Sadie's Little Dream dress and materials. Click on Compatibility in the bottom pane.
3) Give it a name by clicking the "Not Declared" box at the bottom and changing it to "Declared As". Either type in or set your definitions as described earlier in this tutorial. In my case this is '3D Universe/Sadie Dream/Dress'
4) Load the dress into the scene and go to the scene tab. Click on the dress and then the icon in the corner of the pane. Go to Edit -> Scene Identification. Set the Compatibility Base to the definition we added earlier ('3D Universe/Sadie Dream/Dress' in my example).
5) Browse to your materials in the Content Library. These are usually stored in 'Pose' if it's older content. Bring up the Content DB Editor once again.
6) Here you want to set the type to 'Preset -> Material'
7) Set the category to /Default/Materials/Wardrobe. If it's not a wardrobe item, for example hair colors, adjust this as necessary.
8) Set the Compatibility to the definition we created earlier. Again, in this example I used '3D Universe/Sadie Dream/Dress'
9) Accept the changes.
You can now open a figure, add their clothes and colour them all from the Smart Content tab. You can use these guidelines to add just about anything to the library. If you require additional help with specific problems or the like, feel free to either reply to this thread or PM me. I'm more than happy to answer your queries.
Have fun!
And the last example image showing how the compatibilities are set for the dress to accept materials.
Wow!. Thanks. This is very useful
Glad you found it helpful. If you need help with any specifics, you can drop me a line and I'll do my best to respond and update the tutorial as necessary.
Thanks a lot for sharing! So helpful! Print Print Print ;)
I searched the forums to find this information and am so grateful for this post.
I am on call for work this week so my 'render' time is going to be short, but can't wait to find the time to try this.
Awesome...been wanting to know how to do this for ages......Kudos..:-)
Thanks. Very helpfull
Note that the current version of DAZ Studio (4.6.3.52) now allows the sue of drag-and-drop from the Content Library to Smart Content. If there's a figure (defined as a compatibility base) loaded and selected the new content will be set to be compatible with that.
Thanks for the great and extremely helpful documentation. Can't wait to organize all the nice freebies :-)
Happy to help. I've been organizing all of my content ever since I learned of this myself. There's almost nothing in my library which isn't smart content compatible.
Hi Thank you for a great post but I'm still having problems
I added a v4 to Gen 2 skin, eyes, nails etc conversion from the content library
Opened up the Content DB Editor
Selected all the files
Changed type to Actor
Under the Categories Tab selected all and added Root Categories to Selected Files send them into Default\ Materials\ Feminine
Under the Compatibility Tab selected all set non declared to declared Genesis 2 as the converted files are for Genesis 2
Pressed Accept
I could then see all the files in the Smart Content file OK
However when I added the Genesis Figure they could no Longer be seen whilst in the Scene Tab Genesis 2 was selected
OK when Default Camera selected
It had also not created a folder
I then re checked the files and they were marked for Genesis 2 so not sure what's happening here
I also tried it a different way
I created a Product called "Blackthorn"
I created a Category called "Blackthorn"
From the Product folder I selected the new Blackthorn folder opened up the content Db editor selected Assets tab
Selected all and changed type to Actor
This time only Selected \Compatibility Tab
Selected all and set to Genesis 2
Pressed Accept
This time I could see them all In the folder called Blackthorn OK but not when Genesis 2 figure was loaded
so I'm at a loss to what to do next?
Adding Metadata to the older, or third party content in Daz Studio 4.8 gets really tedious when you have hundreds of files to go through. I'm dissappointed that Daz3d didn't make the process more efficient. Furthermore, after going into the Content Database Editor and selecting a compatibility base as well as declaring an identifier for the item (both dialog boxes refering to this as selecting a "Compatibilty Base" as if the two things were the same) i find myself then having to load the item in the scene and then use the scene identifier dialog box to select another "compatiblity base" and a "perferred base" (which are usually repeats of the info i entered in the Content Database Editor). The program should have filled the scene identifier with the info i put in from the CDE scene IMO. Or am i doing something wrong? Is this a bug?
I noticed there are some users trying to automate the process. I would like to try my hand at that too, but I can't seem to find where the scene identifer info is stored on the hard drive. Does any one know where this is?
P.S. I am posting this on several on-topic posts because i have not figured where the time stamp on these posts are and therefore don't know which ones are old or new. Hopefully i dont necromance too many dead ones.
+1
Split off petroljunk's other posts to keep the discussion in one place, moved HorusRa's post here
Richard....to make sure I understand...
Do you mean that if I load M4 into the scene and drag and drop some of his content from the content library to the smart content that it will be set to be compatible with him? And maybe I'm not picturing things correctly, but if I have the content library selected, it seems that I would be dropping it on the smart content tab because it would be hidden beneath the content library which is active. So where does it put it when you drop it. In Undefined? And then you have adjust the setting to put it under Wardrobe, if that is what it is?
Thanks.
It works best if you have the Content Library pane on one side and Smart Content on the other. Load M4, then drag a clothing item from Content Library to Smart Content and into the category you want it in, and it will be set compatible with M4.
Thanks,Fixmypcmike!
Here a few more questions...
if you add a shirt and you want to add the textures that go with it, should you have the character and the shirt in the scene, or just the shirt?
And should you put the textures under Materials or under Poses? (I can't remember for sure if there is a Poses category in Daz Studio 4.8. In Poser poses to pose or to apply textures all went under poses.)
Why do some items have poser textures and Daz Studio textures? Is there a significant difference? I found one product that had Poser, DS2 and DS3 textures.
Thanks
When you want to add metadata for the textures make sure the shirt is selected.
Material presets should go under Materials -- since these categories aren't tied to file locations, the fact that a lot of material presets are located in the Poser Pose library because of the old kludge before Poser 5 really doesn't enter into it (unless that makes it easier for you, of course).
Remember that the textures you see in the library are material presets -- Poser and DS handle materials differently, so the DS ones are optimized to look right in DS. DS2 didn't have Elite Human Surface Shader built in the way DS3 did, so the DS3 presets make use of that shader, while the DS2 ones use the default shader. In those cases you most likely only care about the DS3-optimized shaders and wouldn't want metadata for the others.
Sorry to revive an old thread but if I did this for a product I made could I export that data for my product and others would be able to use it and see my items in the Smart Content?
You'd need to export the metadata for the product (to Runtime\Support) and if you were not distributing through Daz (and the users were not installing via DIM) they would have to reimport metadata to get it into their CMS.
Hi!
But ... if i want to add an product icon?
I made an icon 114x148 and named as the the .DSX support file...
but in my smart content the icon is empty ... :(
Why?
You need to reload the metadata after put it there, actually twice in my experience.
I show it in my new Video Tutorial:
http://www.3d-almanac.com/index.php/2016/02/16/tutorial-metadata-101-create-smart-content-metadata-for-3rd-party-content-in-daz-studio/
Very helpful! On a side note, how do you fix that issue where in Smart Content you don't have an icon anymore, just a triangle with an exclamation point?
I didn't do this for DAZ Stuff yet but i would guess missing Icon File. I have som of those. I'm going to investigate when DAZ is FInished with my current render
Thank you!! It works now :D
First of all a belated thank you to the OP for sharing this tutorial; it helped me a lot back in DS 4.8. However, with 4.9 I'm running into problems and I'm trying to determine if this is by design or caused by a glitch in my database (I already fixed one glitch this evening).
In short: I can navigate to an item in my content library pane, but any attempts to assign a category to the file(s) fails, trying to set a filetype fails, so basically nothing happens. This used to be no issue with DS 4.8 but ever since I upgraded this is a no go. Obviously I did some research and came across this help article which seems to suggest that the procedure to add external contents also involves creating a product item.
As such my question: can someone confirm that what I'm experiencing is a glitch or if this is something that was changed in 4.9?
Is this Poser-format content? There was an issue with Poser-format content which is fixed in the latest Public Beta (4.9.1.25).
No, any type of content. Both Poser and Daz format. At this moment I can't even assign a category to my own scene files nor assign them the "scene" filetype.
In the mean time I did some reading up and experimenting with creating a new product but that's not much of a solution for me either because it will add all items from a specific folder, I can't remove any afterwards, and this isn't really working because some folders contain different product types which really don't belong in the same product.