bones and ik chain
 dot_bat
Posts: 373
dot_bat
Posts: 373
trying to animate this. im getting close, problem is the left object A is made of many parts. how do i get A to be one piece so it respects my bones and ik chain. i can get it tyo work but not all parts are moving. some are left behind and not attached. hope this makes sense thanx
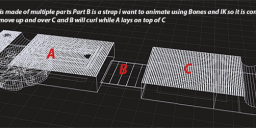
Illustrate movement.png
684 x 251 - 260K
Daz 3D is part of 
Connect
DAZ Productions, Inc.
7533 S Center View Ct #4664
West Jordan, UT 84084
Licensing Agreement | Terms of Service | Privacy Policy | EULA
© 2026 Daz Productions Inc. All Rights Reserved.
Comments
dont know how to edit comment to add this shot, but this is the result of what i get
If part A has animated parts,. (make it an animated group) then you can parent items to that group.
part B doesn't need to share the same bones ,. it could have a simple set of bones to allow it to bend,. Add an ik chain to create an IK target,.. then parent that to part A,. and parent the IK target (from part B) to part C,. then when you move part C,.or part A,.. it'll move /bend part B
Hope that makes sense :)
ahh! exactly what i want to do. thanx 3dage you have helped me many times.
I got it now. it works and works perfectly! one more question and i'll quit bugging you—if you look at my object tree there are screens one of them opens on a hinge how can i animate that inside the animation group? i meant 2 questions, in my object tree why arent the bones and strap inside the animation group? sorry about slipping that last question in. thank you much for your help 3dage!! now i have to work on the influences and fix the distortion and then animate. hopefully i can get thru the last processes without help. thank you again 3dage for all of your help!
No problem Dot_bat :)
always happy to help.
Carrara will create a group or animation group, from anything,. what's in it, depends on what you've got selected when you create the group,.
fortunately you can drag things into a group,. or out of them,. if you have the wrong things in a group,. you can drag them out
Normally I'll select the Model,. and shift select the Bones,. then create an animation group .
With Hinged parts,. those should be Parented to the main object,. then you can adjust the part's hotspot (caps lock (on-off)) to place it where you need the object to rotate.
then set the constraint for that part to "axis" and set the limits for the Maximum / minimum rotation,. in the litttle dial.
Pics to help :)
quick scene file to illustrate
3dage i just noticed something in your attachments in the 2nd one you have ik target from part B. you can take an ik target and place it where you need it to animate something? is that corrct or am i missing something? also i cant get the zip file to open. thanx again for your help. you wouldnt know of a comprehensive tutorial on weight paimting. ive read the carrara manual but need more practical info and a search for tutorials yeilds very little. you sir are a fount of useful information and i thank you for it
Here's a dropbox link
https://dl.dropboxusercontent.com/u/7907045/AnimParentLinkFlip.car
you got it,.
the IK target is what the bone is pointing to, or tracking,. but it can be attached to another thing,. or animated by hand,. or attached to an animated , or physics simulated object,.
since it's a helper which is added to allow you to control the bone movement,. (rather than manually rotating (posing))
it's not part of the object or it's bones ,.you could actually change the IK Target (in the end bone) to track any object in the scene,. or any target
Weight painting in carrara should be semi-automagical,. meaning that you shouldn't need to do much
You can increase or decrease the strength "Weight of influence" for each bone, over the area of mesh closest to that bone,. (like a magnetic zone of influence)
strongest near the source,. and fading smoothly.
since the bones are generally placed inside the mesh in the areas were they'll control the bending and rotation,. then the automagic "Bone area" to "Weight influence" over vertices, is normally pretty good.
the important point is vertices,. :) those are what is being weighted, or influenced by the bone
The denser the mesh,. the more detailed the weight painting can become,. EG: Face bones
the more vertices you have, the more control over specific areas of mesh you could have
not much of a tutorial,. but have a play around with a simple object,.. add some bones,. jump into the Vertex modeller Weight painting,. and see what's going on,.
Selecting "Animation / Detach skeleton" will wipe out any weight mapping,. so you can start again. after re attach skeleton.
i got the zip file and thanks for info above. is there a way of turning off 100% of a bones influence? ive searched every tut i could find but nothing. im assuming it is not possible, ivr tried everything i could think of. might have to try a hide and substitute if i can get the sustitute to track with the ik chain. is that possible? i may have picked the wrong animation method. thanks 3dage!
In the Vertex modeller / (Animation mode),./ "Bones tab" you should see a set of sliders which you can use to adjust the weight's of the bones (select the bone from the top menu options)
The other method is to click the weight painting brush tool,. (top toolbar) and then select the bone to adjust,. Select the Mode: (add or subtract) and paint over the "vertices" to visibly change the colour strength of influence on that vertex for that bone
ive tried all that. i need to remove the influence 100% from everything after the strap. i am assuming that the objects not boned are picking up the influence from the one boned object below them. (the disc and flower objects) and that influence will be removed. ive attached the dialog box for weight painting, under bone influences there is the option to remove bone but when i choose it nothing happens (would be too easy). going to keep futzing with this. i think i got the influence off the block A but now those objects that are after chain are doing weird things and they have no bones so no influences to control. i think what i will do is weld those parts. i wanted to keep them seperate for texturing reason. oh yeah how do you save the weight map? thanx 3dage
I think the issue is separate parts,. Ideally your Box should be a single item
right now it looks like you have bones in the Box
or,..
if you select those parts (ungrouped) and attach a skeleton so that One large bone effects the entire Box,. (without the animated parts and hinged panels)
you can Parent those animated parts to the main Box.
but,. the Box doesn't need to have bones,. just the connector band,. ... so,..make that connector section a seperate rigged thing and "Parent" that connector to the box.
thanx 3dage will try your suggestions and welding everything on the box object. havent had much time to try it yet