Canary's Composition Helpers [Commercial] - See video of the helpers in action!
 Canary3d
Posts: 2,005
Canary3d
Posts: 2,005
Post update: I've made a video showing what it's like to use the guides and backdrops in Daz Studio.
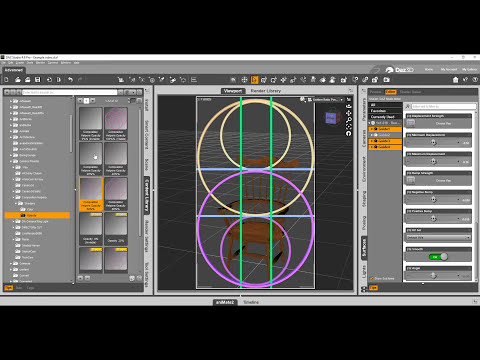
Now in store! Canary's Composition Helpers is a set of 10 different composition guides that sit right inside your Daz Studio camera so you can use them to compose your scene. Each guide is an individual prop with multiple material zones so you can make lines transparent or semi-transparent, and you can flip and scale the guide. It's easy to use; you just pick the aspect ratio you want from the 13 pre-configured cameras, load it, and use the scene tab "eyeball" toggle to turn guides on and off as you like. When you're ready to render, turn them all off and you're set.
To make it even more helpful, all of the guides are included as transparent backdrops, as stacked PSD files, and as OBJ props ready to import into other programs like Bryce, Poser, Cararra, etc.
I'll use this thread to answer questions (of course!) and also try to list the items that appear in the promos.
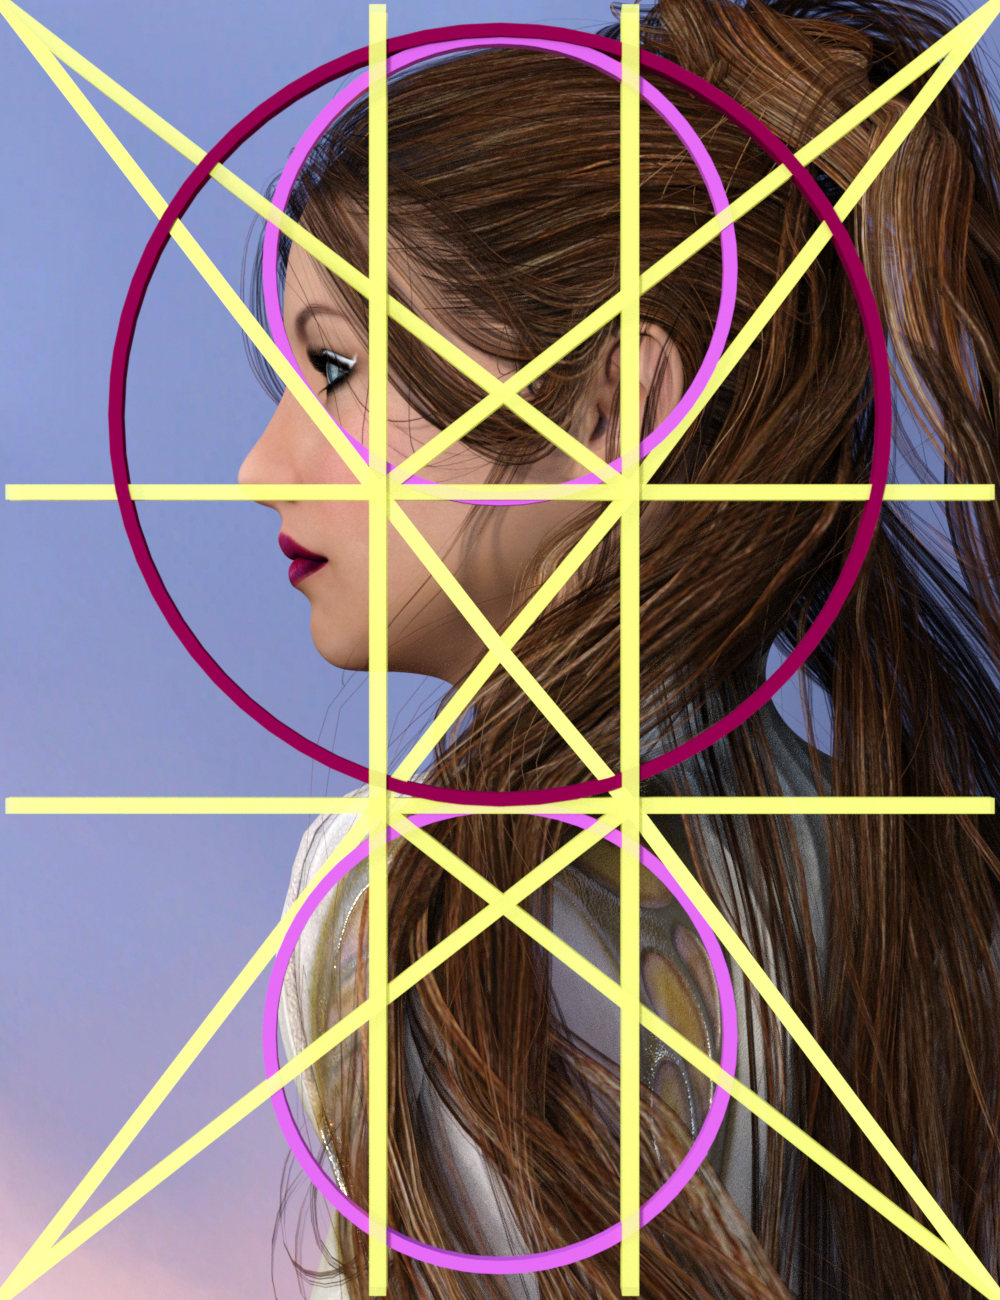
This image features the "Golden Mean with Diagonals" guide and the "Renaissance Circles" guide. Products in the image are Genesis 2 Female with Nova character mixed with the G2F head morphs, Dragonfly Hair, and Aeon Soul's Skylis dress, which is no longer available. (Neo Ayane Fantasy has a similar look and is still available).

Daz 3D is part of 
Connect
DAZ Productions, Inc.
224 S 200 W, Suite #250
Salt Lake City, UT 84101
Licensing Agreement | Terms of Service | Privacy Policy | EULA
© 2024 Daz Productions Inc. All Rights Reserved.
Comments
This image has the same content as above -- the backdrop is by Diane & Predatron, I forget which set. This guide is "Golden Mean with Diagonals," with some of the lines more opaque than others. The product has opacity presets and color shader presets that work in 3Delight or Iray--they just apply a base color and an ambient color, so the guide shows up no matter what the lighting is.
This is Pix Synx Cyborg looking out the window of Stonemason's Dark Star. The image in the window is from NASA. Synx is wearing Hellboy Soto's buzzed hair and Mada's alliance outfit. I'll need to look up what boots these are.
This image uses the "Golden Mean" and "Golden Spiral" guides.
This is "Rule of Thirds with Diagonals" in backdrop form. Rule of Thirds and Golden Mean guides are similar but the proportions are different -- the rule of thirds divides the canvas evenly, while the golden mean does not. For my helper guides I've also selected slightly different diagonals for each type, to provide more options. Note: the "Golden" guides are only truly in the golden ratio when you use the "golden ratio" cameras/aspect ratios - otherwise they are stretched to fit, or in the case of the spiral, turned to fill the frame of the camera (I don't stretch spirals or circles!).
This is Mada's eclipse outfit catsuit (I think) with Uzilite's Liquid Halo on Sky 16, with new shaders on the boots and catsuit. DZFire's emissive shaders and Khory's Synthetics for Iray - I also used Khory's synthetics in the Synx picture up above. I'm not sure which guns they are but they're probably by Nightshift3d. I forget who made this cool pose - another one I need to look up.
This features the "Renaissance Triangles" guide, with the gun girl from the previous image. Scenery is Stonemason's Chinatown with ThePhilosopher's Epic Skydome/Cloud Haven--which also provides all the light in the scene.
This image features the "Golden Rectangles" guide used in photoshop format, to help me crop an image into a stronger composition. This image was originally rendered in landscape format with the girl in the center....not good! I started this project just trying to make my own compositions better and it kind of grew from there!
This image features Stonemason's Planet Lava on the left, with stone shaders from my Sculptural Genesis Ultra Fun Kit, and an older building on the right--I think it's by Inception8. Inception8 has new buildings in the shop that are in a similar style. Down on the ground is Petipet's New Colony, with Stonemason's Iray clouds making the ground fog. The figure is Victoria 7 with Raiya's Cailin character, wearing a bodysuit with a shader from Eva1's sci-fi fabrics. The bodysuit is probably Mada's Eclipse again, I use that all the time. The sky bike is Ravnheart's Jet Bike with an updated shader/texture. I'll have to look up the hair, as usual!
This image features the "Rule of Thirds" guide and the "Renaissance Circles" guide. For the very wide cameras and for the 1x1 camera, the circle, spiral and triangle guides are different in order to maintain their proportions and create useful ways to fill the space, so if you are working with more extreme camera proportions there is still a full range of good options.
This scene features ThePhilosopher's Epic Skydome/Cloud Haven again, with Stonemason's Iray clouds in front of the big Zeppelin. All three vehicles are by petipet - Zeppelin Star, Dirigible Perun, and Intrepid Explorer Phoenix.
Last but not least -- this image features the "Pogany Curves" guide, which I created based on curve forms in Willy Pogany's Parsifal images (c 1912).
This image features Flipmode's Tree of Life and one of Blondie9999's Entry Guardians.
Thanks for looking! The store page shows all the guides in plain-white and material-zone-colored formats, if you want a closer look.
How easy is to adjust for different aspect ratios or focal lengths (I would think focal length matters, anyway)?
Very easy - the guides sit as near as possible to the "lens" of the camera, so to adjust them for focal length you just z-translate them backwards or forwards until they fill the frame again. There are 13 aspect ratios already set up--cameras that use the DS default position and focal length, with 10 prop guides each--but if you want to go beyond that, you can rotate the guides and scale them on the X and Y axis to suit your scene. I'll post some screen caps or a vid once I get my DS to launch--it's having an argument with CMS this morning, apparently!
I haven't used the duf files yet, finding it simple enough just to use the png backdrops in the Environment tab to help frame my images in interesting ways. They've been useful and even inspiring. The one thing I wish was different (especially from the 'inspiring' point of view, when you're looking for ideas rather than for something specific) is that the lines of the png files were black (or any other colour than the white that they actually are), as they don't show up against the Windows folder background when you're browsing and so you have to remember what all those names mean. Even if you know what Pogany Curves, Loomis Curves and Renaissance Circles are as well as you know your own name, things would be a bit less clunky if you could see the lines in the Windows thumbnails. I'll find time to do copies of them myself in black eventually though, as they've already proved to be a useful resource here.
Astracadia, sorry about having to do the PNGs in white - Daz Studio's background function does a yucky thing to the edges of transparent backgrounds that makes the background color show up all around the edge of the cut. So when I had color guides, they had a distracting and ugly jaggy all around the edge, whereas when they are white, you can change the background color and that will change the guide color, and the edge is all the same color.
If you do a "select all" when you're browsing the folder, the thumbnails will turn blue, which lets you see the white lines against the blue.
Good thinking :)
Thanks, I hoped that would be the case.
Ok, I've made a video and added it to the youtube PA channel - check it out to see the helpers in action: