How to Build a quad-GPU rig for monster Iray performance (and animating)
 PA_ThePhilosopher
Posts: 1,039
PA_ThePhilosopher
Posts: 1,039
(note, this post will be an ongoing WIP. I will update it regularly as we share more info in this thread)
Based on a recent discussion, it seems there is growing interest in animating in Iray. As such, I figured I would dedicate this thread entirely to this purpose; to sharing everything I (and others) have learned on this topic. I invite you all to ask any questions you may have. And I also invite others with quad setups to share their knowledge as well. I am by no means an authority on this topic. But if we put all our heads together, I think we should be able to iron out all the details in this process.
QUESTION 1: Is a quad GPU system necessary for animating? Does it really help that much?
The short answer is a resounding YES! To those who are serious about getting into animating (or for productivity in general), a quad GPU setup is a gamechanger. It is like having your own personal render farm, as it frees up your workflow immeasurably. I have made a living from creating animatable products. And I wouldn't have been able to so without the quad 780 Ti's that I have been running for the past year. Imagine rendering each frame in 20-30 seconds. That is my life. It quite literally opens you up to new possiblities, because your creativity is free to run wild.
What about the gains?
I ran tests when I installed each new card, and while the gains weren't proportional (they gradually decrease with each additional card), they were still massive (note, they ARE proportional in Octane. But not quite proportional in Iray). As long as you keep things cool---namely, use water with a good pump and large radiator---then the gains will be huge. But again, water is a must. A quad system on air is a waste of resources, so don't even try it.
For reference, here is a little video I put together showing the viewport performance of my quad setup. As you can see, viewport feedback is instantaneous. And with the latest Iray updates, it is actually real-time.
QUESTION 2: So where do I begin? What parts do I need?
The most important components of this build are the four GPUs (obviously), the water cooling setup for the GPUs, the motherboard, the CPU, the power supply, and the watercooling setup for the CPU. Of these, the watercooling aspect requires the most attention to detail. So we will dedicate an entire section to that later.
BASIC COMPONENTS
- CPU Lanes: CPU must have 40 lanes (This effectively limits your selection to Haswell or Broadwell CPUs, unless I am mistaken---someone please correct me if I am wrong---i.e., LGA-2011 and LGA-2011 v3. There may be newer CPU's with 40 lanes, but I am not aware of them). So for example, you could go with an i7-6850K (Broadwell-E 6-Core 3.6 GHz), which is an LGA 2011-V3 socket type. Just be sure your motherboard matches this socket type.
- Motherboard: As I said above, the motherboard must 1) support the socket type of your CPU (basically either LGA-2011, or LGA-2011 v3, unless there is some other socket type I am not aware of). It must also support 4 GPUs at PCI speeds of 16x/8x/8x/8x (You can check the specifications for something like "PCI modes supported: 16x/8x/8x/8x/.") The motherboard is important, so don't skimp on this buy. Buy the best you can afford. I usually recommend the Asus Rampage Extreme series, since they are pretty well established and sell such a high volume----although I have the EVGA X99 myself. It should also be "Extended ATX." (see list here).
- CPU cores: The more cores on the CPU the better. (I recommend 6 cores minimum. While the GPUs do all the work, the CPU enables them to operate optimally. A good CPU is like a shot of adrenaline to the GPUs.
- Overclock the CPU but not the GPUs: Overclocking the CPU helps bigtime. A safe overclock on water is 4 Ghz (mine is at 4.5 Ghz). As I said, it is like a shot of adrenaline to your GPUs, and makes a huge difference in the "snappiness" of your viewport. (I remember for the longest time my viewport seemed slow and sluggish. I could not figure out what the problem was until I realized that my BIOS had been reset--along with my overclock settings. To make matters worse, I had accidently set my Windows power options to "Power Saver," which actually downcloks your CPU. Needless to say, I learned my lesson.)
- GPU Selection: There is no question here. 1080 Ti's are the way to go. Period. If you cannot afford 1080 Ti's, then go with 1080's. If you cannot afford those, go with 980 Ti's. Anything less, imo, would be a waste (I would say go with 780 Ti's, but you may run into compability issues with nVidia drivers on older cards---like I have. Best to stick with newer cards).
- Power Supply: PSU should be 1500 Watts and high quality (EVGA and Corsair are generally regarded as high quality). Although newer cards don't require as much power, you still need to factor in a large buffer zone for power-spikes, which can wear out a lower-end psu over time. Plus, it has to have enough PCI connections to power all four cards (remembering that some GPU's require two PCI x8 connectors, potentially requiring up to eight 8x connectors total). My first PSU was only 1,000 W and it got so hot that I often smelled smoke coming from it. I had to updgrade it almost immediately before it exploded.
- RAM: Minimum 32 GB RAM is a good rule of thumb. Be sure that the RAM has been tested and verified by your motherboard manufacturer. Ever motherboard will have a list of compatible RAM that the manufacturer has tested on it. Stick to the RAM modules on these lists (for example, here is the compatibility lists for the Asus Rampage Extreme V)
- SSD: SSD is recommended but not required
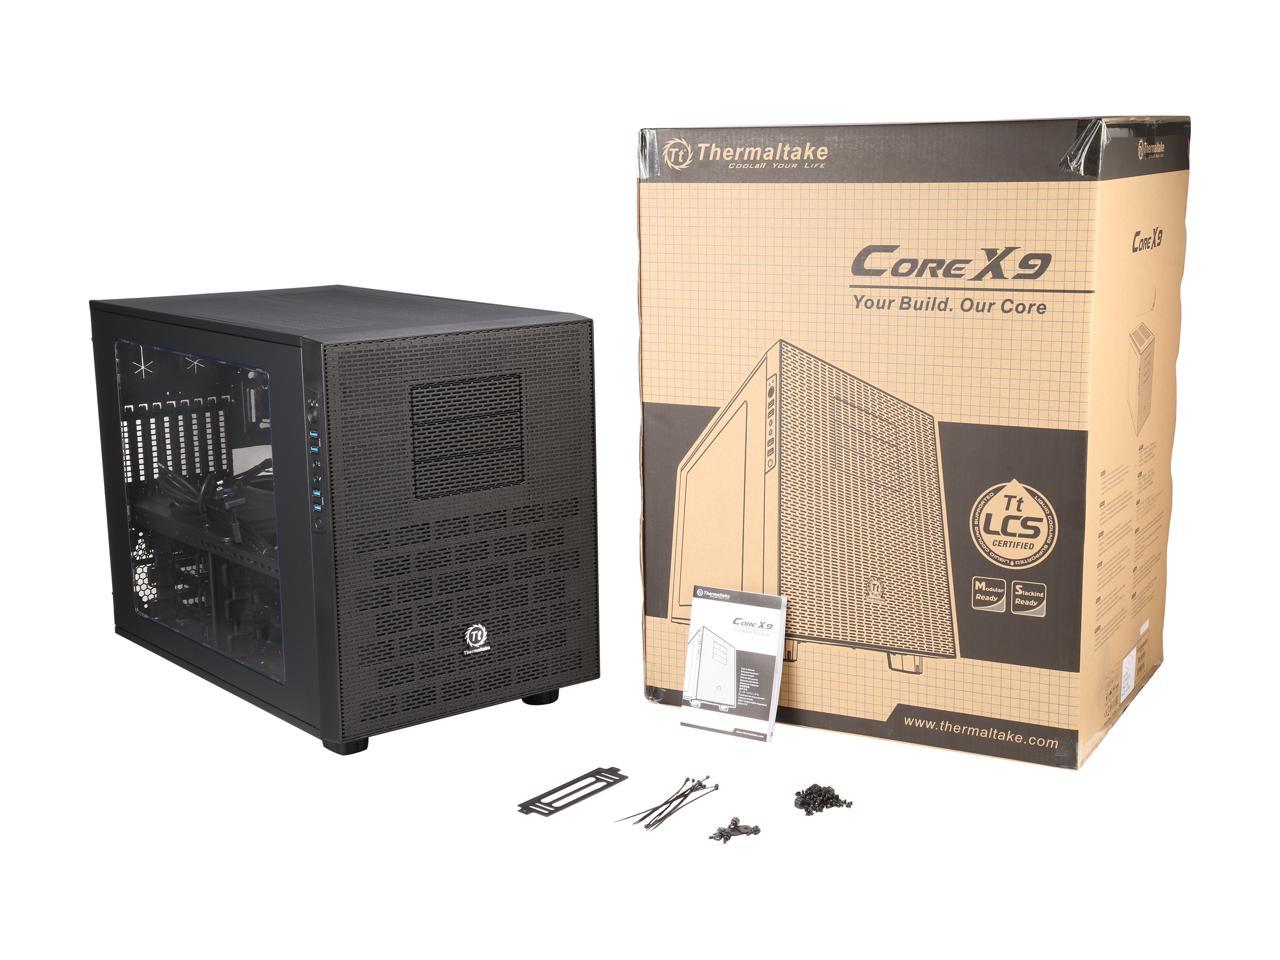
- Case: Case needs to support extended ATX motherboards, as well as be sapcious enough to house a resevoir and multiple radiators. For reference, I have the Thermaltake Core X9. Its cheap, spacious, and is easy to work on since your board lays flat;
QUESTION 3: Do I really need to watercool?
Yes! I cannot emphasize this point enough. The more cards you add to a system, the hotter things get. And the hotter things get, the slower your renders will be. A quad GPU setup on air is a total waste, because the third and fourth cards will add so much heat that all your GPUs will have to downclock to 50% or less of their max boost clock, in order to keep things cool---which can more than double your render times!
I had to learn the hard way myself. My first quad build was with the stock air coolers, and I was very dissapointed to say the least. The 3rd and 4th card really didn't add much.... As soon as temps rose to 80+ degrees, render times slowed to a crawl. I could not figure out what the problem was until I researched and discovered that GPUs automatically downclock when they hit their max temperature (in order to keep their internals cool). So as soon as temps hit ~80*, their clock can change as much as 75% or more, from say ~1300 Mhz down to ~500 and below. It wasn't until I decided to take the plunge and switch to water that I saw the difference. With water, my temps never rose above 50 or 60 degrees, so the cards are always operating at max overclock.... This means 100% performance on all 4 cards, rather than 50% or less.... which is huge...
WATERCOOLING
The GPUS absolutely must be watercooled. In my system, I set up a custom watercooling loop for the GPUs. And then I bought an "all-in-one" watercooling kit (Corsair H110) for my CPU. This seems to work well for me, as it keeps the water separate and allows me to fine tune the pump/fans for the GPU separately from that of the CPU. But this may not be necessary, as some people build one big loop for both the GPUs and CPU together. This should be fine too, because typically when working in Daz, only your GPUs will get hot, not your CPU. Rarely will your CPU get hot b/c you won't be using it for rendering (CPU should be unchecked in the Render Settings tab). So it won't heat up the water too much.
Online Stores:
Some things to remember.
- PUMP: D5 pump is pretty much industry standard. You don't need more than one, since it is so powerful. (The variant of the D5 is the MCP655. The is the one I have, which has a variable speed adjuster on it, and I have it turned down to below 50% power.) Note, I use a separate water cooler for my CPU (Corsair H110, which is an "all-in-one" unit).
- RADIATOR: A large radiator for you GPU's is mandatory. Mine holds 3 140mm fans and is very thick. Here is the link. Use a separate radiator for your CPU (mine is 2x140mm), so you can tune your fans separately (I use the NZXT Grid+ so I can customize my fan profiles. But some people don't worry about that, and just run their fans at max always).
- TUBING: Tubing size doesn't really matter. I prefer 3/8" for better flow (yes, smaller is actually better) but some use 1/2."
- WATERBLOCKS: Stick to EK waterblocks. They are well-established and reputable.
- FITTINGS: Fittings are a matter of preference. I use the cheaper barb fittings, rather than compression.
- RESEVOIR: The resevoir is mainly meant as an aid in filling and emptying the loop. And if there is a leak, it is easy to tell because your water level in your resevoir will gradually decrease over time. Size doesn't matter all that much. But I went with a big one because its just easier to fill and work with.
- SERIES VS. PARALELL: It doesn't really make that much of a difference in temps. I prefer to go connect my GPUs in series to insure that 100% of the water travels through the full circuit. Since the D5 pump is so powerful, the added resistence of a series loop won't matter much.
With this setup, my GPU temps idle 27 degrees. And at load they hardly move into the 50's. Thus the base clock is always at 100% and the boost clock is always on.
MONITORING SOFTWARE
CPU-ID: Use this to check your CPU stats, and make sure your clock speeds are right. This is important, b/c sometimes your computer will decide to downclock your CPU because some wierd option is turned on in your BIOS (like C-states or something), or your power options are set to "Power Saver" rather than "Performance," or something else. If you set your OC to 4 Ghz in BIOS, use CPU-ID to verify you are actually running at 4 Ghz in Windows.
MSI Afterburner: I use this program to monitor my GPU and CPU stats from my system tray. You can also overclock your GPUs with it, but I do not recommend this. Only overclock your CPU (using your motherboard BIOS). I have attached a screenshot of my system tray, which shows my GPU temps, my GPU loads, and my CPU temp. You can monitor more than this, but I only chose these three.
EVGA Precision X: Similar to MSI Afterburner. I prefer Afterburner for the UI and ease of use.
DAZ STUDIO SETTINGS
Render Settings: In advanced settings, be sure to uncheck Opti-X accelration, as well as your CPU. Opti-X slows down a quad GPU setup for some reason. And the CPU.... well, the CPU does not add much in terms of performance to your render times, considering the huge power draw and strain it will add to your system. I feel it is best to leave the CPU free to do other tasks while your GPUs render in the background. Your electric bill will thank you too, as will your PSU.
OVERCLOCKING YOUR CPU
Overclock your CPU in your motherboard BIOS. 4 Ghz is a safe and conservative overclock for most Intel i7 LGA-2011 chips. (Trust me, this makes a difference. Mine is overcloked to 4.5 Ghz. And as you can see in the attached image, it idles at about 50 degrees. This is fine for this substantial of an overclock). I will not detail how to overclock here, as each motherboard is different. Its easy though. All you do is adjust the multiplier up to the value you want (not the base clock, as that will affect your memory), and run a few tests to make sure your system is stable and your temps are good. That's bascially all there is to overclocking. People make it sound more complicated than it really is. For a moderate overclock on water---4 to even 4.5 Ghz----you don't really need to fiddle with anything else.
-P

Daz 3D is part of 
Connect
DAZ Productions, Inc.
7533 S Center View Ct #4664
West Jordan, UT 84084
Licensing Agreement | Terms of Service | Privacy Policy | EULA
© 2026 Daz Productions Inc. All Rights Reserved.
Comments
For reference, here is a photo of my rig. Its not pretty, but it gets the job done;
Very interesting but your PS is rated 1500W and you said the 1000W PS was at capacity so do you use only your computer to heat, I don't know, one or two small rooms when it is cold?
So....how much did this setup cost you? Just curious.
A few thousand dollars, give or take. I lost count after third or fourth GPU, as it was a long term project. But I did save a lot of money by buying my GPUs used off ebay for only $300 ea. And the waterblocks I also bought used as well. Most of the other components were new.
It is true. When I do overnight renders, I do have to turn my heat down. :)
OK, very cool, but out of my price range for sure when utilities are added in. I will have to wait for more energy efficient technology.
So, I'm going to assume that you're more than an enthusiast at this point? Because what you are suggesting is way beyond what even those of us who plan to do more advance enthusiast projects can afford unless you were doing this like a per month purchase project.
And even then, I'm sure there will be a plan to get some sort of ROI for all the equipment purchases other than just producing personal artwork only.
Yes, this is probably more for those who do this for a living, or who are serious about maximizing their productivity and workflow.
This kind of setup is probably not for the weekend hobbyist.
-P
Well, I wouldn't consider myself a "weekend hobbyist"...lol...and honestly, though my rig is on a much lower end than yours, I still run about four GPUs, 32GB of RAM, 2 SSDs, 2 SATA drives, three monitors, an i5 processor and my MB is a EVGA Z99 series. It's pretty capable. However, your setup is rock solid, but I would have to use something like that if I was a full-fledge production house doing it for a living (which, if all goes according to plan, I might be doing that within a year).
Yeeowsa! What a rig!
I had a custom system built that I thought was over the top, but yours is even more powerful. Whew!
My rig was about $3800 (including the UPS), but as I said, I had it built, and bought everything brand new. I went to Fry's Electronics and enlisted the help of an expert who assisted me in picking out my components. It's designed for rendering stills, not animation. My renders are rarely over an hour, averaging 30 minutes.
Intel i7 6 core processor, 64 GB Ram, GPU: 980ti, watercooled (dual radiator), and pretty purple fans. The motherboard has the capacity for additional GPU's, but my budget can't handle it at this time.
Here's a couple of pics of my pretty PC:
How not to build a quad GPU system - or how to build a quad GPU system if you don't like yourself very much (aka air cooling). I've got two of the GPUs up on riser cards and a fan under the shroud beneath the power cables blowing directly along/under the GPUs. Still high temps - gave up on rendering with all four. If you're going to pack that many GPUs in, you really need to go hybrid / water. Live and learn...
Bless you, ThePhilosopher, for taking the time to write all this down for us and for giving links. Your instructions, like your products, are impeccable (at least as far as I know until I can implement them later this year). At any rate, I am no longer baffled by the subject; so, thanks for the demystification.
Love the case, I've been looking for a new one; so you've sold me on the Thermaltake.
I also like the fact the motherboard lies flat.
There are a few like it. My personal gaming/rendering system I built in a CoolerMaster HAF XB Evo : http://www.coolermaster.com/case/lan-box-haf-series/haf-xb-evo/
The TT x9 cube is HUGE. The CM HAF XB Evo is a bit smaller.
Plenty of room, unbelievable airflow, Easy to open, move, etc. Even the power supply mounting allows it to easily slide in and out. Motherboard tray comes out in a single piece, so it's a LOT easier to work on. Routing a lot of cables underneath can get tricky, and the HotSwap bay control board position makes the power supply cables a bit tight. But it's VERY nice. Put a 200mm fan on the top venting out, fans on front pull in, fans on back vent outward. I never see temps above 50°C on the water cooled CPU (i7 6800k) and never above 60°C on the two 1080 GTX GPUs (Asus STRIX ROG) even under full loading.
I'll post a photo of it later, after I get home!
That's a nice looking case. However, checking the specs, it looks like it can only support one 240mm radiator and one 120mm radiator, which would not be enough for a watercooled quad setup. The radiator for the GPUs should be large, at least three 140mm fans or three/four 120mm fans (mine is 140mm x 3 = 420mm total). And it should be thick too. The radiator for the CPU doesn't have to be as large. Mine I think is only 280mm (two 140mm fans).
Here is a photo of the X9 exploded, with internals. As you can see, it has plenty of support for large radiators. Without the panels on, it is like having an open-air test bench.
I had to learn the hard way myself as well. Oh well, live and learn right?
You're welcome! Glad I could be of help to you.
Nice, well let me know if you have any questions along the process of your build, either through this thread or via PM.
-P
Assuming that your software would support it, how does this compare with renting cycles in a commercial renderfarm cost-wise? As an example, inputting my specs and render time on my system to Rebus farm for an average scene time for me shows a cost to me of $0.29 for a single render.?
I could see working out your render in loq res/quality, on one's own system, then submiiting the a hi-res production version to the farm, might be a cost effective option?
@PA_ThePhilosopher Oh, I wasn't suggesting it for a Quad-GPU All watercooled system. Was just showing it to nicstt as an alternative, as the XB Evo is a bit cheaper ($100 vs. $170), and doesn't require as much desk/floor real-estate. But for a dual-GPU system with lots of good airflow, it's a nice choice.
My rendering computer is using dual 1080 GTX, ASUS Rampage MB, i7-6800k CPU.....the CPU is watercooled, but the two 1080's are on standard air cooling. They have a full slot space between, and with the fan blowing upward above them, it exhausts the heat just fine. But with a quad system, you're going to be cramped between the cards, so you won't be able to get proper cooling on air.....watercooling is needed for the GPUs in that situation, no argument!
I suppose it would depend on what your goals are; enthusiast, power-user, professional? While a render farm is suitable for one-offs, rendering is only half the picture. Most of your time will be spent working inside Daz Studio in creation/design. Having your own render farm not only speeds up renders, but every other bottleneck on your computer, such as viewport performance, For the power-user or professional would be preffered in the long-run.
The aspect I was commenting on was not whether or not such a system is more efficient/convenient at use, but rather if, depending on the situation, it was more cost effective. The biggest bottleneck on my system is not compositing/design , its rendering, expecially in multi-light, multi transparency map scenes. All things considered, I suspect that a long animation sequence would be better run on rented cycles. Its not just the PC base cost, but electricty usage, depreciation, etc..
As an example. one of the exercises I was involved in before retiring was looking at workstation costs for a data modelling and simulations dept at work. They did some seriously heavy stuff, that had them always asking for bigger, faster workstations. (more of everything) we did a TCO (Total Cost of Ownership) and ROI workup, and found that in most (but not all) cases it was far cheaper in the long run to have a thin client with access to a dedicated fast network segment on the desktop, and let the heavy lifting be done by a high end server cluster.. That's the sort ofthing what I was wondering with my original question..
Regarding power consumption, it is worth mentioning that the 1,500 Watt rating of the PSU is only a max theoretical value. In reality, actual power consumption will be far less. When I am not rendering, my computer only draws 170 Watts of power, which is like 2 light bulbs (@ 4.5 Ghz overclock). This number can be reduced further by changing your power settings in Windows control panel from "High Performance" to "Balanced." (High Performance locks the the clock at max, while Balanced only uses what it needs. So at idle, it will automatically downlock to save energy. In this case, it may only draw maybe 125 Watts).
Even though the PSU is capable of 1,500 Watts, it never comes close to this even while rendering. During an overnight render, it may hover around 800 Watts or so.
Tell you what, lets agree to disagree.. and leave it at that....
ThePhilosopher, thanks for posting the details. No wonder you can crank out your amazing products in such a fine fashion!
Agreed! Very useful information.
I've upgraded computer parts (hds, gpus, memory, etc), but never built one entirely from 'scratch'. While the rewards are high (much faster renders), the risks are high too (mismatched parts, not enough cooling, not enough power, static electricity, etc.). Installing water cooling makes me nervous.
I'm sure there are sites that will do this build for you, at least the tricky parts, it's just a matter of how much they'd charge for the labor as opposed to ordering each part separately from ebay.
Either way, this is a terrific guide for those who want to take the leap!
Ooh, goodie, a juicy hardware thread to follow. If my current house sells well I might go for something insane like this. I can't "justify" it for any reason other than I want to. Cost benefit analysis? Whatever (as the young people say). I still boggle at how fast Iray renders on my one TitanX (which I don't need, either) so will be amply entertained by new toys.
Rather than one big lump case, I'm going to be looking at external radiators on a quick release system. Apparently, this can now be done straightforwardly without leaks and losses. I can keep radiator setups at my most frequent destinations and just transport the system core in its aluminium Lian Li case.
Just for adding to the conversation: I have a 1U Tesla unit that contains 4 Tesla compute GPU units and it is completely air cooled. It is as loud as a jet engine, but air cooled none-the-less.
Kendall
Watercooling intimidated me at first as well. But just like building your first computer, once you do it, you look back and say "That's it? That was easy." In hindsight, it is really quite straightforward. The biggest thing is just making sure you get all the right parts. (I had to place a number of orders at first to make sure I had enough fittings, hoses, etc.) But once you get all the parts, putting everything together is easy. The biggest things to remember are;
That's about it. These are the most important things to remember. The rest is pretty straightforward, as most online tutorials will detail. When you turn on your computer for the first time, just check your temps for your GPUs and CPU. They should idle around 30 degrees C or less at idle without overclock. A little more is ok. The max temp for the GPU is somewhere around 80*, at which point they will begin downclocking to reduce temps. The CPU will also begin to downclock around this temp (although it has a higher safe max temp, closer to ~100* I think).
So, my theoretical question of the day is, what can 128 PCIe Gen 3 lanes do for ya? Will they even make a mortherboard that can house 8-10 high end GPU's? And how about a case to house all that? I suppose that (if you could double up PCIe lanes in the same slot) that you could do the dual GPU on a card thing... Of course, NVidia would have to make a new dual GPU card (their current one is 3 years old at this point).
I'm talking about 32 Core AMD Naples of course, but do take note of what's coming alongside/after Naples in the link below. Starship (it's successor) is supposed to have 48 Cores, on 7mm process, possibly arriving in 2018...
http://wccftech.com/amd-cpu-roadmap-leak-7-nm-starship-14nm-naples-snowy-owl-zen-core/
WCCFTech's leak coverage usually pans out, but of course this is a leaked roadmap so consider the 'upcoming stuff' with the usual grain of salt.
That's probably gonna cost more than a new car to build a rendering system that takes advantage of all those lanes. Naples is supposed to arrive this quarter... I'm sure the 8 channels of memory (versus Intel's 6 channels with Intel's Xeon E7) might help slightly too, although you KNOW that Intel will be firing right back with an answer to Naples. This has turned out to be quite the interesting year in CPU's...
I think it's worth pointing out this article from the other thread in which PCIE lanes at x8 speeds end up being faster than x16 in Octane. Here's the link again: https://www.pugetsystems.com/labs/articles/Octane-Render-GPU-Performance-Comparison-790/ Here's another old bu relevant article:http://www.tested.com/tech/457440-theoretical-vs-actual-bandwidth-pci-express-and-thunderbolt/
If PCIE 3.0 at x4 speeds will still give nearly 4GB/s speeds, then the 40 lane CPU isn't necessary. Some motherboards, the EVGA x99 FTW K I believe is one, will still run all of their PCIE 3.0 slots even with a 28 lane CPU. I think that particular mother board runs x8/x8/x8/x4 on a 28 lane CPU such as 5820k or 6800K, and you would still be able to run all four gpus. Theoretically, if you had 4 Titan X GPUs, enough data to saturate their VRAM (12 GB) could be sent to them in about 2 second, while the fourth gpu at x4 speed would take 3 seconds. Other motherboards, however, disable specific slots if a 28 lane CPU is used, and so the quad gpu setup wouldn't at all in those cases. If budget is a huge concern, it's possible to slap a "budget" X99 cpu like 5820 or 6800 into a motherboard such as I've described for around $500. I think one of Gigabyte's lower end x99 boards also fits this role.
A strange build for sure. Why skimp on the backbone of a high end x99 build right? But if iray/octane performance are the only goals, you could squeeze in that 4th 1080ti where before you may have only been able to afford 3.
Interesting thoughts. I'm not sure why x16 was slower than x8 in that test. A 1-4% difference could just be a margin of error though. I'd be curious what motherboard they were using, and if that test can be duplicated on other setups.
Anyway, it sounds like there may be a ray of hope for someone stuck with a 24 or 28 lane CPU to squeeze out a quad build. However, it seems we need to see more testing done in this regard, before it can be recommended to people as a feesible option.
-P
Right, definitely not to be recommended. Just possible. A quad GPU setup that's worth the effort to build is gonna be between 3500-500 bucks, right? So what's another 500? But for the few who will be trying to build such a rig on a budget, it could make the difference between 3 and 4 gpus.
Another problem of course is the NVME drives running on PCIE lanes. That FTW K board can run four gpus at the speeds I mentioned in my previous post, or it can boot off an NVME drive, but not both.
I think there's a general misconception that PCIE lanes render images, whereas they're actually only involved in transferring data from CPU to PCIE devices such as GPUs.
Side note, I have that same case laying around, the Core X5. I just can't seem to get myself to build in it. Nice case though, but it's so big.
@PA_ThePhilosopher "You can connect them either in series or paralell. I prefer connecting them in series, since the D5 pump is powerful enough"
This would allow doing without another block, but potentially increases temperatures in the last GPU. It may not matter much. Do you see any temperture difference between GPU 1 and 4? Seems like parallel plumbing might be simpler?
Anyway thanks for the details. FWIW, I was also leery of water cooling, but after putting an all-in-one cooler on my CPU, I'll never go back to air cooling. Next builf will include water cooled gpus.
FWIW, folks shouldn't ignore this thread just because it's focused on quad gpus. The DIY watercooling info is worth the read by itself. Dual gpus folks should think strongly about watercooling and even single gpu folks that worry about running the gpu at 80C fopr long periods should consider the same.