Object transparent in scene
 jvdesuit1_582de7c548
Posts: 182
jvdesuit1_582de7c548
Posts: 182
Hi
I have a curious effect that I can't explain netiher solve.
I have converted a sketchup model with my usual method
Sketchup collada file export into ---->Import into Blender and----export in Wavefront obj format---->DAZ Studio 4.5---->Import obj file into DAZ scene
I have created in Daz Runtime library two sub-folders folders:
in Geometries / Amphitheatre/ contains all the obj elements
in Textures/Amphitheatre/ all the jpeg files of the object and its different components
For reasons I can't understand although I have defined the surfaces with DIFFUSE , AMBIENT and OPACITY parameters as I do usually, the structures of the object are totally transparent and I can view on plan thru the other!
Should I create for each jpg file a corresponding Alpha one? If so this would be a nightmare!!!!There are 54 files!
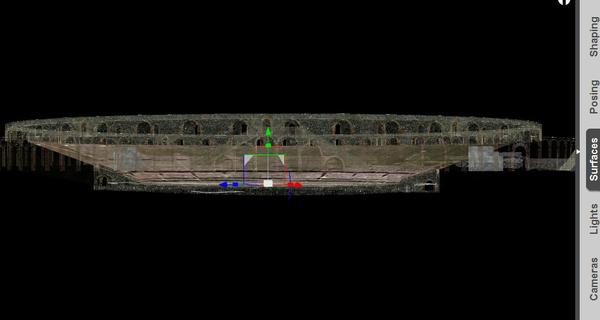
Can anyone give a solution to this stupid situation! Here is how it looks:
Daz 3D is part of 
Connect
DAZ Productions, Inc.
7533 S Center View Ct #4664
West Jordan, UT 84084
Licensing Agreement | Terms of Service | Privacy Policy | EULA
© 2026 Daz Productions Inc. All Rights Reserved.
Comments
It looks like the object is not properly UV Mapped. It looks to me like one UV Template is stacked on top of another
Is this object in seperate pieces in the Scene tab, or is it all one object?
No it's in single object but for the floor of the arena which is separate and of another source as to be a the right level about 10m below the ground as it is in reality. I just separated from the amphitheater the hills around it which were in the sketchup file a separate set of polygons. There too was a huge mistake as they were putting the theater above the level of the ground. The Monument was dug inside the hill and not above it!
Please select this object in the Scene pane, then go to the Camera dropdown at the top of the viewport as shown below, and select UV view.
You will need to select the surface in the Surfaces pane as well, and then you should see the UV Map for that surface if there is one. Are there seperate surfaces listed for each part of the object?
Yes for each part there is a separate jpeg which appears in the surface folder and of course I have linked the diffuse, ambient and opacity parameters to each one of them with the proper texture related. I'll do that when I come back this evening; I'm now leaving home for the afternoon. Thanks Jimmy. I'll keep you posted when I come back
It looks like the surface Normals are reversed on the object,.
The textures seem to be applied,. but,. "If I'm looking at it correctly" the image is a "Side on" view,. and you can see through it.
which point to it being a problem with the surface Normals direction,. EG: it's outside - in
;)
To fix it,. you would open it in a Modelling program like Hexagon or Carrara, and "Reverse Normals" or "flip normals",
It certainly could be that Andy, thanks, it is originally a Sketchup model.
I'll check with Hexagon hoping I can manage as I do not know a thing of this software!!!!
Thanks guys I'll come back to you if I have a problem doing the bloody job!Grrrrrr....!
You really should have zoomed in to a section of the model so we could have gotten a better look at the problem. Studio shows back facing polygons so it is doubtful that it is normals. If you have a trans map applied to the Opacity channel it will give that phantom look in preview but render fine, assuming the trans map is properly made.
It's not a problem; here is a close up at the level of the main stairs, first a medium one then a very near close up to the stairs; as you can observe, one can through the stairs back to the arena itself! It's a Phantom of an Amphitheater!!!!
Try to render it with just the camera light in the scene, as it looks like the standard OpenGL display issue with opacity, in which case it will look correct in the render.
Sorry Bejaymac to acknowledge so late your advice, but I had problems with viruses on my pc adding up with a slight surgery I had to undertake last week! But it is solved now thank goodness!
I tried your idea but although I made sure the light pointed to the amphitheater, it remains transparent not only in the workspace but after rendering too!. I've tried too to load in Hexagon the scene like suggested above but did not understand how to deal with the "normals". The action is not clearly explained in the manual either in its English or French translation....
Has this been Suggested yet? Open your Surfaces Tab. Select one part of your Object, Select the same Part in the Scene Tab. Then apply a Standard DS Shader to that surface. Now render. If that part renders it's not the Normals. It's the textures and how DS is reading them.
Hi Jaderail,
Actually I've found a video tutorial to reverse the normals in Hexagon; I applied it and now in DAZ the different surfaces are not anymore transparent but have lost their textures and colors!!!!!I'm getting mad! I have to check the folders I think it is the place I put the textures which is the problem now. I'll come back after that to tell the results.
I have tried everything I could imagine without success; this is what I get after reversing the normals in hexagone and reimporting the resulting wavefront object ....Grrrrrrr!
I wish I could help but I do not know enough about modeling or converting from one program to another. Maybe you could PM one of the people in the Art Studio Forum in the Car and Bike lovers thread. They seem to know a lot about converting models from one type to a good DS version.
Thanks for the tip I'll do that.
A couple thing I noticed.
First was your diffuse colour was black and diffuse strength was set to 0%. Most times the colour should be white and the strength at 100% If you still have the old object; try loading it again and making those changes.
Second; Blender can reverse normals too so you don't need to learn a new software. But as mentioned in a previous post; Studio can "see" back facing polygons so normals direction is really not an issue.
I made different tries with the diffuse, ambient and opacity parameters and the result is still the same; the whole set is transparent....... So I'm still not understanding where the problem is. Only the floor of the arena is ok because I did it myself from the original image I found in a paper as to get the exact texture it has today, partly sandy partly grass. If I had the knowledge to texturize the remaining walls etc, I'll do it and probably better than the guy did with Sketchup because I've been there at least 15 times during the last 50 years!
What I have noticed in Hexagon is that the normals are not all oriented in the same directions; I wonder if this is not a problem in itself. Should I reorient all the faces in the same direction once and for all and as you can see it would be a huge task due to the complexity of the object? (see picture here)
Have you really set your jpgs in the opacity parameter of the surfaces tab? I think that makes them a transparency map, which could explain why your object is partially transparent.
Don't set any image on the opacity parameter. Just set the opacity to 100%.
Set your jpgs on the diffusion parameter, set the diffusion color to white (255, 255, 255) and the diffusion strength to 100%. See if this helps. Also, with an object like this, you should not need any ambient light. You don't want the object to glow in the dark. I don't think you need an image on the ambient parameter and I would set the ambient strength to 0%.
Mark I've just put the opacity parameter to none and you are right that was the error! For the other parameters I had used each sub items with its corresponding texture in the surfaces tab. You are right too about the ambient it's not useful although it could be an option in the movie to give a more sinister aspect to the place when the camera discovers the skeleton of the fellow who was trapped in the Palestra during Mount Vesuvius eruption.
Well at last I will be able to move forward after so many trials.
Thanks a lot