Tutorial Uber Area Lighting: The Basics

Uber Area Lighting: The Basics
I got this together before the end of last year; before my computer died a horrible death and my hope was that my fellow CV’s would correct me if I had gotten certain facts wrong. Unfortunately with the holidays and some not using Daz Studio has made it difficult to clarify the contained information although I am fairly certain my info is correct but I am always open to be corrected. With this in mind I will provide an open post at the end for any information that either needs correcting or adding.
Area Lights also commonly referred to as mesh lights as we use a geometric shape as a light source. When a surface is used for a light source the direction of the mesh’s normal dictates the direction of the light projected. Take a standard Daz Studio sphere; its normals are facing outward...when used as a light source the light emits outward.
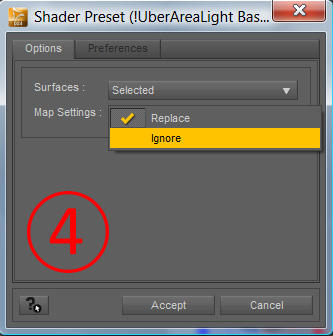
From a lighting standpoint my personal preference is Area Lighting for its softness and more realistic effects. This is due how the light rays travel from the light source’s surface compared to the standard lights like Spot, Point and Distant lights. Refer to image 1 below. Plus we can control shadow colour and intensity and my favourite Fall OFF. I love using Fall off for many reasons like avoiding light spilling on to other parts of the scene, for small lights sources that fade out after a distance and more importantly using Fall off saves on memory as once the light hits the cut off point no more calculations are needed.
As you can see the light rays are not parallel to each other so light gets around the curved edges more as real light would.
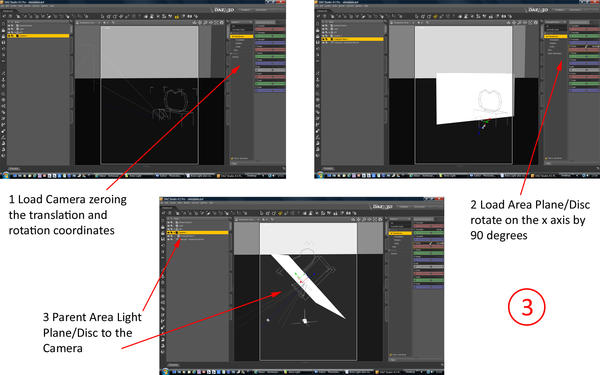
In Daz Studio we have a number of geometric area light presets, plane, sphere tube etc and the Base preset, my favourite. :) Refer to image 2 The Base preset allows us to turn almost any object in to a light source. But it does increase render times but IMHO well worth it when you see the results.
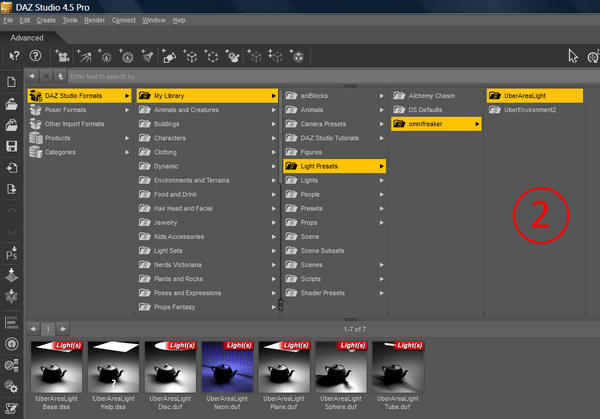
When using an Area Light Plane I find loading a new camera and adjusting the location to 0 on all 3 axes and 0 on all rotations. Load an Area Plane, rotate on the X axis 90 degrees and parent the plane to the camera. Now you have a viewing angle to position the plane with, move the camera you move the Area Light Plane. See image 3
An Area light Sphere is like a point light which emits light spherically.
Area Disc is pretty much the same as the Plane and to be honest I hardly ever used them except for the example below.
Area Tubes are good but the ends don’t emit light, this is where I find the Area Discs come in handy placing one disc on each end of the tube or for example on one end of a light sabre. ;)
The only time I use the Neon preset is for the light setting and surfaces properties on 3D text or for the Area Tube set up mentioned above.
Area Base allows us to use just about any mesh as a light source. To apply the Area Base first select the object and the surfaces in the Surfaces Pane. Double click the Base preset and adjust the surfaces accordingly.
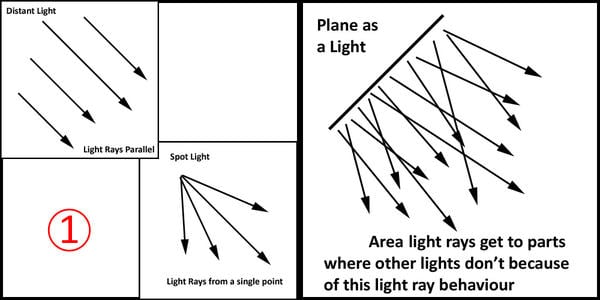
To apply an Area Light base to a textured object and you want to retain the diffuse texture maps then holding down Ctrl while loading the Area Base Preset will allow you to “Ignore” replacing the texture maps and therefore retaining the colour maps. Refer to image 4
Daz 3D is part of 
Connect
DAZ Productions, Inc.
7533 S Center View Ct #4664
West Jordan, UT 84084
Licensing Agreement | Terms of Service | Privacy Policy | EULA
© 2026 Daz Productions Inc. All Rights Reserved.
Comments
With all the lights in Daz Studio we adjust in the Parameters Pane but with Area Lights we are using the surface as a light source so the light settings are in the Surfaces Pane. See image 5
The surface properties are pretty much as you would find on a Daz Default surface with a few added channels. The different bits of the surface tab
Fathom: This is great for hiding the light source like the fireplace Area Sphere in the scene further down the page and still emit light. You may not want the light source to reflect in any reflective surfaces so turning On fathom helps.
Samples: This is our first quality control and really depends on the surfaces being rendered. For the example scenes below Samples were set to 32 and the render settings shading rate at 0.20. If using advanced surfaces like UberSurface/2, Human Skin Shader etc then you might find you need to increase the Samples even more all the way up to 128. I really don’t see the need to go higher when the main Advanced Render Settings can play its part too.
Shadow Colour and Intensity:You get create some funky effects when using a different shadow colour. Intensity is just how strong the shadow is and is not a shadow edge softness setting. Area Light is soft in nature.
Fall Off: Is the distance the light travels before it starts to fade out and falls off totally. Leave the fall off Start at 0 and adjust the End value to get a more realistic fall off. But this is not to say you can't play with the Start value...it is art after all.
Below are some quickly made examples (see images 6 and 7), first a spot versus Area Plane/Disc. Area plane and disc at default, only Ambient engaged so you can see it, and a standard Spot at default apart from engaging ray traced shadows. See how much more light is spread by the Area plane/disc compared to the Spot and they are all in the same place at 100% intensity. Look closely at the neck of the urn see how more light gets to parts where the spot doesn’t?
Next size matters. With Mesh based lighting the smaller the object is the brighter it will get at the same intensity. Meaning 100% intensity will be more brighter if you scale the object down, scaling up will have the opposite effect. See image 8 below. Rule of thumb the smaller the surface area the brighter the light will be and vice versa.
Here are some more examples. But don’t let these simple examples hold you back, try the planes for up-lighting...very spooky, light from above only, very angelic feel or use surfaces of a scifi set to light the scene etc. I have even used a light bulb’s mesh for a light source which leads me nicely to the example scene rendered below.
Here I have used the Area Base Presets on the two light bulbs themselves, one Area Sphere in the fireplace and Uber Environment 2 for a little fill light. See the complete settings below.
When using any lighting that is either contained or semi contained in glass we must allow the light to pass through the glass this is done by adding “Refraction” 100% and Index of Refraction (IOR) of 2.50 to the glass surface. Added to this we must tell the render engine, via the Render Settings pane, how many rays we need to pass through the glass. The Glass shade is well made having a thickness to the mesh; in effect it has 4 faces as you pass through it so we set the Max Ray Trace Depth to 4.
The ambient level on the light Bulbs is set to 500% this is so the glow bright. For some reason when using Ambient and Area Light on the same surface the ambient needs increasing more to have a dramatic effect. To increase Ambient Strength higher than the default of 100% click on the little Cog wheel to the right of the slider and increase the MAX to whatever value you want and Accept. Now you should be able to increase the Strength.
Please if I have left something out that you feel needs to be included
let me know and I will add it here.
1: In DS3 you will have to select the object and the surface to apply Area Lighting to a surface. DS4.5 does this automatically now so it didn't come to mind until nowefg posed a question which reminded me about DS3.
2: DS4.5 doesn't flip normals with Negative scaling anymore so to make a light emiting skydome one needs to reverse the normals in a modeling program ie: Hexagon or Blender etc then import the sphere back in to Daz Studio.
3: Totte asked me about how to avoid the Area light/s showing up in Reflections even though "Fathom" was turned on. I found it strange but we found the cure. Turn Opacity down to 0% for the Area Light. It will still emit light with Fathom on and Opacity at 0%.
I hope this helps a little and encourgaes you to play with these lights more.
Very useful, thank you!
Thanks Simon
Thanks so much for doing this Szark, you're a real gem.
Haven't read it in depth yet but just glancing over it has shown me quite a number of things I wasn't aware of.
Hope it helps bluemoon, thank you.
Okay, so I'm playing with this using this model:
http://www.foundation3d.com/index.php?categoryid=38&p13_sectionid=307&p13_fileid=1677
I applied UberAreaLight Base to the 7-Lightsheets material zone (which are supposed to emit light).
In a previous render I used point lights to simulate the lighting, but I wanted to play with these light types. The UberArea lights on that material zone is the only scene lighting present.
Okay, one thing I had an issue with is that I had to jack the Shadow Samples way up to 64 in order to get the graininess out of the shadows (on the lights in the material zone). I have my render shadow samples at 16, but I'm still seeing graininess. It took a whle to render, so I just wanted to ask, do I need to jack up the shadow samples in the render engine or do I need to up them in the lights themselves again?
I can't tell from that image what the problem is to be honest. The problem we have in Daz Studio is knowing which way the normals are facing, I use Blender to see the normal direction and change it if needed. Also what intensity did you use? Panels that size might need to go to about 400 to start with may be less.
Shadow Samples...yes Shadow Sample Rate in the Advanced Render Settings does have an effect. When using any soft lighting with soft shadows you should always increase the sample rate to at least 20 I have gone up to 28 before now but I always leave the Uber Area Light shadow sample rate at 4 never having an issue. But my main Shading rate is usually set to 0.20 for final renders.
Hey, Szark,
This is great!
Thanks for taking the trouble. There's a lot in Studio I don't yet use, because the learning curves, starting from ziltch, can be so steep. You level this feature off nicely and usefully.
Question: I was doing a scene with wall lights this weekend, like the one in your example; tried point-lighting with not very good results; tried Opacity-Zero on the globe, the bulb, etc., and Ambient, but the point lighting didn't get where I wanted. Just a light smudge on the wall that didn't look like it was coming from the lamp at all, even when the point-light was centered in the globe itself.
So, if we use an object, like the bulb, as a light source with Base, are we selecting that object as we would any other, with Surface Selection Tool and Surfaces Tab, and then applying Base (I'm lost here),
or are we picking the item off the list of Surfaces, accessing Uberlights, and Ctrl-double-clicking...
It's all new to me. Sorry if you've covered this... I have this tiny little monitor, and making out the illustrations can be problematic.
Forgot question two:
Where are you getting those color-maps shown in post 2?
Thanks, again.
First off clicking on the image will expand the image a lot more which might help.
In this case, with Jack Tomalin's Holiday Nook set, the light bulb has a surface (material) zone of its own. So in DS4.5 if I select the Light Prop in the Scene (or Scene Pane) then the surfaces that pertains to that light prop will pop up in the Surfaces Pane. Then select the Bulb surface zone and apply the Area Light Base to that one surface.
The way DS4.5 selects objects and surfaces is so much better than it used to be. If you select a surface it selects the object and vice versa, the old way was we had to select the object and then go looking for the surface/s zones in the surfaces tab among all the surfaces in the scene...now we can filter by showing the surfaces of the item/s we select But essentially you need both the prop and surface selected to apply Area Lighting.
There is a way to make your own material zones in DS4.5 if needed http://www.daz3d.com/forums/discussion/14082/#204267
Thanks a lot Pete! This reminds me that I wanted again to start playing with the AreaLights - very good written!!!
Three in a row.
Sorry about that, Szark; it's not like you weren't clear and precise enough.
I caught up with the answer to my first question. Just had to reread your tutorial over again from the beginning. Second question answer is probably in there, too...
Great work Pete. I'm a big fan of Uber lights and I would never have thought of using a camera to position my lights. That tip alone was worth gold. I'll cross post a very recent Uber light render here as well.
Harry Dresden thx and nice soft lighting there too. How many area lights in that image Harry, 2 or 3?
Only 1 area light believe it or not. I also used Uber environment with an HDR map for global lighting.
Arr the old UE2 big Fill light.....yes I would believe it now. :)
I have been using Uber Area lights more and more, sometimes mixed with linear point lights or distant lights. It occurred to me I could use a camera parented to the Uber Area light to point the light a few weeks ago. I'm going to read this carefully to look for more ideas.
Here is an example portrait with a 3 light setup in which all 3 lights are Uber Area lights. The setup is shown in the second iamage.
The Key light is elevated, because light coming from above looks more natural to the human eye. The key light is set to be twice as bright as the fill light.
The fill light is a circular Uber Area light around the camera used to render the image. There really is no reason for it being circular. Some photographers use ring flash around their lens to provide on axis fill. I was sort of thinking of ring flash fill when I chose a circular Uber Area light, but this light is much bigger and therefore softer, than a ring flash.
The accent light behind the model just creates highlights along the edge away from the key light to improve the separation of the model from the background.
The background is just a primitive plane. The surface has been made grey with grey ambient light emission. You cannot get very much light emitted this way, but that is ok. I'm just doing this so I don't have to light the background. I want it rather dark. There is a spot light just in front of the background pointing at the background. This light is light blue to create the blue highlight around the models head.
There is no Uber Environment light used. The thing at the models feet is the Uber Area Headlamp Blocker, which is a fake light added every time you add a Uber Area light to turn off the default DAZ Studio lighting. (Youn only need one.)
Thanks Mark
I didn't mention the blocker as that is explaned in the Help Preset Icon but thanks anyway.
Accent light we call Back Lighting or Rim lighting just so people don't get too confused. :)
Nice Setup too and a great help showing how you used it, thank you for chipping in there.
Thanks so much for putting this together, Szark! I haven't had time to study it yet, but I'm sure it will be helpful.
thank U Szark & Mark for this tutorial, very informative for new bee's
gupta
hai Mark,
if possible can U post screen shot for the 'UberAreaLights' lights setting for the rendered image you have posted above.
thanks
gupta
I'm at work now, but I will try to post those tonight.
I have been adjusting the lighting intensities a little so I am not sure exactly what settings I used for the image posted above. I have re-rendered the image below along with the current light settings and the render advanced settings. This image looks like it has a bit more fill light so that the shadows are not as deep as the first one i posted. I have circled the most important settings which are not default.
I use 'Samples' of 32. Szark suggested 32 as the value he usually uses and I also found this value a good compromise. The default is 8.
On the advanced render tab, I always use 'shading rate' of 0.2 on recommendation of many people here.
I also changed the color of the light slightly, although I don't think this is very important.
I turned on the 'Falloff' feature. I am did this to keep the Key and fill light from illuminating the background. The fall off is set to start after the light has passed the subject, but well before it reaches the background. Real lights in a photo studio of course don't have this feature. Photographers frequently have to use lights to light the background. I'm just using the rather weak ambient light from the background plane, so I want to keep the key and fill lights off it.