No one asked me - Diomede screenshots on whatever - Warning AI Discussion OK
 Diomede
Posts: 15,442
Diomede
Posts: 15,442
This thread is meant to help people who have bought Carrara and are now saying, "Now what?" You will learn how to load a Daz figure (genesis) of a particular character (Michael 5), find shader elements that don't load by default, apply a preset skinshader, use strand-based dynamic hair, load clothing content designed for genesis, apply the "fit to" function to conform the clothing to Michael 5's shape, apply a preset pose, create a landscape for the genesis figure to stand on, customize the terrain and adjust its shaders, load a plant, and create a realisic sky with sunlight. What you will not learn is how to install Carrara and its support files, or anything artistic like principles of lighting, composition, color balance, etc., because I don't claim to know much about that stuff. Oh well, can't have it all.
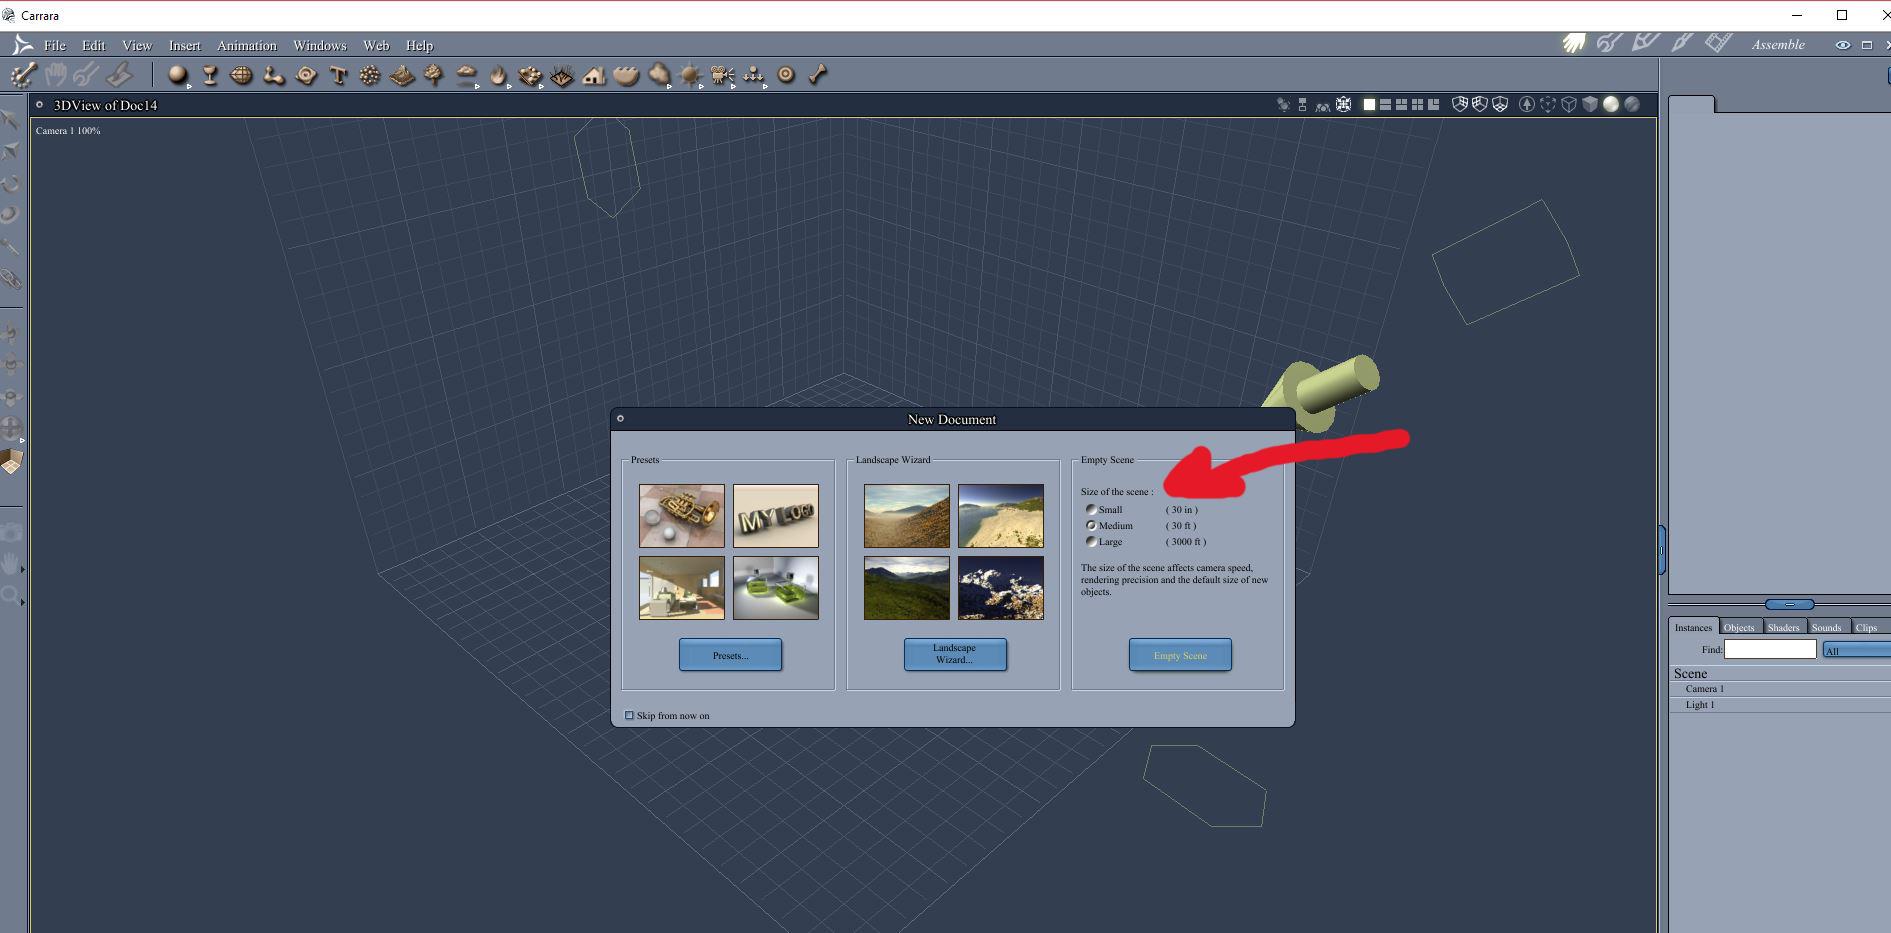
First, start Carrara and choose a medium empty scene.
Use the arrows along the left side to move the camera around, which changes your point of view. There are hotkeys for panning, etc., but this tutorial will only use menu commands whenever possible.
EDIT: I have added additional tutorials that show how to integrate daz store bought content and how to model a few items yourself.
EDI 2: I changed the title of the thread and will continue posting screenshots on my workflow or projects or anything else.
Daz 3D is part of 
Connect
DAZ Productions, Inc.
7533 S Center View Ct #4664
West Jordan, UT 84084
Licensing Agreement | Terms of Service | Privacy Policy | EULA
© 2026 Daz Productions Inc. All Rights Reserved.
Comments
At the time of this post, Carrara comes with genesis and some genesis related content, as well as with various models and shaders that are part of Carrara native content. The thread intends to use content that comes with Carrara, but also point out several places in which Carrara allows a user to competely customize the function. We will start with loading genesis. Genesis could be loaded from the smart content tab, but instead this series of posts will focus on the regular content, shader, and object tabs.
Once the default medium scene is loaded, open the browser tray by clicking and dragging the handle found at the bottom of the room. (See pic) The tray opens with the sequencer tray. Open the content browser by clicking the browser tab on the left. A series of tabs appear along the top of the browser tray. Click on the one labeled "Content." Scroll down to People " Genesis " Characters. Click and drag Michael 5 to the instances tray (box in lower right of screen).. Michael 5 will load at the zero zero zero position. Note that you can click and drag M5 directly to the scene area where you want it to load.
Carrara performs its functions in a number of "rooms" which are accessed by clicking on the icons in the upper right part of the screen. We won't be using the animation room for this tutorial. Most of what Studio does is accessed in the main Assemble room. Carrara has a separate room that looks like a wrench for modeling objects, plants, terrains, hair, and replicators. The shader/texture room looks like a paintbrush. The render room looks like a piece of film.
Once M5 is loaded in the scene, the figure can be translated, scaled, and rotated using the tools in the upper part of the left side menu.
First, for whatever reason, Daz has failed to have Carrara load by default all of the texture maps that come with genesis characters. So, we will enter the shader room and learn where to find them, how to load them, how to save an adjusted shader, and how to load a preset shader.
Highlight the"actor" level of the genesis tree in the lower right instances tray (see pic). Click on the paintbrush icon in the upper right to enter the shader room
You will see that genesis has a great number of shading domains (right side) each with its own customizable shader.
We will examine the shader tree for one shading domain just as an example. From the right side, double click the 3_SkinFoot domain. Its tree will open in the box on the left. The tree is made up of a number of channels to affect a different aspect of the object's appearance. Here are some examples. Color is the basic color. Alpha will make it visible or invisible. Highlight and shininess control how light appears on the surface. Bump can give the appearance of roughness. The skinfoot uses the "limbs" texture maps, but for some reason did not load the maps for highlights or for bumps. You would click on that channel, choose texture map as the option, then navigate to where your maps are. There are a couple of ways to find the maps. If you used DIM to install your content, you can also use it to display the location of installed files. The other way is to open the color channel and hover your cursor over the name of the texture map. Note the file location. The bump and other maps should be in the same location.
Return to the bump channel, navigate to the same location, and load the bump map. In the attached, I have navigated to my location and loaded the M5 bump map for Philip for M5.
Now, that would be a pain if it had to be done for each shading domain each time! Thankfully, Carrara can save and load "global" shaders that account for each shading domain. In the interest of time, I am going to show how the global tab works, then encourage people (for now) to explore the settings of a sample global shader for things like bump settings, subsurface scattering, etc. Can return to skin shading later, but this is just to get people up and running.
At the top of the list of shading domains, there is a sphere with multicolored sections. This is the global shading domain area. If you have adjusted a figure's shading domains the way you like, you can click and drag from this sphere to your browser tray under the shader tab.
Speaking of which, I believe that Carrara comes with sample Carrara shaders for Michael 5. Open the browser tray and click on the shader tab. Open the "skin" folder. Open the subfolders for Genesis Michael 5 : Phillip. Click and drag Phillip global (BTL, but not gens for geneitals) to the multicilored sphere at the top of the list of shading domains.
Now, take some time and go through the sample settings for highlight, shininess, subsurface scattering, etc. in the Phillip global shader that comes with Carrara. Note that there was another map that had failed to load. In this case it was loaded in the highlght channel even though the name makes it seem like it should go in the subsurface scattering channel. There are other threads on skin shader approaches and settings, so we can go in more detail later. On to hair!
You could load conforming prop hair, but that works just like conforming clothing which will be shown later anyway, so we will take a look at how dynamic hair works. You can "grow" hair directly on the model for genesis or any other figure. However, if you want to use the hair style on more than one figure, it is better to grow the hair on a hair cap. The cap and hair can be saved to the browser to be loaded for later use. Carrara comes with a couple of sample hair caps. You can find them in the content browser under the objects tab, Hair : DAZ. To prepare, go to the genesis figure in the lower right box and open the gouping. Click the triangle next to "hip" to open the tree and navigate to the head. Click and drag a hair cap to the head. Use the manipulation tools (upper left) to move and resize the cap to the top of the head if it is not there already.
Once the cap is in place, find the hair icon on the top menu. The name of the icon will appear if you hover the cursor over it. The hair icon looks like a square with lines coming off of it (like hair :>). Click and drag the hair icon from the top menu on to the cap in the lower right box (instances tray). The modeling room will open for hair.
I am going to use this as a placeholder for the hair modeling room. Here is the room and will return to talk about grow regions, guide hairs, and the styling tools.
Carrara comes with a couple of sample hairs. Lets use one of those just to keep this tutorial moving. Highlight the hair cap in the instances tray (lower right). Hit delete.
Open the browser tray and open the objects tab subfolders and look for hair: samples. Click and drag the Blonde ND hair to the head (in instances tray lower right) of genesis. Adjust to top of head if necessary. It may look like there is no hair. Don't worry. It is just hard to see. You should see the 3 manipulation arrows.
Lets do a test render in the render room. In the upper right, click the film icon to enter the render room.
Click on the "render in new window" button.
Return to the assemble room by clicking the hand icon in the upper right.
Time to clothe genesis with some of the clothing content that currently is packaged with Carrara. At this time, Carrara comes with Bobbie25's B25 Ranger outfit. If you look at the instances tray (lower right), you will notice that the figure is a group called "Michael 5" which contains the group "Genesis" and the genesis group contains two subgroups "actor" and "hip." I prefer to load clothing to the "Michael 5" level which I call the supergroup. As a result, the clothing items should be on the same level as the "genesis" group, not a subgroup of it. I load the items without conforming yet. So, click and drag the B25Ranger boots, arms, top, and pants to the Michael 5 level in the lower right instances tray.
Notice that each of the items seems to have two levels, for example, B25RA Top and then a subroup B25RA Top. Highlight the 2nd level (B25RA Top) and then notice that the upper right box (called the properties tray) presents a number of menu tabs.
Under the "general" tab, you will see a box that says animation group and "fit to." Click "fit to" and choose genesis. Depending on your system, it may take a while for Carrara to calculate and project the morphs. Repeat for each clothing item. Unfortunately, B25's clothing will load without textures. This not normal but is easy to take care of.
The B25 ranger outfit comes with a subfolder for its materials presets, which is not unusual. Highlight the 2nd subfolder for one of the items (B25RA Top has a 2nd sbfolder with the same name - highlight that). Go to the materials subfolder and then double-click the materials icon for that item. The material preset should load. Note - this would be a good time to check the shader tree to see if Daz inluded everything appropriately (just like the skin example above). If there are bump maps that are supposed to load, for example, can check on that. Once again, if you make adjustments to optimize the shader, remember to save the global shader to your shader browser so that in the future you can fix with one click and drag to the multi-colored sphere.
Repeat for each item.
Now, let us go back to the render room for a test render (you can do test renders in the assemble room by using the camera icon on the left side but I prefer to use the render room when I have dynamic hair - pure personal preference).
Click the hand to return to the Assemble room. Next is posing. In general, select an individual bone like the thigh or shoulder and then use the rotate tool from the left side of the Assemble room to pose the figure. I prefer to select the bone that I want by opening the group in the lower right instances tray and opening the tree that starts with the word "hip." Give it a try with the neck and the shoulder selected from the lower right.
Carrara can also apply the preset poses that can be bought for the various figures. I'm not sure what comes with Carrara, but I think the genesis base male poses do. Open the Browser tray, under the content tab, go to People : Genesis : Poses : BasicMale and choose the "Male Standing 01" To apply it, select the figure level (Genesis) in the lower right instances tray and then double click on the pose preset (Male Standing 01) in the browser tray. Depending on your system, it might pause a moment to apply the pose preset. You can still continue to select bones and use the rotate tools to adjust the pose.
The terrain is next. Either from the top menu, choose INSERT : TERRAIN, or click and drag the terrain icon from the top menu to the instances tray (lower right box). The modeling room for terrains opens (see the wench in the upper right glow a little?) Increase the detail level of the terrain to at least 512 or 1025. See upper right of the terrain modeling box.
The terrain modeler has a lot of great tools. You can import grayscale heightmaps. You can import actual usgs information for real terrains. You can even paint directly on the heightmap. However, we are going to work with the generator and filter function where it says "filter layers" (upper left). By default, the terrain editor starts with a mountain in the filter box. Fine, but we want a flat spot for our Michael 5 to stand on. So, click the "add" button and a "null generator" will appar in the filter box below "mountain." A drop down menu labeled Null Generator appears. Click it and you will get the choice of a filter, a generator, or an advanced generator. Choose "filter" and select "plateau." The terrain now has a flat area. If desired, you can make adjustments for the amount of the plateau and its slope. For this, we will just accept the default plateau.
Click the hand icon in the upper right to retun to the Assemble room. Notice that the terran is large enough that our Michael 5 is below the surface. We will take care of that and retexture the terrain next.
Select the Michael 5 supergroup and use the manipulation tools (upper left) to move the group vertically until M5 is standing on the flat part of the terrain. Use the camera movement tools (left side toolbar) so you can see the figure and the terrain. Select the terrain and enter the shader room by clicking the paintbrush (upper right).
Notice that the terrain shader tree on the left side looks a little different than the skin shader had looked. The default terrain shader tree has four regions divided by the natural functions of slope, altitude, etc. The top shader says global (gray) and then there are three terrain layers. If you highlight each of the three, you will see them labeled just to the right "land", "grass", and "snow." The region covered by each depends on how steep and the altitude of the terrain at that particular point. The default grey covers steep cliffs. The green grass covers relatively flat areas as long as they are not so high to be snow covered. The yellow land is steeper than grass but not as steep as the cliffs. You can change the shader for each terrain layer, for example by tiling a texture map of actual grass in the grassy area or of rocks for the cliffs. You can also adjust the distribution functions, for example, by extending grass up steeper slopes or by extending snow down to lower altitutdes.
However, we are going to do something simple.to break up the monotony of the default terrain. Select the top line of the terrain shader tree where it says "top shader." Click the drop down menu and choose "complex shader." From the menu, choose "multi-channel mixer." The tree will now offer two terrain slots (source 1 and source 2) and a blender. In other contexts, this is a great way to create a road, a river, a parking lot, or whatever you want, by having the appropriate blender.
We are just going to create a blender for two terrain shader presets. Select source 1. Click on the wizard button and choose one of the shaders that has both green and rocks. Select source 2 and choose a different terrain shader that would have some grass and rocks. Select the blender. Choose the natural menu and pick "cellular." Reduce the scale so that the cells are smaller. Now the terrain shader will have grass that is a mixture of the grass from two different shaders, land will be mixed with land, etc.
Don't forget that you can save a global shader if you like it and then load with one click and drag in the future.
Next up is to take a look at the sky. Carrara can use HDRIs if you have them. An HDRI would get put in the background in the scene tab. However, to limit this tutorial, we will focus on the realistic sky editor. Select the "scene" in the instances tray (lower right). In the upper right, a few menus appear, including "ambient", "atmosphere", "background" and "backdrop." Open the ambient menu and set it to taste. Many people set ambient to zero.
The realistic sky editor is found in the atmosphere tab. There is a drop-down menu next to the word atmosphere so use that to pick realistic sky.
Then an editor tab appears. You can use this to change the color of the sky, the types and quantity of clouds, the amount of haze, the position of the sun and moon, night and day, and many other features. You can even pick a specific day/time of a speciic year. For this tutorial, we will accept most of the defauts. However, in the left of the editor, there are 4 cloud levels. Click the first cloud circle to bring up its submenu. Pick cirrus clouds.
Click accept to return to the main assemble room.
The next step is to link the lighting to the sky. To do this, we are going to eliminate the current light in the scene, add a "sun" light, and then in the render room tell Carrara to use sunlight. So, here goes.
From the top menu, find the "lights" tab or use INSERT : SUNLIGHT. If you use the menu, click and drag the sunlight icon (it is one of many) from the top menu to the instances tab (lower right).
The sunlight will come in pointing straight down, meaning that the sun is at high noon, unless you have changed it in the realistic sky editor. We can use the rotate tools (upper left side menu) to change the angle of the sun.
Click the film icon in the upper right to go to the render room. There are three tabs, rendering, output, and progress statistics. Under the rendering tab, there is a section for global illumination. Check the boxes in this section for sky light and light through transparency. Sometimes, if people forget to check light through transparency then the eyelashes and eye lens result in bad eyes.
Return to the main assemble room. Select the original distant light. You could delete it, but I generally just set its brightness to zero.
Rotate the sunlight to an angle that you prefer.
Aside on lighting. This has been an example of an outdoor scene. However, if you want other kinds of standard lighting, there are plenty of presets that come with Carrara. For example, if you go to the browser tray and look under the scene tab, you will see folders for various lighting rigs. One of them says "lighting scene" and has a 3-point lighting preset.
Second aside on lighting. You have additional control over lights through the modifiers tab. From the top menu, choose INSERT : SPOT, or use the icon menu to click and drag a spot light to instances tray. Select the spot light and use the manipulation tools to translate it vertically so it is above the terrain and near the M5 figure. Select the spot light and in the upper right click the modifiers tab. Click the plus sign and choose "point at" and then navigate to the head of the genesis figure.
OK - delete the extra lights so we just have the sunlight working for now.
This pose seems like a good excuse to bring in a tree for genesis to lean on. We will insert a tree to open and explore the plant editor, but then load a tree preset.
From the top menu, use INSERT : PLANT or click and drag the plant icon from the top menu to the instances tray (lower right). The plant editor opens and the wrench icon in upper right tells you you are in the modeling function. There are tabs for editing the trunk, branches, the leaves, the tree shape, and experts. For this kind of scene, might want to lengthen the trunk (raise the first branch higher along the trunk) to give genesis a space to lean against. Notice settings to bend the trunk, make it wider, decay, etc. You can change the length and angle of the branches. You can change the size and quantity of leaves. You can also change the objects that load as leaves, including modeling your own fruit. You can create your own leaves. There are a number of possible tree shapes, and you can create a wind effect.
For now, delete the default tree and we will load a preset.
Rather than reinvent the wheel, we will just load a tree from the object browser. Just pick one that you think you might like. I recommend a tree with a long trunk like an aspen. Click and drag your tree of choice from the browser tray to the instances tray (lower right). The tree will load at zero zero. Use the manipulator tools (upper left) to move the tree so that it is next to the genesis figure. I am going to use Aspen 2. You can find it in the OBJECTS : BASIC PLANTS folder.
Time to do a test render.
Click the film icon to go to the render room. Change the dimensions by going to the output tab. Uncheck the box for keep proportions and then reset the width to 500 and the height to 800. Check the "keep proportions" box again. Return to the assemble room. From the top menu choose, VIEW : SHOW PRODUCTION FRAME. There should now be a white outline of the render dimensions. Use the camera movement tools to get the view of the Michael 5 that you find appealing. Similarly, use the rotate tools for the sunlight to create the lighting angles and shadows that you find appealing.
Click the film icon to return to the render room. Make sure that sky light and light through transparency are still enabled under global illumination. Click render in new window. Here is my first test render. We will want to do more about the lighting, and then increase the quality of the render settings, but for now, this is what I have. Note - Carrara can do multi-pass which we will include soon.
Now you get the idea. Personally, I don't like the tree bark shader, or the sample hair, or... The lighting needs work. However, this was all done with default content and without modeling any custom objects. Lets at least light up the face more and improve the render settings and show how multipass rendering is done.
OK, insert a spot light. Translate it so that it is in front of the genesis. Use the modifier "point at" to point the spotlight at the genesis head. Reduce the light brightness to 30 percent or so. Use the light settings to limit the spot light to only the genesis character group. Increase the angular falloff.
And here I have increased the render settings. Changes include full ray tracing, increased pixel accuracy, and that sort of thing. Under the output tab, notice the multipass menu. I have checked multipass renders for the volumetric primitive (that will yield the dynamic hair), object index, and depth. There are others as well. These can be a great help for postwork, if desired.
And here are the render results. I don't claim that this is a particularly good render. However, it does provide an introduction to loading a Daz figure (genesis in this case), adjusting and saving skin shaders, loading a skull cap and using dynamic hair, posing with the rotation tools, applying a preset pose, loading conforming premade clothing content for genesis, applying material presets, fitting the clothing to a morphed genesis character, loading and editing a terrain, changing the terrain shader, inserting sunlight and linking it to the realistic sky, changing the default clouds in the realistic sky, inserting a plant and editing its features, and applying modifiers and constraints to lights It also shows how to adjust render settings and how to use multipass rendering.
Well, there it is. A simple screencap guide for setting up a basic first-time outdoor scene in Carrara that uses only content that comes with Carrara (pretty sure) as it is sold now. Feel free to offer suggestions. There are threads that focus on each of these topics so in many cases I think linking to them here would also be helpful.
Hi Dio,
Am just 'stopping by' but this is a great starter and intro to multi-pass. Thank you. More please! (Am tied up/down with work, grandchild and have visitors from the US or I'd be doing Phil's contest... I want my life back!)
Silene - Hi, What Phil's contest? Just updated my Carrara Challenge entry... got nothing but spare time... think I'll go model something... jewelry probably since I don't have any of my own content for that.
diomede, Sadly the wacky server problems don't show many of your images. Been adding to my Help Request to let them know how important the Forums are to DAZ customers.
That's the Marriage Challenge you are on already! Enjoy... wish I was 'there'. Just brought home sick granddaughter from nursery....ack...and it's my husband's birthday today. What a week! Silene
Silene, Of course... Doh! Since chickenman is making all the rules and doing the work I'd not put the two together. Hope your grandaughter is well soon.
Fantastic, diomede!
Man, if I wasn't already your #1 fan!!! :)
So cool! Linking this up in my menues!