G3F Teeth Shrink with Self-made Morphs
 aaráribel caađo
Posts: 691
aaráribel caađo
Posts: 691
I wanted to make some custom morphs for my favorite character. The first morph I made combined a few dialed shape morphs (to overcome some weird clothing issues). I saved it out as a zero-level .obj file, dialed out the shaping morphs I no longer needed, and then used Morph Loader Pro to bring in the obj file as a morph. It works great.
The next couple of morphs I made in Modo Indie, working on a G3F base mesh saved out as at zero level (this time, with no shaping presents applied). I made my first batch of changes, saved that as a new .obj, and brought it in. I thought it worked great, since the expression I was using had a closed mouth. Then I created a few new morphs, including one that manipulated the teeth slightly. When I opened the mouth to see the lips better, I realized something was wrong.
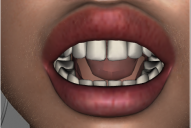
In the attached images, the first one is the body morph only. The second one adds the facial morph (that doesn't do anything to the teeth), the third is the body is all three. the last image is one with all morphs dialed out (at first I didn't realize the body morph was changing the teeth, since the effect is smaller). Each new morph morph seems to shrink the teeth.
How can I avoid this? I can survive without the teeth morph, but I'd really like to keep the facial morph. Can I isolate it so it only impact certain areas of the mesh (e.g., exclude the teeth)? Is there a solution the would allow me to modify the teeth and keep my morphs?
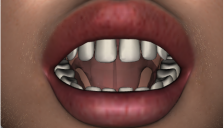
Body Morph.png
467 x 267 - 174K
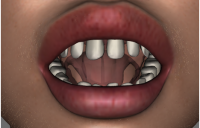
Body + Facial Morphs.png
468 x 300 - 196K
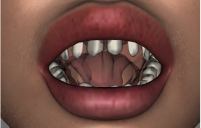
Body, Facial + Teeth Morphs.png
467 x 297 - 196K
No Morphs.png
468 x 313 - 204K
Daz 3D is part of 
Connect
DAZ Productions, Inc.
7533 S Center View Ct #4664
West Jordan, UT 84084
Licensing Agreement | Terms of Service | Privacy Policy | EULA
© 2026 Daz Productions Inc. All Rights Reserved.
Comments
That looks like the mouth realism morph was on when you exported your base resolution g3f. Both the navel and mouth realism morphs load up on the default G3 characters, and you need to zero the figure, as opposed to just setting it to base res before export.
If the default shape will still fit in the mouth:
Add you morphs to favourites, by clicking the heart icon on the slider
Use the Geoemtry Editor tool to select the teeth (probably simplest by selecting their surface group in the Tool settinsg pane, then right-clicking and using (from memory, I'm rendiering) Convert Seelction>Convert to vertex Selection
Right-click again, Morph Editing>Removed seelcted deltas from favourites (again, I can't check the labels as I'm rendering but it should be findable).
Agreed this is a possible way to salvage the morphs. Also check if the navel is affected, and do the same for that area, and you must re-save the morph afterwards to save the changes.
Load the morph and make sure it is working (and make sure the type iss et to Modifier/Shape)
File>Save as>Support Assets>Morph Asset
The Author and product names in the option dialogue determine where, in the Figure's Moprhs folder, the asset files are written.
Once saved as an asset you cans ave a Shaping preset.