-
Hi can someone help me with making a muscle woman! i cant get it right
hi you think the tone muscle morph will work?
Hi can someone help me with making a muscle woman! i cant get it rightMusculature hd and every muscle morph from the store i bought them all ! so i use them all!
Question; does the loREZ Horse 2 use parametric joint bending or weight maps? (answered)Thank you. I expected that too but didn't want to buy it until I was certain.
Weight-mapped figures transfer to Blender really well using Diffeomorphic, parametric rigging means you have to rig it yourself from scratch. I will have to learn to do that in Blender sometime, but I just don't have the time to do that amount of studying at the moment.
[Released] OBJ Companion [Commercial]Richard Haseltine said:
OZ-84 said:
ManFriday said:
OZ-84 said:
Cool Product! Thanks for that. But there is one little problem i search a solution for ...
When exporting through DAZ GOZ to zbrush and reading the morph back in through the plugin, there seems to be no way to set an import size?! Is this correct?
Would clearly need such an option. Otherwise its only possible to export through plugin and read back in through plugin.
Is there hope for a later "fix" of that "problem"? :-)
Thank you for your support! Can you clarify what you mean by "import size"? If you mean the scale -- I don't have ZBrush so I can't test myself, but in theory the plugin should use the same import settings that you can specify with the "Edit options" button in the top "export" group. So if the scale is off, can you try changing that in those options? Thank you!
Also, keyboard shortcuts are a good idea. I'll add that to the list.
Problem is that DAZ sends out over the goz bridge in 1% scale to Zbrush. At least Zbrush reads it in as 1% of the size it should be.
When u do the Zbrush export now (not using the bridge to send it back to Daz (yeah there are reasons not to use it back), Daz reads it in as 1% of the size it should be. Result is that u shrink the mesh.
But not only with Zbrush this problem is likely to happen. Since scale isnt really defined in OBJ format (i guess it can be but there is no golden standard), this problem might appear with many other tools like Max, Maya and whatever... Kind of sad this makes your plugin useless then.
I find that using the Modo preset works for ZBrush, matcging axes to DS and 1 unit = 1m instead of the Daz Studio 1 unit = 1cm. What you are seeing doesn't mean it is sent across at 1%, it means you are importing it with (I guess) the Daz Studio native preset which uses the wrong value of the OBJ unit for ZBrush.
Well yes thats the problem indeed. Its imported with a 100% scale preset. But thats what the OBJ companion does without leaving me a choice to set the scale manually.
And thats why i am asking for an additional option to set the import scale myself. In morph loader pro u can do this, no problem. But the OBJ companion is about NOT using the morph loader pro and speeding things up... right? :-)
[Released] OBJ Companion [Commercial]Now I just wish somone would make a script to handle the exporting from Blender to Daz, or at least define the export preset that works for all Daz morph creation.
I've sucessfully made many Daz morphs in Blender.
I never have a problem with the "Geometry did not match". Whenever I do have a problem, it is always that Morph Loader claims to have successfully created the morph, but when I use it the geometry "explodes", sending verticies wildly about (and yes, the import scales do match).
I suspect that there are some export-from-Blender settings that need to be set differently during some of my morph creations, but not others. But I have no idea. All those export settings are just cryptic mysteries to me.
What I'm saying is this problem I'm having is another obstacle to having a lot of morph creation fun. And someone would do well to offer a product, or at least a page of their tutorial/user's manual, to completely put an end this problem.
Has anyone have probelm with 'Body Diversity Morphs for Genesis 8 Female(s)' by zev0There's an obvious issue with that slider indeed. Zev0 moved some vertices in the left pectoral. It's already visible from -100 to 100 (default limits) and inevitably the defect becomes more visible when pushing the slider above limits.
That's a faulty morph/slider. Submit a ticket about it. Or contact Zev0 here or on Renderotica ¯\(シ)/¯
[Released] OBJ Companion [Commercial]OZ-84 said:
ManFriday said:
OZ-84 said:
Cool Product! Thanks for that. But there is one little problem i search a solution for ...
When exporting through DAZ GOZ to zbrush and reading the morph back in through the plugin, there seems to be no way to set an import size?! Is this correct?
Would clearly need such an option. Otherwise its only possible to export through plugin and read back in through plugin.
Is there hope for a later "fix" of that "problem"? :-)
Thank you for your support! Can you clarify what you mean by "import size"? If you mean the scale -- I don't have ZBrush so I can't test myself, but in theory the plugin should use the same import settings that you can specify with the "Edit options" button in the top "export" group. So if the scale is off, can you try changing that in those options? Thank you!
Also, keyboard shortcuts are a good idea. I'll add that to the list.
Problem is that DAZ sends out over the goz bridge in 1% scale to Zbrush. At least Zbrush reads it in as 1% of the size it should be.
When u do the Zbrush export now (not using the bridge to send it back to Daz (yeah there are reasons not to use it back), Daz reads it in as 1% of the size it should be. Result is that u shrink the mesh.
But not only with Zbrush this problem is likely to happen. Since scale isnt really defined in OBJ format (i guess it can be but there is no golden standard), this problem might appear with many other tools like Max, Maya and whatever... Kind of sad this makes your plugin useless then.
I find that using the Modo preset works for ZBrush, matcging axes to DS and 1 unit = 1m instead of the Daz Studio 1 unit = 1cm. What you are seeing doesn't mean it is sent across at 1%, it means you are importing it with (I guess) the Daz Studio native preset which uses the wrong value of the OBJ unit for ZBrush.
[Released] OBJ Companion [Commercial]ManFriday said:
OZ-84 said:
Cool Product! Thanks for that. But there is one little problem i search a solution for ...
When exporting through DAZ GOZ to zbrush and reading the morph back in through the plugin, there seems to be no way to set an import size?! Is this correct?
Would clearly need such an option. Otherwise its only possible to export through plugin and read back in through plugin.
Is there hope for a later "fix" of that "problem"? :-)
Thank you for your support! Can you clarify what you mean by "import size"? If you mean the scale -- I don't have ZBrush so I can't test myself, but in theory the plugin should use the same import settings that you can specify with the "Edit options" button in the top "export" group. So if the scale is off, can you try changing that in those options? Thank you!
Also, keyboard shortcuts are a good idea. I'll add that to the list.
Problem is that DAZ sends out over the goz bridge in 1% scale to Zbrush. At least Zbrush reads it in as 1% of the size it should be.
When u do the Zbrush export now (not using the bridge to send it back to Daz (yeah there are reasons not to use it back), Daz reads it in as 1% of the size it should be. Result is that u shrink the mesh.
But not only with Zbrush this problem is likely to happen. Since scale isnt really defined in OBJ format (i guess it can be but there is no golden standard), this problem might appear with many other tools like Max, Maya and whatever... Kind of sad this makes your plugin useless then.
AOBB's Babyface for G8.1F head morph based loosely on Jean Harlow. No materials nor textures.@gaylewray - I am thrilled that my work is appreciated enough to have someone (you) want to commission a head morph from me. Before we go any further I would like to make some things clear:
I cannot make likenesses of anyone for any kind of gain unless you have the consent from that person or their estate as a legal document. This includes ficticious characters (from any media forms) that are not in the public domain. It would be your task to obtain such consent or prove that the character is in public domain and provide me with a copy of such permission/proof.
If you do not have such consent, please post a request for a head morph freebie in the thread that is listed in the footnote of this post. I will consider making a freebie according to your wishes but I make no promises. Sometimes I simply don't like a character and then I don't want to make it or sometimes it is simply impossible for me to make a head morph for objective reasons. I would let you know upfront if I am interested/can make the head morph. Please understand that I have already several other requests for freebie head morphs lined up so it could take me some time before I get to work on your character. You might get lucky though - if I really like your idea I might make the freebie pretty fast.
It would be best, if you want to keep this conversation private, that you PM me. I 'd rather not email you from my regular email account as I prefer to remain anonymous.
Thank you for your interest in my work.
Sincerely,
AOBB
Geometry did not match, failed to create morph.You cannot change the number of vertices or the vertex order. You can only manipulate the existing vertices, otherwise the morph will not import.
Blender has "Keep Vertex Order" in both the import and export options when importing/exporting OBJ's, ZBrush probably has something similar.
Geometry did not match, failed to create morph.Hello,
I'm trying to create a fantasy character in Daz, and this character has details like scales and horns.
I'm using Morph Loader Pro to add the changes I sculpted in ZBrush, but I always get the message:
"Geometry did not match"
I've read that I can't add geometry to the mesh during the sculpting process, but if I can't change the base mesh, how can I create these character details?
Thank you so much.
[Released] OBJ Companion [Commercial]OZ-84 said:
Cool Product! Thanks for that. But there is one little problem i search a solution for ...
When exporting through DAZ GOZ to zbrush and reading the morph back in through the plugin, there seems to be no way to set an import size?! Is this correct?
Would clearly need such an option. Otherwise its only possible to export through plugin and read back in through plugin.
Is there hope for a later "fix" of that "problem"? :-)
Thank you for your support! Can you clarify what you mean by "import size"? If you mean the scale -- I don't have ZBrush so I can't test myself, but in theory the plugin should use the same import settings that you can specify with the "Edit options" button in the top "export" group. So if the scale is off, can you try changing that in those options? Thank you!
Also, keyboard shortcuts are a good idea. I'll add that to the list.
Yet another "Which Character Is This" thread.Hi, I created the promotional images for Titan Xi. Below you will find some of the information to recreate that character
Skin - Andrea Andrea for Genesis 8 Female | Daz 3D
Head morph - is a blend of
Rachelle 36 % Sisters Tammie and Rachelle for Genesis 8 Female | Daz 3D
Teen Josie 48% Teen Josie 8 | Daz 3D
Teen Kaylee 10 % Teen Kaylee 8 | Daz 3D
VW Baby Ella Cheeks 13 % Ella for Caryn 8 | Daz 3D
VW EAsian Cheeks Up/Down -57 % East Asian Women for Mei Lin 8 | Daz 3D
Body Morph- is a blend of
Rachelle 56.4 %
Teen Josie 62 %
I hope this can answer your question.
Regards.
LoRez Horse Cart for DAZ Horse?WendyLuvsCatz said:
if you bake rotations just changing scene identification would work
I didn't know that, with clothes, I always transfer the rig after baking. Sounds right though! - Now I'd REALLY love to buy the cart today and start playing with it, but the buy-in for the freebies is still ridiculously high - 15 bucks instead of the 5 it was in the beginning of the sale. Not cool with that, so no sale again from me today. Hopefully, they'll start seeing sense again soon.
LoRez Horse Cart for DAZ Horse?@paulawp, wow, you've really done such a lot of work on this already! Just a thought, is the tack rigged by any chance? I'd think it should be, because it's like a piece of clothing for the horse. So then after fitting it to DAZ Horse, could you not bake joint rotations and then use the transfer utility to transfer the rigging from an old Horse 2 tack to the LoRez one? That should be doable. I'll be getting the cart and all today or tomorrow, maybe I'll have time to fiddle a bit myself then.
Help With Toning Down Skin and Lip TextureRichard Haseltine said:
The detail may come from bump, normal, or displacement - or from an HD morph. All of those can have their strength reduced (through the Surfaces pane for the first three, through Shaping or Parameters panes for an HD morph). You will need to look to see which of those are even in use and try reducing those thata re (of coruse this will have knock-on effects on the rest of the skin).
The red is most likely in some of he settings related to transluceny or scattering in the Surfaces pane - again, altering them will have a knock-on effect.
Where it is surface settings one option might be a mask for the lips and under the eyes (white where you want to weaken the effect, black elsewhere, with a soft transition) - if you open the image menu for the affected property (the nano-thumbnail on the left) and select Layered Image Editor you can add a new layer with a neutralising colour (usually mid gery for bump or displacement, pure blue for normals) and then add the mask to that to limit the areas that are toned down.
thank you so much for the help Richard, i did try some of those settings before and wasn't getting any results, but i tried all three that you suggested together, bump/normal/displacement and i got the lips to tone down alot, and i'm very happy with it, so much so that now the face issues don't bother me as much, as i did change those 3 settings as well and didn't see a difference, but i think i'll just leave them as is for now.
thanks again for taking the time to help me out, i appreciate it
is there a Face Transfer threadI noticed this recent traffic in this thread and thought I'd drop in to say hello. I use Face Transfer and love to chat about it. I previously used FaceGen - it's what got me into 3D art to begin with, so I have a soft spot for it - but find that I prefer Face Transfer. I posted some stuff not long ago over here:
Face transfer so much better - Daz 3D Forums
Issue with Leonard / Torment VeinsMoogoo said:
@Jukingeo just had a play around with it, I get your point now. I tried recreating the head shot from the promo and I could see that as being doable and looking good but changing the lights just by a bit creates loads of points that look inverted while other bits looks fine. the vampire skin rather than the pale skin seems to work better on the face and body but obvioisly is not as dramatic.
the amount of messing around to get a decent image is just too high imho for this product it really needs a HD veins morph to get the best of it and be consistent. getting the lighs and angles to look good on one bit destroys another bit so unless you are doing heavy shadow play where the darkness covers the crappy bits it seems a waste of time.
but ofcourse maybe i just can't get the best out of it.
Sorry that I have not been here in a bit, but I don't visit this forum everyday. Well, I am a bit disappointed that no fix presented itself. So as Gordig pointed out, do you think the creator of the package fudged the outcome of the renders by using a different rendering engine such as Cycles? That is a crock and I am really dismayed about that. It is a shame that I discovered this issue after the 30 day window, otherwise I would have returned the product.
Thanks,
Geo
LoRez Horse Cart for DAZ Horse?tsroemi said:
paulawp (marahzen) said:
Here is my 10-minute, out-of-the-box test on this question (so apologies up front for the imperfections of the quickly assembled renders). Here's Daz Horse 2 with the cart.
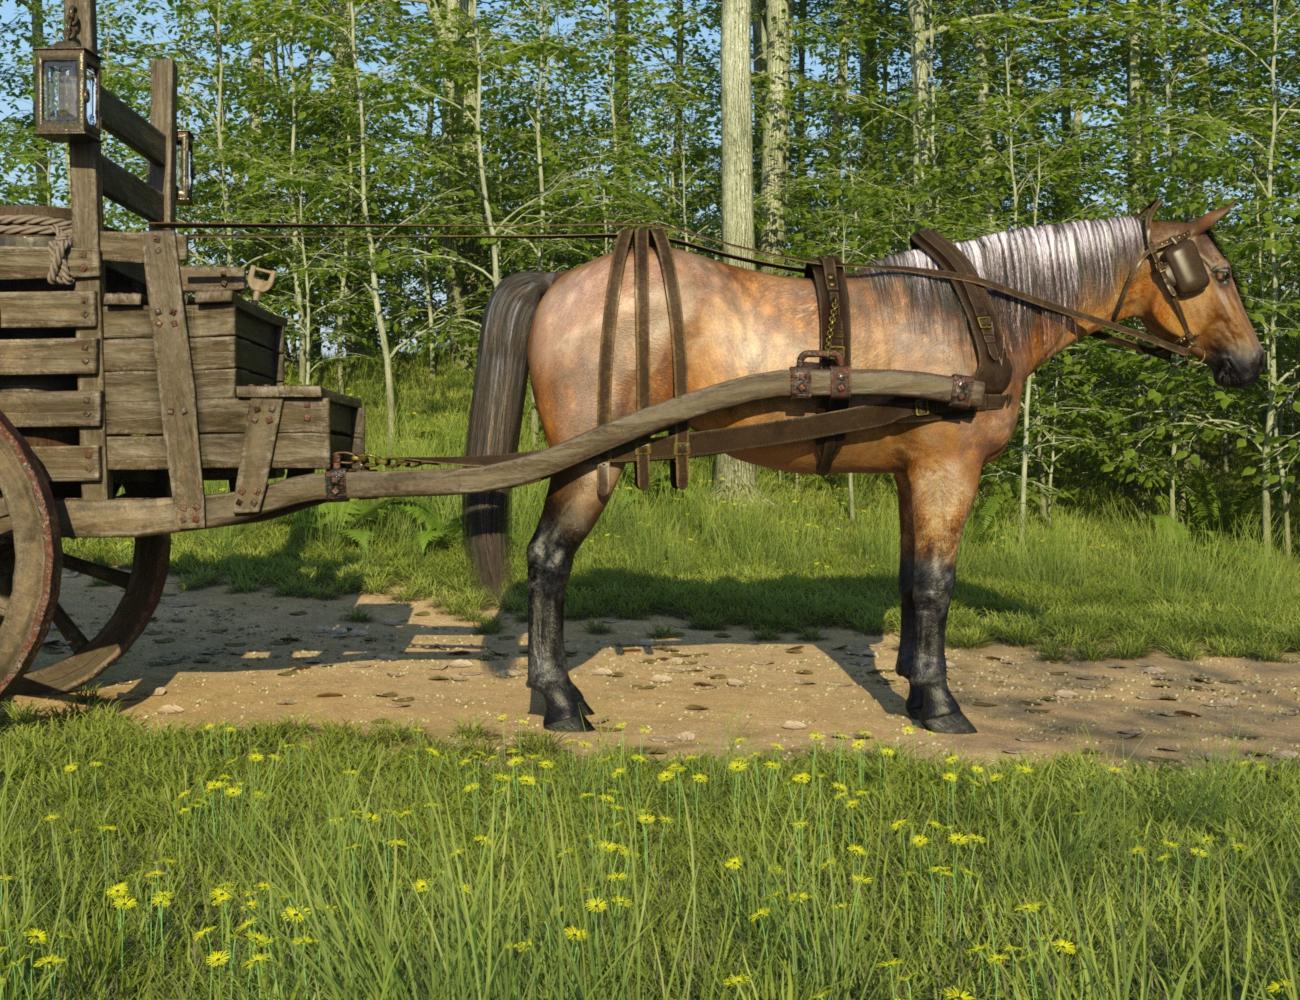
With extremely minor twiddling on the x/y/z axis, you can get everything except the headstall in place. I find a similar situation with the rest of the tack.
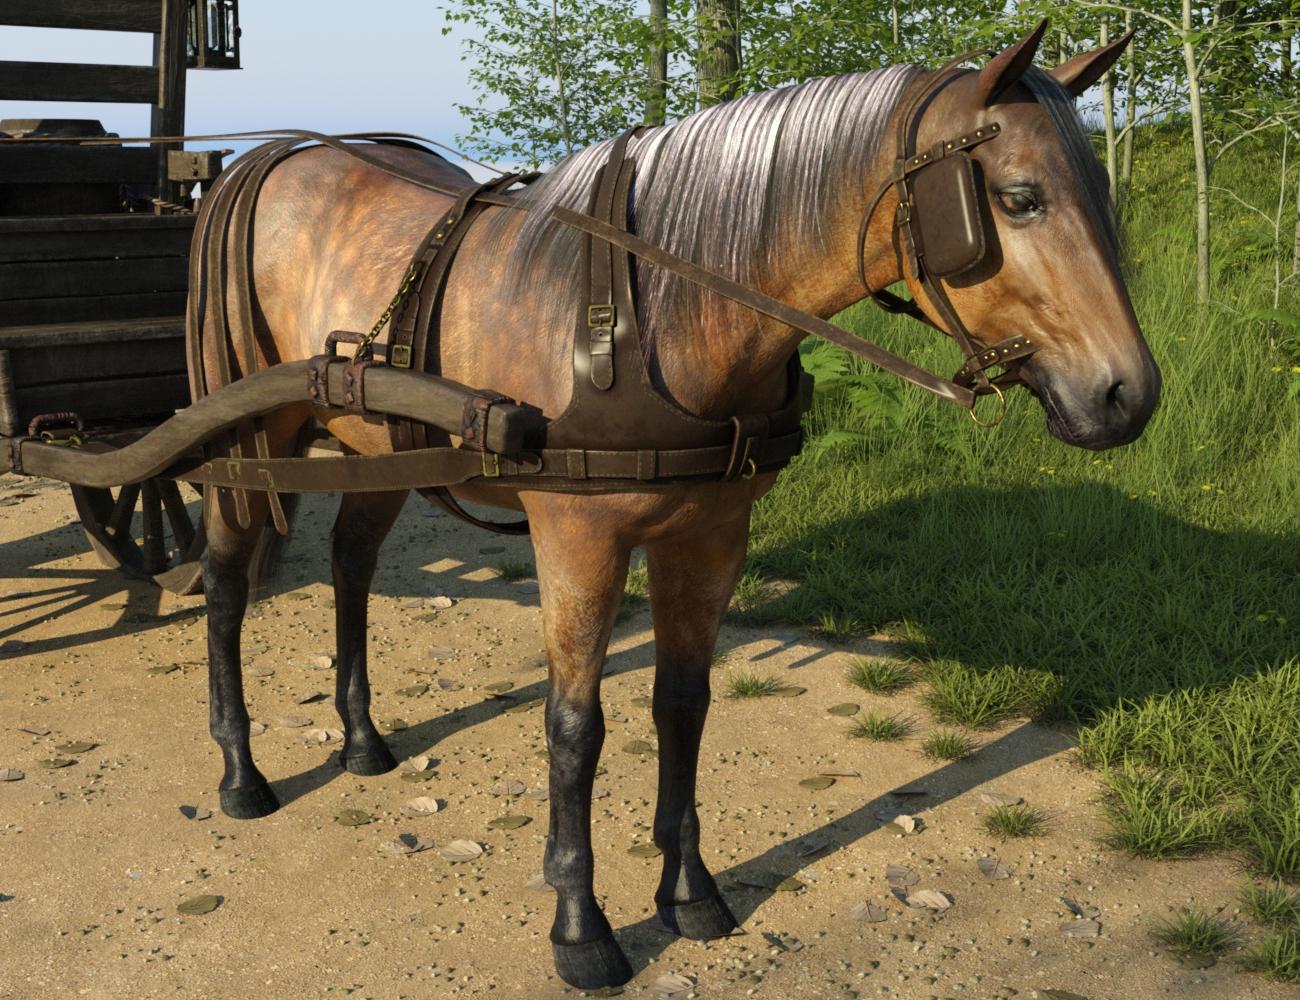
The saddle requires only minor x/y/z tweaking (and here, a smidge of scaling) to achieve good-enough-for-art purposes. However, the full situation with the bridle (which similarly applies to the halter) is clear. This is how it is put on the horse figure out of the box. You can improve this with similar tweaking as the other parts of the tack, but eventually there's an issue with the fitting the strap behind the ear and over the nose. I'm working on it, because I desperately want a halter as much as anyone.
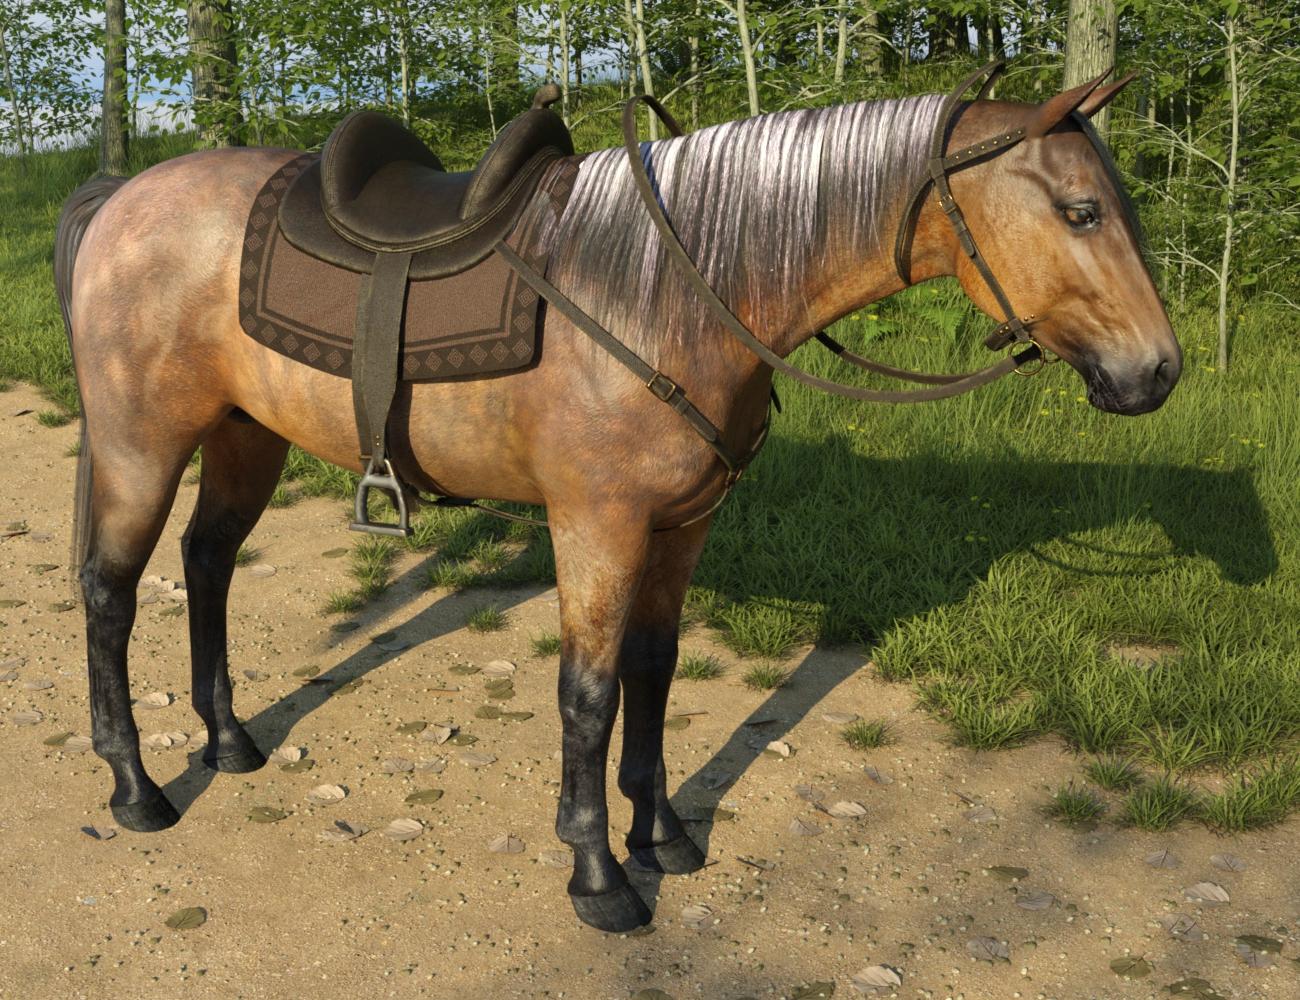
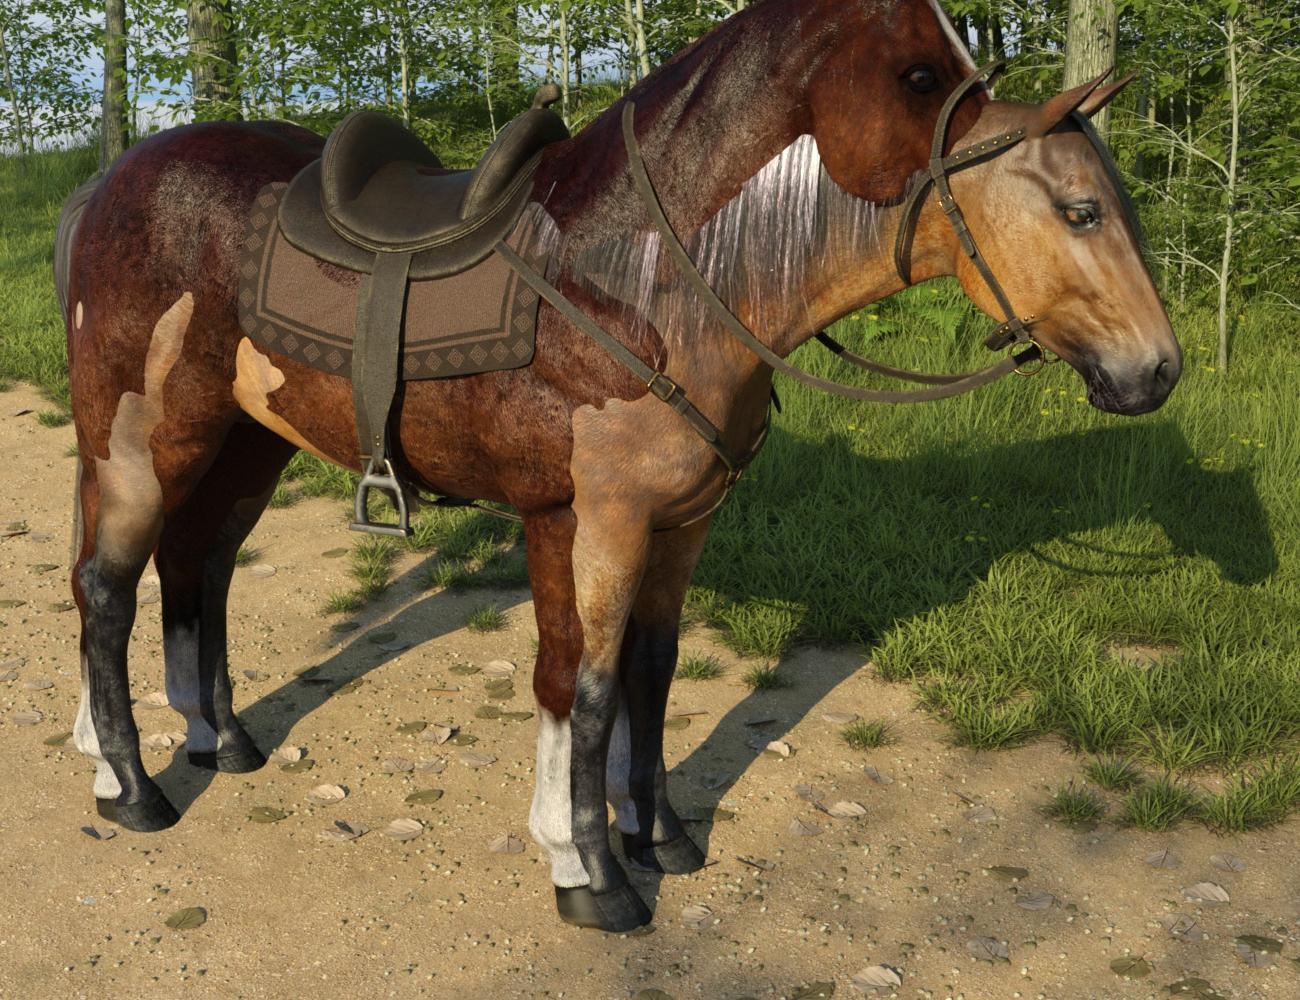
For the record, here is the Daz horse with the LoRez horse superimposed for comparison.
 A
AOh wow, thank you so, so much for sharing all this! So it's not hopeless at all! The tack even doesn't look too bad, nothing that couldn't be fixed with a simple morph or two. Great! If you achieve any more of these good results, be sure to share again!
@AllenArt, I know, I'm such a fiend for animals, too, 3d and otherwise ;-) So I will probably get the LoRez Horse in the end (it does look quite nice in the direct comparison, I must say, although there, DAZ Horse is in it's base form of course, without any add-ons) - but I definitely want to be able to use the gear and stuff for the 'normals' horse as well. And now it looks like we can!

I totally agree - I was expecting much more of a mismatch between the Daz horse and the LoRez tack, and was pleasantly surprised.
Now, these examples are with a default Daz horse at 0/0/0. I'm newish to Daz so I'm not sure why, but there are different oddites about fitting these tack items. They parent to the Daz horse if you select him, then load the tack..When parented to the Daz horse, the saddle follows movement of the Daz horse, including rotating. It does not follow with posing of the horse, so if you pose the Daz horse, you have to manually fix the saddle. If unparented, the saddle doesn't do anything (as I'd expect). The bridle, when parented, similarly follows the horse on movement, but when the horse is posed, it stays in the same spot but pivots on a rotational axis. If you unparent the bridle from the Daz horse, it continues to follow in the same way - staying in one X/Y/Z spot, but rotating around on the X/Y/Z axis to follow some point on the horse that it's no longer parented to. That I didn't expect. Why would it still be following the horse in any way after being unparented from it?
As to the horses themselves, I haven't done a seriously intended scene with them together yet but my first impression is that you could reasonably use the LoRez horse in a scene with a Daz horse. They're similarly scaled, though differently conformed by default. FWIW, I think that the LoRez horse is taller and chunkier; the Daz horse is leaner and more refined. I haven't done enough testing of LoRez horse and his textures to have a definitive opinion on how the two horse figures look standing next to each other, in the various textures available for each. Interestingly - if not especially useful - if you try Daz (or Mil) horse poses on LoRez horse, it moves the head. (LoRez poses don't work at all on the Daz horse.)
How to utilize all cpu cores?Daz Studio and Iray are two different things. This is important to understand.
When using Daz Studio, the application uses just 1 core. It doesn't matter what platform you have, it only uses 1 core.
Iray is a plugin, when you hit the render button, Daz Studio sends your scene to Iray to render. If you use the CPU for rendering, this will use any number of cores you throw at it. You can into the Iray Advanced Settings and select the CPU as a render option, not only that, you can even pick exactly how many cores you want to render! This is helpful for people who want a core free so they can still use their computer while a render is in progress. But again, the Daz Studio application itself is still running on a single core. And GPU rendering is king with Iray, if you have a even half decent Nvidia GPU you will render faster than even the biggest baddest CPUs in existence, as long as you have enough VRAM.
So single threaded performance matter for how well the application runs. You can have 100 cores, but if each core is slow by itself, you may have trouble. The brand new Intel Core i3's have only a few cores, but the single core much is faster than a Xeon CPU that has dozens or more. The Xeon might render faster, but Daz Studio itself will be less responsive when working a scene.
I used to have an i5-4690k from 2014, and that CPU was showing its age. When I built a new PC with a Ryzen 5800X, Daz Studio ran so much better. But it wasn't because the Ryzen had 8 cores, it was because its single core speed was significantly faster. The 5800X has proven itself to handle almost everything I throw at it when it comes to Daz.
Daz Studio 4.x is pretty old The nuts and bolts of the software were not built for a multicore world, and so it cannot be changed. The hope is that Daz Studio 5 will finally change this. But Daz is super secretive, and we don't really know
BTW, if you are having lag when using Daz Studio, there is a good chance that smoothing is your problem.
--Disable 'smoothing' on any item that has it. You can turn smoothing back on before rendering. Smoothing is calculated every time do anything in Daz. Move the camera...calculate smoothing. Dial a morph...calculate smoothing. Heavy breathing....calculate smoothing. If your CPU is slow, this calculation can take a moment, and that will create lag. Some CPUs can handle a little smoothing on an item or two, but it adds up fast if a bunch use it, or some have high iteration counts. A lot of Daz clothing and hair products have smoothing on by default when you load them, too, so you may not be aware of how many items are using it.
Smoothing was what hurt my performance the most when I was using my 4690k.
Daz 3D is part of

Connect
DAZ Productions, Inc.
7533 S Center View Ct #4664
West Jordan, UT 84084Licensing Agreement | Terms of Service | Privacy Policy | EULA
© 2026 Daz Productions Inc. All Rights Reserved.