-
Grasp Helper for G8 Nipple Issue
hansolocambo said:
Gamerheadset255 said:
if you do there should be a morph to flatten the nipples easy peasy .
The OP has a problem. And you give him another way to end up with the same problem..
-------------------------
If you created your pose before applying Grasp then there's no reason for the generated grasper and grasped objects to be any different from what they were. So no reason for anything to become flat if there was nothing flat being used as the grasper item.
I did a few tests and didn't see anything wrong with Grasp Helper which is more than the usual "ghost" and smoothing modifier as it duplicates the objects, hides the orignals, then subdivide the double, thus calculating the effect with more geometry/better results.
A screenshot, as always, would have helped to, maybe, understand what'syour issue.
Select the grasper (Genesis who's hand grasp something) then in the pop-up window select the grasped object. And that's all.
Grasp Helper is very useful even for those used to bridges to other 3D apps and custom morphs. As it batches the process of creating subdivided grasping of the skin (or any other object) in 1 click.
I wasn't sure if nude model screenshots were allowed but I have attached two here. One is before the helper is applied and the other is after. You can see a clear difference in the shape of the nipples despite the morphs remaining the exact same. Maybe its my optimization settings?
The big announcement on September 21, 2022 - place your bets!I predict DAZ will introduce a morph to drop the jaw of Genesis 8.1.
Elbow Deformed Problem! (Rigging? JMCs? HELP!)Do any of the individual morphs you are using do that? Most likely it is a corrective morph/joint adjustment kicking in when it shouldn't.
Grasp Helper for G8 Nipple IssueGamerheadset255 said:
if you do there should be a morph to flatten the nipples easy peasy .
The OP has a problem. And you give him another way to end up with the same problem..
-------------------------
If you created your pose before applying Grasp then there's no reason for the generated grasper and grasped objects to be any different from what they were. So no reason for anything to become flat if there was nothing flat being used as the grasper item.
I did a few tests and didn't see anything wrong with Grasp Helper which is more than the usual "ghost" and smoothing modifier as it duplicates the objects, hides the orignals, then subdivide the double, thus calculating the effect with more geometry/better results.
A screenshot, as always, would have helped to, maybe, understand what'syour issue.
Select the grasper (Genesis who's hand grasp something) then in the pop-up window select the grasped object. And that's all.
Grasp Helper is very useful even for those used to bridges to other 3D apps and custom morphs. As it batches the process of creating subdivided grasping of the skin (or any other object) in 1 click.
Really nice tool. Simple, and surprisingly efficient.
Solutions to have clothes realistically look scattered on the floor (crumpled, piled etc.)?Chezjuan said:
Federmann said:
lilweep, Chezjuan, rosseliani thanks for your feedback! Some great tips there. I now know that 'Hang, Drop and Fold Morphs' are a thing that some developers have included in their products and kudos to them. As a noob I never heard of 'Marvelous Designer' but that product sure looks quite attractive, would love to create content soon but I have to come to terms that I would have to budget the yearly subs of zbrush, Marvelous Designer and Adobe suite etc. etc. the aggregate sum of which would be quite substantial given my current financial situation. For now the only programs I have is Adobe CS3, DS, Blender, Bryce and Hexagon, just started learning Hexagon and Blender, never got anywhere with Bryce.
1 Could a DS program like ManFriday's "Mesh Grabber" [link] be a 'good enough' solution for my clothes on the floor problem?
2 (noob alert) Would it be possible to dforce fit clothes around some sort of flattened figure (shapelier than just a plane let's say, more like an emaciated skeletor) and then use the Adjustment morphs to create some shapes and then hide the flattened figure?
IMO Mesh Grabber would be difficult - I find it is best for more precision changes. Perhaps adding a D-Former as that can work over a larger area.
If you're going to use dForce, the the best thing to do is just give it a try on the clothing item. I have found that about half of the clothes I try (either already dForce or with a dForce Modifier: Dynamic Surface added work fine. I could make more work if I knew how to use weight mapping and knew more about dForce settings since some have parts that don't simulate.
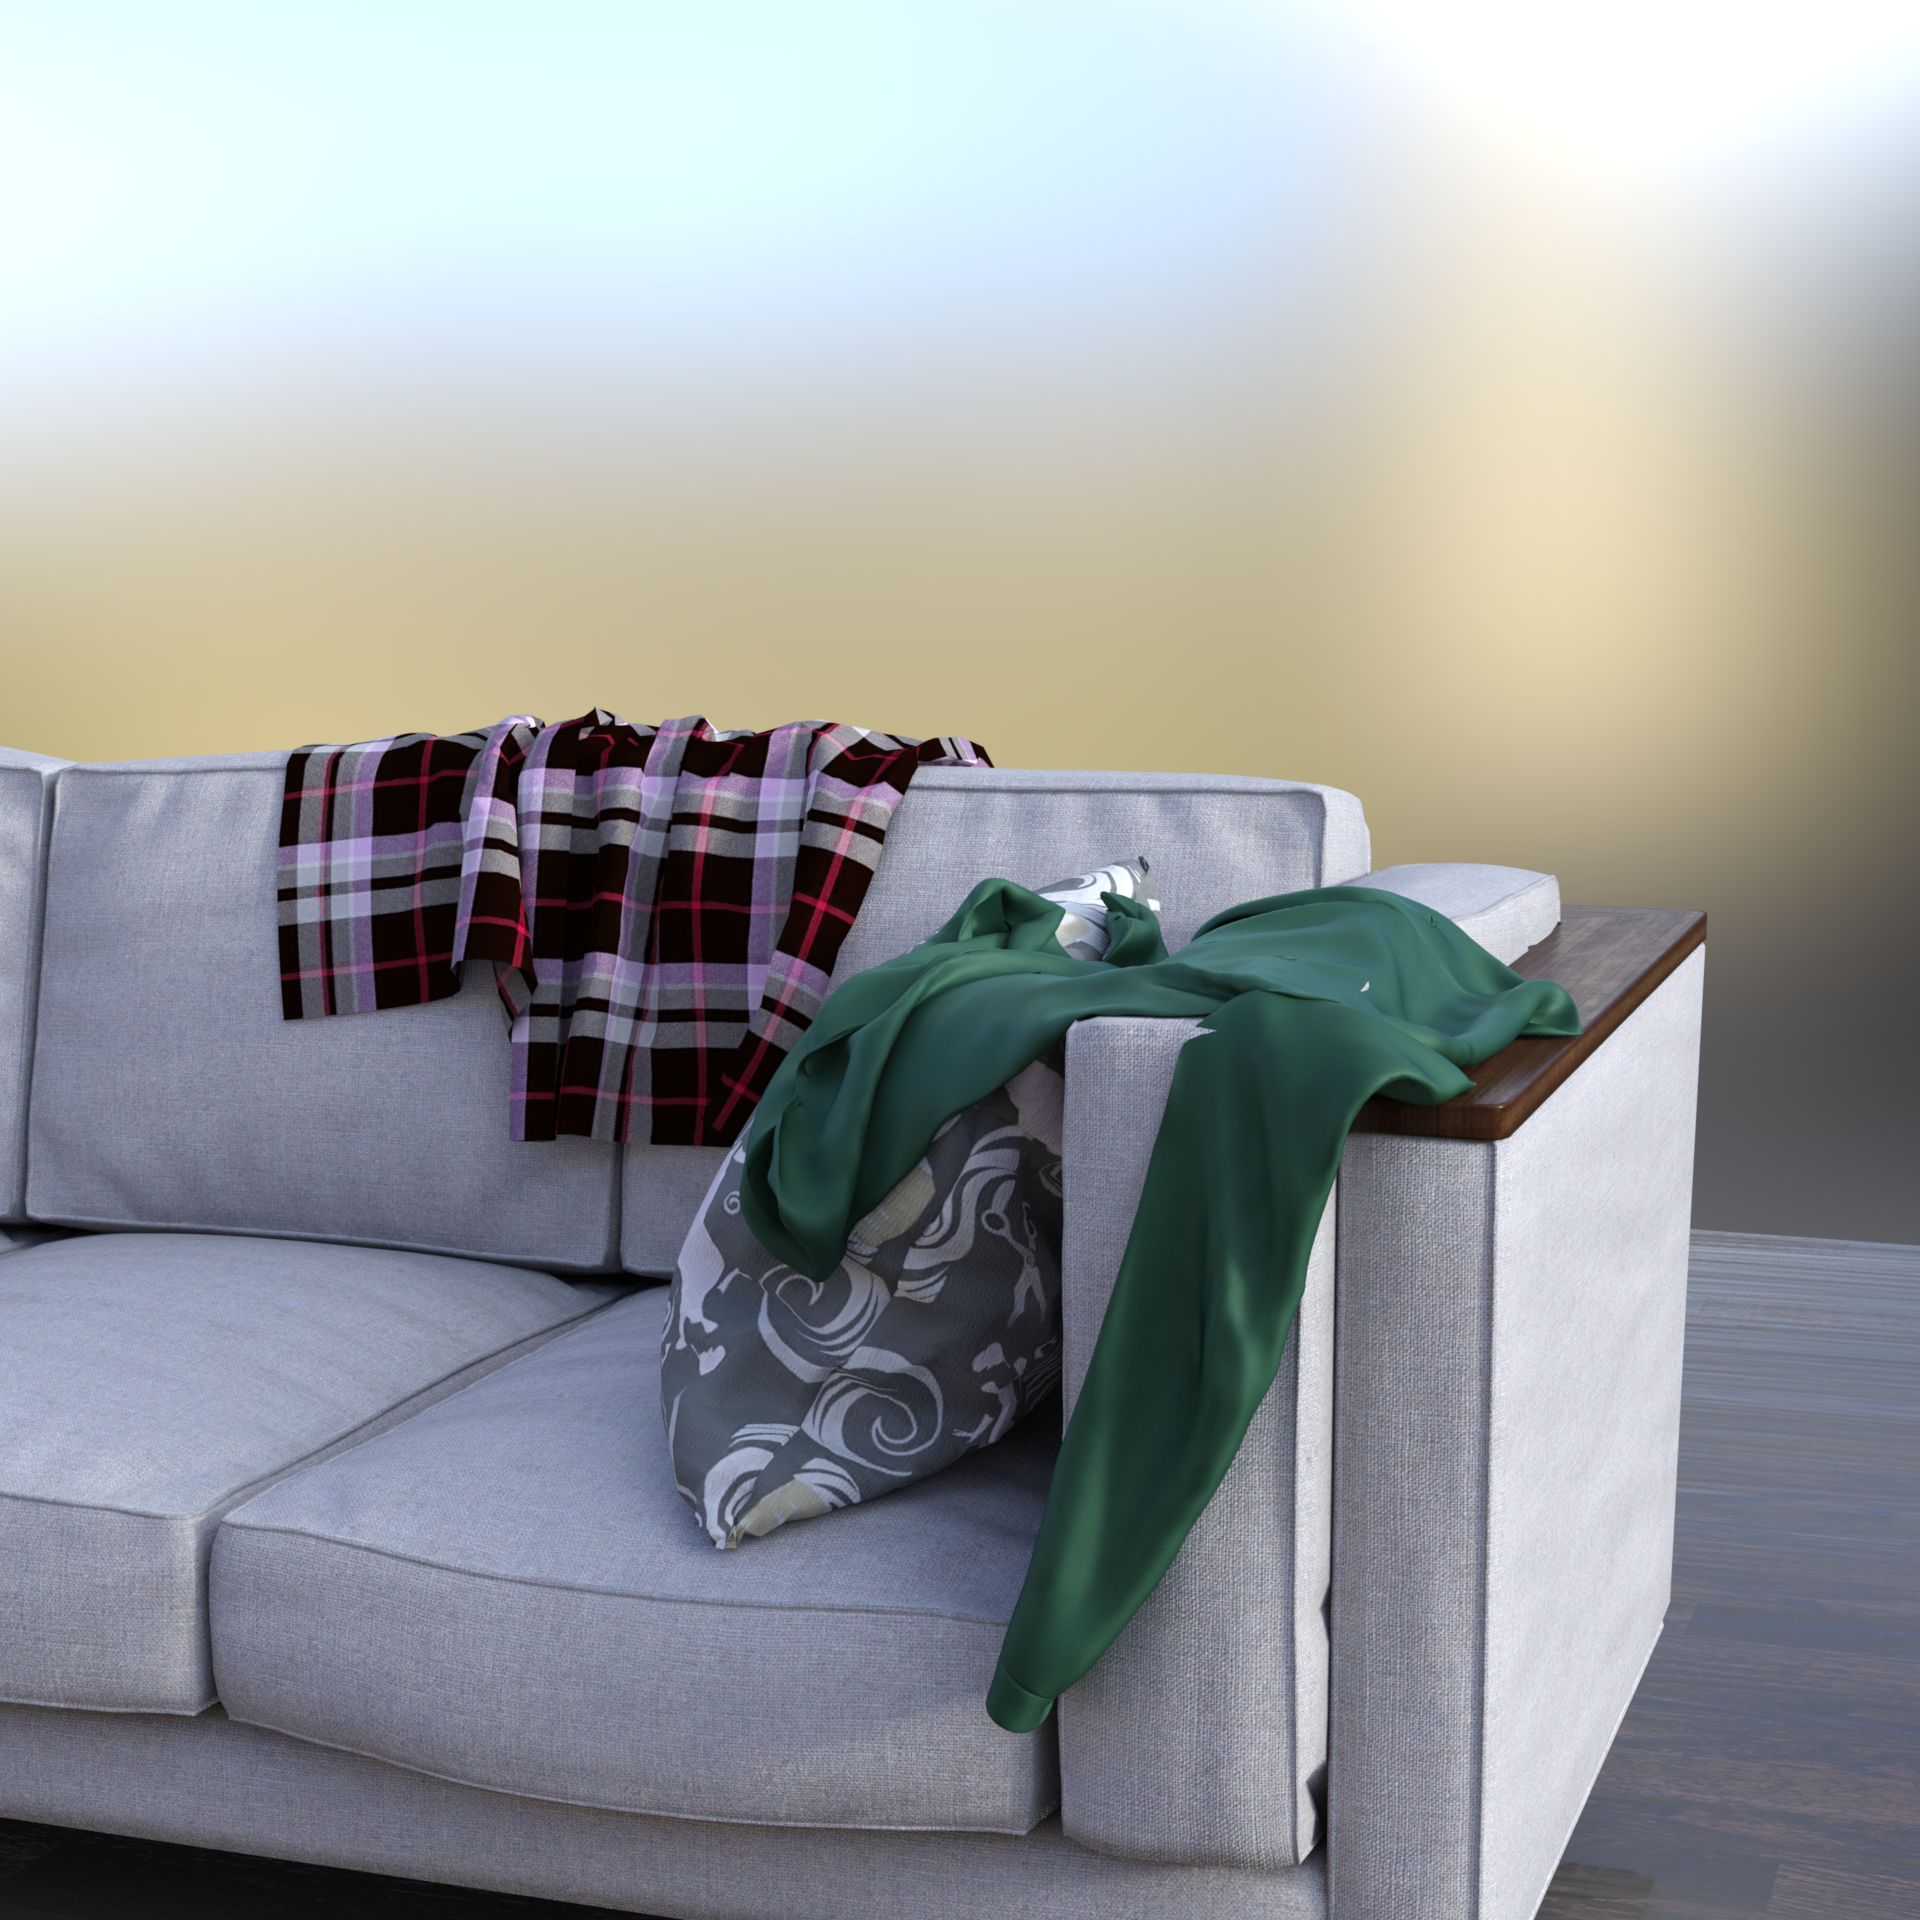
For the image below, I:
- Loaded the colthing item (the wrapped blouse from the Formal MEGA Wardrobe). It is not dForce
- Added a dForce Modifier: Dynamic Surface
- Rotated the blouse to be parallel to the ground and turned. I did this using it's hip bone since then it rotates in place.
- Positioned it above where I wanted it to drape and ran the simulation.
I've also loaded a floor or ground from a set, and dropped the clothing on it for a flat (or piled) look.
You could then save the item as a prop or a morph asset or similar to re-use it, though for clothing where this works I usually just simulate it in the scene.
One tool I highly recomed for dForce is dForce Companion 2.0. A great feature is the ability to only simulate the item that you want, rather than everything at once.
ETA: The blanket on the back of the couch is part of the prop.
Wow that looks great! I'll try to follow the steps you suggest and will certainly get the dForce Companion 2.0 tool asap, at some point I'll get the mesh grabber bundle too since it is on my shortlist of 'need to haves' (trying to stem my random purchases of "nice to haves").
Solutions to have clothes realistically look scattered on the floor (crumpled, piled etc.)?Federmann said:
lilweep, Chezjuan, rosseliani thanks for your feedback! Some great tips there. I now know that 'Hang, Drop and Fold Morphs' are a thing that some developers have included in their products and kudos to them. As a noob I never heard of 'Marvelous Designer' but that product sure looks quite attractive, would love to create content soon but I have to come to terms that I would have to budget the yearly subs of zbrush, Marvelous Designer and Adobe suite etc. etc. the aggregate sum of which would be quite substantial given my current financial situation. For now the only programs I have is Adobe CS3, DS, Blender, Bryce and Hexagon, just started learning Hexagon and Blender, never got anywhere with Bryce.
1 Could a DS program like ManFriday's "Mesh Grabber" [link] be a 'good enough' solution for my clothes on the floor problem?
2 (noob alert) Would it be possible to dforce fit clothes around some sort of flattened figure (shapelier than just a plane let's say, more like an emaciated skeletor) and then use the Adjustment morphs to create some shapes and then hide the flattened figure?
IMO Mesh Grabber would be difficult - I find it is best for more precision changes. Perhaps adding a D-Former as that can work over a larger area.
If you're going to use dForce, the the best thing to do is just give it a try on the clothing item. I have found that about half of the clothes I try (either already dForce or with a dForce Modifier: Dynamic Surface added work fine. I could make more work if I knew how to use weight mapping and knew more about dForce settings since some have parts that don't simulate.
For the image below, I:
- Loaded the colthing item (the wrapped blouse from the Formal MEGA Wardrobe). It is not dForce
- Added a dForce Modifier: Dynamic Surface
- Rotated the blouse to be parallel to the ground and turned. I did this using it's hip bone since then it rotates in place.
- Positioned it above where I wanted it to drape and ran the simulation.
I've also loaded a floor or ground from a set, and dropped the clothing on it for a flat (or piled) look.
You could then save the item as a prop or a morph asset or similar to re-use it, though for clothing where this works I usually just simulate it in the scene.
One tool I highly recomed for dForce is dForce Companion 2.0. A great feature is the ability to only simulate the item that you want, rather than everything at once.
ETA: The blanket on the back of the couch is part of the prop.
Ben and Lyn for Genesis 8.1franky85 said:
Here's a pretty neutral light / background / pose for both. For skin details, well.. bluejaunte exists

Thank you! They are kind of scary with that 100 mile stare, ain't they? - Hm, skin really isn't much, and I usually don't buy to swap out major parts of the product immediately. But the morph is still kind of sweet, and one doesn't get many sibling characters usually, especially younger ones. Maybe I can fix them up with Porefectionist and the Skin Details Sevrin mentioned. Still on the fence ...
Please clarify something for me - a new Blender userAs for diffeomorphic:
1. Basically once the scene is in blender you can do anything with it, while daz studio is limited in many ways. You can transfer everything, but HD morphs require extensive manual work so it's easier if you can avoid them, the HD shape is transferred easily.
2. There's a tool from @Millighost with some limitations, don't know how it is up to date. https://sites.google.com/site/millighostmix/home/export_dsf_prop
3. The animations you do in blender can transfer back to daz studio, this way you can use more advanced rigs for animation.
4. I don't think so, apart what you can do with the daz studio import tools as usual.
Celebrity Look-a-Likes for 3D figures part 3RayDAnt said:
magikhs said:
Dang! I really, really, reeeally could use a good January Jones (Betty Draper in "Mad Men", Emma Frost in "X-Men: First Class"...) face morph.
Can't believe there isn't one already out there, literally like anywhere. :(
The ony one I know of right now...
I see no reason to think that was based on Jones.
Celebrity Look-a-Likes for 3D figures part 3magikhs said:
Dang! I really, really, reeeally could use a good January Jones (Betty Draper in "Mad Men", Emma Frost in "X-Men: First Class"...) face morph.
Can't believe there isn't one already out there, literally like anywhere. :(The ony one I know of right now...
Celebrity Look-a-Likes for 3D figures part 3Dang! I really, really, reeeally could use a good January Jones (Betty Draper in "Mad Men", Emma Frost in "X-Men: First Class"...) face morph.
Can't believe there isn't one already out there, literally like anywhere. :(Elbow Deformed Problem! (Rigging? JMCs? HELP!)Richard Haseltine said:
Faust011235 said:
barbult said:
By combining the morphs into one, you eliminated all the joint control morphs (JCMs) that went along with those individual morphs to adjust the mesh for joint rotations. Instead, you should create a new property and ERC freeze all the individual morphs to the new single controller.
i did (see my response to Richard above)
No, your reply to me is what barbult was commenting on - exporting to OBJ and reloading creates a single new morph without any links to corrections, setting the morphs separately, creating a new property, and using ERC Freeze to make that new property drive the morphs preserves all of the correctives but still gives a single-slder control for the shape.
im sorry. I didn't understand the distinction. Could you direct me to a walk through or instructions on how to do that?
Can you save characters to Metamixer addons?RexRed said:
Can you save characters to metamixer addons?
I have noticed a lot of my favorite Genesis 8.0 characters do not have Metamixer addons.
Is there a way I can make them or save them from the characters to use in the metamixer toolkit?
Sorry about this question, I am just learning to use the Metamixer toolkit.
As far as I know, there is no way to save metamixer presets (you can save a mix you make as a morph) probably for the same reason that you can't create the compressed version of HD morphs that Daz3d considers propriatary. You may have noticed that the metamixer addons are all characters owened by Daz3d and I think all have hd settings.
Is anyone using Nvidia's Omniverse yet?I use it often for projects Daz can't handle, it's like Daz but with very little ready to use assets, you can either import your stuffs from iclone/CC, blender or other software, the rendering engine is powered by Nvidia's RTX with native support, but it's not very useful for Daz users who rely their content creation on ready to use assets in DAZ, you can technically export your DAZ stuff to omniverse, on regular content, it will work, but on complex morph such as muscle & vien, it won't look right, not to mention all the deforced hairs, rigging and other stuff. in short, it's not very useful for DAZ users.
The big announcement on September 21, 2022 - place your bets!The headline copy in the image shows The Next Evolution...
"Something big is coming soon and we can't wait to share it with you. Join us Sept. 21 at 16:00 MDT (UTC-6) for a sneak peek at a jaw-dropping new addition to the DAZ lineup. Mark your calendar and watch the live reveal to earn a FREE Item just for tuning in. We'll see you there!"
When Genesis was first released, they named the whole product line of morphs Genesis "Evolution"...
so hopefully in calling it The Next Evolution is a big hint at Genesis 9, and all its "evolution" morph packs.
The first GENESIS EVOLUTION...
https://www.daz3d.com/genesis-evolution-head-morphs
https://www.daz3d.com/genesis-evolution-body-morphs
https://www.daz3d.com/genesis-evolution-expressions
https://www.daz3d.com/genesis-evolution-shapes-bundle
https://www.daz3d.com/genesis-evolution-muscularity
And if it's NOT a sneak peak at Genesis 9, I'll be both surprised (and disappointed).
And if it's an NFT, or any of that Clone X nonsense... (ughhhhh, don't get me started) ...then I'm outta here, and nevermind about the freebie.
Maybe everyone will get the base figure for free... you know, "just for tuning in".Grasp Helper for G8 Nipple IssueGamerheadset255 said:
So I am using grasp helper for g8 for the first time and it is great but everytime I apply it to a female or male figure the nipples become flat and smoothed over. I suspect it is something to do with the replacement figure the script applies but I can't seem to find a fix. Anybody know how?
Don't know how to use Grasp Helper but .... do you have the morph packs ? if you do there should be a morph to flatten the nipples easy peasy .
More weird Daz issue makes product unuseableSo one day, my daz menu just decide to change itself, when I restarted it, all my contents weren't displaying, it tells me I lost connection while my internet was 100% functional, then I managed to fix it via a PC restart, little did I know it became a nightmare
After the restart, I found half of my props products that used to have bones, rigs and morphs no longer have bones/morphs, for example this JP Doris Curtain used to able to bend, support 10+ morph shape, and now it's just a bland plane I can't do anything with, no option to morph what so ever even after I mannually added the bones, this screenshot shows no morph option after my last restart.
another prime example would be FPE tentacle armies, it used to have bones and support multiply riging slider bars and now, all gone. I even looked up on product's documentation, premade bones and rigs was added by default, I can not add them back, so just like that, half of my products became useless over night. Anyone ever encountered this and got a fix?
[Released] OBJ Companion [Commercial]marble said:
ManFriday said:
I don't know any timeframe about DS5 either, but I don't expect to get my hands on a copy in the next couple of months.
How much work it will be to get my plugins working on DS5, I cannot say until I have it and try. In many cases it might be a few adjustments here and there and they will work again in a day or two, so upgrading the plugins will be no major effort. But I can't say that for sure at this time.
Having said that, Daz Studio 4 will continue to be available and updated. Daz Studio 5 is not primarily not about new features; it is about bringing the technical base up to date. I expect my plugins to continue to work on Daz Studio 4 for a long time.
Hope this helps!
Well, what helps is you saying that you have not been given DS5 (or an alpha) to help you develop which suggests to me that we are still some way out from any DS5 announcement. I think that saying the DS4 will continue to work is beside the point - yes, I do expect it will still work but if DS5 is a dramatic upgrade (such as the afore-mentioned collaboration with Unity or somemething similar) then I think a lot of people will want to migrate.
But I am encouraged by your committment to updating your scripts when DS5 eventually arrives. I have been trying to urge DAZ themselves to make a DAZ-to-Blender bridge in the same sense that GoZ and the Hexagon bridges work but those pleas were ignored. As usual, they rely on PAs to provide those useful tools. I'm assuming that your OBJ tool is a similar concept to the ZBrush GoZ bridge?
I don't have ZBrush so I'm not entirely sure, but it does a part of what I understand GoZ does. It does the export and import bit to create a morph on the Daz Studio side. My tool does nothing on the Blender side: you'll still have to do the import and then again export there, but that's not hard.
The main reason I wrote it is that exporting an OBJ manually and correctly from Daz Studio is not easy (hiding everything in the scene, unparenting things, hiding unrelated geometry that might be deep in the scene hierarchy, detaching geografts, hiding geoshells, ...). The tool automates all these clicks, and you can export many OBJs in sequence with automatic naming. And it remembers what it exported so you can import things again quickly to create the morph.
Arianna 8.1PixelSploiting said:
xyer0 said:
Great renders! So, the cracking in the skin on the promos might be the HD turned to the max.
Might be HD loaded onto the figure with default mats. G8.1 core figures come with two sets of normals - the second one is for use with HD morph and is much softer. Default one used with HD has all details cranked up because now they 100% are on both HD and textures.
Ah, so desu ne! Thanks again for the info, @PixelSploiting.
Merging Geograph from Daz character with Diffeomorphickaotkbliss said:
I ran across this thread as I wanted to do the same thing, use geografts in UE5.
I downloaded the latest blender, this diffeomorphic plugin, followed all the steps and got it set up.
Got the figure and graft sent to blender and after a couple tries, finally got the graft and character merged (using the vague instructions on the diffeomorphic blog)
Except after getting them merged in blender, I exported the figure as a wavefront obj.
I then imported the object back into Daz, converted the obj to a weight mappped figure and used the transfer utility to first transfer only the morphs for the figure from the original to the new
-Click the show uptions button then in the general option uncheck everything except Morph Targets. Select Morph Targets and there is another option to the left, in the dropdown select All (or if you set up favorites, select that option).
- Uncheck all the post transfer options
Then I used the transfer utility again the transfer just the morphs from the geograft to the new figure, this time making sure to uncheck the override existing option as the first time it erased all the previous morphs I transfered.
With all the morphs transfered, I ran the transfer utility 1 more time and transfered the rigging, making sure to uncheck the Morph Targets option this time.
Now I have the rigged figure meged with the geograft with all the morphs available that I was able to send to UE5 via the bridge :)
How are you using the UE5 Bridge? I'm having issues with retargeting the animations. I've fiddled with the settings, using fixroot and 0rot, my char comes in with arms like the inflatable ballon man (https://encrypted-tbn0.gstatic.com/images?q=tbn:ANd9GcQc9XhcCQolA1DMxelXfr7X3hkUWV5KwiW3pQ&usqp=CAU)
without them, the arms deform when retargeting via the IK rig (the left arm bends backwards in the middle of the bicep, and forearm). I'm struggling with Daz and unreal. The only minor success I've had is going from DAZ to CC4 to Unreal.
Daz 3D is part of

Connect
DAZ Productions, Inc.
7533 S Center View Ct #4664
West Jordan, UT 84084Licensing Agreement | Terms of Service | Privacy Policy | EULA
© 2026 Daz Productions Inc. All Rights Reserved.