-
No one asked me - Diomede screenshots on whatever - Warning AI Discussion OK
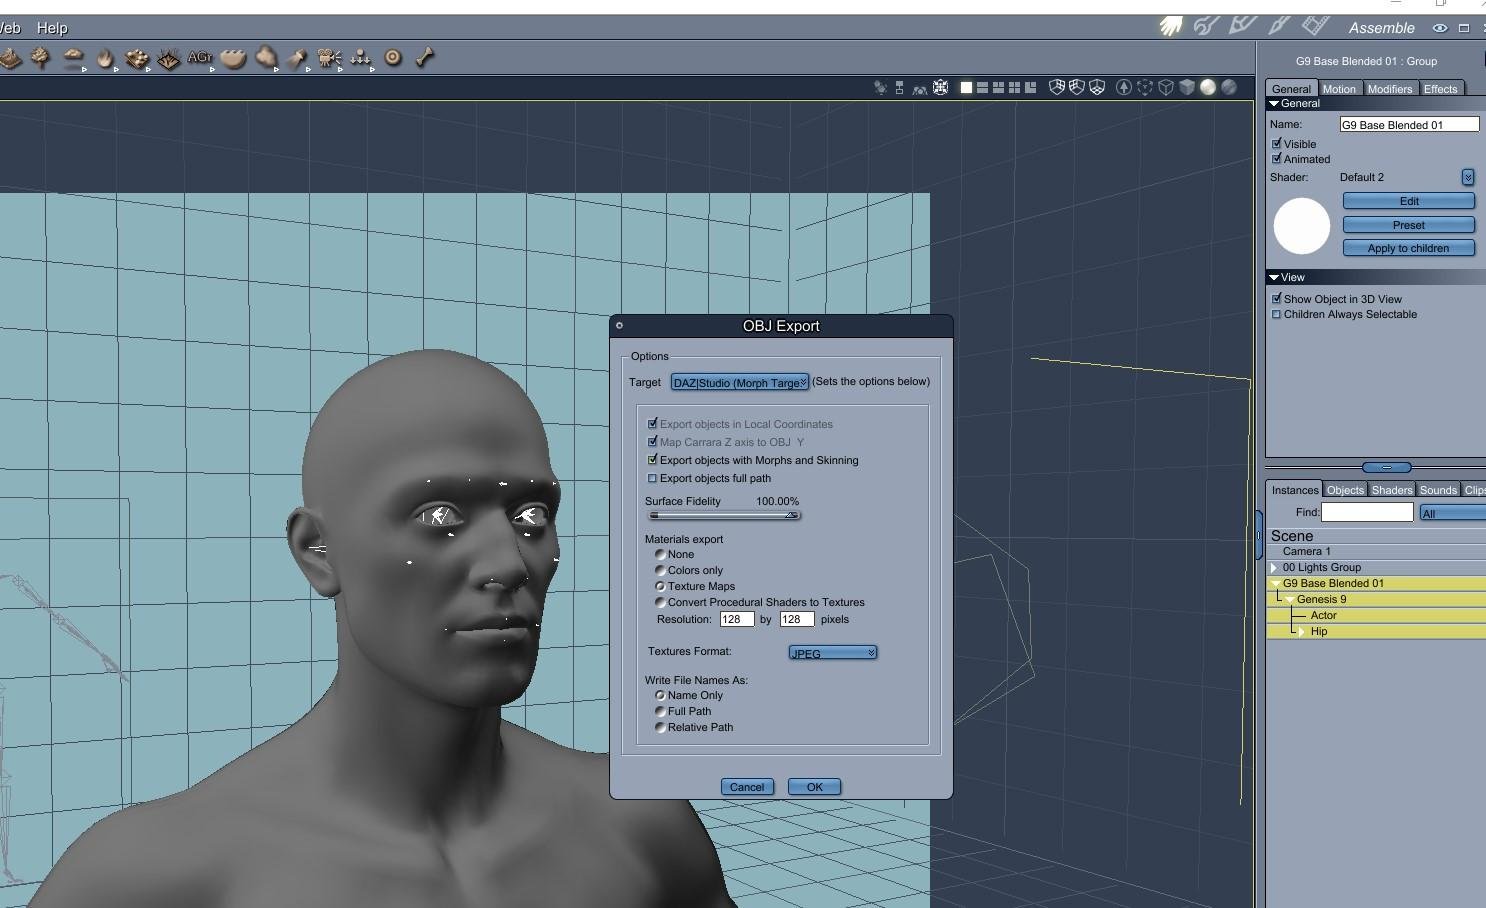
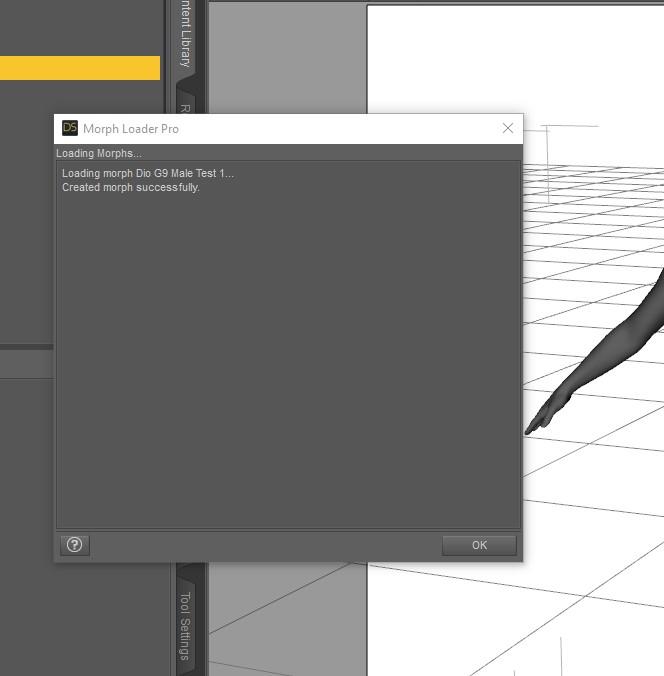
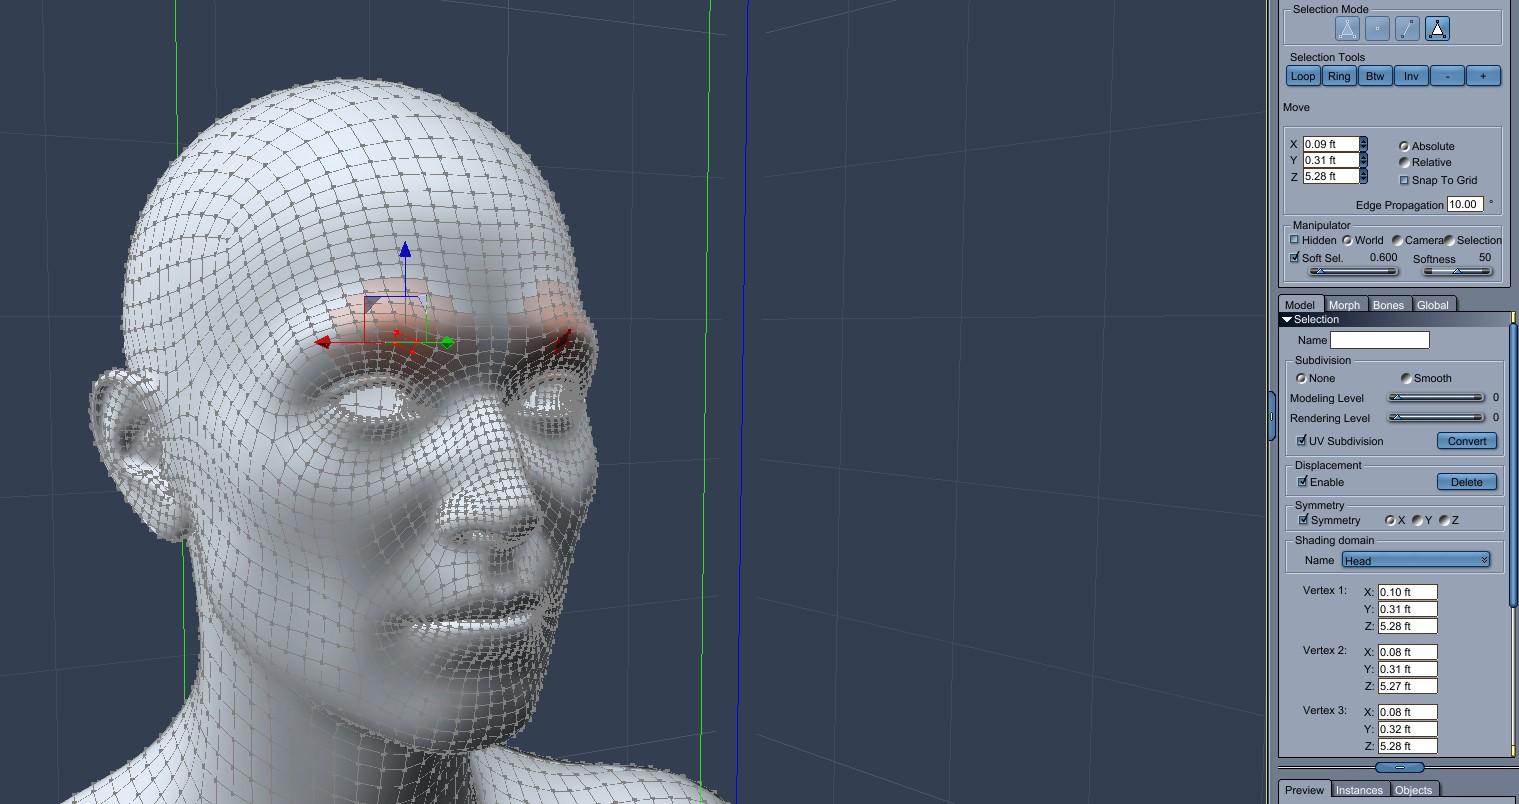
Exporting the Morph from Carrara and Loading on G9 in Daz Studio
- I exported the morphed G9 from Carrara using the obj preset (Daz Studio Morph). See other settings below for this example.
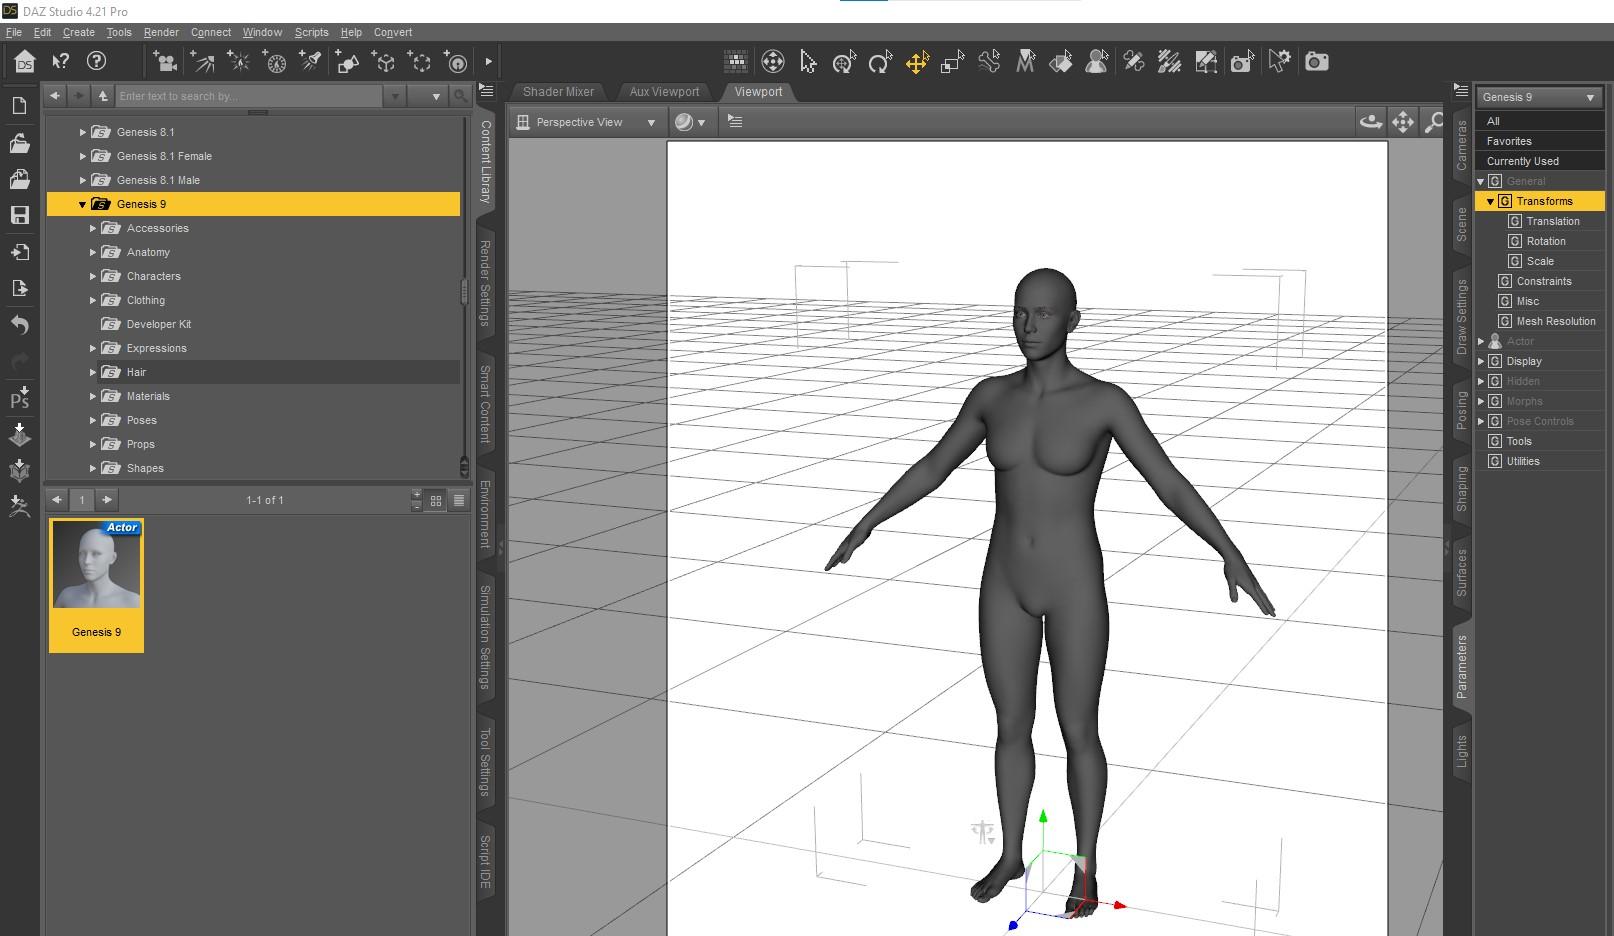
- Opened a Daz Studio scene and loaded the default G9. Note - I did not load the G9 from the development folder. I wanted the eyes to be loaded with the figure in Daz Studio.
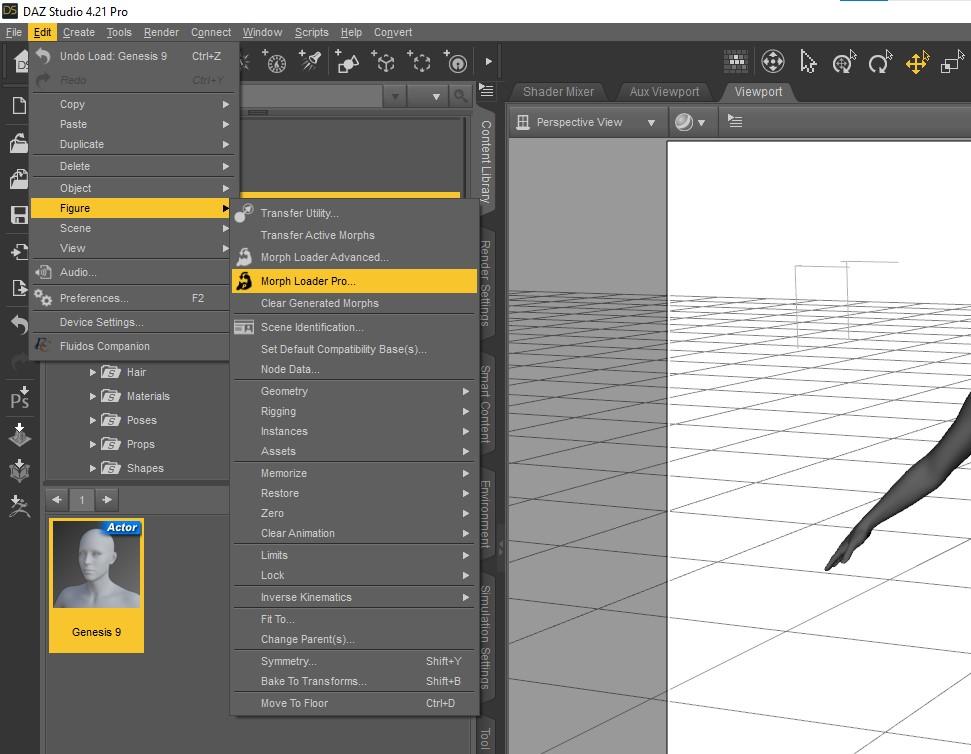
- Use morph loader pro. I load it from the edit menu. There are several places to find it.
- Load your exported morph. Use Carrara scale. As a habit, I set change deltas only and reverse deformations to yes. You can change names, locations, not doing that here.
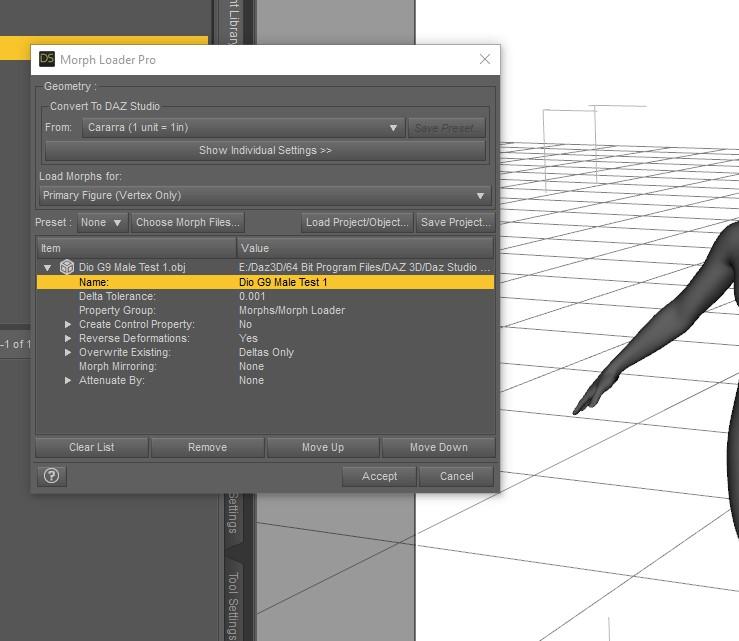
- Should get a message confirming morph creation. If not, likely wrong number of vertexes, such as if forgot to turn off smoothing before exporting from Carrara. Or if you had a stray object exported with it.
- Can now confirm morph is in location in parameters tab.
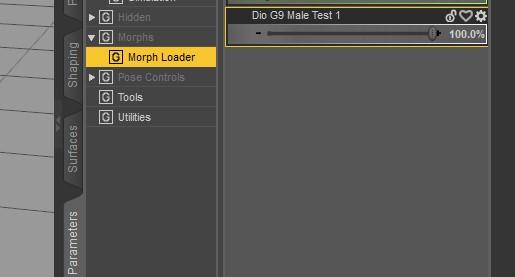
- Set Morph to 100 and confirm is working.
- Note that because I changed height, etc, the figure bone skeleton no longer matches the geometry so have to adjust rigging in next step.
No one asked me - Diomede screenshots on whatever - Warning AI Discussion OKCreating a G9 Morph in Carrara
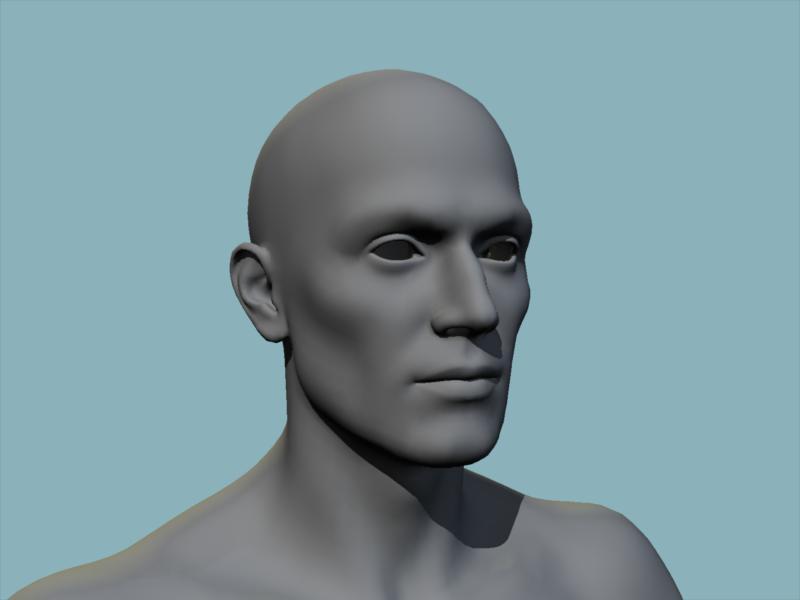
- I created the following head morph in Carrara. Note that I also morphed the body a little, making sure to change height so that I knew the conforming eyes would also have to change.
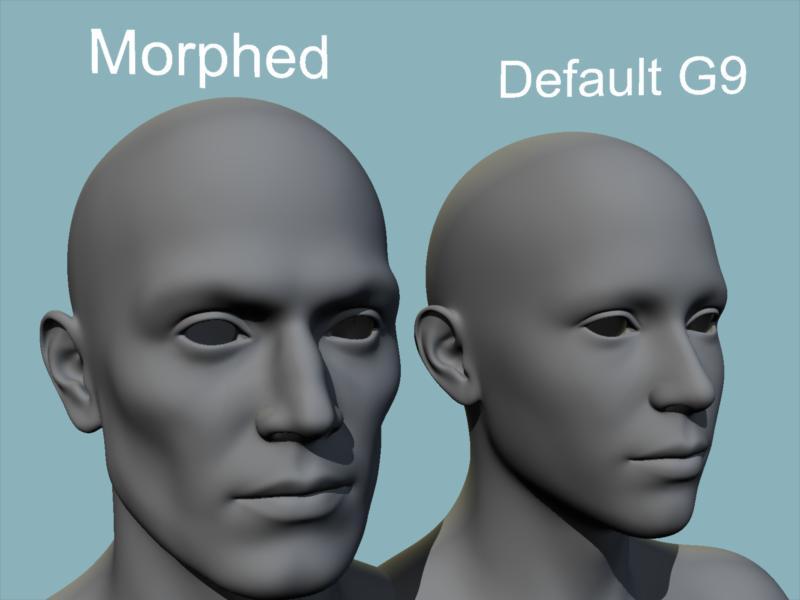
- To create the morph, I used a combination of the displacement brush and manipulating polygons in the vertex modeler.
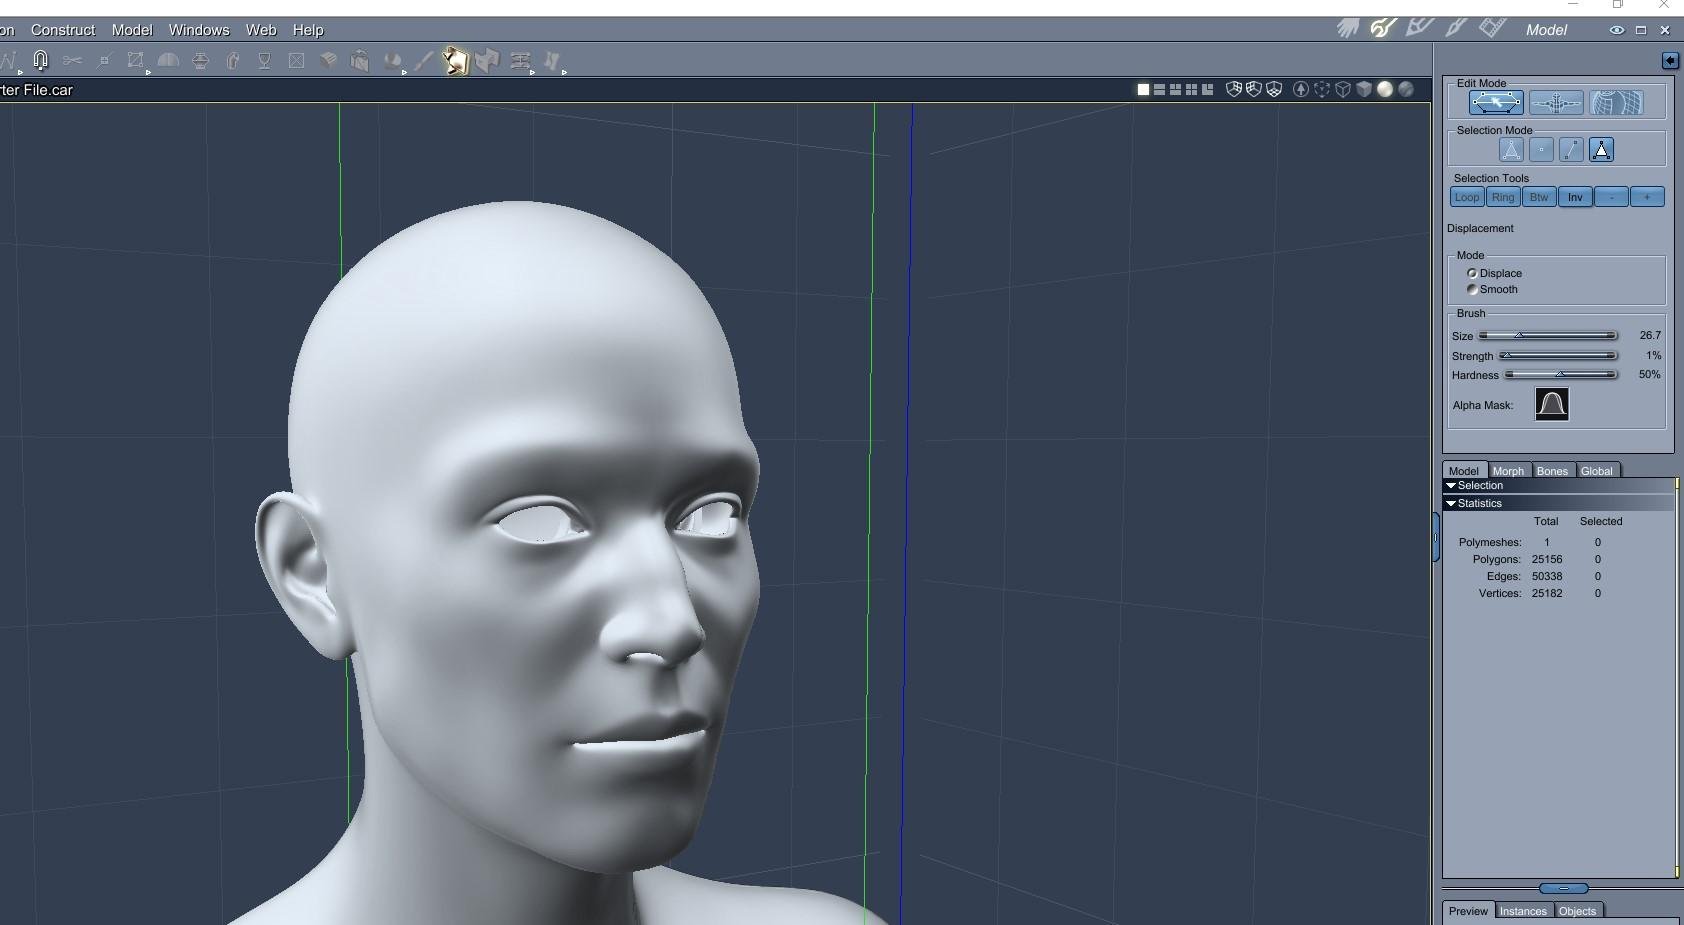
- I set subdivision smoothing to none because it has to be none when transferring to Daz Studio. I did not want to have to deal with the steps of creating a separate detail normal map for this test.
- So the unsubdivided result lost some detail but the changes to the brow ridge, etc are still pronounced enough for this test
 No one asked me - Diomede screenshots on whatever - Warning AI Discussion OK
Using Carrara to Create a Morph for G9 and Saving for Future Use - With Expression Test
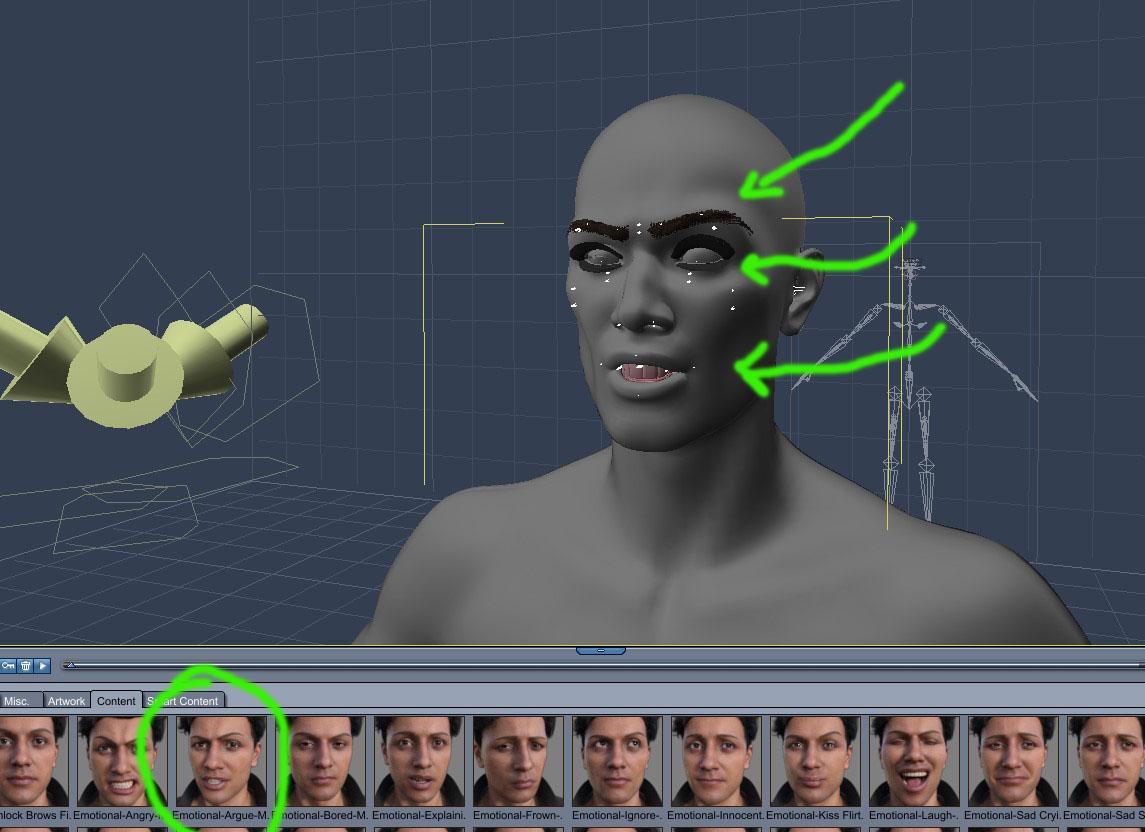
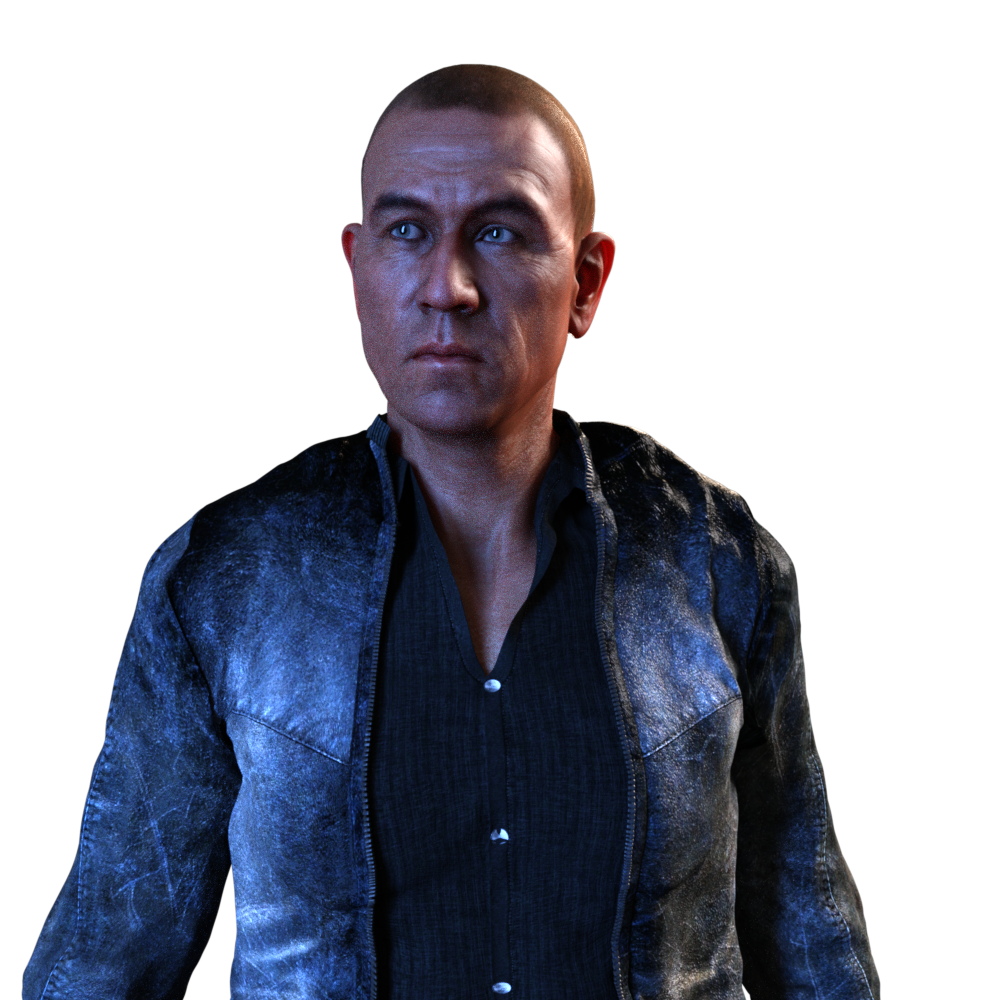
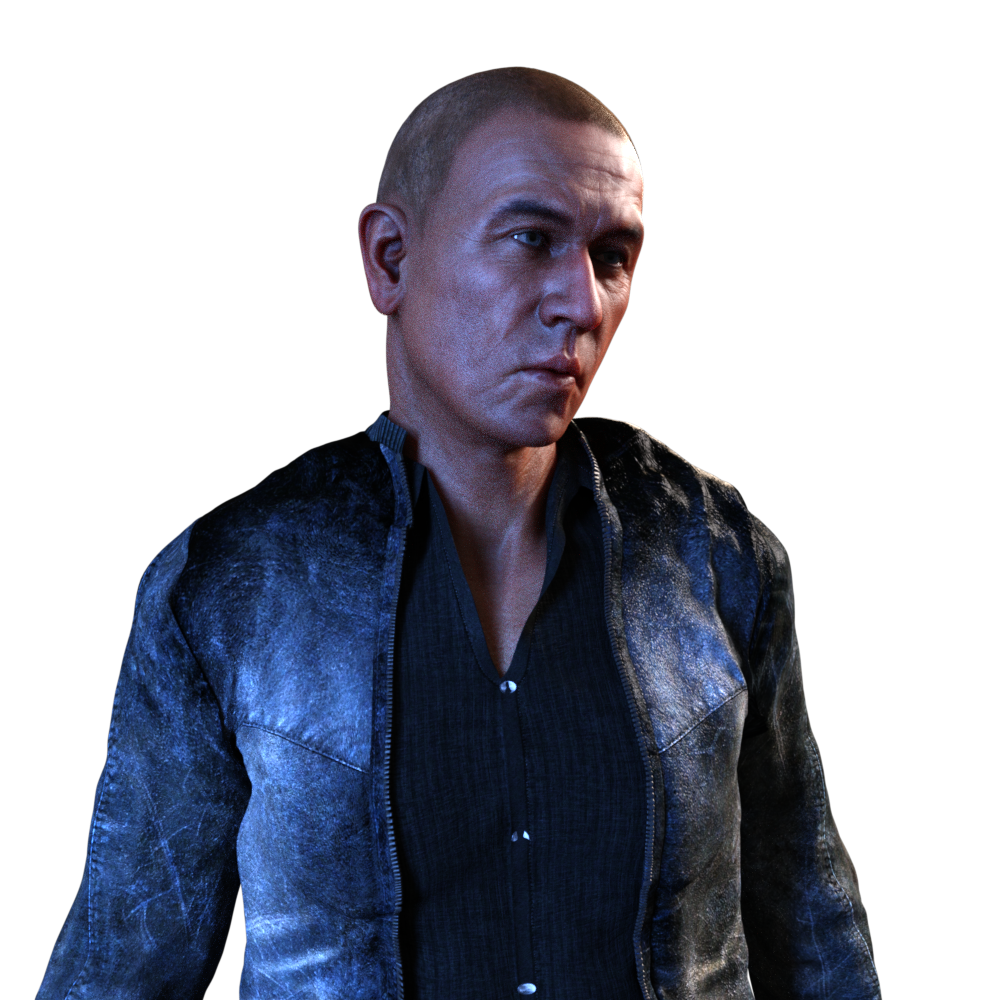
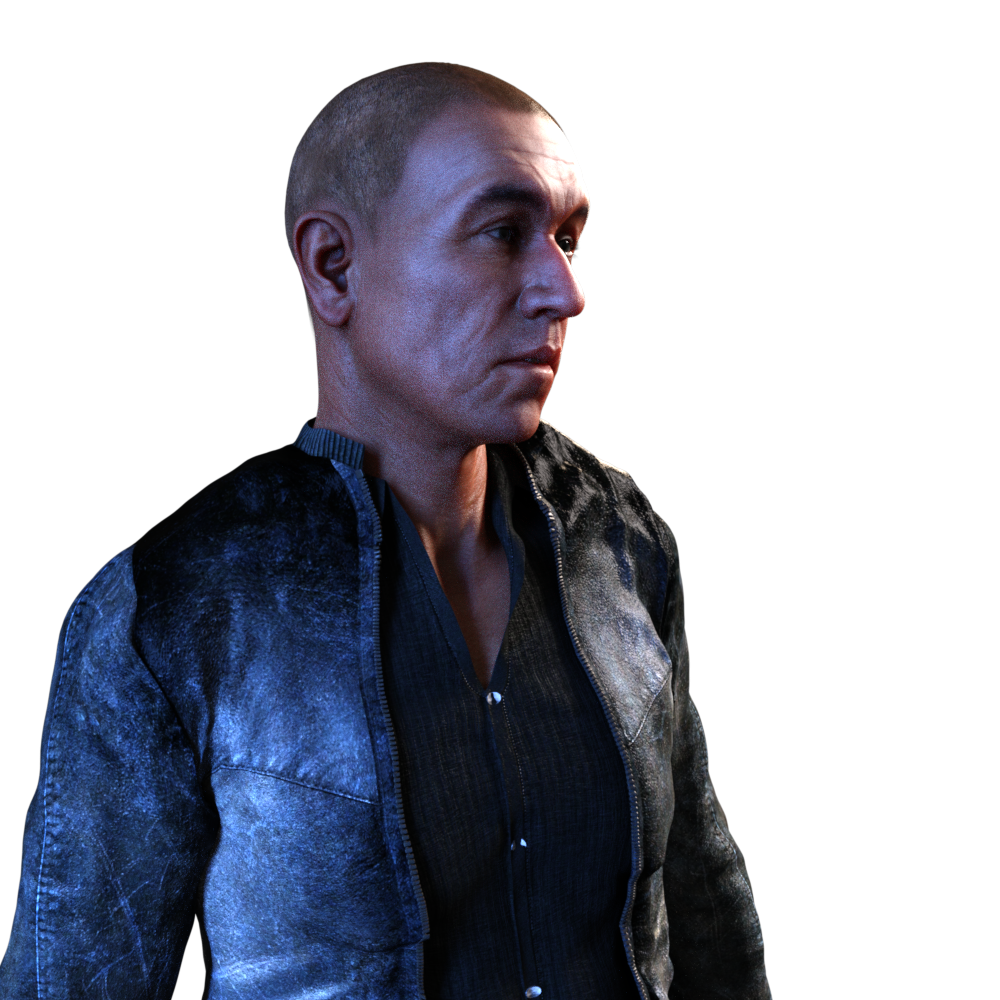
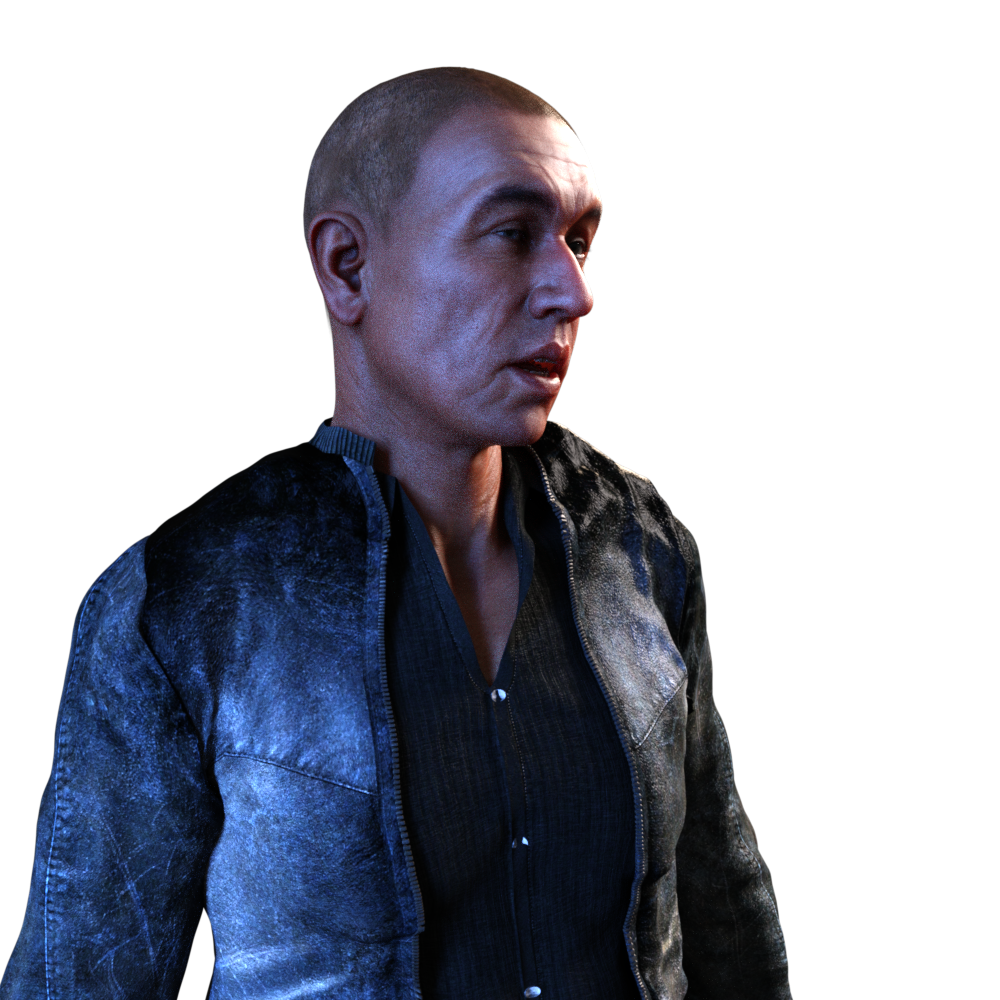
Newer Genesis figures use both geometry morphs and facial bone poses for expressions. Genesis 9 separates several of the facial features from the main figure. This includes the eyes, eyebrows, eyelashes, and mouth. I wanted to test Carrara's ability to conform the detail eyes, etc to the face for a custom made morph and an expression pose. I think this was a reasonable success. Excuse the lack of textures. In the posts below, I will show the steps to create the morph in Carrara, load it in Studio for future use, then apply an expression in Carrara. Here is the result.
 Genesis 9 we are back in the game Carrara users
Test of Face Morphs and Canned Expressions
This is just a test of applying a pose expression to a face that has been morphed with a custom morph. Recent genesis figures combine geometry morphing with manipulating facial bone rigs. I created a full body morph for G9 making sure to change the height so the eyes etc would have to move with the morph. Changed some other facial features like the brow ridge, cheeks, jaw, etc that could be affected by facial bones for arching the brows and opening the mouth. Then I applied an expression for G9 acquired from Daz. The eyes, eyelashes, eyebrows, and mouth appear to have morphed reasonably well with the FBM I created, and matched the pose expression change. I will put the steps in my 'No One Asked Me' thread.
 Jeepers, Creepers... I gave G8 G9's peepers.
SolitarySandpiper said:
lilweep said:
Maybe you are color blind, there is clearly blue there in your screenshots...
Look at the Head bone, there will still be some red weight assigned to that. So you need to paint it so eyes are all red (which will mean no other bones have any red weighting)
Also pro tip dont follow these two steps of the tutorial. Scale and position each eye individually (probably best to do it in Blender in Xray or Wireframe mode using a native G8 set of eyes as a guide), otherwise the G9 eyes will end up in the wrong position and it will become more obvious with eye poses and face morphs
MeneerWolfman said:
- Select the left eye joint and scale the left eye joint to 125%, set y translate to -2.65 and X translate to .13
- repeat with right eye joint but make the X translate -.1
Yes i can see that but none of these eyeballs have been painted yet... how can you possible tell when the eye has been completely painted red with the brush when 95% was red to begin with?
Edit: or am i misunderstanding and the eyes already come mostly weighted and i just need to fill in the bits missing?
you did Transfer Utility in a previous step, which will transfer most of the weights to your G9 eyes, but it wont be perfect (some of the weights will be assigned to the Head bone instead of the Eye bones)
to make it perfect, you need to manually paint any parts of the mesh that arent already red for the Eye bone to red (95% of it will already be red from Transfer Utility).
Cloth distorted on some character modelsAfter you have dialed in the character morph to G8F, select the Glove, on the Parameters Tab, show hidden, find any reference "generated" morphs caused by the dialing in of the figure. Dial those out. If this solves the problem, then make these into replacement morphs on the gloves, named the same as the generated morphs so that next time when the same character is dialed into the figure, instead of generating a new morph, it will use the one you have made.
Cloth distorted on some character modelsHello all, I'm currently having some issue with ths pair of gloves I'm making.
I notice that some characters with hand/finger bones changed, it distorts the shape of glove very severely.
Screenshot is shown without mesh smoothing but even mesh smoothing won't help much due to how severe distort is.
How should I approach this issue so it won't distort unless the character morph is really really severe?
I tried Rigidity Group, but I feel like I'm doing it wrong because it doesn't do anything for me
Base figure is Genesis 8 Female.
And before you ask, this glove has no hand or finger related bones and polygroups. It only shares lForearm so that it can receive movement from the parent figure.
Thanks.
Jeepers, Creepers... I gave G8 G9's peepers.Maybe you are color blind, there is clearly still some blue there in your screenshots...
Look at the Head bone, there will still be some red weight assigned to that. So you need to paint it so eyes are all red (which will mean no other bones have any red weighting)
Also pro tip dont follow these two steps of the tutorial.Those values stated in the tutorial will put the eye in the wrong position and it will become more obvious with eye poses and face morphs
Scale and position one of the eyes in Blender in Xray or Wireframe mode using a native G8 set of eyes as a guide. Use Morph loader and use symmetry options to apply the eye morph to both eyesMeneerWolfman said:
- Select the left eye joint and scale the left eye joint to 125%, set y translate to -2.65 and X translate to .13
- repeat with right eye joint but make the X translate -.1
Genesis 9 we are back in the game Carrara usersBasically another test like the one I did above. I made a fresh attempt to load the textures for Victoria 9. I added some subsurface scattering to the skin texture. Used Jay Versluis's method to transfer Genesis 8 character morphs to Genesis 9. Here is a mixture of the G8F Janet character with Victoria 9. Hair is a Carrara dynamic hair I made for Genesis 2 - fortunately on a hair cap so can be used on other figures.
Overall, for the moment, I think I could get better results in Carrara with Genesis 2, and with less hassle. The biggest issue seems to be the joints. Noodles. Not sure if the cause is JCMs, or maybe how blended rigging affects weightmapping, or... Perhaps as the utility producers like Xevo and RSSY offer joint corrections it will improve. Or maybe the error is mine and it will get better as I learn the figure more.
One of these renders has indirect lighting checked and the other does not. Make a difference with the subsurface scattering I added to the skin?
 Toonish for G9 (Free full Character)
I think something was packaged right. The morph does not show up.
Jeepers, Creepers... I gave G8 G9's peepers.SolitarySandpiper said:
i could do with clarification on the following steps...
10, export as what?
12, via transfer utility?
15, does this mean remove the _ but leave a space?
Thank you.
10.) You would export as an obj with the default settings.
12.) Correct, via asset transfer utility
15.) Correct, this is so the surface has the same name as the default g9 eye surfaces so you can apply materials to it.
DAZ, MD, and Traditional Pattern Making - GraduationWow!
Watched it right away. Another great video. Had no idea you could use a different versions of the mesh for weightmapping. Or if I did, I forgot long ago. Brilliant. And this video has a nice potential solution for Barbult's earlier questions about seams. Fantastic.
Thanks again.
In my Art Studio Forum thread here at Daz, I have been posting screenshot series documenting my workflows for various tasks. Easier for me to go back and find something than searching a video. One example was using Mada's method for a DForce dynamic add-on for thickness for DForce objects. Another is the steps in trying to implement videos by Jay Versluis and Mada for using the transfer utility for a character shape instead of base shape. Another was using Carrara's 3D paint to create opacity maps for geoshells. I hope you wouldn't mind if I post a similar series based on my attempts to implement some of the insights from your videos. I would combine it with what I have learned from sources such as MD's videos and a video by Jay and Fugazi in the Daz+ area and....
Jeepers, Creepers... I gave G8 G9's peepers.i could do with clarification on the following steps...
10, export as what?
12, via transfer utility?
15, does this mean remove the _ but leave a space?
Thank you.
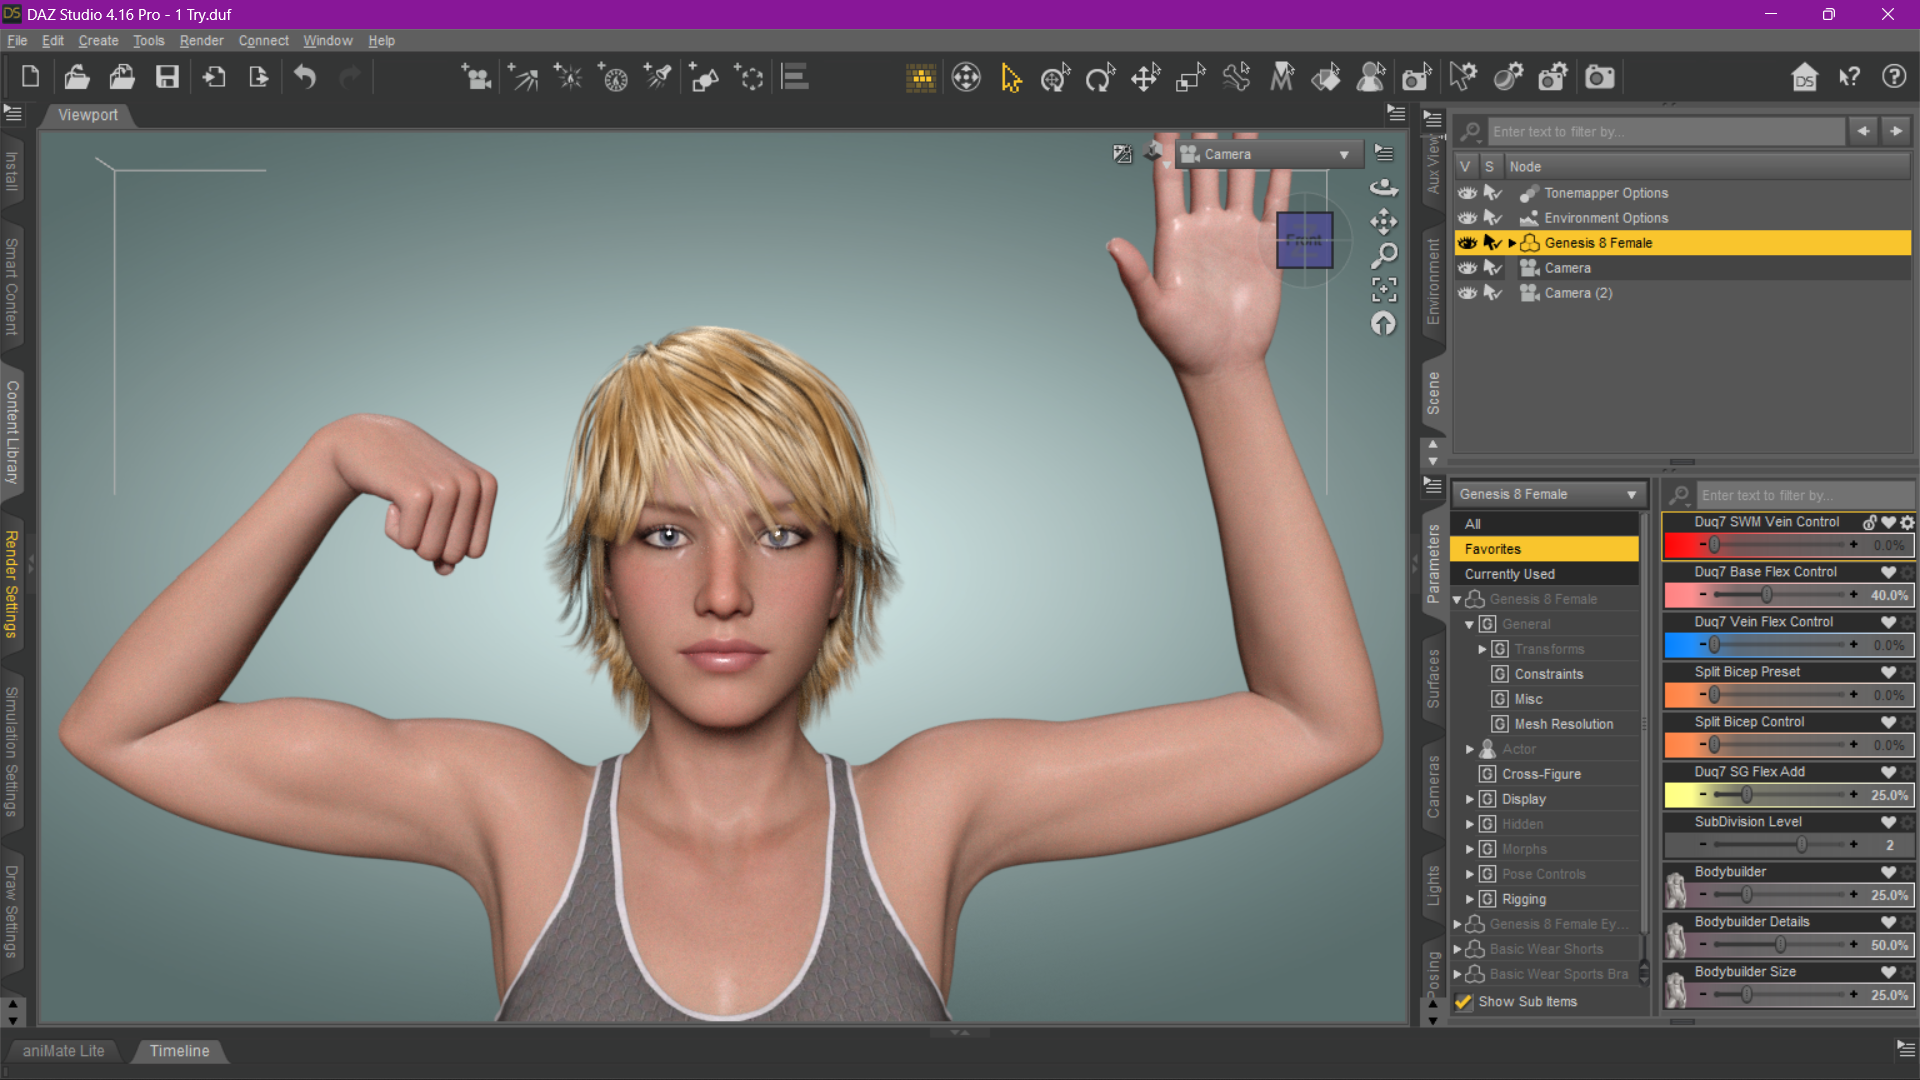
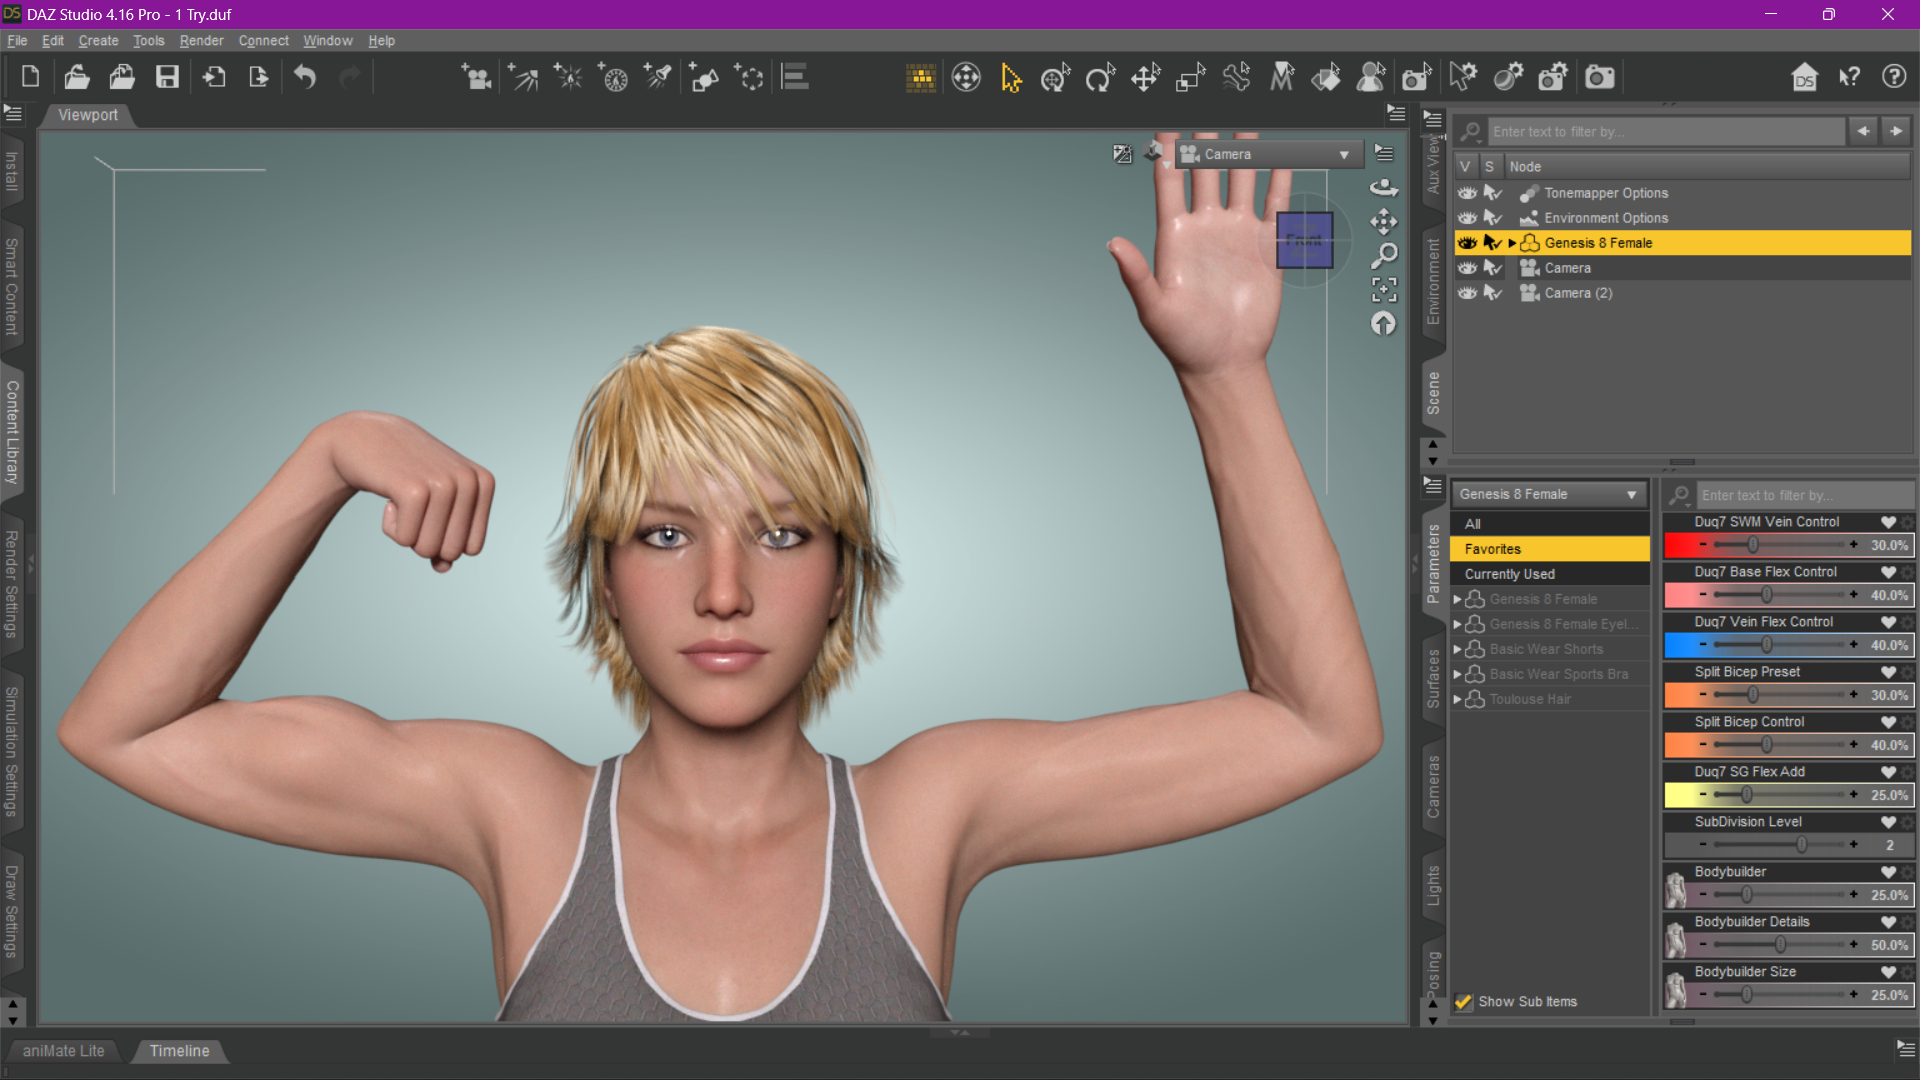
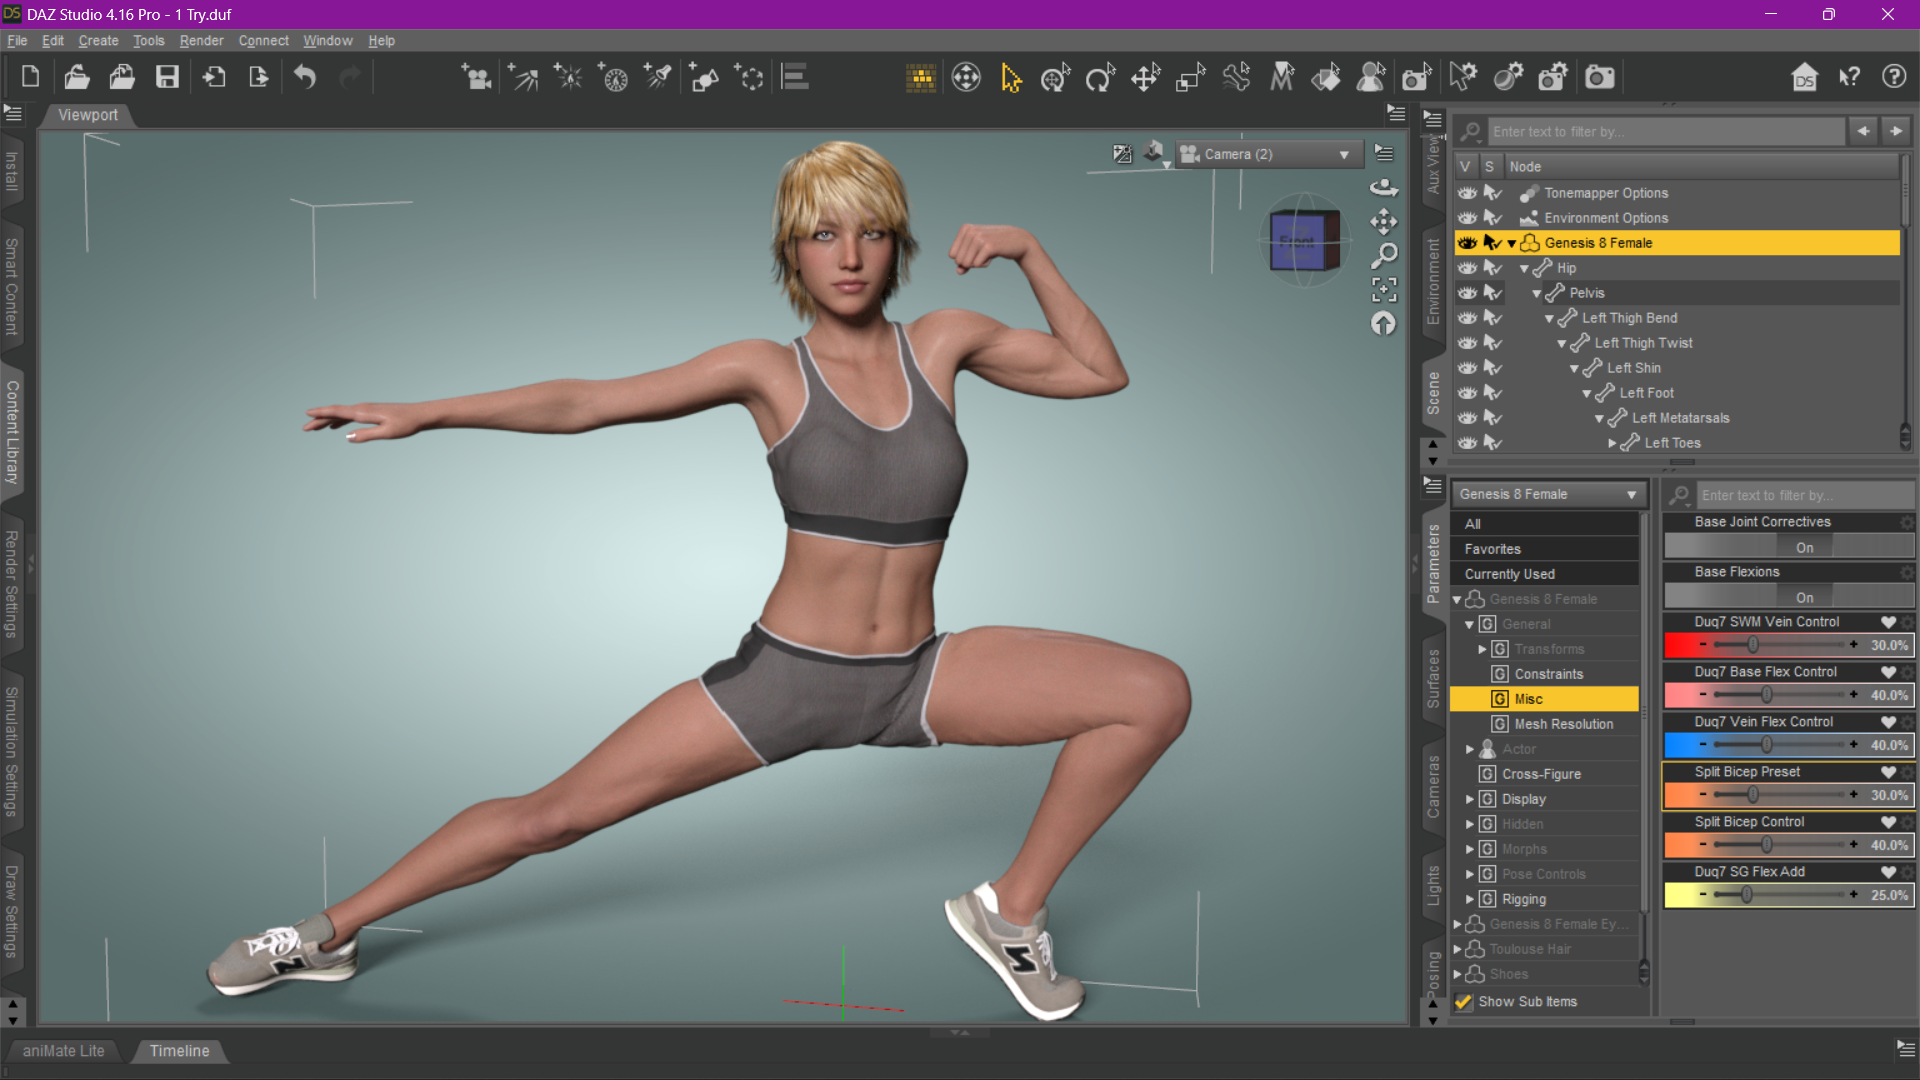
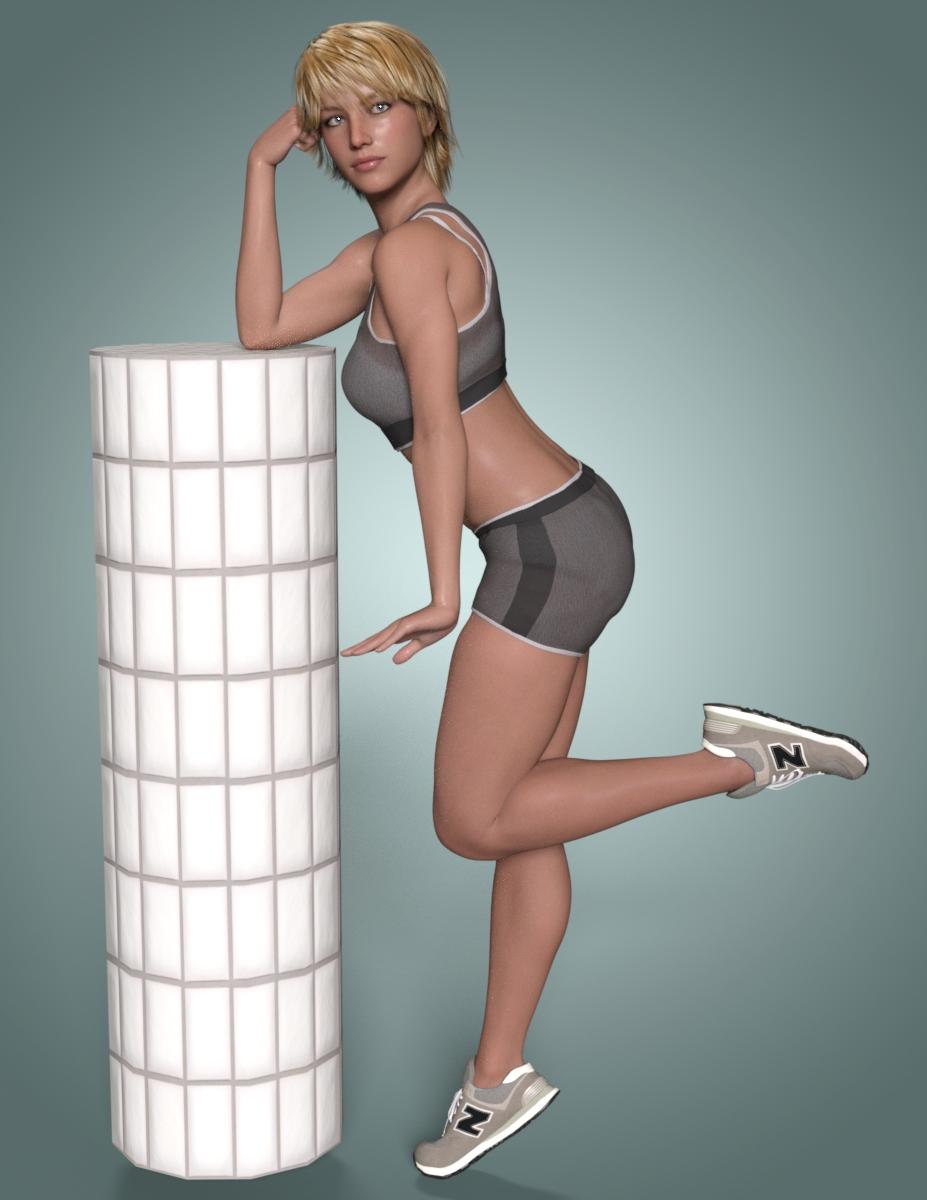
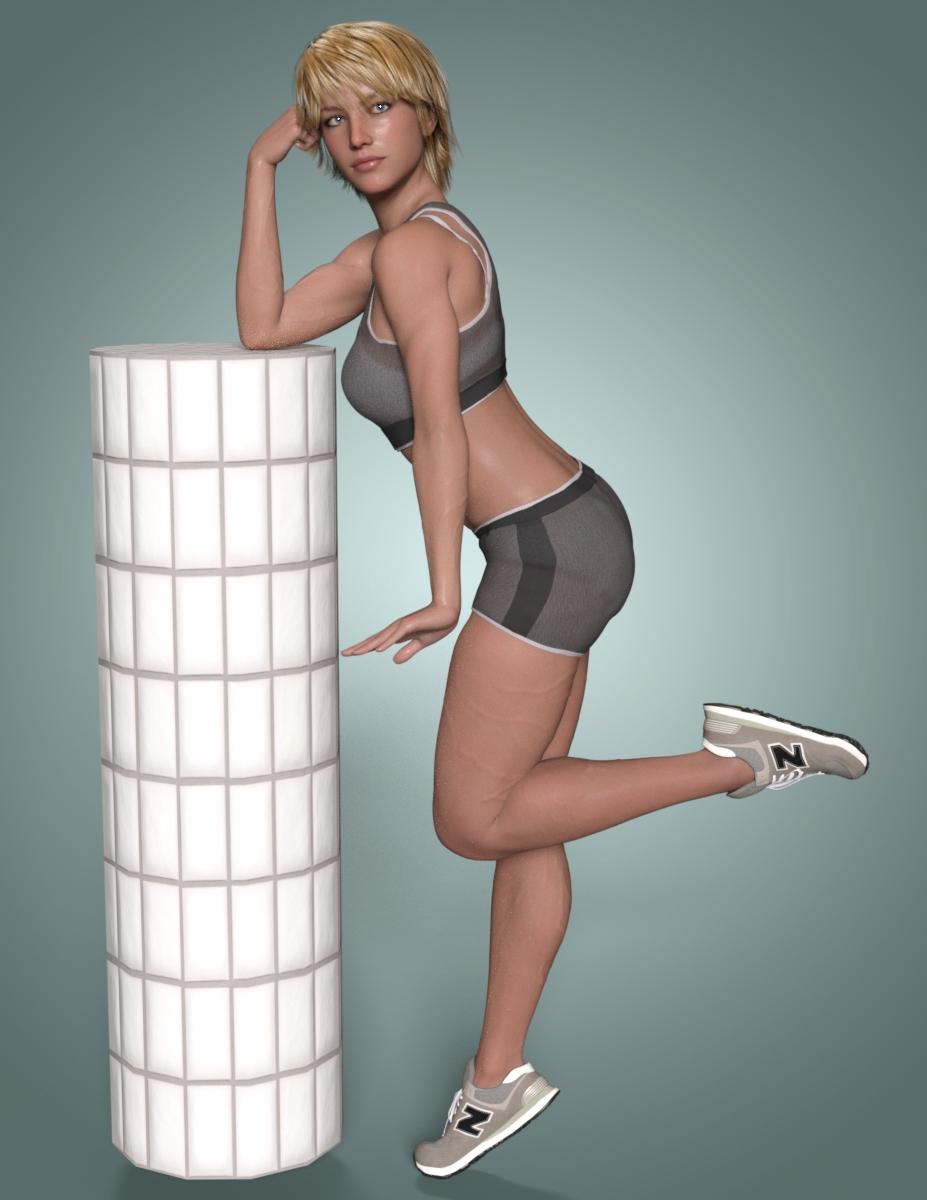
Free Flexion Enhancement for G8/8.1F. Also SWM Flex Vein Control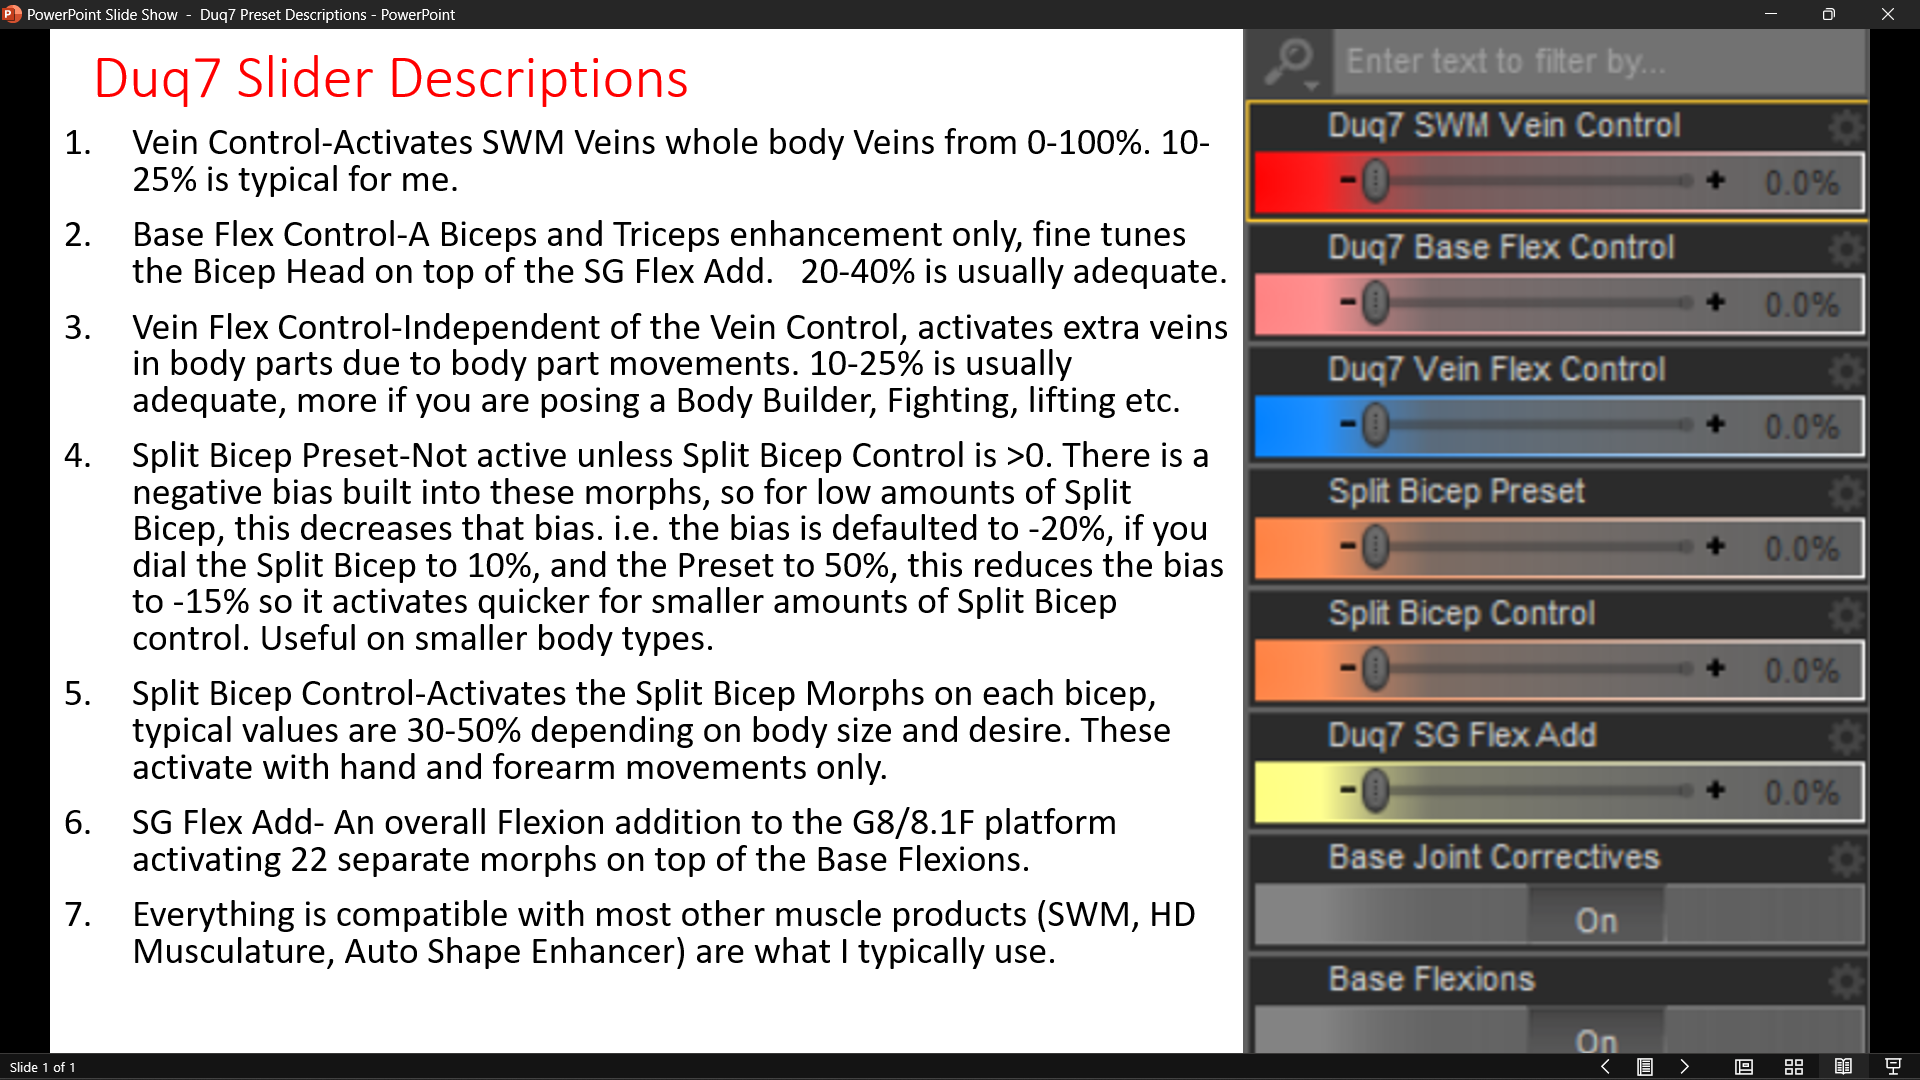
From Discussions on this thread:
unrealistic biceps and arm muscles in general, any hope for gen8/8.1? - Daz 3D Forums
and all my work and tutorials over on:
Auto Muscle Enhancer HD [Commercial] - Page 38 - Daz 3D Forums
Several folks have asked for my files on creating a Split Bicep Morph on the G8/8.1F Platform. I have come up with a somewhat useable solution and it is presented here. for the Flexion morphs, these can be used on any G8/8.1 Female character. The sliders allow for larger body types and greater musculature as desired. The Duq7 SG Morph control enhances the whole figure (Biceps, Triceps, Chest, Back, Thighs, Hamstrings and Calves). The Duq7 Flexion Enhance is a Bicep/Tricep additional focus using the forearm and hand movements to control.
To use the second file you must own:
Add Some Veins HD for Genesis 8 | Daz 3D
The second file has a preset slider to control how much total body veins is dialed in, rather than the supplied preset of only 100%. In addition I created controls that use the supplied individual area sliders to "increase the Flex of the Veins for the Upper Arms, Fore Arms, Chest, Back, Thigh, Hamstring and Calves.
RenderPretender and windl3356 both personally requested these files, so I thought I would put them up as Freebies. These morphs and controls were created by me using various other morphs, D-Formers, and the Awesome Mesh Grabber Bundle (Win) | Daz 3D tools. All this was done completely inside DAZ studio, as I don't have a clue on some of the other tools available out there. These are not perfect, but I think you will get some farily favorable results. These must be manually installed. Have fun, I think this really brings the G8/8.1F platform to life, especially if you like Fit or Muscular characters. TD
Edit: added some descriptions for the sliders in the attached picture. Sorry for the delay or confusion. TD
Second Edit: Added a short PDF user guide showing my process on applying and using these packages. TD
Third Edit: Deleted extra files accidentally included in the original file. Apologies to anyone that downloaded that file. TD
AOBB's freebie head morph Dashing for G8.1M based on Cary Grant. No materials nor textures.Dear SapphireBlue! Your support is invaluable. You always have such nice things to say about my work. Thank you!
 I don't find Dashing very similar to Cary Grant but it is a nice head morph, so I posted him.
  I think he has a warm, soft gaze...
Thank you for you lovely comments in my gallery!
Always good to hear from you and I am looking forward to seeing your render with Dashing! I know it will be awesome.
 G8.1 M Morphs and Materials on G8M?
inquire said:
I thought that the G8.1M morphs and materials could also be applied to G8Ms. I tried this with Trance, and nothing gets applied. Here's Trance: https://www.daz3d.com/trance-hd-for-genesis-81-male
Is there a way to apply this to a G8M?
Not offhand. G8.1 morphs and textures are not backward-compatible with 8.0. The UVs are different, and 8.0 can't "see" the 8.1 morphs, although 8.1 can see and use the 8.0 morphs.
You can probably do a map transfer to write new versions of the 8.1 textures to work with 8.0, but that doesn't help with the morphs/shapes, I'm afraid.
G8.1 M Morphs and Materials on G8M?The morphs should appear in your shaping tab. 8.1 has both 8 and 8.1 UV's while 8 just has 8 UV's so some elaborate map transfer would have to be done to apply materials.
Artists and their ToolsI chiselled stone for more than thirty years. I also like to paint, sketch and create digital art. Each of these forms require different tools.
I could try and sketch with my stone tools and I can sketch on stone. Taking my chisels to my computer would be a disaster!
That said I'd like to try and explain that, although I did spend a good amount of time lately learning Daz Studio, I'm never 'jumping ship' from Carrara, like some folks might have thought. Just expanding the tool range. Why?
 There's a thread in this forum regarding the use of Genesis 9 in Carrara, and it's a good one. I think it's really cool that we can get Genesis 2 through 9 to work in one way or another in Carrara.
 I bought Misty's Genesis 3 presets for Carrara and also have the ones she made for Genesis 8. They do allow me to bring Genesis 3 and 8 figures into Carrara, and I've done so on many, Many occasions.
Now, when I load Genesis 3 through 9 into Daz Studio, I can literally give them a pose and render them in Iray, and not only do they work, they really look good!
So I took the time to learn how to animate in Daz Studio along with getting (at least a little) familiar with Iray and OctaneRender within. Compared to Carrara, Daz Studio is a cludgy, headachy disappointment when it comes to animating. It's like it tries hard to diminish my attempts to do so.
Before this whole endeavor I used Daz Studio for other things like adding Triax rigging to older Poser-style rigging, adding new morph target posibilities to the figure so that I could more easily add full-body morphs while working in Carrara, without having to unloack the figure, creating custon aniBlocks and so forth. It was, as Haedwax
calls it: my Carrara Plugin.
Using what I've learned over the years on working in Daz Studio in this limited way, I was able to create my own custom tools to help me animate directly within Daz Studio in a much more efficient, less headachy fashion. For how I work, this was a lot easier and faster for me than trying to get any one of those figures to do in Carrara what I need them to do - and the end results are a lot better, in my honest opinion.
Genesis 3 introduced a whole new figure architecture that plays more and more toward what professional filmmakers are expecting to see in a commercial figure. Big difference that the average user might not notice much aside from the fact that it's a new, different figure setup. Genesis 8 took that many steps further and then came Genesis 8.1 and now 9. This not only helps Daz 3d get these figure more widespread into cinema and professional use, but it also adds a whole set of newly improved system to the software that's meant to make it shine - Daz Studio.
So that's why the
analogy at the into of this message. I could paint with my chisels and get it to work - and maybe I will from time to time.
Carrara is still my Powerhouse when it comes to everything that doesn't include working with Genesis 2 - 9. So I'm grateful that I have it.
Daz Studio renders to alpha by default. Bonus! Didn't need to learn that!
In my early tests with this process, I would take my resulting animated renders from Daz Studio, apply them as an animated texture map to a plane in Carrara, and have my actor directly in the Carrara scene as I work and ultimately render. I can still do that and in fact I plan to be doing a Lot of that. But when it comes to my main heroes, it's really nice to keep them as separate 'layers' to be used in my movie composites. Since they're not being baked into the final render, I get a Lot more flexibility on how the end result turns out.
Genesis 3 came out at a time when Iray was introduced to the world and was incorporated into Daz Studio, so it's the
generation that started getting these amazing Iray shaders thqat came with the character products we buy from Daz 3d. Genesis 2 can work in Carrara, but the auto-fit mechanism in Carrara sees it as "Genesis" and doesn't know that Genesis 1 items should be changed to fit. For me this poses a Huge problem working with that generation in Carrara. I will use Genesis 2 in Carrara, but only if I'm okay with using Genesis 2 (only) conforming items with it.
In Daz Studio, auto-fit can literally work with any figure - period. It is what contains the toolset to make it so - and it works brilliantly.
Diomede and I attended a webinar that shows how to create a character convertor that takes Genesis 8 character shapes to the new Genesis 9 as a new morph. The process for making Auto-fit Clones is incredibly similar to that same process.
Once made, Daz Studio will know what to do from there.
I'm using very similar techniques to be able to make my own animation tools that reside directly on the base figure as morph dials, even though they aren't morphs at all. This took a bit of hit and miss attempts and a lot of head-scratching. But it
was So worth it.
So when it comes to making figure compsatible with Carrara, the best solution for me is to simply use the best tool for the job at hand. I use "Animation" as my reason, but these same techniques work very well for the still artist. Most professional illustrators using these tools will take their renders into an image editor like Affinity Photo along with other elements, sometimes (always for me) with other renders and combine them using layers, crafting them into their final result. VFX artists do the same thing for films. The tools are different because they're working with many frames instead of one, but they're So Incredibly Similar in how they work and how we use them.
Blade Runner was released in 1982. If you watch the Behind the Scenes of that, you'll notice right away that somebody made that look a Lot more interesting than what came from the original camera footage. "Colorists" use software like DaVinci Resolve to color grade films to make sure that the colors from one shot match the colors from those that have to be cut into it. It's a lot of work and they love it. Color is what they do. Color matching is only the first step, however. They follow that with giving the film what's called a "Look", which is to enhance the contrast, alter the color - sometimes only for part of the image, like the irises of the eyes of one person, for example. Sometimes there's a whole lot of this that ultimately make the movie look the way it does.
...and since the very beginning, nobody has Ever expected the camera operator to get this final look using nothing more than the camera.
So while I did stray from Only using Carrara for my work, I only did so to make my Carrara results even better.
Cheers all, and I hope you enjoy my little explanation that I truly did Not "Jump Ship"! :)
 The History of Daz 3D - Where We Have Been and Where We Are Going
RobotHeadArt said:
Isn't the history of Daz basically them repeatedly trying to branch out of 3D content sales or ways to repurpose the existing assets and failing?
- Attempt at 3DCC tools and the acquisition of Bryce, Hexagon, Carrara
- Attempt at repurposing Genesis 2 for Unity under the Morph 3D platform
- Attempt at repurposing assets for 3D printing
- Tafi avatar system
- NFTs
The huge problem is, Daz assets are designed and work best when using and rendering in Daz Studio and are unfit for basically any other purpose. "How Many Times Do We Have to Teach You This Lesson, Old Man?"
LOL!!

However to be fair Genesis 8 along ,with diffeo exporter to Blender, is quite useful for getting decent figure meshes into Blender for animation as long as you replace the Daz rig with a proper human IK control rig from Autorig pro or Rigify Is it possible to create an interesting G9-Character?
I doubt. Or at least - I doubt, if we don't have access to the HD-Tools. I tried to transfer several G8 characters to G9 - it is possible, but the resulting characters have a flat face and body. Not so surprising, because the morph transfer tool does not work with HD morphs. But perhaps it's a more general problem - I think so far the only convincing G9 character is Victoria 9; which indeed is beautiful. But that seems to be a result of HD-morph and texture. Many new g9 characters are looking strange or flat, with thick lips and flat face. In the best case they look like a Victoria 9 modification.
Perhaps I am wrong. Perhaps it is possible. (Stella HD is a positive exemption...) Perhaps we need some morph kits to create interesting faces with flaws and wrinkles. Or perhaps it is the lack of HD tools, or is there a lower resolution in the model mesh? I am rather clueless at the moment.
Daz 3D is part of

Connect
DAZ Productions, Inc.
7533 S Center View Ct #4664
West Jordan, UT 84084Licensing Agreement | Terms of Service | Privacy Policy | EULA
© 2026 Daz Productions Inc. All Rights Reserved.