-
[Released] RSSY Clothing Converter from Victoria 4 to Genesis 8 Female [Commercial]
Hi, FSMCDesigns.
For me such a converters are a big time savers.
I accept, that not always all work, like you describe, but I have hundreds of items for V4,
that otherways would become obsolete and I would not use them at all.
After all advances with Genesis 8 figures, there is no way, I go back to Victoria 4 renders.
So in short - I am very happy with the converter and I will continue to use it.
Accessing DS content- Poser runtime, Content or something else?Again would recommend the skinshaders :- https://www.daz3d.com/dp-victoria-6-carrara-shaders
That would allow you to explore how the shaders are set up as well.
In the meantime some settings for you to explore (there are other variations as well) :-
Highlight
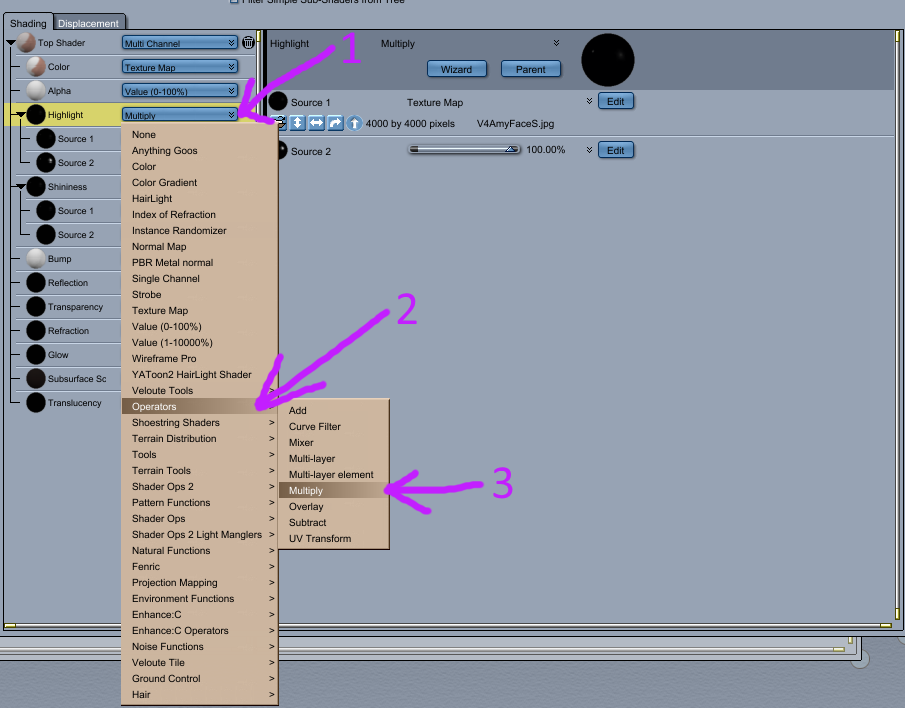
1. In the Highlight channel need to set up as Multiply.
2. Click on channel and slide down to Operators
3. At Operators click on Multiply

4. Choose Texture Map in the Source 1 channel
5. Click on folder to find file
6. You are looking for a monochrome image with"S" on the end of the name
7. Adjust slider
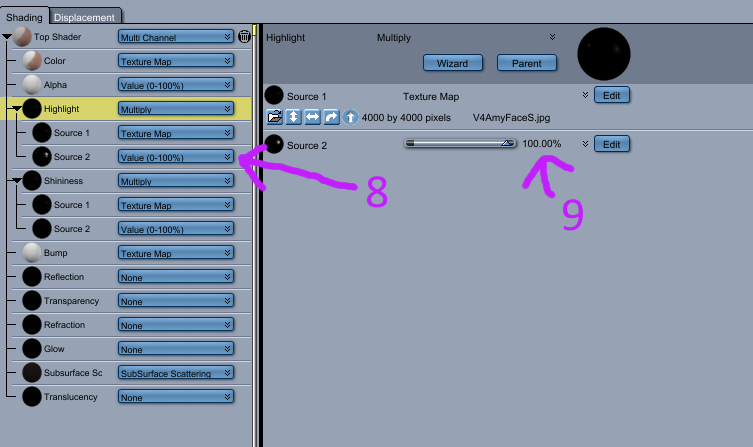
8. Click on Source 2 channel and get the Value (0-100%)
9. Adjust slider
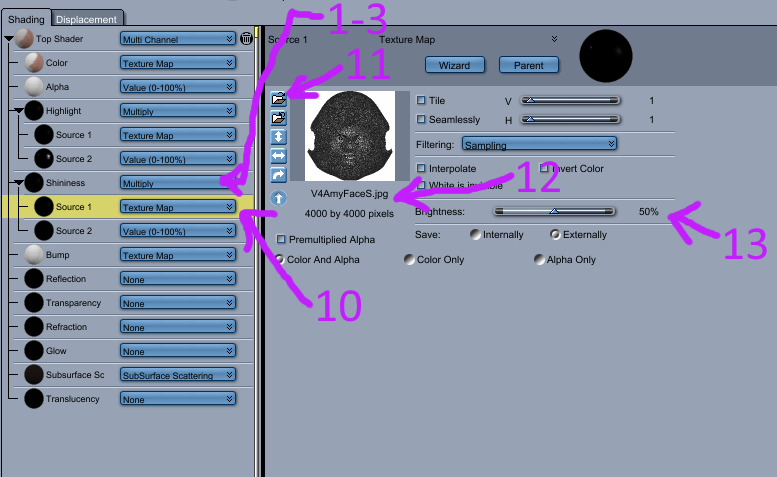
1 to 3 Repeat steps 1 to 3 to set up Shininess
10. In Source 1 channel click on Texture Map
11. Click on folder to find file
12. Looking for the texture file with "S" on the end of the name again
13. Adjust slider
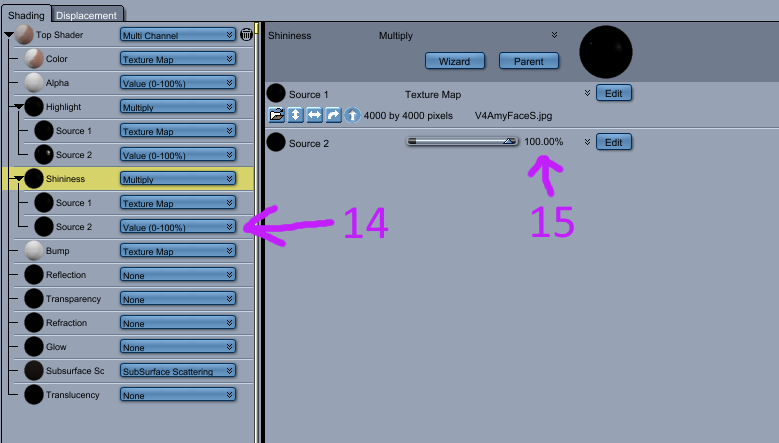
14. In Source 2 Channel click on Value (0-100%)
15. Adjust slider (NOTE - this will require a few test renders to get the value looking right to you, there are various values used by different people)
Bump

1. In Bump channel click on Texture Map
2. Click on folder to finf the file
3. You are looking for a name ending in "B" or "Bu"
4. Adjust slider (Some people use 50%)
AGAIN - there are different variations of above, just something to get you started !!!
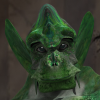
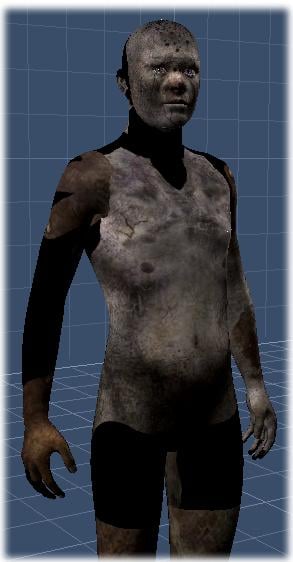
Looking for blood/gory effects and propsBig thanks for the setting Sven. May I know where did you get the model of severed head, or is there any way to detach a head from for example Victoria 8 model? :)
If you pose the head as Sven did, without the severed end being visible, you can just use a regular G8F and just turn visibility off for everything below the neck.
If you want something more sophisticated, there's a product over at Rendo that does it.
Morphs I would like to seeMorphs to change different parts of the face independently could be made. However, depending on the base model you are working on, adding morphs to create small skin defects probably won't work. Genesis 8 has less than 20 k polygons, I believe, so the mesh density is not high enough to create realistic skin defects, Victoria 4 has more than 3 times the number of polygons of genesis 3 and 8 so you might be able to make some skin defect morphs on that character, but even so they would still have to be relatively large. Further you would not be able to place a mesh morphed defect where ever you like. Small skin defects/marks can be made in the Genesis figures using DAZ3d proprietary HD technology, but that is only available to DAZ3d vendors, not to the rest of us; again they would not be moveable. You can try making skin defects yourself by using displacement, normal or bump maps, along with matching texture changes to the diffuse map; then you can put them where ever you want. (You'll need a 2D graphics manipulation program, for example Photoshop.)
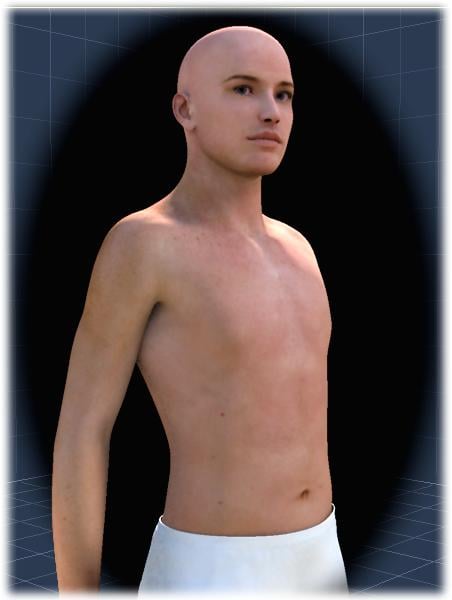
Setting up Basic Materials for Genesis Figures Optimizing Shaders
Everyone has a different view on what an optimized shader is. Basically, if we’re happy with how the Basic Male looks when he’s loaded in from the library, our journey to optimizing will be quick. This is a very basic, but well performed optimization that the Daz3d Developers have built into their Daz Studio shaders - knowing how they will translate into Carrara.
While I’ll be using Basic Male in my example, the same applies to the Base Daz3d character presets. Quite simply, there are certain aspects of any material setting in Daz Studio or Poser that will never transfer perfectly into Carrara when being loaded in. This cannot be helped.
So the developers looked at how Carrara is converting the materials over, and designed their base Daz Studio shaders to make for a good cross over - which I think is really cool.
For more realism, however, we have at least one more map to add to some of the shaders, and want to set things up to work more like the real thing. We cover that in the More Advanced article.
Lets look at the simple setup and advance in the next article. That way those of us whom are happy with the simple setup have less to read, and it also helps to explain where we’re going with the more realistic options later.
By the end of this Basic Shaders discussion, we’ll wrap it up by making a full-figure (Multiple Zone) preset that can add this optimized shader set to any figure of the same base mesh (Genesis, for example) as well as how to create individual shader presets to add these settings to ANY figure period.
 Basic Shaders
It should be said that we’ll need to load a figure for this exercise which comes with texture maps. Genesis base figure does not load with maps. So we need to load Basic Male, Basic Female, Basic Child, Genesis 2 Male or Genesis 2 Female, etc., It can also be Gorilla or Troll or Michael or Victoria, Gianni, Gia, etc.,
For a full understanding, however, please refrain from loading in a third-party character preset. As with Carrara artists, Daz Studio content artists enjoy thinking outside the box to get their shaders to be special, and that sort of thing doesn’t often translate to Carrara, often leaving your figure all black or something odd.
We’ll get to how to load in your third-party characters in the Advanced section. For now, however, it’s best to start with one of the Genesis (1 or 2) standard characters.
(Image on left - Genesis 1 Basic Male, No shader changes)
After we’ve performed the Edit > Remove Unused Masters > Consolidate Duplicate Shaders, let’s take a look at one of the skin shaders.
Select “Actor” and go to the Texture Room so we can see what’s getting applied to what. When asked if we want to Create a New Shader or Edit the Existing Shader, choose Edit Existing, so that all Shading Domains get updated, not replaced, starting with a new, blank shader.
Setting up Basic Materials for Genesis FiguresUV Coordinates for Genesis in Carrara
When we bring in the Base Genesis model from the library, it comes in without textures. If we instead load in one of the versions found in the Characters section, they come in with their basic color maps in place, and they load with the UV Mapped Coordinates for that specific shape. This can be important to know if we wish to use a specific set of maps - no matter the shape we want to end up using.
Basic Female comes in with UVs that match Victoria 4 texture maps. Basic Male is the same for Michael 4 maps and Basic Child for Kids 4 maps.
 Other characters we collect will often have custom UVs which make for more uniform texture mapping of the figure after its shape has changed to that, particular shape - a really nice design feature Daz3d has built into their Genesis system.
Knowing this, let’s consider that we want to use (for example) the Troll maps on a shape of a small girl child.
To do this easily, we’d start by loading in the Troll character preset so that the maps line up. Remember, we want to use Troll’s maps. Those maps were made to fit the custom UVs of the Troll shape.
So we begin with the Troll character preset and then change the shape to anything we want. In this case, remove the Troll morph, and add some Female and Child morphs to our liking.
In this same idea, we can use Michael 5 maps on a Troll or Gorilla or on Victoria or whatever shape we want. We just want to begin with the base character that corresponds to the maps we want to use - and then change the shape to whatever we want.
It’s important to do this or we’ll end up seeing map irregularities on the figure, like the outside of the map, etc.,
The figure here shows the Troll maps loaded onto the basic Genesis. Notice how the maps don’t line up with the figure. This is what I’m talking about here. If we want top use the Troll maps, begin by loading the Troll character preset. This will give us the proper UV Mapping for those textures. Now we can change the shape to anything we want, and the mapping will follow.
Daz Studio has a built-in function which allows users to swap UV Mapping directly while working but Carrara does not. So the simple work-around is to just load in the preset character according to which maps we will use.
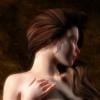
ID outfit used in Z-Cowgirlit's actually the Summer Outfit for Victoria 8 by Halcyone over at Rendo, just re-textured.
ID outfit used in Z-CowgirlCould it be the "Summer Outfit for Victoria 8 by halcyone and faintblue" over at Renderosity?
Accessing DS content- Poser runtime, Content or something else?The product is Victoria 6
Buy Something That Doesn't Work in Carrara? Post your Questions and Workarounds here. (please)The comment at the following link might help, or perhaps the larger discussion within which it is located.
https://www.daz3d.com/forums/discussion/comment/1667771/#Comment_1667771
Your copy of Carrara 8.5 should have come with Carrara specific shaders for Michael 5 and Victoria 5 (genesis 1). These are found in folders under the Shader tab in the browser tray at the bottom of the interface. The term global is used because the shader contains info for each shader domain of the figure, not just one material zone. As you acquire more figures and characters, I recommend you create and save your own global shaders. So, in starting a scene, you load Michael 5 (or whatever) directly in Carrara from your content browser. It loads with Studio optimized shaders, not Carrara optimized shaders. You could adjust each material zone one by one (limbs, face, ...). Or, you can drag and drop a global shader that adjusts all in one step. However, to do so, you must have a global shader created and saved first. Just a one time step for each new figure / character set that you acquire.
hope it helps.
sale errors5 old items (from the Victoria 4/Michael 4 category) plus two older new releases works for me. I don't, however, get two of the five free if I remove one of the new items - I think the free items have to be exactly the right number to match the number of freebies allowed.
Accessing DS content- Poser runtime, Content or something else?That is very interesting. Thank you for the details. Does 3Delight render glass with the necessary reflections, that simulate real glass? I used iray in DS but find Carrara easier to use due to its selective lighting ability. I'm surprised that it is not physically based.
I don't know what I did wrong but V6 loaded OK. The basic V6 rendered OK but when I added the texture, V6 turned black. Thats a pity because I purchased V6 because I couldn't find any decent skin textues for G2 in the store..... Lots for V6. Is there any specific settings I can adjust to get the skin to render as intended ?
Black skin answered in another thread :- https://www.daz3d.com/forums/discussion/comment/4321471/#Comment_4321471
Skin shaders worth checking out :- https://www.daz3d.com/dp-genesis-2-females-carrara-shaders-collection
Accessing DS content- Poser runtime, Content or something else?There are Carrara V6 shaders in the store, that renders nicely in Carrara and can be used to learn about shaders. The default shaders should not be black though. https://www.daz3d.com/dp-victoria-6-carrara-shaderssale errorsI don't see any items in there from yesterday or today.
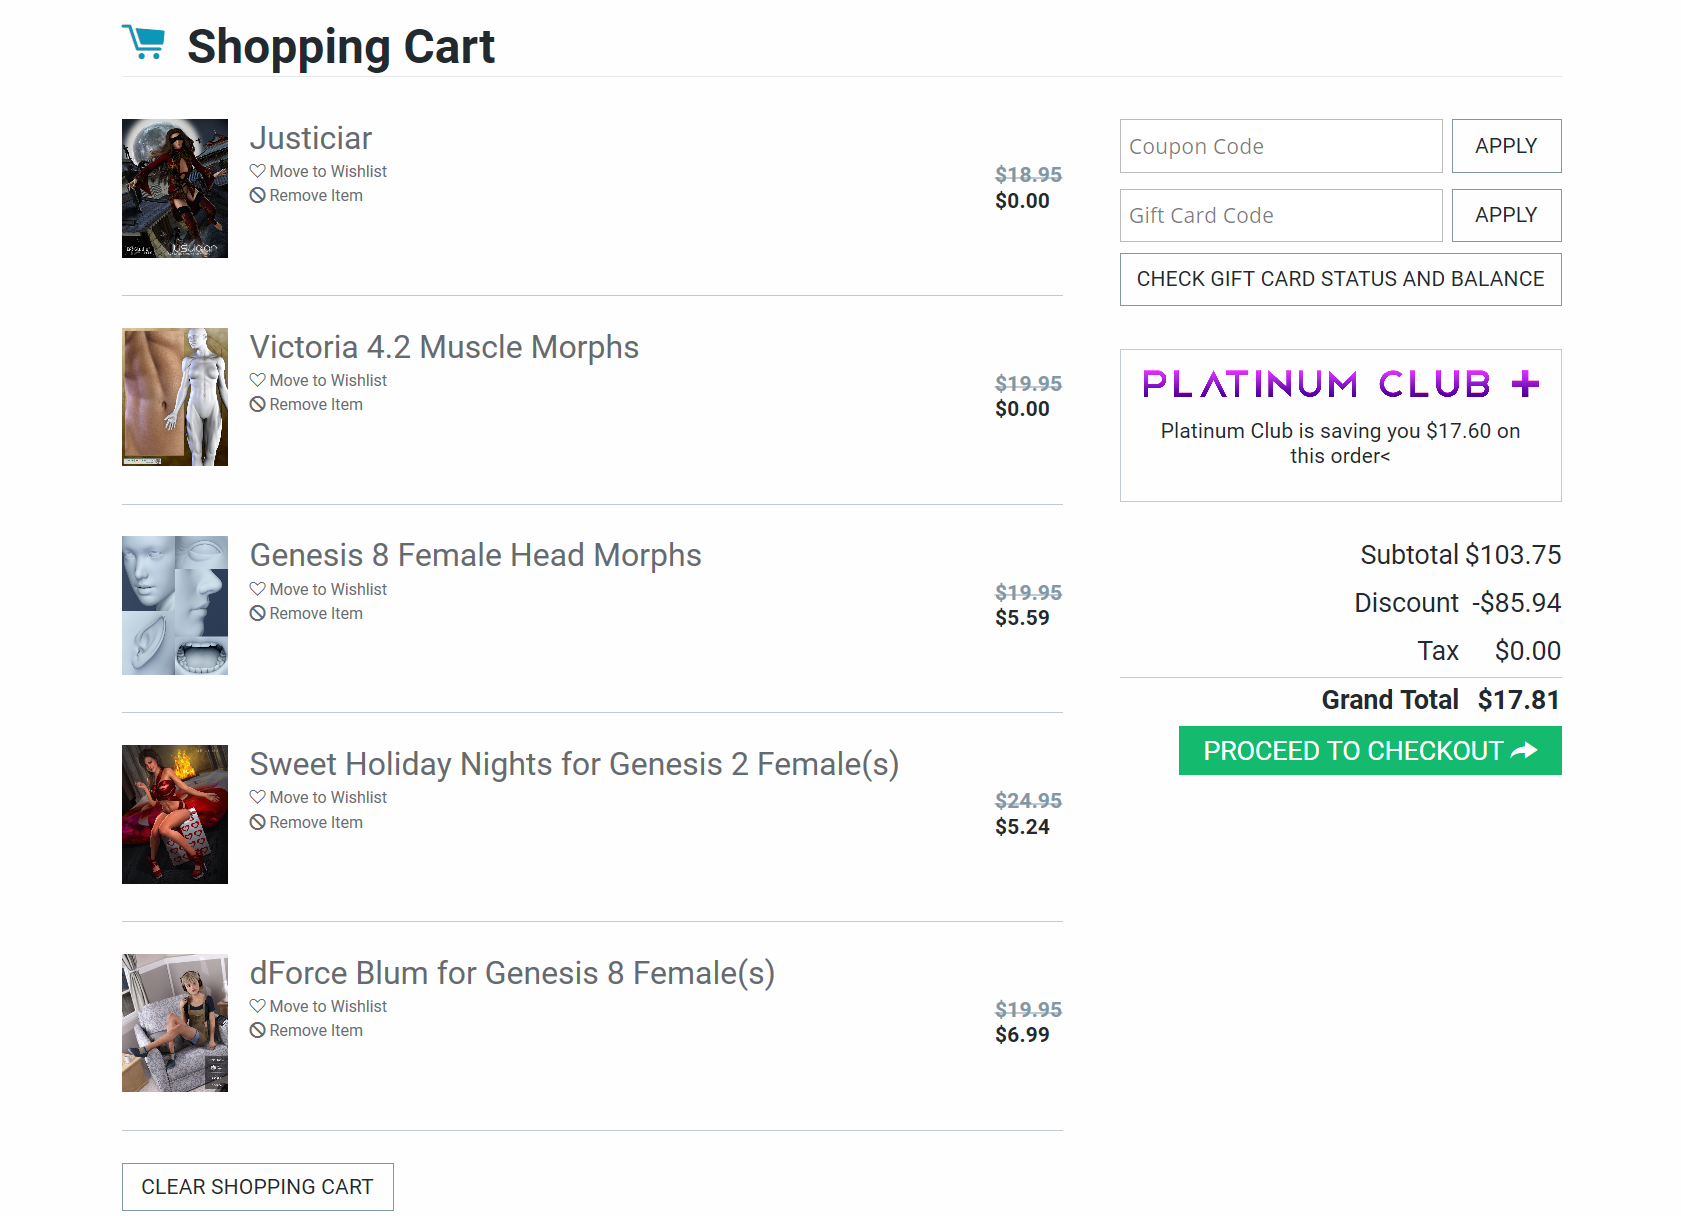
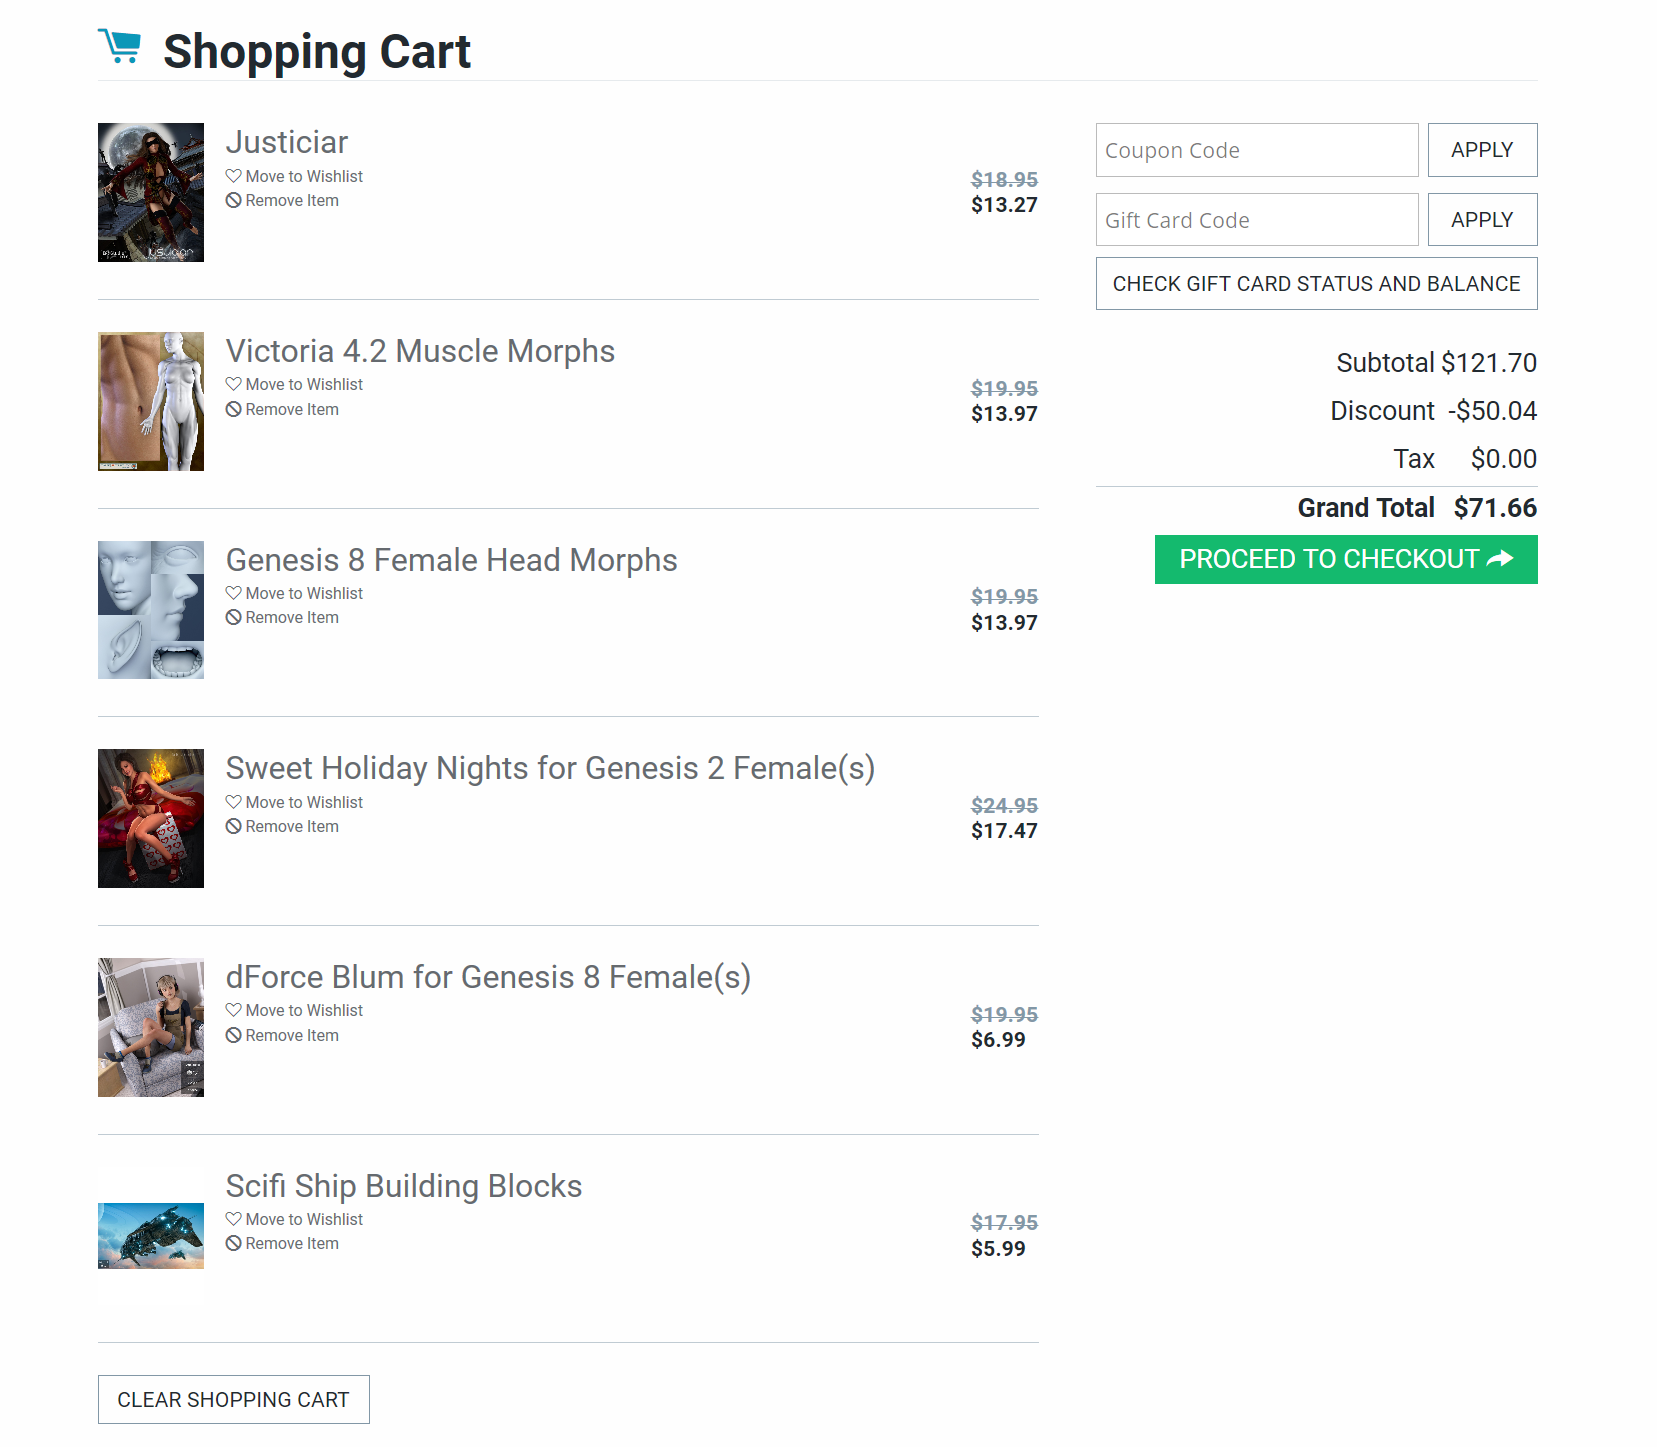
"Buy a New Release to unlock extra savings on Michael 4 & Victoria 4, Genesis, Genesis 3 and Genesis 8 Items below" it has to be New Release not today's release. (*Items must be in cart simultaneously for discount to apply, qualifying purchase must be over $5.)
All of the bonuses work good with just one new release but if someone puts two new release there the bonuses disappear.
The difference between these two Shopping Cart is that in the first one there is only one new release in the second one there are two new release and no bonuses. Why it's a problem because buying two new releases should get you a slightly higher bonus according to the sale. (and +3 Select Michael 4 or Victoria 4 Items for FREE)
 Product "Required"?
in G8 if the character says it requires Victoria, or Stephanie etc., it doesn't.
It does if you want the character to look like the promos, as it uses the named character shape as part of the morph mix. However it's not required to use the texture, which was sometimes the case for older genesis versions as named characters each had their own UVs.
You snipped this sentence "You may not be able to get a render to look exactly like what the product page shows" where I made that point.
The point of my post was to give more details on what you said, not contradict it...
Tynkere Carrara FAQ scrapbook & other thingsRE: Genesis+ figures. Folks have already mentioned the imortant issues, but I'll throw in my two cents. Here is my current approach to using Genesis 1-8 characters - just another set of options. Your mileage will vary.
- Warning- some of this is considered advanced, some not. This is not intended to overwhelm you, just give you something to refer back to. When and if you ever want to create a custom genesis+ character or whatever, ask and will point you to more clear examples. In the meantime, here is a taste of some of the possibilities, from the most basic use of existing conent, to creating custom genesis+ characters, clothing, hair, and props.
- BASIC use of genesis+ figures. - Within Carrara, load the genesis+ figure from Carrara's content browser. Select the actor level of the figure, go to shader tab in properties tray, drag and drop a saved global Carrara shader for that genesis+ figure on to the multicolored sphere at the top of the properties tray. Use morph parameters menu to adjust genesis+ shape. Load and conform other items from content browser. Adjust shaders if necessary. Load or create lighting, sets, props, and other scene elements. Apply pose preset or select joints and use rotation tools, including expression morphs and adjustments. Make any adjustments for poke through, etc. Make sure lighting is still what I want. Adjust render settings (especially tile size which scrolls below my screen - argh), including any desired multipasses. Render.
- for one-time or infrequent projects, I load the genesis figure directy in Carrara, dial spin a desired shape from the morphs listed in the parameters menu, and do whatever I want to do entirely withn Carrara.
- for regularly used characters derived entirely from purchased content, I load the base figure in Studio, dial spin whatever morphs I want, and save as a scene subset. To use in Carrara, I go to the content tab in Carrara's browser menu, and load the saved figure from the location the scene subset was saved to.
- for textures and shaders to be used in Carrara, I save an adjusted global shader for aquired character packs. A saved global shader can be dragged and dropped on a figure in Carrara and adjust all of the materal zones in one move. Yay! That is so awesome. It means I do not have to adjust the bump map and highlight channel etc. for every arm/leg/toenail etc. each time I load another figure. Just adjust once when first acquire the character set and save as a global shader to Carrara's shader broiwser. But where can a beginner find examples of Carrara-specific shader settings? Assuming you have Carrara 8.5, it should have come with examples of global shaders for Michael 5 and Victoria 5 in the browser tray at the bottom of the interface. I believe these two examples can be found in subfolders labeled Skin \ Genesis \ Michael 5 and Skin \ Genesis \ Victoria 5. I used the settings in these as a starting point to create Carrara-specific shaders for other genesis+figures, which I then drag and drop when I load the appropriate figure. I don't hold myself out as a realistic shader person so I will refer you to others for more advanced specifics. There are threads here in the forum, tutorials, etc., etc., etc. to help.
- for my custom character shapes, I load the base genesis in Carrara, turn off smoothing, and use Carrara's vertex modeler to shape the character as desired. I just ignore the topology warning. Sometimes I may want a single combined morph for dial spun combination that I want to be able to adjust on a single slider. If so, I just dial spin a shape instead of using vertex modeler tools. When satisfied with the shape however achieved, I save out as an obj using the preset for (Daz Studio Morph). In Studio, I load the base figure and use morph loader pro to import my morph. In the morph loader menu, I use the obj format preset for Carrara. If figure proportions have changed, I make sure to align the joints. For extreme morphs, I mght want to adjust weightmaps and JCMs and that sort of thing, but not usually necessary for most basic changes. I save as a morph asset. If morph asset saved correctly, in the future I load the base figure in Carrara and find the custom morph in Carrara's parameters menu. Within Carrara, I use like any other morph. Of course, these custom morphs work when just using Studio as well.
- for custom conforming clothing and accessories, load the base figure in Carrara. Use Carrara's vertex modeler to create the clothing or accessory. When satisfied, export the mesh in obj format using the Daz Studio Full Scene preset. NOTE - the preset for Daz Studio Full Scene is not the same as the preset for Daz Studio Morph used for creating custom characters above. In Studio, load the base figure. Import your custom clothing mesh using the obj preset option for Carrara. Use the transfer utility to convert the mesh to a conforming figure. Couple of save options. For personal use, can be convenient to save as a scene subset or as a wearable preset. If you plan to distribute then save as a figure/prop asset, but that also requires some isolation and grouping of associated dsf, data, and texture files. To start, just save the custom clothing item as scene subset. Then, in Carrara, can load you custom clothing item directly from where you saed it as a scene subset or wearable preset. It should conform to the appropriate genesis figure and morh with it just like other content. You can also use this method to model your custom clothing to your custom morphed shape, then use the transfer utility's option to reverse to base shape when doing the conversion. Of course, these custom clothing items work when just using Studio as well.
- for custom hair, I load the base figure in Carrara. Sometimes I creae a hair cap to grow the hair on, but depends on the project. A lo of times can grow the hair directly on the genesis figure. I use Carrara's dynamic hair modeler to grow / drape / brush / cut the basic shape of the hair style I am going for. I use Carrara's hair shaders to supplement shape with frizz etc. I use Philemo's free hair-to-mesh plugin to convert the hair to an obj. NOTE - have to adjust the "display percentage" in the hair modeler to avoid making the hair obj too dense. When satisfied, I export the hair obj and convert to a conforming figure using the same steps and settings as for conforming clothing above. The uvmap for a hair strand is a single vertical box so can create transparency maps to make frayed fringes. For morphs for the custom hair, I use the same base Carrara dynamic hair with Philemo's plugin. It will preserve the number and order of vertexes for correct morphs as long as same settings for things like display percentage etc. are preserved. Of course, these custom hair figures should work when just using Studio as well.
- for custom sets, I load and pose Genesis figures when constructing props and sets. For example, I created a custom leprechaun figure. If I want appropiate furniture, I can load and pose the leprechaun in Carrara and make sure the fellow's feet touch the floor when he sits in his chair.
Product "Required"?in G8 if the character says it requires Victoria, or Stephanie etc., it doesn't.
It does if you want the character to look like the promos, as it uses the named character shape as part of the morph mix. However it's not required to use the texture, which was sometimes the case for older genesis versions as named characters each had their own UVs.
You snipped this sentence "You may not be able to get a render to look exactly like what the product page shows" where I made that point.
Report sales errors here. Missed it? No worries. "There's Always Another Sale™"Does the "Free Micheal and Victoria 4 content" sale require a new release from its page to trigger its deals ?
I tried it on other new releases and they didnt work, but I havnt done an exhaustive test
yes
Report sales errors here. Missed it? No worries. "There's Always Another Sale™"Does the "Free Micheal and Victoria 4 content" sale require a new release from its page to trigger its deals ?
I tried it on other new releases and they didnt work, but I havnt done an exhaustive test
Does "Wet and Tanned Skins for G8F" only work with certain anatomical elements products?Hi,
I have the product below
https://www.daz3d.com/wet-and-tanned-skins-for-genesis-8-females
On a default G8F body the bikini tanline i want to use looks ok. For the Golden Palace for G8F the material transfer utility that comes with GP works fine. However i dont want to use GP because i cant get it to look the way i want. The genital product that i want to use is 3feetwolf's New Gens for Victoria 8 however the transfer material utility that comes with the wet and tanned skins is messed up. The tan lines between the G8F and the NGV8 doesnt line up. And on the NGV8 between the anus and vagoo there is a straight horizontal line where on the side towards the front of the character is untanned but to the rear of it is is tanned.
Edited by a mod to adjust title
Daz 3D is part of

Connect
DAZ Productions, Inc.
7533 S Center View Ct #4664
West Jordan, UT 84084Licensing Agreement | Terms of Service | Privacy Policy | EULA
© 2026 Daz Productions Inc. All Rights Reserved.