-
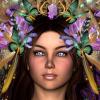
Who said Blender was hard?
Hmm Gedd, I wonder if you've noticed this; when creating morphs in Blender, even with all aspects zeroed before exporting from Daz, I'm getting slight movement on the morph everywhere on G3F.
I tested on a figure I didn't alter in Blender; I imported it, then immediately exported. I get the same.
nicstt, what is your morph workflow? I just created a nose morph in Blender 2.77a on Genesis 3 Female and applied the morph in Daz Studio with no trouble. Here is my workflow:
Exporting your OBJ
- In Studio, I zero the navel and mouth realism HD morphs and set the resolution of the Genesis 3 figure to base.
- I export the figure as an OBJ with Daz scale (or whatever scale, but remember which) and with either Write Groups or Surfaces, depending on my needs.
Importing to Blender
- In Blender, in the Import Wavefront OBJ options, I select Keep Vert Order and checkmark Polygroups.
- The figure has a rotation of X90, so I use Ctrl A and apply rotation so that I can utilize X symmetry.
Creating a Shape Key
- With the figure still selected, I open the Object Data properties and under Shape Keys create a Basis Key.
- I create a second Key by pressing the plus sign next to the Shape Keys panel. I rename this new Key to describe the morph I am making. I created a nose morph and thus named it Nose01. It is important to set the value on this new key to 1.0 before you sculpt.
Sculpting the Morph
- I switched to Sculpt mode.
- Make sure X symmetry is on if needed and sculpt the shape the shape you want.
More on Shape Keys
- If I want to create another morph, I zero out or hide the eye on the key I was working on.
- Always select Basis before going on to creating a new key with the plus sign. Follow the steps listed in the previous section to work with the new Keys.
- If you wish to do a mixture of the morphs you have made, you can change the values till you have the shaping you like and then from the down arrow to the right of the Shape Keys panel, choose New Shape from Mix. Rename this mix key appropriately to describe your morph.
- There is also a way to create partial morphs from any mixes or morphs you have created where you want to, say, separate out the mouth and nose as their own Shape Keys. I can describe this technique if anyone is interested.
Export your OBJ for use in Studio
- Once you want to export the morph(s), zero out, or hide all Shape Keys except the one you want to export as an OBJ.
- I have gotten into the habit of exporting with "selected only" checkmarked.
Importing with MLP, Testing the Morph and Saving your Asset
- In Studio, remember to have your Genesis 3 exactly as you exported (morphs zeroed/base resolution) and bring in your OBJ morph through MLP (Morph Loader Pro).
- Make sure the same scale you exported at is the same when you import.
- If you need to, set up the path where the morph should go and accept.
- Test your morph by spinning up the dial.
- You can bring in multiple morphs.
- Set up the parameters.
- Save as a morph asset.
Its time for new Cat and Dog models!I don't care who releases it or gets a morph done of it but I want a fat arsed Wombat!

and an emu

Knowing you Stezza that makes me wonder ............. Hmmmm............ Hmmmm........ Now what in the world is Stezza going to do with a fat arse wombat and an emu??
I'm still giggling about your Kiwi Kiwi !!
 Its time for new Cat and Dog models!
I don't care who releases it or gets a morph done of it but I want a fat arsed Wombat!
and an emu
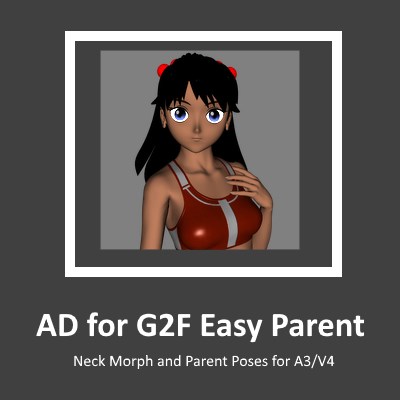
FREEBIES: Anime Doll for G2FAD for G2F - Easy Parent
This includes a neck morph to make it easier to parent the head to older figures, and a couples of Poses to auto-parent it to A3 and V4.
 Its time for new Cat and Dog models!
It's not just whispers. Alessandro is indeed working on some "less exotic" animals, but I don't think that they are "for DAZ". Alessandro's animal work is indisputably some of the best available for this market (there are some fanpersons at HW3D who may feel otherwise). I dare say that his work will outshine the competition. (FULL DISCLOSURE: Alessandro is one of my best friends on the planet.) If DAZ has contracted other artists to make animals, or is making them in-house, I am not aware of it.
I don't think that anyone considered the BC2 the epitome of Big Cat meshes. At the time it was released it was all that was available that was new (Alessandro had older Big Cats models, but I guess they were just considered "too old"). I don't know who was responsible for the mesh, nor do I really care. The "flat" paws were explained at the time the mesh was released, and I believe that a morph to make "non-flat" paws was made available. As stated in the forums, the reasoning at the time was to keep the rounded pads from poking through whatever the BC2 was standing on (and to minimize the "floating" that would occur with rounded pads if the user just CTRL-D to the floor). It was probably the wrong decision to make at the time.
Kendall
Until AM does come out with more critters (I now have almost all of them), I'd definitely be interested in the paw morph for BC2. Any idea where I'd find that?
Select the Paws in the shaping pane, then you should see "Paws Flat". There are also morphs for "Claws Out", :Paws Big", and "Paws Splay".
Kendall
Its time for new Cat and Dog models!It's not just whispers. Alessandro is indeed working on some "less exotic" animals, but I don't think that they are "for DAZ". Alessandro's animal work is indisputably some of the best available for this market (there are some fanpersons at HW3D who may feel otherwise). I dare say that his work will outshine the competition. (FULL DISCLOSURE: Alessandro is one of my best friends on the planet.) If DAZ has contracted other artists to make animals, or is making them in-house, I am not aware of it.
I don't think that anyone considered the BC2 the epitome of Big Cat meshes. At the time it was released it was all that was available that was new (Alessandro had older Big Cats models, but I guess they were just considered "too old"). I don't know who was responsible for the mesh, nor do I really care. The "flat" paws were explained at the time the mesh was released, and I believe that a morph to make "non-flat" paws was made available. As stated in the forums, the reasoning at the time was to keep the rounded pads from poking through whatever the BC2 was standing on (and to minimize the "floating" that would occur with rounded pads if the user just CTRL-D to the floor). It was probably the wrong decision to make at the time.
Kendall
Until AM does come out with more critters (I now have almost all of them), I'd definitely be interested in the paw morph for BC2. Any idea where I'd find that?
Its time for new Cat and Dog models!Have to say the HW cat's body, head shape and size are better. The paws are hugely better. The DAZ Big Cat 2 looks like a cartoon kitty compared to the HW's new release. Now according to whispers I think there is someone working on new animals for DAZ so it will be interesting to see who wins this race! lmao
It's not just whispers. Alessandro is indeed working on some "less exotic" animals, but I don't think that they are "for DAZ". Alessandro's animal work is indisputably some of the best available for this market (there are some fanpersons at HW3D who may feel otherwise). I dare say that his work will outshine the competition. (FULL DISCLOSURE: Alessandro is one of my best friends on the planet.) If DAZ has contracted other artists to make animals, or is making them in-house, I am not aware of it.
I don't think that anyone considered the BC2 the epitome of Big Cat meshes. At the time it was released it was all that was available that was new (Alessandro had older Big Cats models, but I guess they were just considered "too old"). I don't know who was responsible for the mesh, nor do I really care. The "flat" paws were explained at the time the mesh was released, and I believe that a morph to make "non-flat" paws was made available. As stated in the forums, the reasoning at the time was to keep the rounded pads from poking through whatever the BC2 was standing on (and to minimize the "floating" that would occur with rounded pads if the user just CTRL-D to the floor). It was probably the wrong decision to make at the time.
Kendall
What features would you like to see appear in dazstudio 5?would like utility script export / transfer raw art creatures like Minotaur6 to carrara, complete with geografts
 Exporting head morphs - eye problem
As I recall people geenrally handled the eyes by using the transforms to put them in the correct position, and linking the transforms to the morph.
Fixing V4 clothing fits on Genesis 3 femaleYou could take the clothing into Hexagon via bridge and make a morph for your figure. You can also transfer bones but you should read up on clothing fits and mods by people like Sicklyield and that usually works better than autofit. Sometimess autofit just works fine somethings it just doesn't.
Third Party Plug-In suggestions/requestsWith the amazing success of VWD's cloth sim/ Philemo's bridge plus Philemo's' no poke through' plug in a whole new world
is being opened up for Carrara users,
So I wondered if we might suggest/ request other plug- ins that will enhance Carrara ?
The idea would be that they were made by talented third party people like Philemo, Fenric, Eric, Sparrowhawke, Howie Farkes etc.
That way we wouldn't have to depend on Daz - who must be busily working on other improvements before they release Carrara 9.
Feel free to add requests here.
I'd like to request:
1) A morph injection tool within Carrara ( similar to Poser's.)
How it works: Load up two figures in Carrara - for example V4 and a V4 item of clothing.
Make sure V4 has the morphs you want transferred already injected in her,
In a drop down menu you would have a 'Transfer morphs" section.
You select from V4 figure to the V4 clothing. All her morphs (or selected ones) are transferred to the clothing.
transfer morphs : https://www.youtube.com/watch?v=T1UAkKCvHjY
2) Morph Brush Tool.
Also similar to poser. This would be similar to Philemo's no poke through plugin but manually controlled.
How it works: Fit an item of clothing to eg V4.
Select the item of clothing.
In a drop down window you select "Make New FBM".
Set the target as V4.
You will get a brush that will either push or pull vertices in relation to V4 until you have the required fit.
The brush can have soft edges,and can pull or push the verticies at 90 degrees to V4 mesh, or in the direction of the stroke.
You can select the size of the fitting margin (ie how close the verticies will go to the target mesh)
links: poser morph brush https://www.youtube.com/watch?v=3v6w45TzpS4
3) Keyboard Shortcuts to go up or down the Content Folder directory.
That would save many mouse clicks.
Note: Fenric said this is not possible.
4) Texture Loader in Shader Room
How it works: In the shader room, go to a shader that has a texture selected as its parameter.
Double click on that texture and the texture loads up in the program of your choice - eg Photoshop.
many many thanks to anyone who attempts these!
+1 for morph inj/ morph channels inj
mebbe will open the door for native carrara human figures content creators

I agree with the +1, so please +1 from me too!
However, we can already do all of this stuff with our Native Carrara figures.
Faba, (fabaone at ShareCG) made a really cool figure - modeled in Hexagon, rigged in Carrara. I don't think she ever made him available to the public though :(
He is one cool looking fellow! If you find her walk animation examples, I think on Vimeo, where he's walking up and down stairs and such... that's the Carrara dude I'm talking about. I'll see if I can find links when I get more time ;)
3D Objects and FormatOK got it. So if for example I want to learn Blender to do modeling (buildings, structures, basically the enviroment my Daz3d charcters will be placed in), and then import that into Daz3d for layout and render, what format should I export my 3d object to in order to not have to re-txture and re-surface them in Daz3d?
FBX or obj or DAE. And even if you import and all the textures are imported just how you like I'm thinking you'll still want to fine tune settings in Surfaces, especially if you want PBR textures and maps to render in iRay.
The way most people use DAZ Studio is to create a nice mesh and textures in Blender, or Hexagon, or Carrara or what have you and export that mesh & textures to DAZ Studio and then transfer rigging and such things from other similar models. Of course if you model has no close analogue in DAZ Studio format then you must manually rig & such things.
Blender has a very capable renderer and hair creation tools itself if you want to avoid DAZ Studio altogether unless you are planning on creating models for the DAZ Store.
Third Party Plug-In suggestions/requestsWith the amazing success of VWD's cloth sim/ Philemo's bridge plus Philemo's' no poke through' plug in a whole new world
is being opened up for Carrara users,
So I wondered if we might suggest/ request other plug- ins that will enhance Carrara ?
The idea would be that they were made by talented third party people like Philemo, Fenric, Eric, Sparrowhawke, Howie Farkes etc.
That way we wouldn't have to depend on Daz - who must be busily working on other improvements before they release Carrara 9.
Feel free to add requests here.
I'd like to request:
1) A morph injection tool within Carrara ( similar to Poser's.)
How it works: Load up two figures in Carrara - for example V4 and a V4 item of clothing.
Make sure V4 has the morphs you want transferred already injected in her,
In a drop down menu you would have a 'Transfer morphs" section.
You select from V4 figure to the V4 clothing. All her morphs (or selected ones) are transferred to the clothing.
transfer morphs : https://www.youtube.com/watch?v=T1UAkKCvHjY
2) Morph Brush Tool.
Also similar to poser. This would be similar to Philemo's no poke through plugin but manually controlled.
How it works: Fit an item of clothing to eg V4.
Select the item of clothing.
In a drop down window you select "Make New FBM".
Set the target as V4.
You will get a brush that will either push or pull vertices in relation to V4 until you have the required fit.
The brush can have soft edges,and can pull or push the verticies at 90 degrees to V4 mesh, or in the direction of the stroke.
You can select the size of the fitting margin (ie how close the verticies will go to the target mesh)
links: poser morph brush https://www.youtube.com/watch?v=3v6w45TzpS4
3) Keyboard Shortcuts to go up or down the Content Folder directory.
That would save many mouse clicks.
Note: Fenric said this is not possible.
4) Texture Loader in Shader Room
How it works: In the shader room, go to a shader that has a texture selected as its parameter.
Double click on that texture and the texture loads up in the program of your choice - eg Photoshop.
many many thanks to anyone who attempts these!
+1 for morph inj/ morph channels inj
mebbe will open the door for native carrara human figures content creators
Exporting head morphs - eye problemI have created various head morphs for V4.2 that I export and then apply with morph loader. When I export, I hide all the body parts except the neck, head, eyes, and upper and lower jaw and tongue. For the most part, when I load these to a new figure, things work as expected (except sometimes when the neck "explodes", very painful...). However, the eye "joints" seem to get fouled up in this process because if I have them follow the camera (with point at) and turn the head, they typically start to leave the eye sockets. I hope that's clear. Any thoughts on how to avoid or fix this problem? Thank you.
Animated Shapes Separate MorphsI'm assuming you exported the morphed figure to use for re-importing the morph. When you did so, did you remember to turn the figure's resolution to base?
Yep! I knew I forgot something! Also, after a few scale reworkings, I was able to get it to exactly as I weanted it! Thanks guys! :D
How do I transfer my DAZ library?I am in need to move my entire library off my hard drive onto an external....and then instruct Studio to go to that drive for content. And then I need to figure out how to instruct DIM to go to that external and download new stuff to it and do updates. I'm not exactly computer savvy, so any help on this is greatly appreciated :)
JeanZ for Genesis 3 [Commercial]I haven't got the male version of it yet but the female version of Genesis 3 Female for Genesis 2 Female(s) works really great on your JeanZ G3 on G2F glad you released this got the wear them all products too but the genesis jeanz didn't always translate well on g3, this pic has Kimo7 and Gia 6 wearing your new jeanz
http://www.daz3d.com/gallery/#images/191471
Ha, the Daisy Dukes are so popular :D It is cool that they work in the converter to G2F.
Quite a bit I'm afraid. Lots of smaller ones from various packs but this is the primary ones
Gianni 7
Michael 7
Bodybuilder
Fitness
Oh, figured it would be simple, J/K. So Gianni, Michael 7 and Bodybuilder have custom morphs so they shouldn't be a problem. I just checked them and they are fine. I don't have the fitness one in my list. Does the belt reappear when you turn off smoothing? Sometimes a lot of smoothing will cause things to disapear like that.
I if you want I am willing to try and whip up a custom JeanZ morph for you. Zero the pose on the male. Zero Gianni, Michael 7 and Bodybuilder. Set the Mesh resolution on the JeanZ to base and export it out of DS as an obj at DAZ scale of 100%. I will message you with where to send it. Can't guarantee that it will be 100% accurate since I will be doing it without the reference morphs.
Cheers!
I am just about to pick this up now I see there will be a 4.8 fix sometime - I hope the male fit issues will get fixed in the same updated, as I'm only interested in it for the Guys ;-)
It turns out it was the LowRise morph that was causing the problem. This is a tricky morph to begin with and then throw all those other morphs in it really gets rough. I have already fixed the LowRise morph and tweaked those other character morphs. I also added 4 new BeltExpand morphs to help with any other issues. Just waiting to hear back from Serene Night on how they work. They will be included in an update, but if someone needs them now they can message me and I will send them to them.
Cheers!
GoZ with Genesis 3 problem (Solved)Grrr... Been wasting hours closing Studio & ZBrush, rebooting, reloading scenes. I'm just trying to do a simple morph, barely moving verticies in ZBrush but I keep getting "The topology of the object has changed..."
I set Genesis 3 Mesh Resolution to base, and SubD levels to zero. I don't do any SubD in ZBrush, just moving some verticies a little and trying to send it back to Studio via the bridge.
Anatomical elements Wet MapsThere is a work around for this. Basically, the problem comes because these products create a geometry shell around the figure, but only have setting for the base figure geometry. They normally don't include maps and setting for GeoGrafted items.. You'll have the same problem if you use tails, hornes, or other GeoGrafted items. The fix is to change the surfaces of the Geometry Shell, and copy the setting from Torso to G3MGenitalia_Genitalia. (The surface in the shell is named 'ObjectName_SurfaceName', by the way, hence the double 'Genitalia'.) Here's a quick walk thorugh using Rolling Water from the Wet Body for Iray G3M.
- Have your model with all GeoGrafted add-ons first. For this example I've got G3M Male Genitalia since that was the OP asked about.
- Apply the GeoShell product.
- In the Scene tab select the Geoshell and expand it. Look for the Torso and the GeoGrafted item, in this example, G3MGenitalia_Genitalia
- Select G3MGenitalia_Genitalia and apply the !Iray Uber Base shader, since it defaults to a 3Dlight shader. If it doesn't take, make sure you have the GeoShell selected, not a parent item such as Genesis3Male.
- Select the Torso (or closest area) and Copy The Selected Surface(s) by right clicking.
- Select the G3MGenitalia_Genitalia and Paste To Selected Surfaces(s).
This is a quick fix. It copies the settings from the torso on to the genitals. Unfortunately, it also applies the maps from the torso which do not match the geometry of the gens. If you want droplettes running down it, you'll have to create your own maps, or find someone who has (I don't know of any). If your going to create one, I'd suggest hopping over to Renderotica and getting the free G3M Genital Texture Helper. It's a prob with two UV maps that let you do a map transfer from a basic torso map to a gentialia UV. Tutoria's included. Not sure if I'm a allowed to link to ouside sites, but if you search "G3M Genital Texture Helper", you'll find it.
EDIT/ADDITION: Some of the shells may have Visibility Parameters that need to be turned on. If you still have large white/blank areas after following the above steps, try selecting the GeoShell in the Scene tab and looking for Shell-->Visibility under the Parameters tab. There may be several parameters that need to be switched On, normally one for each node of the GeoGraphed item.
 My Project: Brash Lonergan adventures - Warning AI Discussion Possible
And despite the fact that I know it is a waste of time to create my own figures instead of making a genesis body morph
I don't see making your own figure as a waste of time,. it's a great learning process,. (even if it doesn't turns out as expected on the first attempt),. and it's often overlooked that we can now build a carrara figure which is technically as good as Genesis or Gen2. or even Gen3,. depending on the amount of face bones you want to add,. you could even go further and add more bones than genesis 3.
Looks good so far :)
I started with Blender and Make Human, but lacked enough ability to make it work... that's when I discovered DAZ and Carrara. Am thinking it might be good to go back to Blender and create some heads for my Neanderthals. Then perhaps I can stick them onto Genesis rigged bodies? Or look at Make Human for bodies? I thought Hexagon would help with this, but the constant crashing made it a no-go for me in spite of a fix that was available.
Heads are my biggest morph problem. In spite of the variety of creature heads, I cannot get a good archaic human look. Morphing existing Genesis heads causes problems sometimes with eyes opening/closing, or applying hair. Sigh... once October comes I can take a fresh look perhaps at a new approach hopefully. Not for animation, just for illustration. Z-Brush enters my mind, but I do not think I am ready for that. If I was, it would have to be soon whilst I could still buy with a student licence.
Love the Brash Lonergran comic strip... there's a knack to giving the right about of dialogue in each scene to carry the action. Well done Diomede!
 Silene
Daz 3D is part of

Connect
DAZ Productions, Inc.
7533 S Center View Ct #4664
West Jordan, UT 84084Licensing Agreement | Terms of Service | Privacy Policy | EULA
© 2026 Daz Productions Inc. All Rights Reserved.