-
Can some one tell the point of having Daz Studio Library and My Library
The My Daz 3d Library in the Public documents is for Install Manager, though since some add-ons have to go to the same directory as the base (e.g. Victoria 4 and other fourth generation morph expansions) people tend to put all of their third-party content in there. The \Daz 3D\Studio\My Library is the default for user-saved files (since they are the user's documents) but was the only content directory in DS4 before Install Manager so older tutorials in particular may use it for content. There's also the My Daz Connect Data in the same Daz 3D\Studio folder, used for Connect installs (those made within DS). The separate folders are to keep things separated, but you do not have to work that way if you don't want to (my set-up has a single content directory for both DIM and Connect isntalls, plus a second content diectory in my Documents folder for new files).
How to save various files?I hate contradicting richard, but he's wrong on this one regarding the file size.
the size difference between the different files types can vary significantly.
A compressed pose file, generally only takes up 4kb, uncompressed it's around 36kb +/-.
A character preset around 1mb(uncompressed), depending on complexity(shader information, morph data etc) and character base.
a clothing preset(wearable preset for saving purposes) can be a few KB to several MB depending on the clothing in question.
A scene file,or even scene subset, even with just a single character, clothed posed, with hair, can run a crazy gammut depending on base mesh used, the number of character morphs installed, morph dials installed, lights, the particular clothing and hair, the render settings, etc etc etc. can easily get into the multi-Megabyte range.
Compressed you might be looking at 100KB, uncompressed 1.4MB, or it may be way larger or way smaller.
So depending on whether you save compressed or uncompressed, what your particular setup is, saving everything as a scene may not be the best option, if disk space is a concern.
a quickie solution to make the drive less full, besides getting a new one, would be to run the Batch convert(it's a tab unto itself) to compress all the files.
the only draw back to this is if you have a tendency to manually edit files, which i do, you'll either have to run the plugin to decompress all the files or just winrar or 7zip on individual files as the need arises.
Assuming there's no embedded content (imports/spawned morphs that have not been saved as assets, weight maps for dForms, dForce or the like, etc.) I would have expected a relatively modest difference - not none, a scene is storing more settings and a longer list of assets than a preset, but not a huge difference in absolute terms. That is down to expectation rather than measurement, but I do wonder if your larger scene fileshad embedded assets in them.
Animating Genesis 8 figure but with Genesis 3 aniblocks?Here are comparison pics of the G8 model and her clothes and my first attempt to match her appearance using G3 textures. I might try to find a base map with lighter skin tone, better eye textures and natural lip color and no gloss. First pic is the G8 model and second pic is my first draft recreation of it on a G3. I cant post it on here since it would be NSFW but the body proportions did carry over too. Only thing i need to figure out is how to save the morph settings on the clothing items. I saved the G3 file, and reloaded it and the clothes went back to default form.

 Character Creation (Genesis 8) Export/Import settings
You are creating a new morph? If you want to save it for just that version of the character save as a Scene, Sceen Subset, or Character Perset (and use the preset to load a new figure, not modify an already loaded figure). If you want the morph to be available on all isntances of the figure, File>Save As>Support Assets>Morph Asset (make sure the content diectory being saved to is a real one, not the Daz Connect one; the names are used to determin the folder names within /Data/Daz 3D/Genesis 8/Female/Morphs in the content directory used that contain the asset files).
Celebrity Look-a-Likes for 3D figures Part 2By the way can someone point me to a product that might have morphs for the nose of G8 that might include a kinda squarish point?
I'm trying to modify a genface made morph of Eva Green into something more accurate but the nose is turning out to be quite hellish to achieve. Every morph I own produces a round tip or a pointy one...
I know it could probably be solved by manipulating the mesh in z-brush but I suck at modeling since I haven't done anthing like that in the last 30 years or so and therefero have no familiarity with any of those tools.
...End of line: Updated - Dead as a Doornailso sorry this crashiness landed on you, kk.
i know that budget is a real issue for you. but i do strongly recommend you check these local guys out. and please do look at their services page and rates (and yelp reviews) before you write them off as potential rescuers. for instance: they include data transfer from old HDs to installed replacement drives as part of their base drive replacement service, and if they don't have to do a ton of deep diving to recover the old drive's data, they charge nothing extra for that. their base rates are super low for the area, but their attitude toward customer service is amazing, and their kung fu is quite advanced. :)
they're good people. excellent to work with if you want someone to build a custom rig for you, too. they saved me a lot of money and helped me avoid a couple of not-the-savviest decisions when i had my box built. and they look for ways to help you afford what you need rather than upselling you, or padding bills.
good luck!
j
...thank you, but there is probably a good chance as I understand that the backup I did on Sunday just after I received the notice of the impending failure nay have captured what I need. Not going to do anything until the new drive arrives and I can restore the backup and see if the scene and character files were indeed saved. If so then no point in paying for recovery.
...End of line: Updated - Dead as a Doornail>> I have a new drive (and one for backup) on the way (courtesy of a generous community member here)<<
Heh, that was extremely generous considering you have a video card that most of us can only dream of having. We do have some very kind and sympathetic members here.
On a more related note, I think remaking your characters will probably improve them. There's likely no one in this community who has remade their characters more times than I have - I've recreated a single character at least 12 times that I can remember and have done it on V4, Genesis, Genesis 2, Genesis 3, and as of yesterday, Genesis 8 - and I do feel that she gets better with each new rebuild. I'm sure there is a lot that you lost that cannot easily be replaced, but you might get some satisfaction from remaking your original characters with the added experience and new tools/figures that are now available.
One advantage I've discovered of using the Genesis line is that because we have to buy the same essential morph sets over and over (which is not a good thing, but), your character settings can be reproduced very well from one generation to the next. Even Zev0's morphs are the same between Genesis versions, and I was able to almost perfectly reproduce my Genesis 3 character with Genesis 8 once I had everything I needed. I know you don't want to have to upgrade to the latest figure, but at the very least, writing down all your morph settings will come in handy down the line.
..well the card was bought used at a good price and terms, otherwise I wouldn't have it.
Well between G2 and G3 they aren't because of the change in weight map format.
How to clear scene animation and keep figures in place?I think I can provide an easy solution for you.
1. go to the keyframe in the timeline where you have posed your figures like you want to
2. select all the Figures with Ctrl+click in the Viewport or the Scene pane
3. go to the main menu and choose Edit>Figure>Memorize>Memorize Figure (Pose)
4. go to the main menu and choose Edit>Figure>Clear Animation>Clear Figure (Pose)
optional steps for Items (those can be props and also can be Cameras, Lights, Groups, Nulls... I hope you get what Items are)
5. select all the Items in the scene
6. go to the main menu and choose Edit>Object>Memorize>Memorize Selected Items
7. go to the main menu and choose Edit>Object>Clear Animation>Clear Selected Items
After that all keyframes are deleted from the timeline but your figures and items stay (in the pose) like you want them. That is because you Memorized them with this all currently used property values gest set to default values - be careful with that. You can now also go to a frame and Restore a Figure to the memorized state. If you want the Property values to reset to be zero by default again first use Zero Figure then Memorize Figure.
I wrote Memorize Figure (Pose) in parenticies because also morph shapes can be animated you may better use just Memorize Figure and Clear Figure to take care of the shape not changing. Also you have to Memorize Items / Objects (DazStudio isn't consitent with the naming) if you want to stop those from floating around, btw also even lightning and Surface properties will get animated. You can use Clear Selected Items on lights to stop them from animating their values. For Surface settings you can only save a Material Preset and apply it to the Frame Zero and maybe you need to apply it to other key frames.
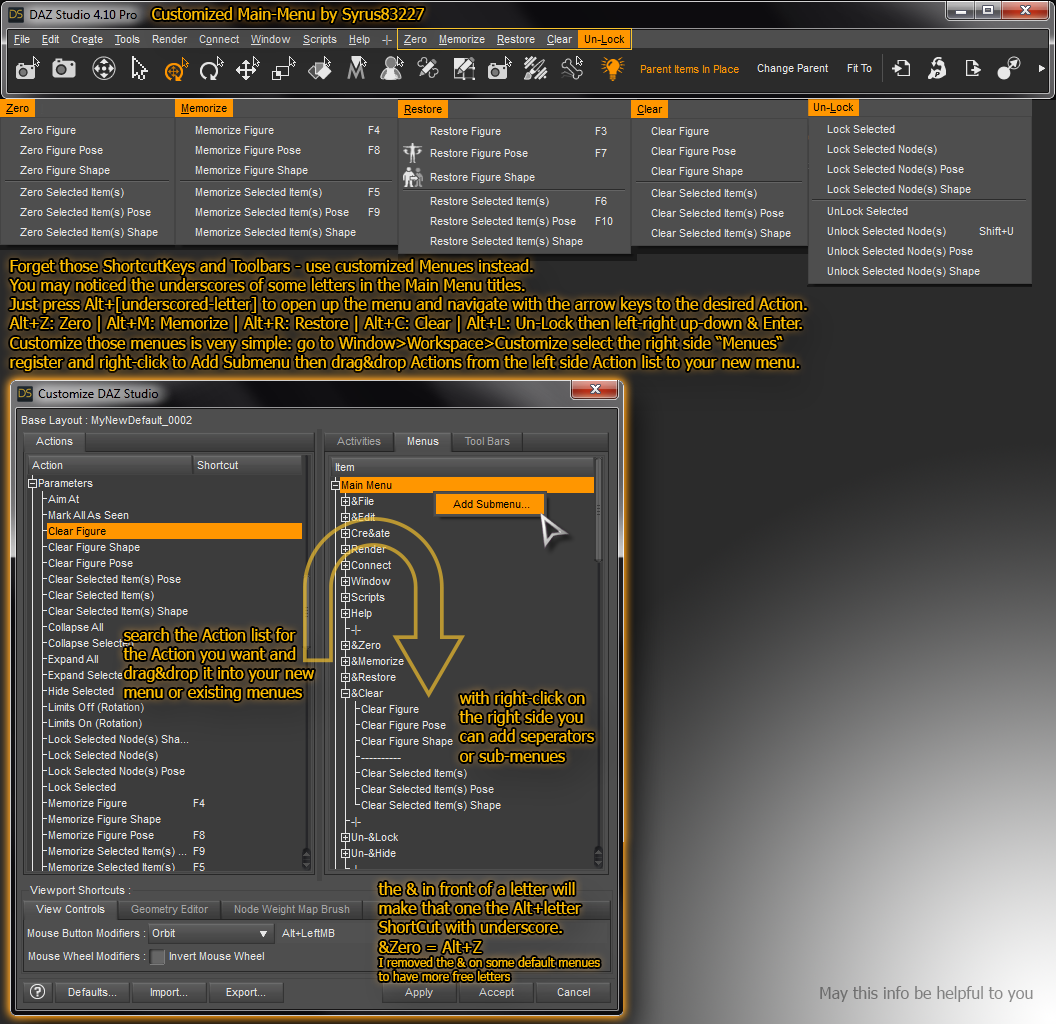
Its faster to acces those Memorize/Clear... commands from the Parameters pane Options Menu (the little button with those lines and a triangle). Its even faster to assign a keyboard shortcut to those commands like I did on the F2 to F8 keys with the Window>Customize dialogue.
See my thread about changing keyboard shortcuts here:
How to Customize Daz Studio - to speed up Workflow!? [WIP]
Especialy the custom Menus can help if you don't like to use or can't remember additional keyboard shortcuts.
Thank you all for the responses. I did find the above to work for me. Much appreciate all.
FIX THE PELVIC DISTORTIONS - SOLVED -Sorry for the confusion where I wrote "your JCM" I always meant your corrective morph pJCMThighSide_85_L for example.
If you read FBM I always refer to your Toned Edna FBM.
But I see this complicated subject demands for another video tutorial. Let me see if I find the time on sunday, well by looking at the clock I see we already have early sunday, I meant after I have slept.
FIX THE PELVIC DISTORTIONS - SOLVED -And here, some pics to explain better than words what I want to achieve.
1 - I made the Toned Edna full body morph character (pic1) and JCM corrective named "pJCMThighSide_85_L" (same name of the base JCM obviously) because there, I want to fix the bug of deformation from Daz (I do not want my products look like Frankenstein). See the arrow. They work perfectly.
2 - When I dial zero the Toned Edna FBM to back G3F base like pic 2 you can see the arrow point at the JCM corrective not completely kicked out.
3 - Goal is back to zero like pic 3, where the arrow point to standard leg of the base character G3F.
Well, this I want to get.
 FIX THE PELVIC DISTORTIONS - SOLVED -
Thank you, what you write about the function of JCMs is fascinating, and sure I will explore with calm, but, incredible to believe I know, my brain run faster more than me, why? It's a long story. So I need to achieve faster than my brain to the solution. Then, I'm trying your guide and is ok, but there's some point that seems little clear, points are the follow:
"9. Next select your JCM in the Parameters pane, right-click the JCM Property choose Show in Property Hierarchy, now it will show up there in the pane". In the first 8 points talk about the base figure, so, if starting from point 1 to point 9 the procedure is for the G3F base, how can I select my JCM? The JCM is the "pJCMThighSide_85_L" corrective that I modelled for the Toned Edna Full Body Morph. And, based on what I read in your guide in the point 9 you say to select the JCM. That JCM is the corrective for the FBM? I understand right? Or I need to load the JCM corrective in the Full Body Morph before to save the Morph Asset?
"6. in Parameters pane navigate to your JCM for the Left Leg, select it". Which one? Mine, it means the "pJCMThighSide_85_L" corrective for Toned Edna FBM? Cause if yes going back to the question above.
"7. click and hold the front of the JCM with the big M and drag it across to the Property Hierarchy, drop it into the Left Thigh Property ZRotate (side side) > SubComponents > 1st Stage (Add/Substract)", here we're talking about the JCM. Corrective or base? Up to point 8 JCM is base and in the point 9 is mine corrective?
Some lights in these points woud be appreciate.
Your guide is really interesting and I'm curious to see what happen. I want to read your post above also. i see interesting things. Thanks to share here!
Meanwhile going ahead with the guide!
FIX THE PELVIC DISTORTIONS - SOLVED -It dosn't matter if the instructions are written for G2F or G3F the ERC thing and the methods of working with the Parameters pane and the Hierarchy pane apply to all genesis figure generations and gender, well it is not even limited to use it only on genesis figures.
[Edit]: You can zero everything - if you don't use the ERC-Freeze there is no need to dial anything up to setup the ERCs with the drag&drop method I want to explain. However if you don't use ERC-Freeze it dosn't matter if anything is zeroed or not - my instruction step 1 is obsolete - sorry for the confusion.
Don't worry I see great potential in what you are doing and I think you are on the right way, it just needs a little more understanding how things work in DazStudio.
I'm interested in all this [ERC] Enhanced Remote Controller technic to understand it better Enhanced Remote Control (ERC) - Documentation Center - Daz 3D
The very first question that I asked here in the forum was about ERC-Freeze and ERC-Bake. See here ERC-Freeze / Property Hierarchy / merge property Sub-Components
Thanks again Richard for your answer. As I figured out how this works I came back to my thread and wrote down what I had discovered. Since this was I think till then nowhere else explained before it even got copied by RKane_1 to his thread to collect this knowledge see here: TUTORIAL - Creating a Genesis series Full Body Morph for DAZ Studio Pro 4.10 by RKane_1 Yeah I'm proud of that my writings got copied and I could give some contribution to the forum.
Years later I still didn't figure out all what is possible with those ERCs but I like to share my knowledge that I earned by experience with others here in the forum so that we can learn from eachother. Also by explaning things I get a better understanding of those things myself.
Toned Edna loaded = JCM corrective activated, Toned Edna zeroed = no JCM activated in the base.
This behaviour clearly shows that something is linked wrong in the Property Hirarchy pane. I actualy can tell that you have linked your JCM pJCMThighSide_85_L to 1st Stage (Add/Substract) in the Toned Edna FBM.
First you would need a character controller also called master controller (Poser speak), if you don't already have one right-click the Parameters pane choose Edit-Mode, right-click again and choose Create New Property, name it Ctrl_TonedEdna for example. Now right-click on Ctrl_TonedEdna and choose Show in Property Hierarchy. Next you can drag and drop your Toned Edna FBM morph from the Parameters pane into the Ctrl_TonedEdna > SubComponents > 1st Stage (Add/Substract).
You can add more morphs to this 1st Stage Add for example if you splitt the body and the head morph, both morph sliders FBM (FullBodyMorph) and FHM (FullHeadMorph) gets combined in there also you can add the Full Body Scale if you like to have a different body scale.
This is how other Daz original characters are setup they have a character controller slider in the Actor > People property group. Now if you turn up the slider Ctrl_TonedEdna all morphs like Toned Edna FBM will follow and get the same value, this is the way the Add works it will Add the value of the controller to the SubComponents.
The next thing to do is you link all JCMs you create as correctives for your character morph to the FBM by drag and drop them to Toned Edna FBM > 2nd Stage (Mulitply/Divide). With this the value of the FBM will multiply the value of the JCMs. Or to explain it simple with this the JCMs will only be activated if the FBM is set to a positive value. Also with no joint rotations the JCMs still have a value of zero thus multiply by zero equals zero so the JCMs don't change the value by dialing up the FBM. Finaly link the JCMs to the asocciated joint rotation properties pJCMThighSide_85_L goes to ZRotate (Side-Side) > SubComponent > 1st Stage (Add/Substract).
You see DazStudio just does simple math with the slider values to control the dependencies between them. BTW even we can show the slider value as percentage, internaly DazStudio calculates with floating point values so 100% is a value of 1, 50% is a value of 0.5 and so on.
- Add is by default (after Drag&Drop) a 1to1 relationship between two sliders - you can turn it around by setting the Scalar Value to -1 or give it another Scalar Value that setting can be found unter Attributes of a Property in SubComponent in the Property Hierarchy tree
- Substract is the opposite I can't tell you for what to use this, I never found a useful application
- Multiply will take the value of the controller slider and multiply it by the current value of the SubComponent slider
- Divide will, you may guess it already just divide the value of the controller slider with the value of the SubComponents I din't make much use of those setting eigther
Well in the video I was talking about DazStudio G2F BasicWear 02 BeautyBend I am setting up a controller property called CTRL_ERC_BBHelper_Shoulders-ON to controll the amount of the JCMs on the figures shoulders - you can see it in the video at 3:00. The downside of how I did this is the controllers have to be dialed up to have the JCMs activated. If I now zero the figure those are zeroed as well. What I would like to have is a controller that turns down the JCMs if needed. I thought Divide would get me there but as I tried it didn't work. I guess I will have to do more research on this.
I hope this post helps you and others to resolve the issues with setting up the ERCs and JCMs. Good luck with your work on the character and your career as an artist.
OT: New Nvidia Cards to come in RTX and GTX versions?! RTX Titan first whispers.I have to figure out, how to pose characters in Unity for static scenes.
Don't know how many people on this forum are aware of this but Morph 3D seems to be some kind of spin-off from DAZ3D in the unity store:
https://assetstore.unity.com/publishers/13832
The MCS female and male may allready be rigged for unity:
https://assetstore.unity.com/packages/3d/characters/humanoids/mcs-female-45807
https://assetstore.unity.com/packages/3d/characters/humanoids/mcs-male-45805
- - -
How to save various files?I hate contradicting richard, but he's wrong on this one regarding the file size.
the size difference between the different files types can vary significantly.
A compressed pose file, generally only takes up 4kb, uncompressed it's around 36kb +/-.
A character preset around 1mb(uncompressed), depending on complexity(shader information, morph data etc) and character base.
a clothing preset(wearable preset for saving purposes) can be a few KB to several MB depending on the clothing in question.
A scene file,or even scene subset, even with just a single character, clothed posed, with hair, can run a crazy gammut depending on base mesh used, the number of character morphs installed, morph dials installed, lights, the particular clothing and hair, the render settings, etc etc etc. can easily get into the multi-Megabyte range.
Compressed you might be looking at 100KB, uncompressed 1.4MB, or it may be way larger or way smaller.
So depending on whether you save compressed or uncompressed, what your particular setup is, saving everything as a scene may not be the best option, if disk space is a concern.
a quickie solution to make the drive less full, besides getting a new one, would be to run the Batch convert(it's a tab unto itself) to compress all the files.
the only draw back to this is if you have a tendency to manually edit files, which i do, you'll either have to run the plugin to decompress all the files or just winrar or 7zip on individual files as the need arises.
Dumping Poser for DAZI changed over about 2 years ago. The only thing I miss is the absence of a morph brush in DS. Before anyone says I could use deformers, the two are not the same. The Poser morph brush is/was a very simple tool to use to make slight corrections (fits and creases) to clothing and to apply pressure indents to skin surfaces. DS deformes might as well be magic to me.... have never got them to work the way I want.
Yeah -- that, too. You can get something close-ish with dformers and weight maps, but it's cumbersome.
Dumping Poser for DAZI changed over about 2 years ago. The only thing I miss is the absence of a morph brush in DS. Before anyone says I could use deformers, the two are not the same. The Poser morph brush is/was a very simple tool to use to make slight corrections (fits and creases) to clothing and to apply pressure indents to skin surfaces. DS deformes might as well be magic to me.... have never got them to work the way I want.
Dumping Poser for DAZThe only thing that occasionally annoys me is that you can't inject PMDs in DAZ. If you have a character or morph that was packaged for Poser with PMD files, you'll need to do a little fiddling to make them work.
FIX THE PELVIC DISTORTIONS - SOLVED -Exactly Richard! Infact this happens. Legs bend with corrective annd it work, legs zeroed corrective zeroed. Up to here everything works perfectly. While if I load a fresh G3F base and I bend legs at 85% I see a trace of the corrective like if not completely zeroed. Here I show you my workflow to load the FBM and corrective.
1 - Load fresh G3F base character
2- load my FBM via MLP
3- in MLP no settings modify and click OK. FBM loaded.
4 - Adjust rigging to shape
5 - fix teeth error
6 - ERC Freeze
7 - save morph asset
Character working perfectly- Step 2 - Legs bend distortion at 85% side side
1 - Bend the legs one per each, start with L leg, of the Edna FBM.
2- Load via MLP the "pJCMThighSide_85_L.OBJ" JCM corrective I made.
3- In MLP I use thtese settings :Name: pJCMThighSide_85_L.OBJ
Property Group: Morphs/Morph Loader
Create Control Property : Yes
Reverse Deformations : Yes
(Submenu) Preserve Existing Deltas : Yes
Overwrite Existing : Deltas Only
ACCEPT - Corrective works very well.Repeat procedure for Right Thigh using the same "pJCMThighSide_85_L.OBJ" changing L with R, then MLP option Morph Mirroring : X : Swap
JCM corrective works amazing.
What I want to solve? Simply back to zero the corrective when FBM back to zero.
What happen if not? When the fresh base character bend the legs at 85% I see part of the JMC corrective cause not zeroed.
UV Maps and sets[EDIT]: I should have mentioned before using File>Save As>Support Asset>Save Figure/Prop Asset switch to the Geometry Editor tool, right-click the viewport and choose Geometry Editing > Merge Fitted Figure(s) Geometry to have the eye lashes and the GeoGraft merged and included in the figure geometry.
By doing this the vertex count will change once more because the vertices of the faces that gets hidden by the GeoGraft (Auto-Hide Faces) remains in the figure, but gets deleted if you are using Merge Fitted Figure(s) Geometry. Sorry for that but I fear you can't use your current UV Layout OBJ you can try but I guess DazStudio will tell you Vertex count is different. You have to export the figure Geometry once more after merging with an OBJ and recreate the UV layout like before in your external editor. If you are using Blender I can tell you how to "transfer" UVs from one mesh to another with it. [/EDIT]
Yes. I know of two ways of loading UV sets into DazStudio. First you need to have saved an OBJ of the figure with the UV layout you want to use.
I made a screenshot of how to load an additonal UV set with Load UV Set. It is found in the Surfaces pane option menu. Choose to load the OBJ with the altered UV Layout. Next enter a name for the new UV set and finaly select all Surfaces and change the Default UV to your new UV set. The Surfaces are not automaticly updated to use the new UV set.

The figure already has a default UV set that you may want to replace. If so you can also use Update Geometry to replace the default UV set.
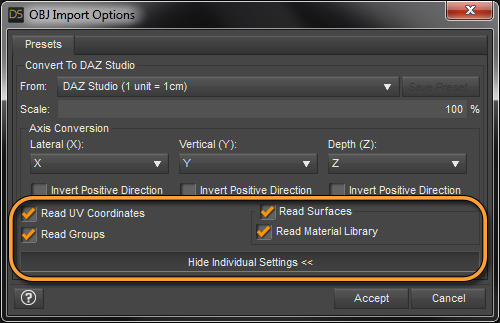
It is found in the main menu Edit > Figure > Geometry > Update Base Geometry. In the next dialogue and that is very important choose Update Full Geometry in Update Operation not Update Vertex Only that is used by default, also check the bottom OBJ Import Options.
Check if the UV has been updated by selecting the Surfaces and then in the Viewport there is the UV View option in the Perspective View drop-down list, its the last entry.
If you want to create a texture template of the current UV Layout I recommend to use mCasuals script mcjTemplate.
FIX THE PELVIC DISTORTIONS - SOLVED -There is an easier way to create the ERC link for the JCM instead of using ERC-Freeze. Did you watch my second video in the other thread? It showed how I drag and drop Properties from the Parameters pane into the Property Hierarchy pane.
Here are the instructions how I would accomplish the JCM relationship.
1. zero figure, memorize figure, select all memorize all including items
2. pose figure leg Left Thigh Property ZRotate (side side) = 85 joint rotation value
4. right-click the Parameters pane and set it to Edit-Mode
5. select the Left Thigh, right-click Property ZRotate (side side) choose Show in Property Hierarchy, now it will show up there in the pane
6. in Parameters pane navigate to your JCM for the Left Leg, select it
7. click and hold the front of the JCM with the big M and drag it across to the Property Hierarchy, drop it into the Left Thigh Property ZRotate (side side) > SubComponents > 1st Stage (Add/Substract)
8. Now the JCM is linked to the Left Thigh Z rotation Side-Side, Properties that you drag&drop into the Property Hierarchy 1st Stage (Add/Substract) automaticly gets a Scalar Value of 1 and are set to Add.
9. Next select your JCM in the Parameters pane, right-click the JCM Property choose Show in Property Hierarchy, now it will show up there in the pane
10. select your character morph in the Parameters pane and drag&drop it over to the Property Hierarchy into the JCM Property Controllers > 2nd Stage (Multiply/Divide), by default it is set to Multiply
Now the JCM should only turn up if you have your character morph dialed up, because the character morph value multiplies the JCM as a controller, also the joint rotation ZRotate have to be some value other than zero to Add the joint rotation value to the JCM. This is how I would do it there may be other ways. The thing is you have to take care about how the JCM morph gets saved. Maybe make the Left Thigh Property ZRotate (side side) the controller of your Left Thigh ZRotate JCM morph instead. Also make the JCM limits 0 to 100 / 0 to 1 if percentage is set off, so it dosn't get dialed to a negative value.
Daz 3D is part of

Connect
DAZ Productions, Inc.
7533 S Center View Ct #4664
West Jordan, UT 84084Licensing Agreement | Terms of Service | Privacy Policy | EULA
© 2026 Daz Productions Inc. All Rights Reserved.