-
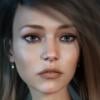
White dots in the rendering
DrunkMonkeyProductions said:
It might also be a makeup effect.
Check the face material settings in the surfaces tab.
I'm saying this as it's present on both cheeks, and appears to be symmetrical, though the right cheek is very subtle, possibly due to the lighting.
If you could, what character/material is that?
could verify on my end if i've got it what's going on.
Hi Drunk,
This is Victoria 8.1 with Genesis 8.1 Female Vellus Hair3D Art Freebie Challenge October-November 2021-"How to repair ..." -Main Thread Onlykatywhite said:
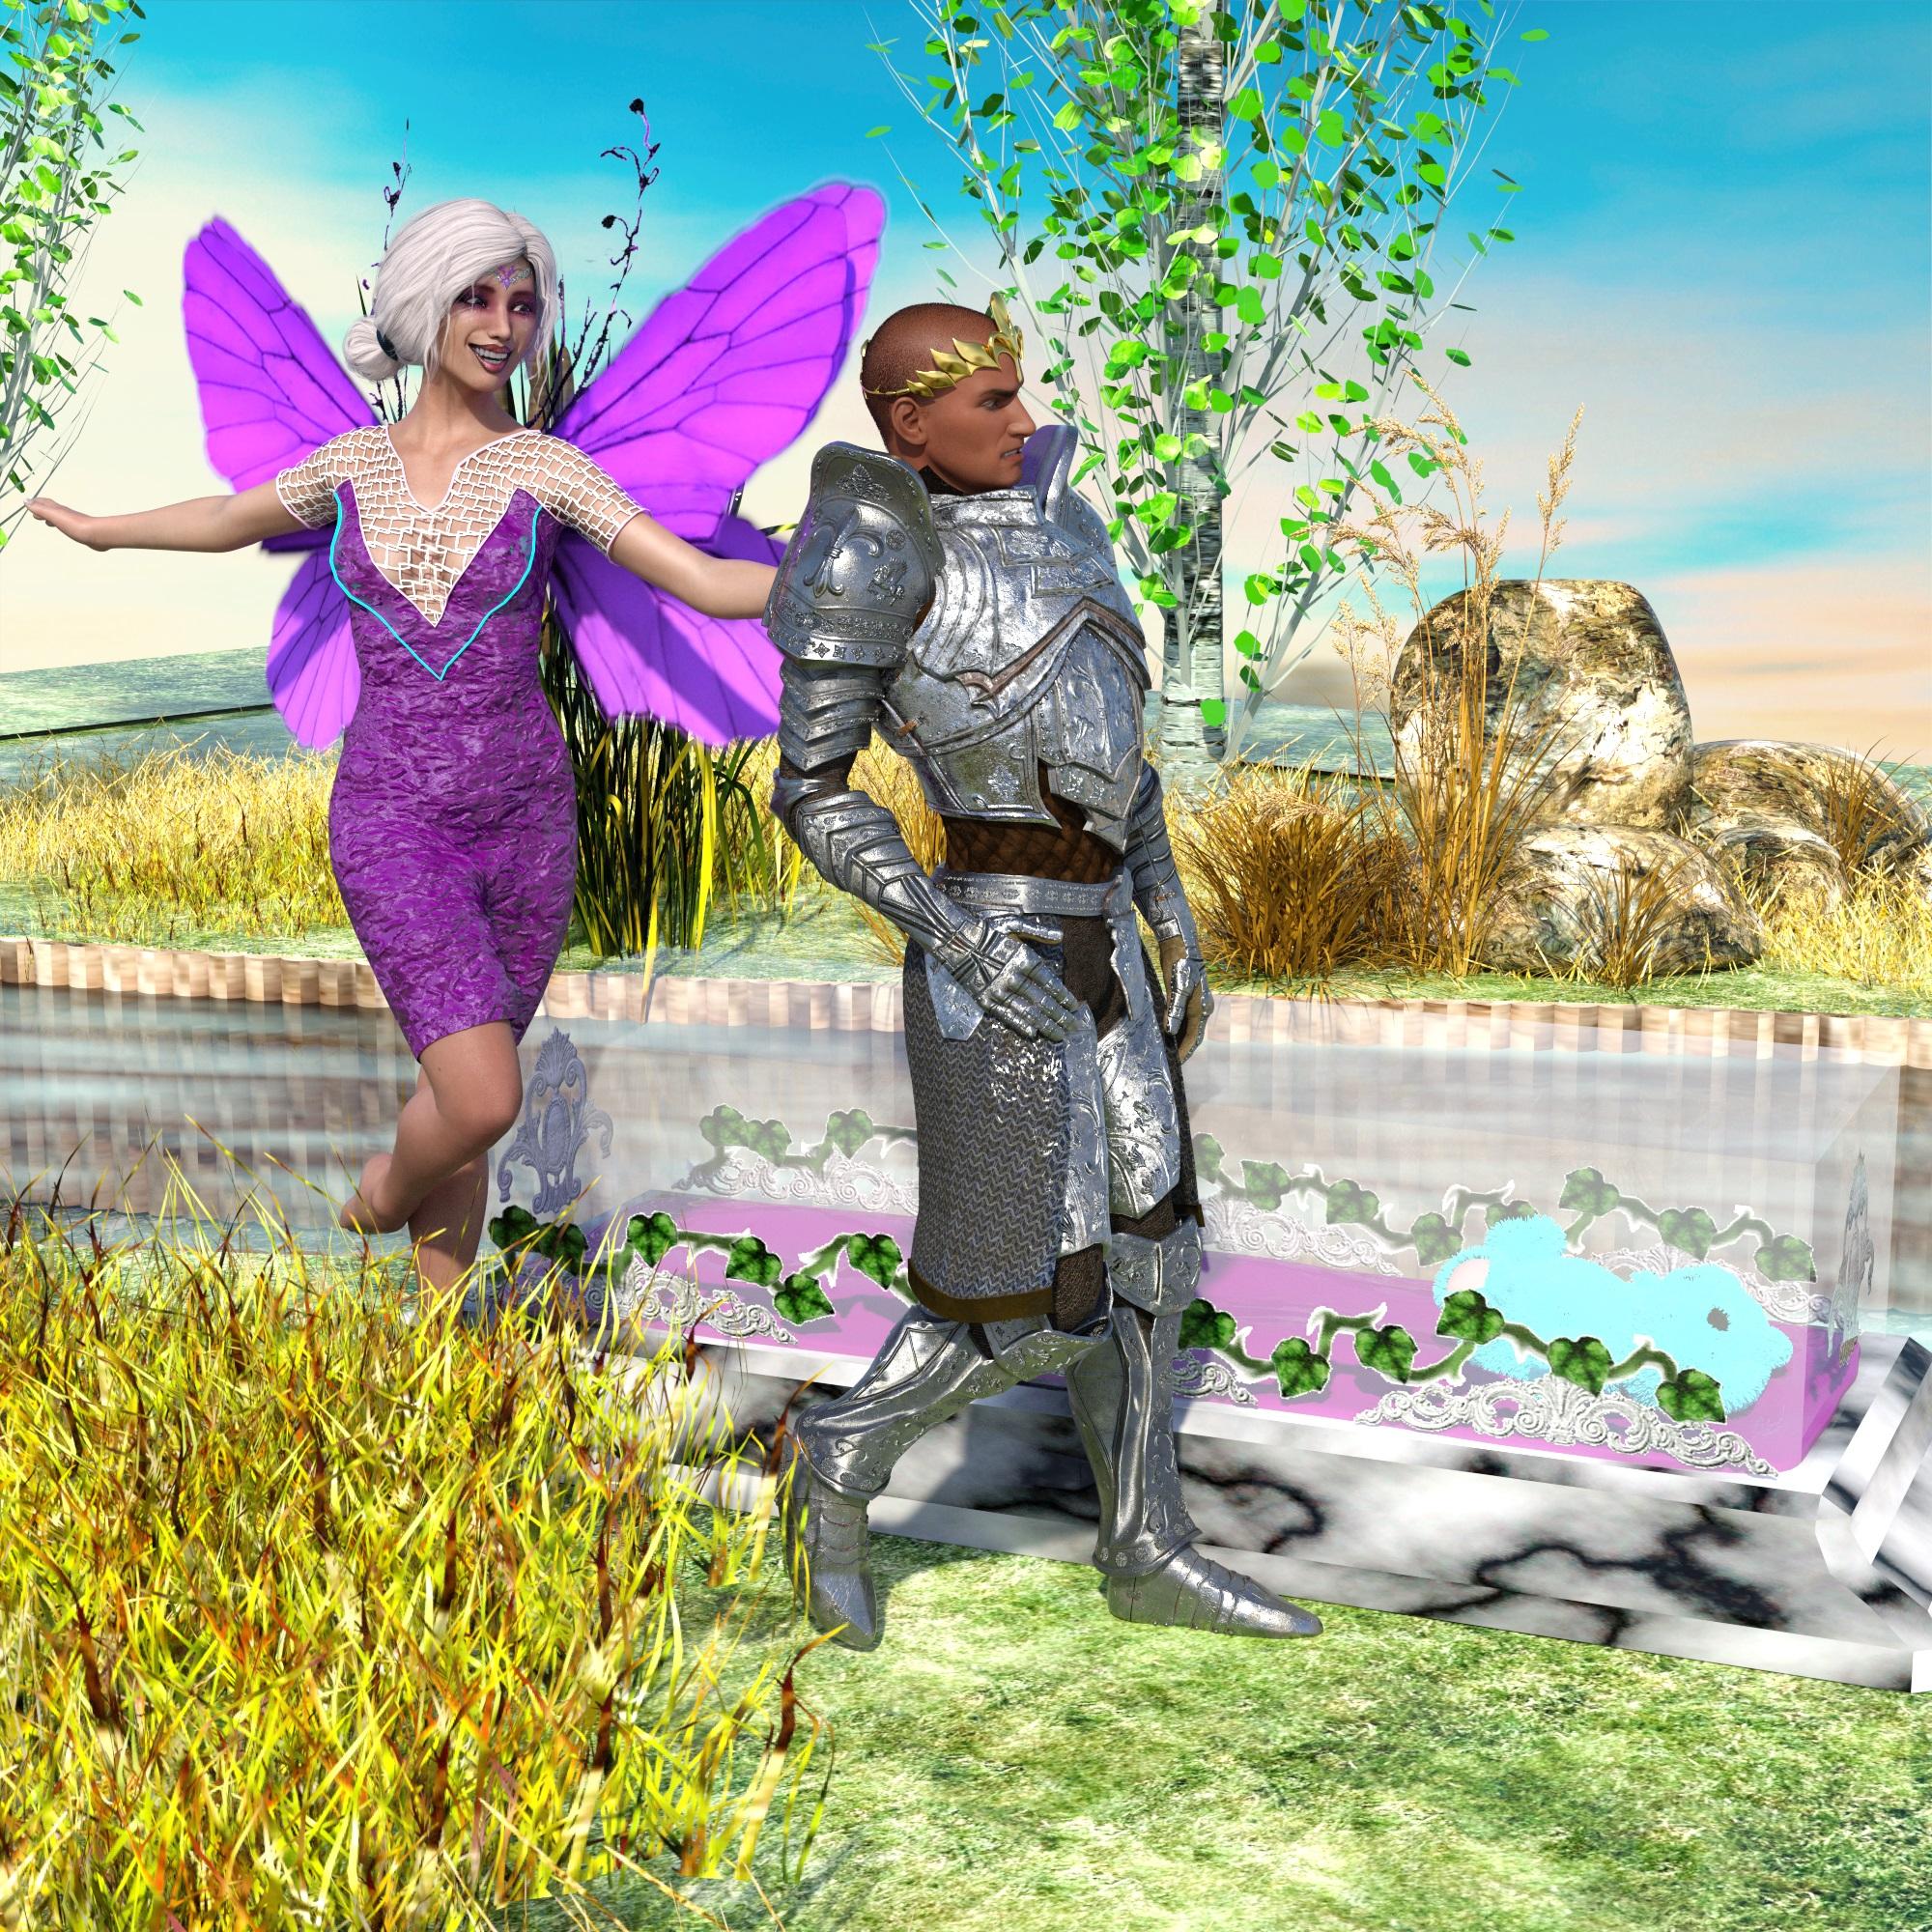
Title: How to repair a fairy tale
Caption: So the princess decided to rescue herself and is no longer present. As the fairy godmother, you still have a fairy tale to complete. Follow the steps below to repair this disaster:
- Replace the princess with a fake
- Act like everything is normal
Paid Items:
- Madelyn for Izabella 7 (https://www.daz3d.com/madelyn-for-izabella-7)
- Orlean's Armor for Genesis 8 Male(s) (https://www.daz3d.com/orleans-armor-for-genesis-8-males)
- Elegant Fantasy Poses for Victoria 7 (https://www.daz3d.com/elegant-fantasy-poses-for-victoria-7)
No-Count Items:
- Genesis 8 male
Free Items:
- Prop - Elven Crown (https://www.renderosity.com/freestuff/items/75636/prop---elven-crown)
- Stuffed Toys for Poser (https://www.renderosity.com/freestuff/items/76447/stuffed-toys-for-poser)
- Halloween Backs 2021 (day 7) (http://www.thefantasiesattic.net/halloween/2021/index.html)
- Antonia Fairy Wings (https://www.sharecg.com/v/56933/related/11/Poser/Antonia-Fairy-Wings)
- Trish Hair for Genesis 3 Female (https://www.renderosity.com/freestuff/items/77150)
- GeoWear: Tiara Jewels - G8F and G3F (https://www.renderosity.com/rr/mod/bcs/geowear-tiara-jewels---g8f-and-g3f-/143382)
- Evening Dress for Genesis 2, 3 and 8 Females (https://www.renderosity.com/freestuff/items/87696/evening-dress-for-genesis-2-3-and-8-females)
- Free Glass Coffin Props and Pose for V4 (https://www.most-digital-creations.com/free_poser_poses_textures_morphs_props_15.htm)
- COURS D'EAU FERME (https://www.renderosity.com/freestuff/items/79497/cours-deau-ferme)
- Iray Fur Shaders (https://www.renderosity.com/freestuff/items/88081/iray-fur-shaders)
All freebies approved, please move to entries!
3D Art Freebie Challenge October-November 2021-"How to repair ..." -Main Thread OnlyTitle: How to repair a fairy tale
Caption: So the princess decided to rescue herself and is no longer present. As the fairy godmother, you still have a fairy tale to complete. Follow the steps below to repair this disaster:
- Replace the princess with a fake
- Act like everything is normal
Paid Items:
- Madelyn for Izabella 7 (https://www.daz3d.com/madelyn-for-izabella-7)
- Orlean's Armor for Genesis 8 Male(s) (https://www.daz3d.com/orleans-armor-for-genesis-8-males)
- Elegant Fantasy Poses for Victoria 7 (https://www.daz3d.com/elegant-fantasy-poses-for-victoria-7)
No-Count Items:
- Genesis 8 male
Free Items:
- Prop - Elven Crown (https://www.renderosity.com/freestuff/items/75636/prop---elven-crown)
- Stuffed Toys for Poser (https://www.renderosity.com/freestuff/items/76447/stuffed-toys-for-poser)
- Halloween Backs 2021 (day 7) (http://www.thefantasiesattic.net/halloween/2021/index.html)
- Antonia Fairy Wings (https://www.sharecg.com/v/56933/related/11/Poser/Antonia-Fairy-Wings)
- Trish Hair for Genesis 3 Female (https://www.renderosity.com/freestuff/items/77150)
- GeoWear: Tiara Jewels - G8F and G3F (https://www.renderosity.com/rr/mod/bcs/geowear-tiara-jewels---g8f-and-g3f-/143382)
- Evening Dress for Genesis 2, 3 and 8 Females (https://www.renderosity.com/freestuff/items/87696/evening-dress-for-genesis-2-3-and-8-females)
- Free Glass Coffin Props and Pose for V4 (https://www.most-digital-creations.com/free_poser_poses_textures_morphs_props_15.htm)
- COURS D'EAU FERME (https://www.renderosity.com/freestuff/items/79497/cours-deau-ferme)
- Iray Fur Shaders (https://www.renderosity.com/freestuff/items/88081/iray-fur-shaders)
Converting V4 clothes to G8shg0816_13461e8196 said:
Leana said:
You need to install a V4 clone for G8F to autofit V4 clothes to G8F directly, only clones from Genesis 1 and up are included in G8F base.
V4 clone:
https://www.daz3d.com/sy-victoria-4-and-michael-4-clones-for-genesis-8
There's also this batch converter:
https://www.daz3d.com/rssy-clothing-converter-from-victoria-4-to-genesis-8-female
Another option is to convert in two steps: first autofit from V4 to Genesis 1, save the G1 version of the clothes, then autofit the G1 version to G8F.
Thank you! I have some V4 clothes and hair I want to use on G8, so this will help!
You don't really need to convert hair just load position and parent to the head.
Converting V4 clothes to G8Leana said:
You need to install a V4 clone for G8F to autofit V4 clothes to G8F directly, only clones from Genesis 1 and up are included in G8F base.
V4 clone:
https://www.daz3d.com/sy-victoria-4-and-michael-4-clones-for-genesis-8
There's also this batch converter:
https://www.daz3d.com/rssy-clothing-converter-from-victoria-4-to-genesis-8-female
Another option is to convert in two steps: first autofit from V4 to Genesis 1, save the G1 version of the clothes, then autofit the G1 version to G8F.
Thank you! I have some V4 clothes and hair I want to use on G8, so this will help!
GF8.1 loads with weird navel (Solved)@PertttiA posted this fix in the Genesis 8.1/Victoria 8.1 main thread:
Shaping Tab doesn't tell you the truth, it shows only a selection of the dials that are attached to the figure - Parameters Tab gives you all the dials.
You could try making sure all the morphs that you have installed, have their default values set to zero;
1. Open DS and load "Genesis 8 Basic Female" (to an empty scene) (or Genesis 8.1 Basic Female if you are using G8.1F)
2. Right Click at Parameters Tab->Preferences->Choose "Show Hidden Properties" (part 3 zeroes only 'visible' dials)
3. Right Click at Parameters Tab->Zero->Zero Figure (Zeroes the value of all the 'visible' dials)
4. Right Click at Parameters Tab->Memorize->Memorize Figure (Sets the current value of all the dials as their default value)
5. File->Save As->Support Asset->Save Modified Assets (Writes the changed default value to the morph files that were changed)When saving "Modified Assets" DS shows a dialog and asks for confirmation;
"The following file(s) will be permanently modified:" - "Accept/Cancel" - Choose "Accept"Converting V4 clothes to G8You need to install a V4 clone for G8F to autofit V4 clothes to G8F directly, only clones from Genesis 1 and up are included in G8F base.
V4 clone:
https://www.daz3d.com/sy-victoria-4-and-michael-4-clones-for-genesis-8
There's also this batch converter:
https://www.daz3d.com/rssy-clothing-converter-from-victoria-4-to-genesis-8-female
Another option is to convert in two steps: first autofit from V4 to Genesis 1, save the G1 version of the clothes, then autofit the G1 version to G8F.
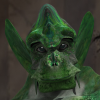
From which character is this skin?Quixotry said:
That PA has a product called Makeup Artist Essentials LIE Poses and Expressions that seems to be the source of the freckles on that model. I would say that the base texture looks fairly unidentifiable aside from the freckling on the face. It's very smooth and there aren't any other obvious identifying marks. It looks as if those characters might have fibermesh eyebrows, so I'm not sure using the brows as an identifier would help much. You could try using any skin with a similar tanned/bronze tone and use that LIE product to add that freckle pattern to the face.
If I was trying to duplicate that particular skin, I would probably lean towards FWSA Taia's texture as a starting place. Keep in mind that lighting and surface settings can also affect the look of a character's skin. Different lighting situations can make skin look paler or darker/more or less saturated very easily. FWSA Taia HD, Twosret 8, Lavonne HD, Malia for Celani 8, P3D Melanie HD, RY Felina, or Ziplha HD look like potential options. If you have any of those characters already, you could play around with lights and settings a bit to see how it looks.
Thank you for your reply! Yes, the skin is very clean without any marks to identify it, Taia's skin seems very similar but that's not in because you can clearly see that she has body marks around her belly button and the desired skin didn't have any marks.
He obviously bumped the spectacular level and maybe translucency too.
In the pictures in this product, I think that all girls have the same skin just with different translucency:https://www.daz3d.com/sunny-days-outfit-textures-for-genesis-81-female
From which character is this skin?That PA has a product called Makeup Artist Essentials LIE Poses and Expressions that seems to be the source of the freckles on that model. I would say that the base texture looks fairly unidentifiable aside from the freckling on the face. It's very smooth and there aren't any other obvious identifying marks. It looks as if those characters might have fibermesh eyebrows, so I'm not sure using the brows as an identifier would help much. You could try using any skin with a similar tanned/bronze tone and use that LIE product to add that freckle pattern to the face.
If I was trying to duplicate that particular skin, I would probably lean towards FWSA Taia's texture as a starting place. Keep in mind that lighting and surface settings can also affect the look of a character's skin. Different lighting situations can make skin look paler or darker/more or less saturated very easily. FWSA Taia HD, Twosret 8, Lavonne HD, Malia for Celani 8, P3D Melanie HD, RY Felina, or Ziplha HD look like potential options. If you have any of those characters already, you could play around with lights and settings a bit to see how it looks.
Missing fac filesRL_Media said:
Yeah, it's a new installation, so all those things are fresh downloads. I lost all the locally saved stuff I had.
After a quick search through my library I don't have those either, So I would say they are from an add_on pack. Tho saying that I do have those under Victoria 8.1 with the label facs_Victoria8_1_ctrl_Wink.dsf etc.
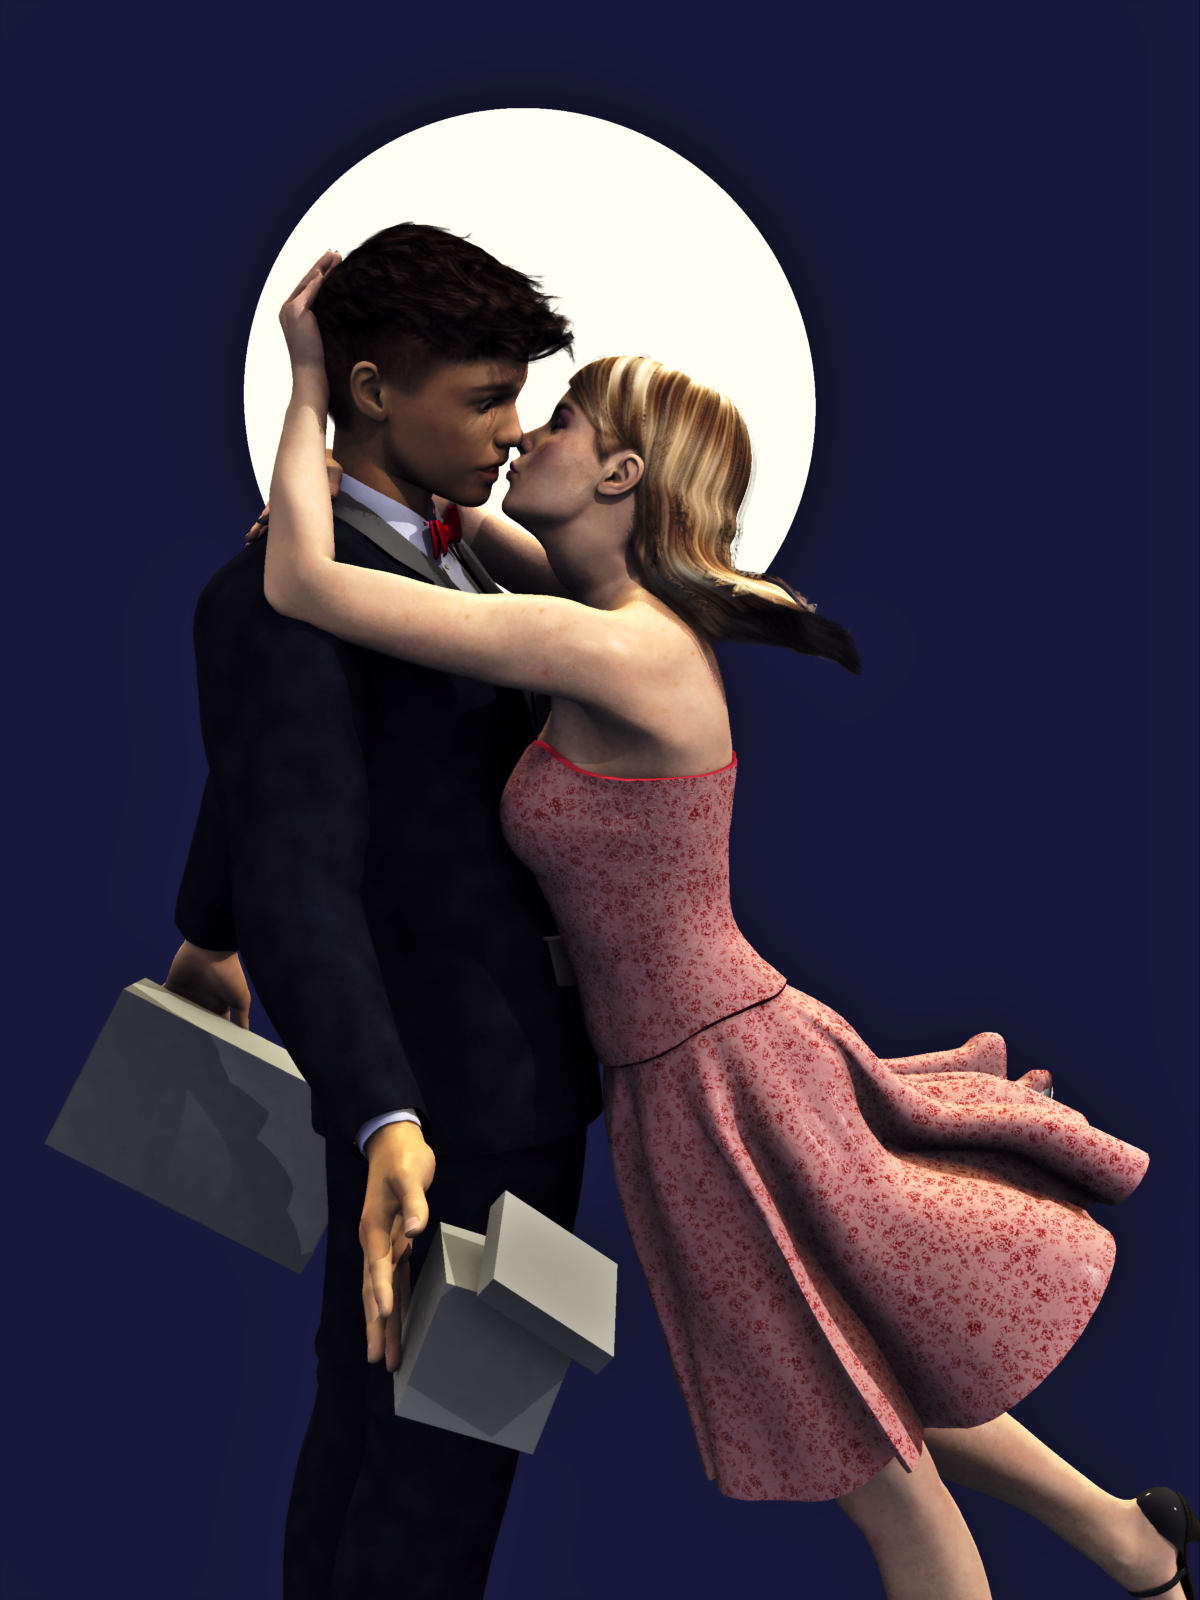
Carrara Challenge #60 - Go - (get it? 60? Go? sorry...) - WIP ThreadDiomede said:
Here is the start of another idea by me. Inspired by a 1950s advertizement for homebuying, I thought it might be adapted for young people of prom-going age.
'Going to the Prom: AKA Shut up and kiss me, AKA Don't ruin it by talking.'
The figures are vintage Victoria 3 and David 3. The cubes are placeholders for a corsage box and candy box. I'm not happy with the hair morphs for V3 hair. I experimented with stacking some GMIC filters.
Nice !!!
What happened to Angel Wings?burningchr0me said:
Last I read in their thread (before it vanished), DAZ wouldn't approve their latest creation, probably because they have such a taboo against child characters and what certain folks might do with them. Not much point being here if the store won't sell your stuff.
Pretty sure they came here specifically because people had been requesting they do an HD add-on for their charcters, like how you can get HD for Victoria 7 & 8, which is a DAZ store exclusive thing. I don't know what the HD addons provide because I've never bothered with them, but I think that's what they wouldn't allow.
Angel_Wings told us she would give it one more shot and after that vanished out of thin air. Child characters by others have been released in HD I don't think that is the problem.
Carrara Challenge #60 - Go - (get it? 60? Go? sorry...) - WIP ThreadHere is the start of another idea by me. Inspired by a 1950s advertizement for homebuying, I thought it might be adapted for young people of prom-going age.
'Going to the Prom: AKA Shut up and kiss me, AKA Don't ruin it by talking.'
The figures are vintage Victoria 3 and David 3. The cubes are placeholders for a corsage box and candy box. I'm not happy with the hair morphs for V3 hair. I experimented with stacking some GMIC filters.
Cel shading / toon shading in 3Delight and IrayUpdate: the shaders in this thread were made with Daz Studio 4.15.0.30.
After having done some groundwork on outlines and edges, it was time to experiment with shading. Here are my results.
General principle
The main idea that I will apply in both 3Delight and Iray is to try to use the diffuse lighting to create a gradient between two colors, namely a Dark Color (low light) and a Light Color (intense light).
3Delight makes it easy by having a [Color] output pin on its Lighting/Diffuse/Diffuse brick. By using this brick with a default white color, the output can be used as a driver for a user-defined gradient, resulting in full control over colors of the lit and unlit areas.
In Iray, it's more complicated. To my knowledge, there is no way to extract the computed diffuse lighting from a material brick in an Iray shader. So I tried experimenting with two options:
1. Figure out a way to use the Iray lighting to get the result. Although many stars have to be aligned to get the effect right, the keys are a custom normal map (to get the sharp transitions), and splitting the Dark and Light colors between emission (Dark Color) and diffuse tint (difference Light Color - Dark Color). Iray Uber Base works here, no custom shader.
2. Implement partially a Phong model in MDL to do a diffuse mix like in 3Delight, and let the user decide how to split the computed color between emission and diffuse.Here is a comparison of the 3 methods (3Delight custom shader, Iray Uber Base, Iray custom shader):
Comparison of toon-style renders made in 3Delight and Iray Soft transitions Sharp transitions 3Delight
All-in-one custom shader

Iray
Skin + Hair: Iray Uber Base
Outline: Inverted Hull geoshell

Iray
All-in-one custom shader

I will split the text in 2 parts. The first part is about 3Delight, and the second part about Iray will be posted shortly.
Part 1 of 2: Cel shading with 3Delight
1.1. The shader
Here is the shader that I will be describing:

The visible bricks can be broadly categorized in two groups:
- the inputs: Utility/User Parameters, Textures/Texture Instance, Mathematical/Mix;
- the processing pipeline and output: (G RSL) Diffuse Curve Mix, (G RSL) Edges Mix, (G RSL) Glossy Mix, Mathematical/Operators/Multiply, Surface.Regarding the inputs:
- many parameters are mapped, ie you can use a texture to define the value. That is what all these Textures/Texture Instance bricks are for. They make the shader look more confusing than it needs to be, but this feature is very useful to add regional sub-gradients on a model, like skin details.
- In this shader, mapped parameters are limited to be between 0 and 1 (I don't know if it is possible to go beyond, but this is what I use) so sometimes they have to be transformed before being used. This is what the 4 Mathematical/Mix bricks do.Regarding the processing pipeline:
- the custom brick (G RSL) Diffuse Curve Mix computes the diffuse lighting;
- this computed diffuse factor is then sent to a custom (G) Curve Step brick which is used to change the sharpness of the gradient;
- the output of the (G) Curve Step brick is then used to compute the gradient between Dark Color and Light Color;
- an edge detection is then added by the custom brick (G RSL) Edges Mix;
- the resulting color, combining diffuse mix + edges, is then mixed with a glossy layer;
- finally, the combined [diffuse mix + edges + glossiness] color is multiplied by the opacity and sent to the output.I will now describe the 3 main pipeline bricks, the most important being the first one.
(G RSL) Diffuse Curve Mix
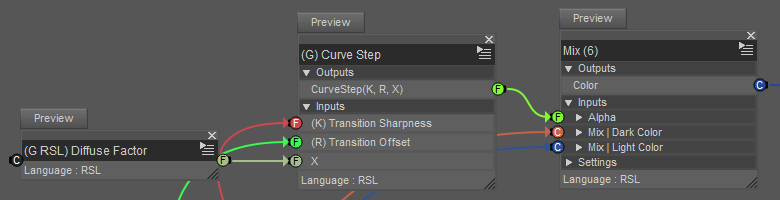
The custom (G RSL) Diffuse Factor brick outputs the lighting information as a value between 0 and 1. This value is modified by a custom sharpening/softening brick (G) Curve Step, and the result is used to compute the gradient between Dark Color and Light Color with a Mathematical/Mix.
(G RSL) Diffuse Factor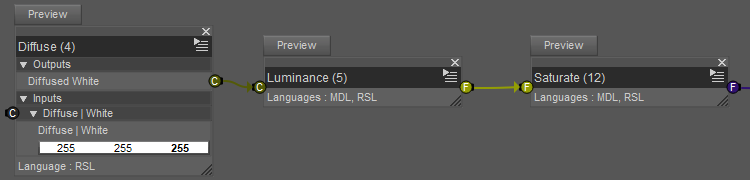
Pretty straightforward:
- Lighting/Diffuse/Diffuse has its input color set to white;
- The result is converted to grayscale with Mathematical/Standard Functions/Luminance (I think it is the MDL function luminance, which computes 0.212671 · R + 0.715160 · G + 0.072169 · B according to the MDL specification 1.7.1);
- Mathematical/Standard Functions/Saturate clamps the result between 0 and 1.(G RSL) Curve Step
This is the implementation of the function that changes the sharpness of the gradient. It is essentially a customizable smooth step function.
I will first explain the theory, and then I will show the brick network.
a) The theory
A common way to achieve a curve sharpening effect would be to start with a s-shaped curve, and by scaling its argument the "s" could be re-shaped into a diagonal line or a sharp step.
I initially wanted to use the trigonometric function atan for this, because it is naturally s-shaped and I would only have to adjust the center (offset) and the bounds (map to range [0,1]).
However, the brick Mathematical/Standard Functions/Atan doesn't seem able to take arguments greater than about 4 or 5, after which the output looks random.
I didn't try to do a sigmoid using exp because I thought that if 3Delight can't do atan, then perhaps it won't do exp either.I knew however that Mathematical/Standard Functions/Pow worked, because I had used that brick in other shaders. So I decided to build a parametric function from scratch by stitching together pieces of power functions.
Here is an illustration of the process:Steps illustrating the process of manipulating a power curve to get an s-curve Step 1: start with a power curve that behaves nicely between 0 and 1 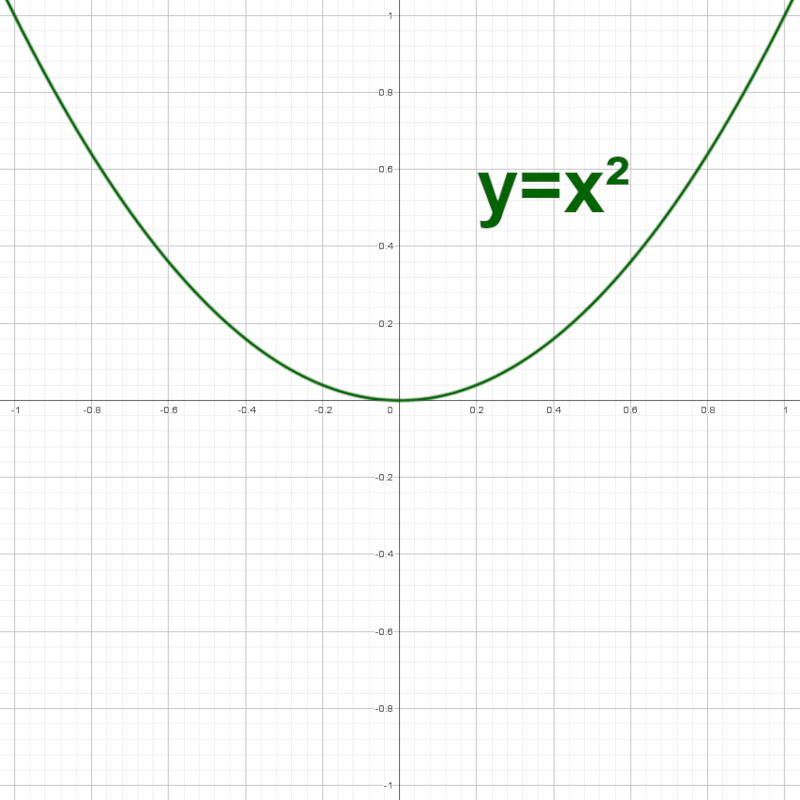
Step 2: isolate the part between 0 and 1 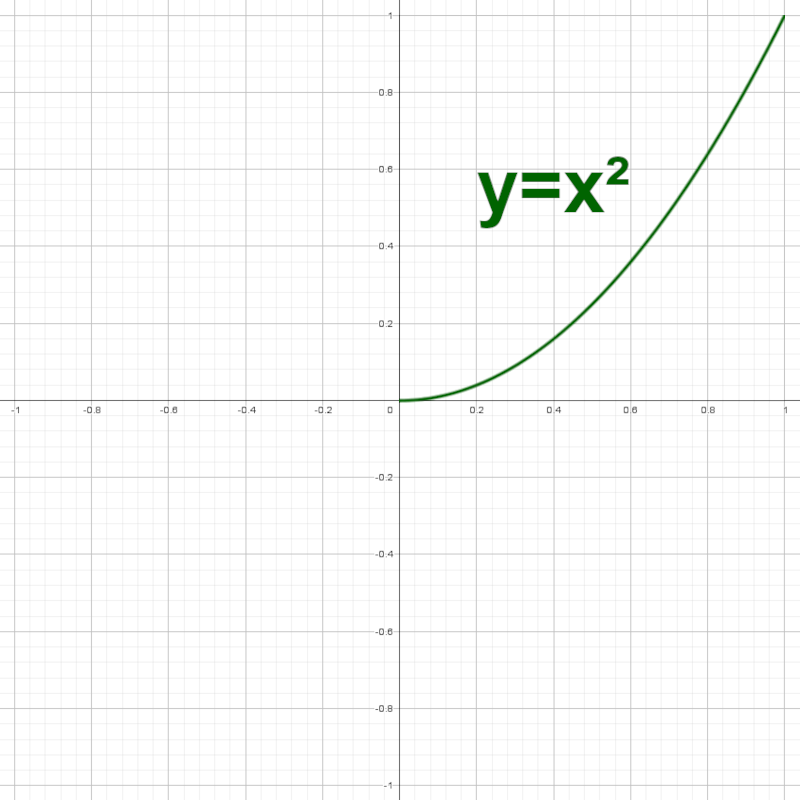
Step 3: duplicate, move and rotate to get a s-curve 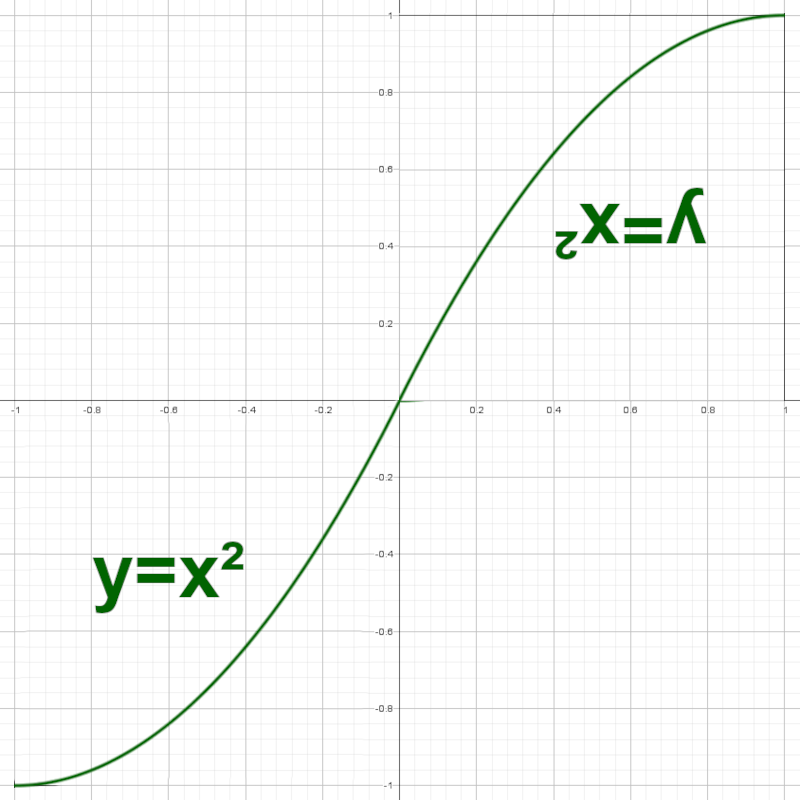
In short: take a power function between 0 and 1, and duplicate, translate and rotate appropriately to get a "s" shape.
The bottom left part of the curve can be expressed with the equation:CSPowLeft(x)=(x + 1)² - 1
with -1 <= x <= 0In this equation, the "+ 1" moves the initial curve (x²) one unit to the left, and the " - 1" moves the result one unit down.
CS stands for Curve Step.
The top right part of the curve can be expressed with the equation:
CSPowRight(x)=C(C(x)²)
with 0 <= x <= 1
and C(x) = 1 - xIn this equation, the inner C(...) performs a symmetry around the vertical axis x = 1/2, and the outer C(...) performs a symmetry around the horizontal axis y = 1/2. Applying successively both of the symmetries results in a 180° rotation around the point (x, y) = (1/2, 1/2).
Note: In Shader Mixer, C(...) will be the custom brick (G) Complement Varying that I used in a previous thread.
That's a nice start, but I want to be able to change the sharpness with a parameter k such that when k is high, the transition is sharp, but when k is low, the transition is soft.
Luckily, a simple modification does it:CSPowLeft(k, x) = Pow(k, x + 1) - 1
CSPowRight(k, x) = C(Pow(k, C(x)))
with Pow(k, x) = x^kAnd now we can stitch the two together with the notation If([condition], [value if condition is true], [value if condition is false]):
BasicIdeaCurveStep(k, x) = If(x < 0, CSPowLeft(k, x), CSPowRight(k, x))Note: In Shader Mixer the brick Mathematical/Standard Functions/Pow computes Pow(X, Y) = X^Y.
We can visualize what happens for various values of k in a graphing calculator (I used Geogebra):
In this picture, the diagonal line is what happens when k = 1: a linear transition.
When k increases above 1, the transition becomes sharper (family of green curves).
When k decreases below 1 (but always above 0), the transition becomes softer in the middle and sharper at the extremities (blue curves).This is looking pretty great, but there are still two missing features:
- I want to be able to change the horizontal position of the inflexion point, in order to change how much Dark Color vs Light Color should be rendered;
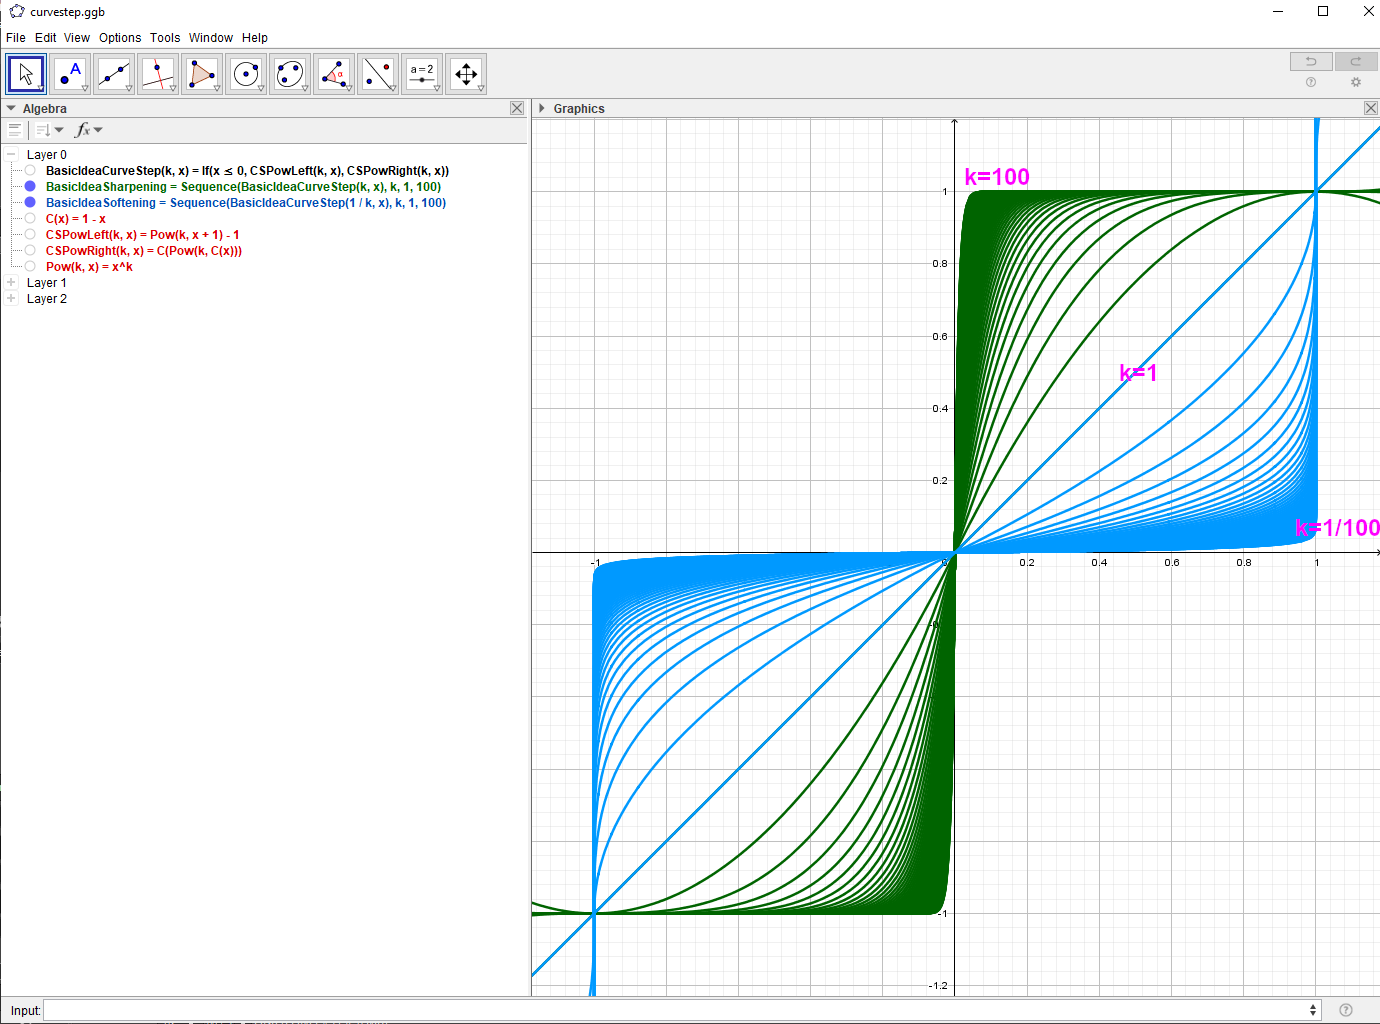
- I want all this to happen between 0 and 1 both vertically and horizontally, because it makes building the shader a lot easier.One possibility here is to scale both parts of the curve with complementary factors. Right now, each part of the curve fits in a square of side 1. If I scale the left part by a factor r < 1, and the right part by a factor C(r), then the combined curve will fit in a box of side 1, and the transition will still happen around 0 even though both parts will be unequal.
This can be expressed with the new equation:CurveStepAround0(k, r, x) = If(x < 0, r * CSPowLeft(k, x / r), c(r) * CSPowRight(k, x / c(r)))In each branch of the If(...) expression, the internal division scales the curve part horizontally around 0, and the external multiplication scales the curve part vertically around 0.
Here is a picture when r = 0.2:
Note: To correlate what I wrote with the picture, you must focus on the interval [-0.2, 0.8] and ignore whatever is happening outside.
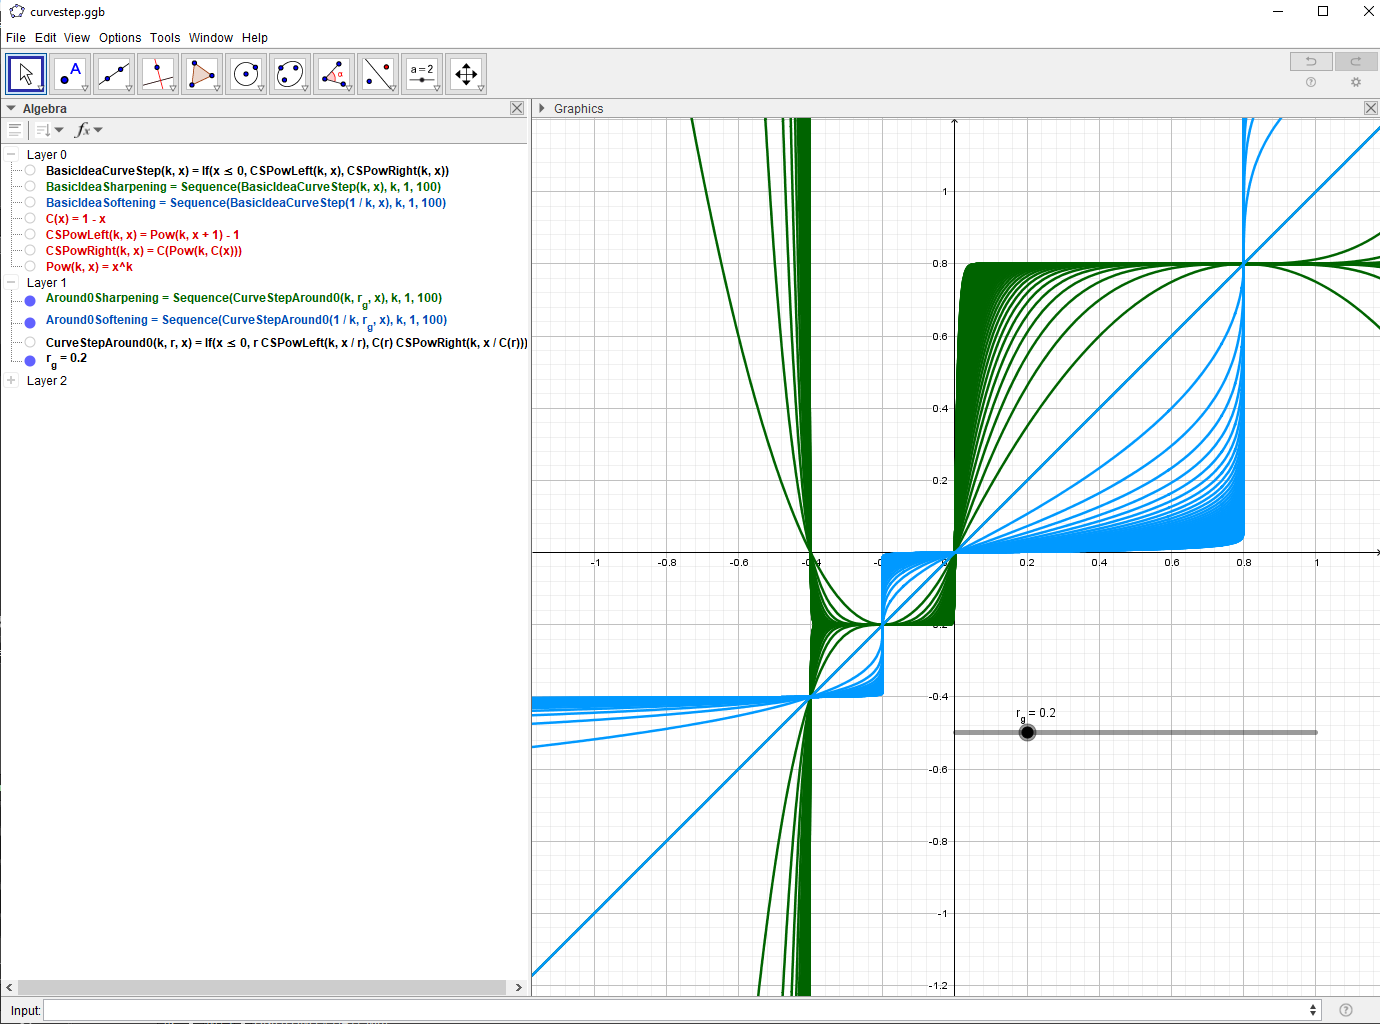
All that's left now is to move the box by translating both parts of the curve horizontally and vertically by an amount equal to the side of the lower left square, which is r.
Final equation:CurveStep(k, r, x) = CurveStepAround0(k, r, x - r) + rIn this equation, the "- r" moves the whole curve a distance r to the right, and the "+ r" moves the whole curve a distance r up. Both of these translations result in the combined parts fitting in the (0, 0) to (1, 1) box.
Here is what it looks like with r = 0.2: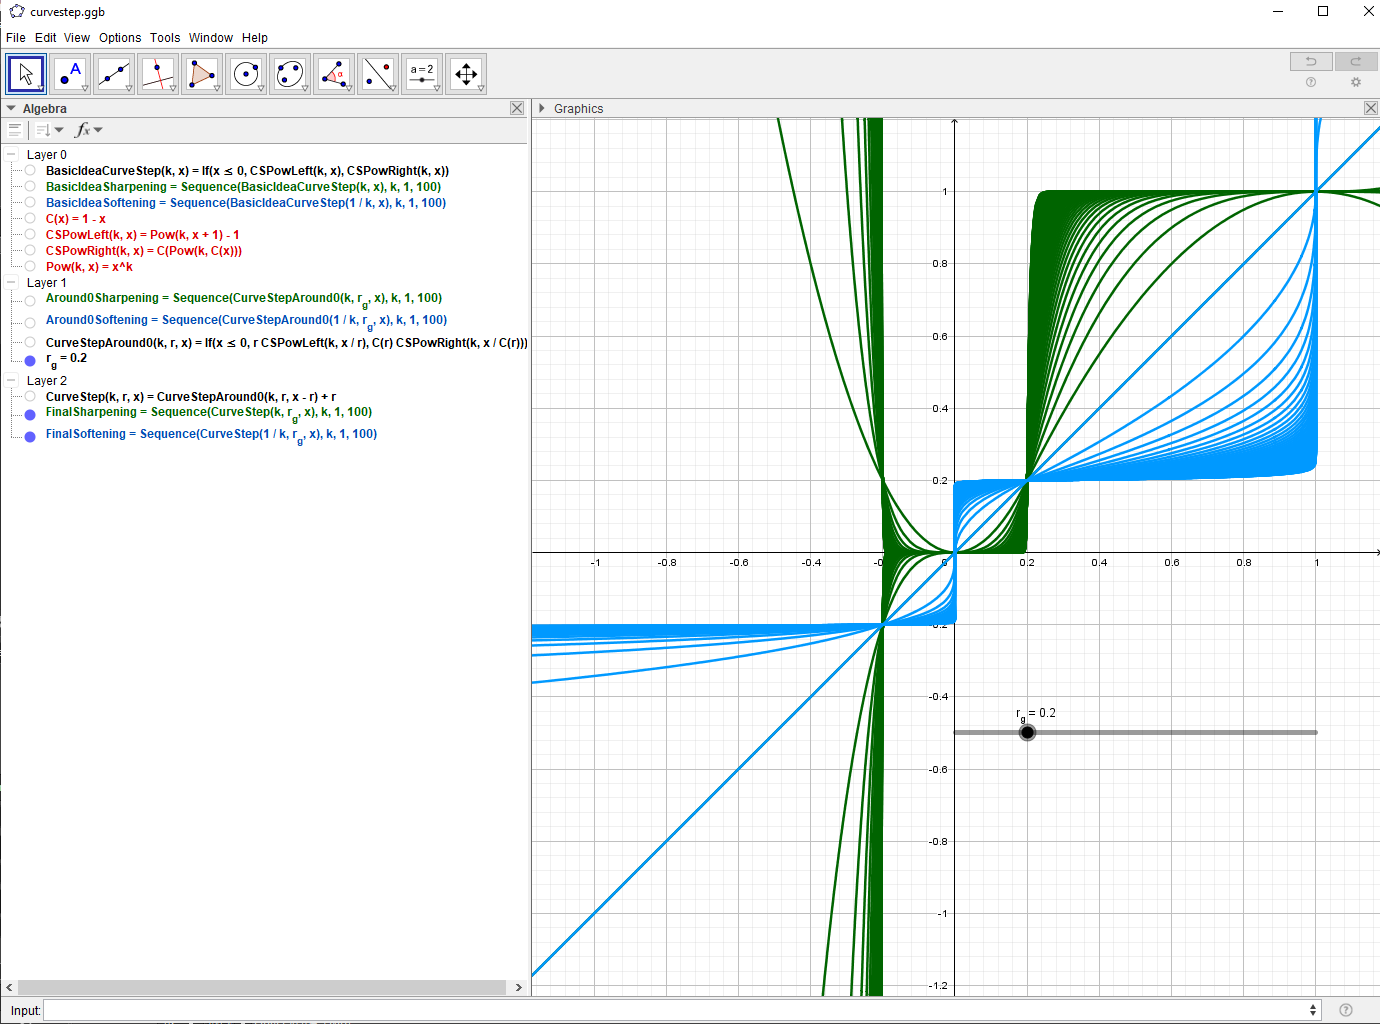
And we can change the value of r at will (between 0 and 1), for example r = 0.5: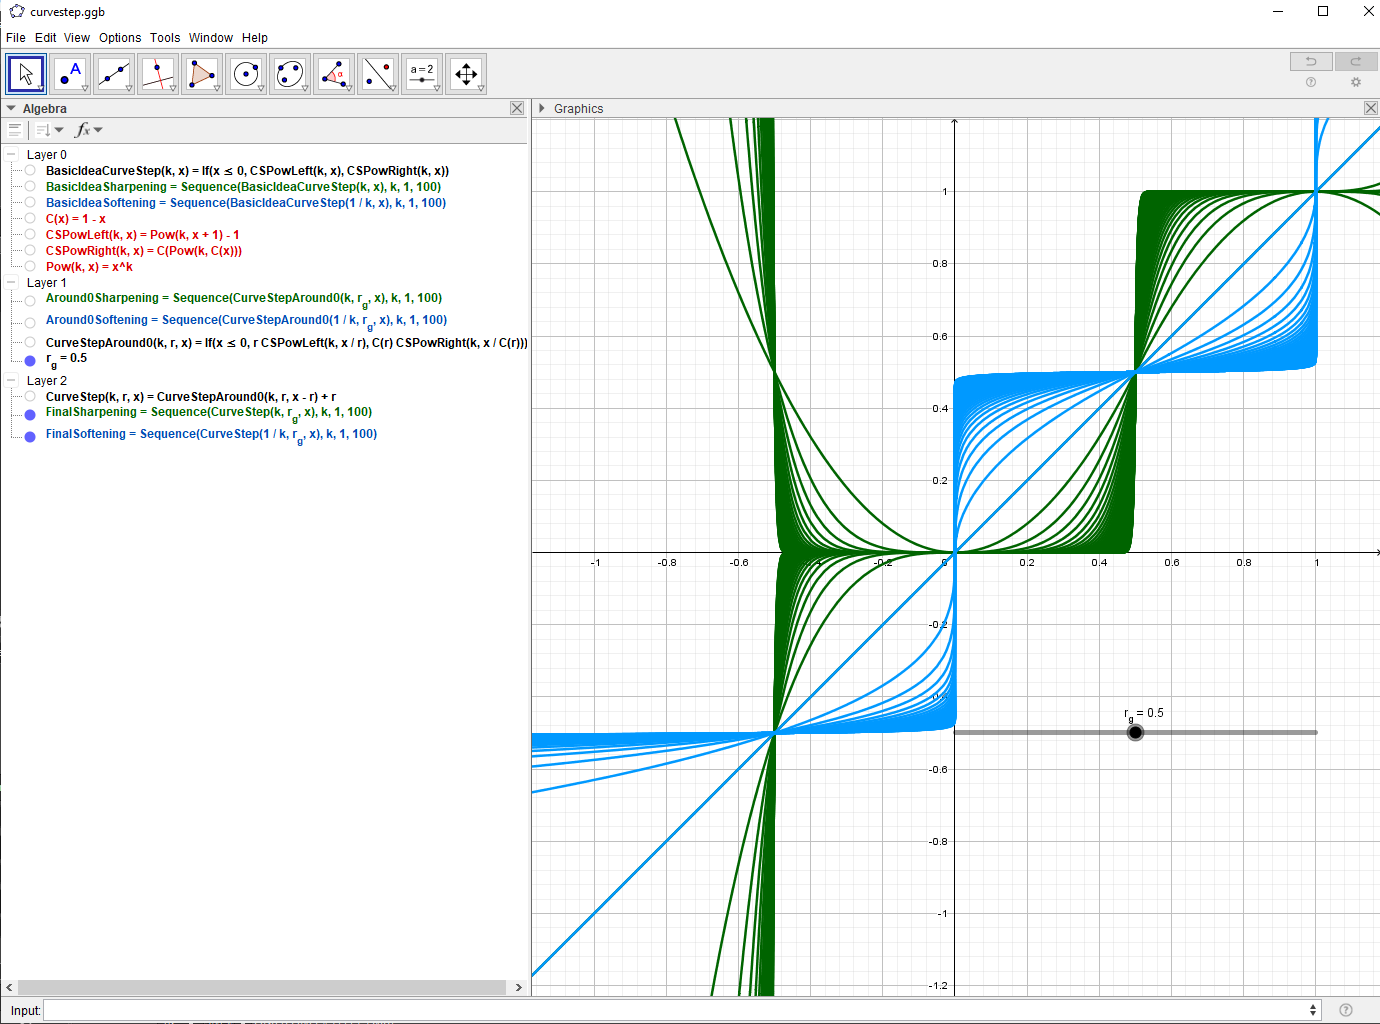
b) The brick network
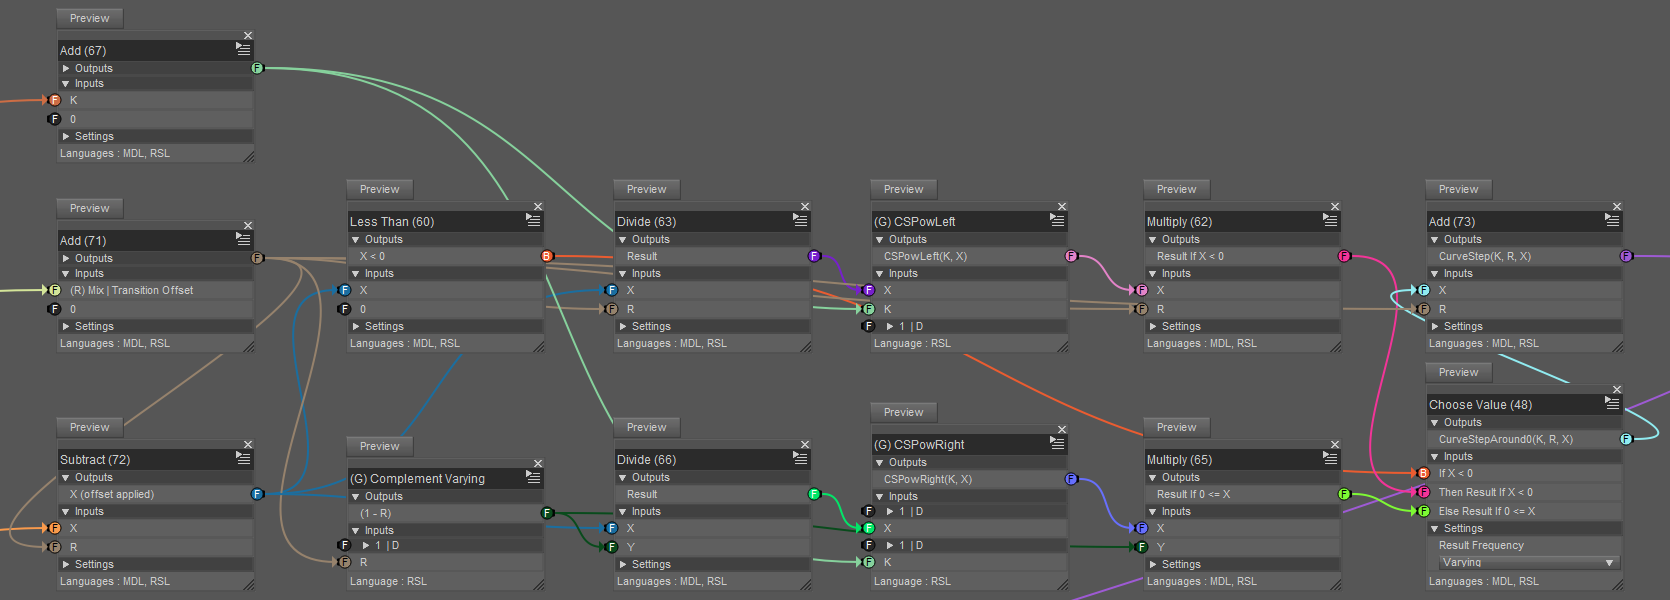
It looks confusing, but it is mostly a transcription of the formulas above, except for the Mathematical/Operators/Add bricks with a second argument 0, which I use as a convenient connection grouping trick that works both in RSL and MDL.The inputs are on the left, and the output is the brick titled "Add (73)" on the right.
I won't detail (G) CSPowLeft and (G) CSPowRight, because they are just the implementations of the functions CSPowLeft(K, X) and CSPowRight(K, X) defined above.(G RSL) Edges Mix

I used Geometric/Special/Toon Outline to save some time. I don't know exactly how it works, I'm guessing some kind of Fresnel-like method.
Since I couldn't figure out how to get the [Outline Color] pin to actually work (the outline is always black), I converted the output into grayscale to explicitly mix the previous color (output of (G RSL) Diffuse Curve Mix) with the user-defined edge color.(G RSL) Glossy Mix
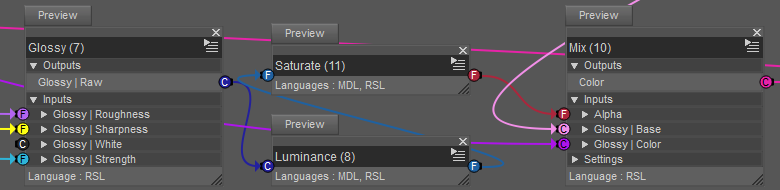
It's the same principle as the (G RSL) Diffuse Curve Mix but without the curve part, and with Lighting/Specular/Glossy instead of Lighting/Diffuse/Diffuse.1.2. The results
1.2.1. Setup
Model: G8F with an anime head morph from sharecg (https://sharecg.com/v/88934/view/21/DAZ-Studio/Anime-Head-for-Genesis-8-Female-and-Male).
Hair: Aldora hair from Genesis Starter Essentials.
Lighting: one distant light with raytraced shadows.
To add some of the details, like the eyebrows and the gradient in the irises, I use The Layered Image Editor to create layers with uniform colors, and I add a mask to the top layers.
For example for the face material I assigned a layered image to Dark Color and another one to Light Color. Each of these layered images is structured the same way: skin + eyebrows with mask.
The layers themselves don't contain any image, they are just filled with the appropriate dark or light color. The mask allows to change the color in a specified region.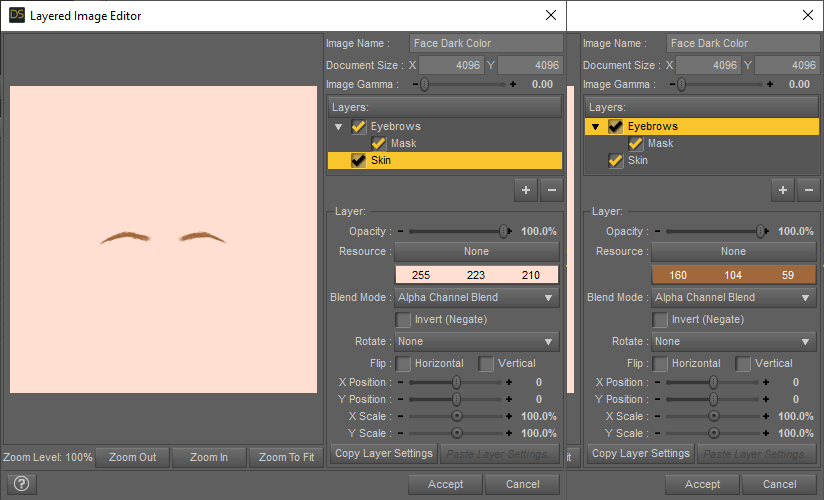
The eyebrows mask was created in Gimp from a Victoria 8 face texture because I was working with this model at the time, but any other face texture with eyebrows would do.
The irises mask was created in Gimp with two well-positioned circular gradients, nothing fancy.1.2.1. Render
Transition sharpness factor = 0.05%
Transition sharpness factor = 20%
So, it mostly works as expected, although I am not satisfied with the Toon Outline and Glossy bricks. I found them difficult to control and they don't give me exactly the result that I want, so next time I will probably just implement those features myself, like I had to do for the Iray custom version.
Rendering with shadows seems to have created some artifacts on the right iris, so I'll have to be more careful about that in the future.
Also, the hair is made of ribbons, which are disconnected open surfaces, and my edge detection shaders don't work on those, so I used only the shader I just described for everything, no geoshell. In the future I'll try to make proper toon hair.
End of Part 1 of 2
DAZ AddictionStarted with Metacreations, sprites overlays(reminded me of the old felt-boards) . Found Terragen it used to be free. Found Jasc Paint Shop Pro free. Found Bryce, fell in love. Lost my Bryce, store went out of biz, but wait...DAZ Studio bought Bryce and offered free download, and free download of their DAZ Studio versions 1 & 2. Had a hard time learning it, using the few items. then DAZ Studio version 3 came with Victoria 3. I was hesitant, but it came with the fairy, and learned a lot. Platinum Club came along, so I ventured into some props and then... I began to understand posing better (got a faster machine). Then DAZ Studio version 4....and new generations of figures. (got an even faster machine) After that, I have cruised for props, and environments (got a faster machine and external drive)And, this sale around, I found products on sale that had seemed beyond reach. Yep. Just when I thought I was sated from this year's PC sale, today a blink sale had Ron's Brushes. Well, heck I got Mermaid stuff on sale, they need water, right?
Ultimate PBRSkin Manager (Commercial) ** 2 additional utility scripts available here **Understood. Victoria 8 is a model using "Iray Uber" as the main shader, which is NOT PBRSkin shader. This is confirmed by the last error message you see : none of the surface uses PBRSkin.
The confusion can happen for a few users, often the new or occasional users, so let's make a bit of history : for the figures, you have mainly 2 different shaders :
- from Genesis 3 up to (and including) Genesis 8 (before Genesis 8.1 appeared), the shader almost always used is "Iray Uber" (the one you will find on a lot of props too). For these figures, I developped a "manager" called "Ultimate Iray Skin Manager" (this is not the one you have).
- When Genesis 8.1 appeared, a new shader appeared with it (named PBRSkin) and people asked for the equivalent manager product; This is why I created the "Ultimate PBRSkin Manager" (this is the one yyou have). Of course, even if PBRSkin is mainly used for 8.1 figures, nothing prevents people from using PBRSkin Shader on Genesis 8, 3 or even Victoria 4! This is why it is also compatible with all those generations, as long as they use PBRSkin as their main shader (which is not the case of Victoria 8).
I'll contact you via mail or PM tomorrow (french hour, it's late here) to help you solving your problem, no worry we'll find a workaround for your issue :)
Ultimate PBRSkin Manager (Commercial) ** 2 additional utility scripts available here **Thank you for responding! I'm simply trying to get the model's skin to glisten a bit. Look at the screen grabs to see what errors I get (too involved to type them out). On the second screen I select 'Apply PBRSkin to nails.'
I'm not that well versed in this... so idon't know how to proceed. The model is Victoria 8... Please contact me at [email removed] so that I don't have to keep digging through fthe forum to see if there's an update.
Thank you!
Ultimate PBRSkin Manager (Commercial) ** 2 additional utility scripts available here **Hi, sorry you have a problem, here are a few questions so that I can solve your issue :
1. can you tell me which script you launch and which error you get? You are supposed to select your figure and launch "V3DSM 01 Ultimate PBRSkin Manager". The supported figures cover Daz Standard figure from Victoria 4 up to the latest Genesis 8.1, the constraint being that they must use PBRSkin shader as their skin/lips/nails shader. (You can check this by looking at what is the "Shader" displayed at the top of Surfaces editor tab once those surfaces are selected).
2. What is the messager error that you have? (What does it say)
3. Did you installed Ultimate PBRSkin Manager using Daz Install Manager, which is the safest installation way for any scripted product?
Don't worry, we should find a solution, so far everybody managed to have it working, so it should be the same for you...
V3 or V4 to GenesisAutofit clones:
https://www.daz3d.com/sy-victoria-4-and-michael-4-clones-for-genesis-8
https://www.daz3d.com/sy-victoria-3-and-michael-3-clones-for-genesis-8
Batch converter for V4 clothes:
https://www.daz3d.com/rssy-clothing-converter-from-victoria-4-to-genesis-8-female
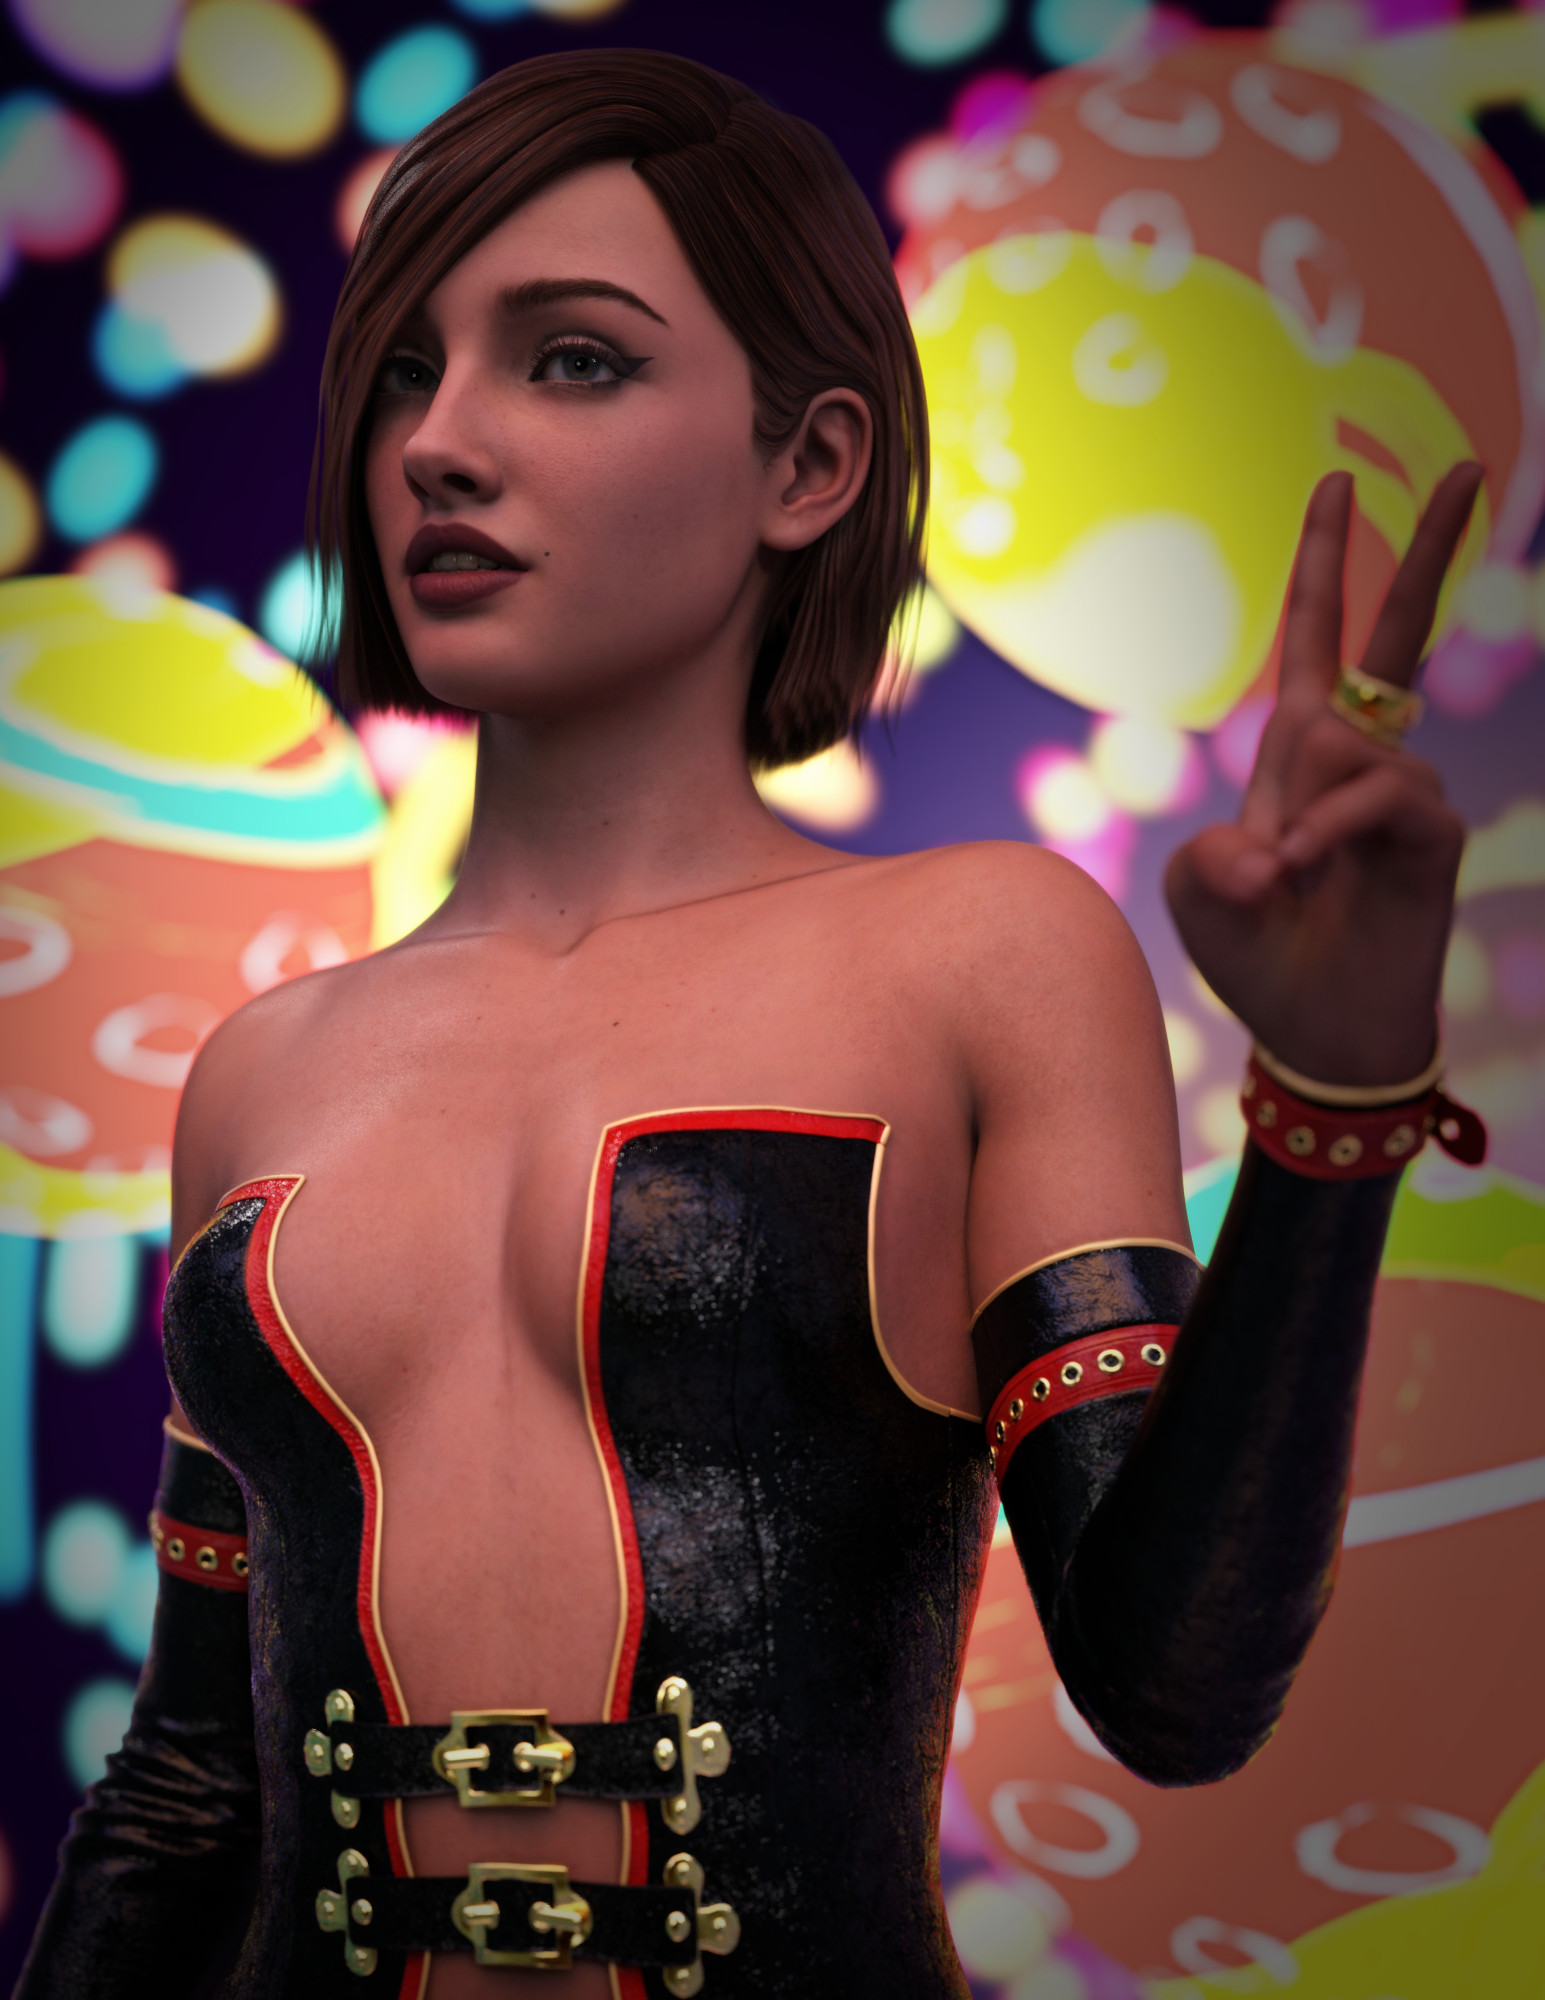
Show Us Your Iray Renders. Part VIIIHappy remaining weekend time.
I think Lilith 6 would break quie a few rules in the store today...
(This is, of course, Genesis 8.1... based on Victoria 8.1, but also a lot of other dials.)
Daz 3D is part of

Connect
DAZ Productions, Inc.
7533 S Center View Ct #4664
West Jordan, UT 84084Licensing Agreement | Terms of Service | Privacy Policy | EULA
© 2026 Daz Productions Inc. All Rights Reserved.