-
Multi-figure bookstacks for Poser (but doesn't work in Studio :o( )
(Unfortunately, due to the use of geometry swapping, this doesn't work in DAZ Studio. There are a few ways I can think of to possibly work around this but I don't really feel like spending the time necessary on it. If there are enough people interested I might be persuaded to take a look)
Now available for download:
ShareCG - Multi-figure bookstacks for Poser - Poser - ShareCG
Renderosity - Multi-figure bookstacks for Poser (renderosity.com)
Note: Two of the PoserPython scripts may crash in Poser 12+ because I forgot to change the print statements to functions - I've uploaded corrected versions to post #136 over there at HiveWire
(What d'ya mean slow ? It's only been five years since the last freebie to come out of my books project which was A Few Books (Hardbacks) For DAZ Studio 4) - in my book that's turbo fast !)
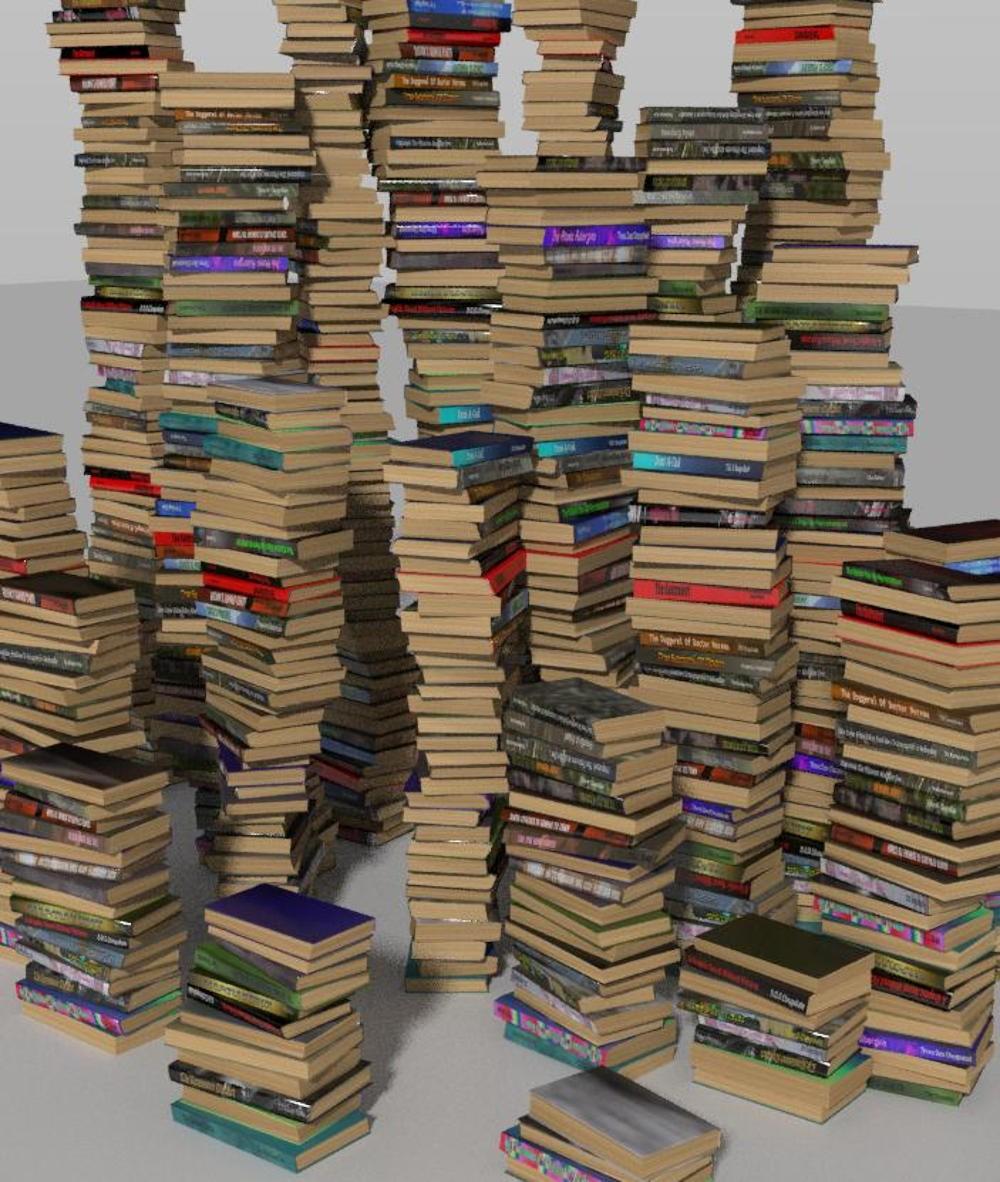
Basically a Poser figure containing four stacked books, each of which can be independently swapped, morphed and adjusted (within limits).
Figures can be stacked one on top of another to create larger stacks.
Stacks of 4, 8, 12, ... 60, 64 books are included, along with a 128 and a 256 book stack .
Since manually adjusting each book in a large stack is impractical there are PoserPython helper scripts to randomize, reset, and change textures. These scripts can be accessed directly from proxy CR2s alongside the stacks.
*** WARNING: DON'T USE POSER'S BUILT-IN 'DELETE FIGURE' WITH THE 'DELETE ATTACHED' OPTION CHECKED FOR STACKS LARGER THAN 40 BOOKS AS THE DELETION TIME IS HUGE AND POSER WILL EFFECTIVELY LOCK UP FOR HOURS. USE THE INCLUDED 'DELETE LINKED' SCRIPT WHICH ONLY TAKES A FEW SECONDS EVEN FOR HUGE STACKS ***
Created in Poser Pro 2014. Tested on a Windows 10 PC in Poser 6 and Poser Pro 2014
~ ~ ~ ~ ~ ~ ~ ~ ~ ~ ~ ~ ~ ~ ~ ~
BUG TRACKING !
First bug found (not including the Poser 12+ script bug already mentioned) - if you use the 'Plump' adjustment/morph on anything except the base geometry (curved hardback, right way up) the book above won't move in concert with it. Easy fix (details in post #155 over at HiveWire3D )
Let's appreciate/discuss today's new releases - more ongoinger threadANGELREAPER1972 said:
WendyLuvsCatz said:
on clones, I find the easiest thing to do is model a bodysuit around one figure then shape and fit it to another creating morphs for both, I edit the morph dsf in notepad to make it a modifier/clone instead of morph and fit clothing to it then to the figure
I have fitted clothing to Vyusur's Catoon this way, humanoid figures this is not too difficult but it's only a loose clothing fit not an exact clone, fingers and toes beyond me
bodysuit do you do this in another program or in daz how do you edit in notepad like do you change a wording or number or what
I use Zbrush and extrude and Zremesh a masked of section or sections depending on if doing separate boot fitting shape
I fit this suit to one figure with the transfer utility then save it as a support asset like any wardrobe item
then I load that asset on it's own along with the other figure NOT fitting it a d scale and move, resize bones to get as near as the shape as possible
then I export an obj of it and appending it to saved Ztool of the second figure use mostly the move brush and smooth to shape it to fit that figure as closely as possible not changing the topography in anyway
I then export that obj to use in morphloader for the first outfit as well as doing the same for the second figures outfit
when you adjust rigging to figure shape and run erc freeze one used to in properties before saving the morph change it from modifier morph to modifier clone but that is no longer an option which is why I edit the dsf for the morph shape in notepad (you need to save the morph asset uncompressed)
it needs to be modifier clone to trigger the fit to dialogue
Books for those empty virtual bookshelves - and stacks tooI'm sure that there are ways around the problem, but I don't fancy spending time on any of them. However, here's a few thoughts in case I change my mind later, or in case somebody else feels inspired to try:
1) Find out from the DAZ techies what's really going on with geometry swapping in Studio. The code to support it is obviously there as it works "most of the time", but there are obviously bits that don't work. Details. If you don't know what's going wrong you can't work around it.
2) Since DAZ definitely won't be fixing it, perhaps a script could be written that's called any time the geometry is swapped. This script could keep the current geometry, UVs, and morphs in sync.
3) An alternative to geometry swapping would be to have the geometries for all six* book types as part of the base geometry, and to have a 'vanish' morph for each book geometry. This would shrink the relevant book geometry to a point within the book's normal spatial extent. Control of the vanish morphs should be easy to do with a bit of valueOpKey ERC so that all the vanished geometries would be hidden inside the one non-vanished one, even when morphs are applied. But of course all the morphs for each geometry would also need to be redone from the new base geometry
*The six book geometries are actually three pairs. Each pair is an identical geometry but with different UV mapping. This was my workaround for Poser not being able to switch UVs, which would have been my preferred approach - I have a vague feeling the Studio can switch UVs ?
Let's appreciate/discuss today's new releases - more ongoinger threadWendyLuvsCatz said:
on clones, I find the easiest thing to do is model a bodysuit around one figure then shape and fit it to another creating morphs for both, I edit the morph dsf in notepad to make it a modifier/clone instead of morph and fit clothing to it then to the figure
I have fitted clothing to Vyusur's Catoon this way, humanoid figures this is not too difficult but it's only a loose clothing fit not an exact clone, fingers and toes beyond me
bodysuit do you do this in another program or in daz how do you edit in notepad like do you change a wording or number or what
Introducing the AI Character Shape Generator by YellowWho is the targeted user group?
Those, who don't know how to use a morph slider?HH Scarlett for G9 [Commercial]hfilb said:
First, this is a great character with detailed JCMs that fix the puzzlingly bad mesh bend distortion that Genesis 9 introduced. Not many PAs have included their own custom fixes for it, so thanks for the effort.
I'm not sure if it's a unique issue on my end, but I seem to be getting some noticeable UV distortion with other G9 textures when using the standard 'Nipples Feminine HD' morph on Scarlett. The nipple morph geo looks to be off-center from the underlaying texture. It's not noticeable with Scarlett's own texture though.
Yes, if you intend to use another vendor's textures but her nipples then that probably won't line up. This has to do with G9's topology and how there is really no reference point or topology ring around where the nipples would be by default. To get it to work, you could manually turn her nipples off, and Daz default back on:
- The easy method is to click on Scarlett in the scene, go to "currently used" parameters, make sure "show hidden" is turned on in the dropdown menu, and scroll down to where you see the hidden parameter "HH Scarlett Nipples" and dial it down to zero. This will utilize Daz's default nipple morph.
If you're really determined to use both and have some experience with a photo editor, you could just bring in Scarlett's torso texture map and the texture map you are using and layer them on top of each other for reference. Then just move the nipples on the texture you are using to where Scarlett's are (on her texture map).
Eden Character for Genesis 9barbult said:
Catherine3678ab said:
barbult said:
Catherine3678ab said:
I bought this after reading the first post.
That's because you are a master of modification. I made a morph for the mouth to match the name of the head morph, so now it dials in automatically. That should have been provided, of course. Mine is probably less than perfect, but serviceable.
Could you refresh my memory on how to get it to dial in automatically? I got it a few times, but not consistently. So something wasn't right.
-- Or if anybody else can, that's okay too ;-)
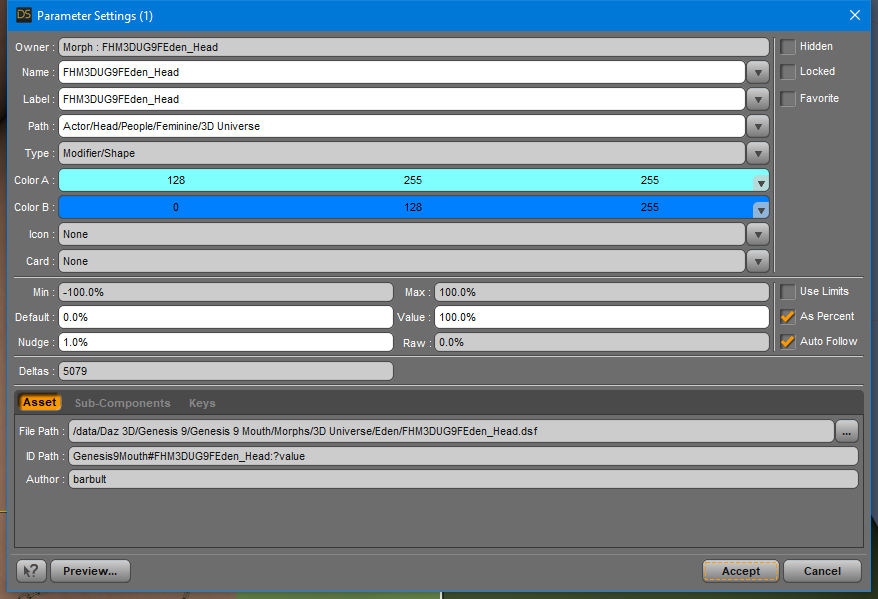
The mouth morph must be named exactly like the character's head morph. I put my mouth morph here (see screenshot of library path), the same place the auto generated morph was created by Daz Studio when it couldn't find a "real" morph.
I have never had a problem with mouth morph loading automatically with the character preset, when the mouth morph is properly named to match the character head morph name (not label, of course) and is a Modifier/Shape asset in the right folder. I haven't experienced any inconsistency in Daz Studio in that regard. After saving the morph modifier asset, it is good to close and restart Daz Studio to test it out.
Thank you so much, I had started off with naming it the same as ... apparently the wrong item! Okay, so that's my goofy. I hope to work on this some more after the sun comes up and hopefully get it consistently doing what it's supposed to.
I had been clearing the scene and reloading, will keep in mind to close DS and reopen it. If there was something still in memory that would explain why I was getting inconsistent results. I made the morph, did a few things, it worked, I saved it. Reloaded, didn't work. {even made sure it was the 'only' one morph I wanted in my data folder}.
Eden Character for Genesis 9Catherine3678ab said:
barbult said:
Catherine3678ab said:
I bought this after reading the first post.
That's because you are a master of modification. I made a morph for the mouth to match the name of the head morph, so now it dials in automatically. That should have been provided, of course. Mine is probably less than perfect, but serviceable.
Could you refresh my memory on how to get it to dial in automatically? I got it a few times, but not consistently. So something wasn't right.
-- Or if anybody else can, that's okay too ;-)
The mouth morph must be named exactly like the character's head morph. I put my mouth morph here (see screenshot of library path), the same place the auto generated morph was created by Daz Studio when it couldn't find a "real" morph.
I have never had a problem with mouth morph loading automatically with the character preset, when the mouth morph is properly named to match the character head morph name (not label, of course) and is a Modifier/Shape asset in the right folder. I haven't experienced any inconsistency in Daz Studio in that regard. After saving the morph modifier asset, it is good to close and restart Daz Studio to test it out.[Issues with product] dForce Strand-Based Short Messy Ponytail Hair for Genesis 9 and 8 FemaleA common issue comes from the figure's head morph... (esp. with custom character). However the auto-follow full head morph (FHM) on SBH cannot be fixed by users by updating the geometry... You can either try reducing or zeroing the value of hidden FHM on the hair, or fixing it with DFormer, or go for the quickest way: direct parent the hair to the figure's head node and tweak its Transforms.
Eden Character for Genesis 9barbult said:
Catherine3678ab said:
I bought this after reading the first post.
That's because you are a master of modification. I made a morph for the mouth to match the name of the head morph, so now it dials in automatically. That should have been provided, of course. Mine is probably less than perfect, but serviceable.
Could you refresh my memory on how to get it to dial in automatically? I got it a few times, but not consistently. So something wasn't right.
-- Or if anybody else can, that's okay too ;-)
Eden Character for Genesis 9Update: I have removed the zip from this post. Have fixed the issue and the new morph will be uploaded in the Freebie thread momentarily.
1. Let's go easy with the PA ... if my frustration is the fault of my memory on how to do something sobeit however I think there's a bug in D/S when it comes to trying to get the mouth morphs to load properly AND consistently. Sometimes it worked, and then it didn't. {as in to have it loading when the character is dialed in} It's been a wonderful evening.
2. Morphs made for the Mouth are stored in the Mouth folder.
3. Merge the contents of the 'data' folder in with the existing data folder wherever your main Content stuff is kept, so everything goes where it should. This morph will not overwrite any existing files.
So I will release a morph, made 100% in Hexagon. All I did was move the mouth in its entirety forward and down a little AND used the resizer to make it wider. We all have to dial it in ourselves if/when one wants to use it. Can be used with any character actually, but it was made for Eden so that's the name on it. With the Mouth selected, on the Parameters Tab under Morphs > Hexagon bridge thing > morph.
If this doesn't work or does anything it shouldn't, let me know. I can't fix what I don't know about ;-)
If one wants variety for teeth, the package by Zev0 is a good buy.
 Moving DAZ Content off of C: Drive in 2020
I've been doing 3D for a little over a year and a half and Daz has been the be-all and do-all of my experience. I've never had to undertake a major migration of assets like this before for any reason. This is epic tech advice of the "god-mode" sort. I can't tell you the trepidation I had, being faced with both running out of space on my C drive and wanting to upgrade to DS 4.22, considering the horror stories I've heard about people losing assets during an upgrade. Not just assets failing to make the trip, but being lost altogether. I can tell you of a certainty every one of my assets are present and accounted for on my new drive. As far as I'm concerned you and fixmypcmike get the Blue Ribbon Award for "How To Turn A Prospective Nightmare Into Child's Play". Robocopy charged through the transfer without a hitch. Now I can feel a heck of a lot more confident going into the upgrade without fear of losing anything. Major "props" to you guys, pardon the pun. You've made a friend and a fan. Be well, sirs.
Things I Learned The Hard Waycolumbine said:
Things that are not in the documentation because the documentation is basically nonexistent which I have had to learn by stubbing my toe on them (sometimes repeatedly) over the last three-plus years, inspired by my comment in a different thread. Add your own to the list!
It's true there is no single, centralised, reference manual - but there is a lot of information put out by the devs 9change logs, forum threads on nwe features, the wiki for example. I would love Daz to assign resources for a full manual - but don't forget that doing so would slow development work on the application as the devs had to explain things to the tech writer, then check what the tech writer wrote (probably across several iterations).
- Photometric lights (mostly spotlights and pointlights) work differently in just about every way from mesh lights (emitters), and since having even one photometric light in your scene will trigger special "photometric mode" behavior and calculations from the renderer, and sometimes photometric and mesh lights don't play well together, it may be better to go all or nothing. (I use photometric lights less and less because I'm tired of dealing with them.)
Not sure about that. Could you explain what you mean?
- You will probably not see that HD feature because the figure or item loaded with the subdivision set low enough that it doesn't come into play and you'll need to bump it up. Many HD surfaces load with the HD effectively turned off because you have to bump up subd yourself.
That is settings, not DS. And setting the HD to full on in the Viewport is probably not geenrally desirable.
- The more shape/morph sliders you have for a particular generation/gender of figure the slower the load times for those figures will be because when you load one it must also load and parse ALL the shape sliders for that generation/gender. I have a LOT of G8F figures, and there are times when I use G3Fs for background characters etc simply because I have fewer morphs for them and they take about a fifth of the time to load.
It's not sliders as such, it's the links between them - and isn't really something that would make the manual anyway, I would think.
- You can use a G8F morph on a G8.1F but not vice versa, so if you're mixing characters and you know you're going to want a mix of 8.0 and 8.1 stuff, use an 8.1 base. (Obviously applies to the men too but I don't use men much.)
Again, content not DS - and, I would have thought, fairly unsurprising.
- Studio does not do garbage collection; when you delete an item from a scene, it is not deleted from memory. It's taking up space and your scene is getting slower and slower to work with. Save your work periodically, use New (which does do garbage collection -- that's that ten-minute wait while it's "deleting items"), and reload the scene. This will usually give you an immediate performance boost, especially if it's a scene you've been working in for hours, adding and then removing sets, etc.
Don't forget that DS must keep deleted items in memory for a while, to support Undo.
- Emitters are affected by mesh density. Basically (I may be oversimplifying) each cell of the mesh is one emitter. This is only ever really a problem if you make human surfaces emissive, where you have suddenly made a LOT of emitters. Unfortunately I do this all the time.
Probably in the Iray docs, which is where it should be.
- Instances are the greatest thing ever but when you make instances of human figures--especially dressed, becoiffed human figures--expect additional overhead on cleanup. Say you make ten instances of a human. Then you don't need them in the scene any longer. You delete the instances first because you're not a monster (actually, it doesn't matter; if you delete the parent first the instances will just become invisible since they no longer have content to clone), and then you delete the real figure and it takes FOREVER. This is, unfortunately, normal behavior and I don't know why it does it, but it happens every time. If you make even a single instance of a base figure, that base figure will then take longer to delete, and the more instances you make of it, the more the deletion time increases. (This does not seem to be the case for instances of objects like furniture!)
What are you expecting the manual to say? That sounds more like a report of how it behaves.
- You can add smoothing modifiers to clothing that doesn't have it. DO YOU KNOW HOW LONG IT TOOK FOR ME TO LEARN THIS
- You can add dForce modifiers to things that don't have it--though it may not work out as well as you hope.
- Sometimes there is legitimate reason to show hidden properties and mess with them, especially if you do a lot of grotesque special effects like I do that depend on weird scaling and distortions. Ditto for removing limits.
- There are an awful lot of hidden things in Window|Panes on the menu. Not all of them are useless. Some of them may be things you want to dock (make a tab for) once you realize they're there.
I'm pretty sure a lot of these are documented.
- Studio has not yet switched over to making a geometry shell have Iray surfaces by default. If you buy kits that have geoshells in them and those geoshells load with Iray surfaces, it's because the PA has switched them to Iray surfaces for you. A fresh geoshell from the menu will always have "Default Shader" surfaces, which means what you're trying to do will probably not work. Keep the basic "Iray Uber Base" icon on speed dial, select all surfaces in the geoshell, and apply it to them before doing anything else. Alas, this also goes for Edit|Duplicate Node Hierarchy, which I use all the time. You make a copy of the figure but the new figure's geoshell(s) are NOT IRAY and have probably lost the effects you were using them for. AND this goes for accidentally deleting a figure and undoing that; when the figure is restored to the scene, the geoshell will have lost its Irayness.
That sounds like a feature request or even - if reproducible - a bug report.
- Control-D is "drop to floor."
Isn't that in the 9admitedly old) user guide?
- Zero is relative. If you zero a figure (I mean XYZ zero, not zeroing the pose, though I often use an icon that does both) that's just out in the scene, it will indeed be the true 0/0/0 in the middle of your world ... but if your figure is in a group, "zero" is the zero location of THE GROUP. If you group two figures who are standing near each other, the group will be created with a bounding cube that encompasses both figures and "zero" will be the zero of that bounding cube. This is INCREDIBLY USEFUL because usually you've grouped the figures because you're about to apply a two-person pose, and you can fully zero both figures so the pose will apply properly, without moving them to world 0/0/0 which may be halfway across the scene somewhere. This is also helpful for poses in a vehicle (or on a horse) which only apply right if both the vehicle and the person are fully zeroed.
Yes? What would you expect, or course the postioning relative to the parent is relative - otherwise moving the parent would be tricky. It could be in a very pedantic manual, but I think the result would be unreadable.
- You can lock X Y and Z on a figure before applying a pose to deal with those pesky poses that insist on moving a character to a certain location in the world. If you're using a pose kit that has both "Go-To Poses" and "Use Anywhere" poses (or equivalent, some PAs call them different things), the "use anywhere" poses are the ones which just pose the figure in place, without moving the figure somewhere. (If you never use poses that were made for a particular set without using that set, you probably never have had this problem.)
That is content and a rule of good practice - to keep plaement and posing separate (so that you can offset two figues shaking hands, and move them around the scene without breaking the offset).
- The overall scale of a figure has a "factory set" default and it may not be 100%. If you change the scale of the character and then use certain zero-pose tools, it'll reset to default scale for that figure and you'll be sad. I have one set of characters I always load at 110% and I finally gave up and locked the scale slider in the saved bases I use so that zero-pose wouldn't mess with it.
- Speaking of factory settings, G9F figures tend to load with Eye Look Out Left and Eye Look Out Right set to 10% (which will show as an altered parameter in "Currently Used") and their right eye set Side-Side 3.0 and their left set Side-Side -3.0 (which will not). I do not know the reason for this; I just know it's annoying to have to manually turn off every time I load a fresh G9.
- Eyeballs in general seem more prone than other body parts to be a little sticky when poses are loaded and changed and unloaded and reloaded and so on, and it's a good idea to periodically check both the pose sliders (Look Side-Side, etc) and the sliders for the eyeballs themselves to make sure they're not utterly haywire.
- And speaking of going haywire, if after repeated poses your character's legs start to look REALLY WEIRD, go find the two Flex Quad sliders and reset them.
al of these are content behaviours, not DS.
HH Scarlett for G9 [Commercial]First, this is a great character with detailed JCMs that fix the puzzlingly bad mesh bend distortion that Genesis 9 introduced. Not many PAs have included their own custom fixes for it, so thanks for the effort.
I'm not sure if it's a unique issue on my end, but I seem to be getting some noticeable UV distortion with other G9 textures when using the standard 'Nipples Feminine HD' morph on Scarlett. The nipple morph geo looks to be off-center from the underlaying texture. It's not noticeable with Scarlett's own texture though.
AIUTO...CHI CONOSCE L’ITALIANO? PARTE QUATTORDICIImago said:
Uno strumento che interpreta e mixa i morph per ottenere il personaggio "che vuoi"? Non fai prima e risparmi soldi facendo da te?

Dipende.. se non hai bisogno di possedere i morph che il plugin impiega, potresti creare molti personaggi risparmiando soldi.
Let's appreciate/discuss today's new releases - more ongoinger threadRichard Haseltine said:
The potential benefit of a stand-alone figure is that the weight maps are made for that shape - a morph can have the joint centres changed but not the weight.
Interesting. Weight mapping is kind of black magic to me, so I don't really understand why a humanoid figure of a different size and shape would need unique weight mapping, but it is certainly nothing I ever considered. I figured there were things about stand alones that I didn't know about.
Yellow AI Character Shape Generator for Daz Studio - Official Beta Launch!Hi Sfariah, yes you can preview the shape generation and then apply the associated full body character morph. For each prompt generated, you retain all the powers of Daz Studio to continue customizing your characters!
Introducing the AI Character Shape Generator by YellowInteresting. Especially if it cleans the mesh. I also wonder if it just uses morphs you own or generating something out of nothing. Both could be interesting. Since the rise of AI over the last couple years has accelerated, I've often wondered how it could be used for 3d models and Daz specifically. Mainly for me it's been trying to generate good face references of say celebs to then input into Face Transfer. This has been a limited success, but it's been a good six months since I last tried and changed in the AI have changed significantly. So for me, without actually trying it myself, this seems like early stages but potentially promising. I'm interested to see how this develops. What I ultimately would like to see is a way to input a lora or a photo(s) and output that as the Daz character. Say I take a picture or two of a friend and then create a Daz character from that using this ai.that would be cool. Watching.Introducing the AI Character Shape Generator by YellowI wouldn't say I'm excited as the video shows it, but I'm incredibly curious to try it out. What would be most useful to me is the ability to adjust small parts of existing characters without needing to fiddle about with dozens of, for example, nose morphs for half an hour.
I'd like to know more about how this works. Is it generative or is it parametrised using your morph library? Or some combination of both? It mentions fixing the topology of the mesh, which is incredibly neat, but does suggest at least some degree of generation or deviation from morphs. Not a bad thing in and of itself as a problem with using a lot of morph packs is you may get the shape you want but the mesh can end up with unwanted artifacts. If it somehow traces or wraps the results of applying several morphs onto a clean topology then that would be a game-changer for me.
AIUTO...CHI CONOSCE L’ITALIANO? PARTE QUATTORDICIUno strumento che interpreta e mixa i morph per ottenere il personaggio "che vuoi"? Non fai prima e risparmi soldi facendo da te?
Daz 3D is part of

Connect
DAZ Productions, Inc.
7533 S Center View Ct #4664
West Jordan, UT 84084Licensing Agreement | Terms of Service | Privacy Policy | EULA
© 2026 Daz Productions Inc. All Rights Reserved.