-
Weird figure inversion. [solved myself]
Hi, on occasions for reason i haven't been able to work out. Sometimes when I import a G8M from Blender after doing a morph the whole figures seams to be ripped apart. See the attachments. I did a morph this morning and it happened from Blender 2.79 so I switch to using 2.9 and did 6 morphs with no problems. Then the last one when crazy again. I changed nothing and was using the same file, deleting the morphed G8M and importing again or undoing if it was a simple morph. I've attached the various files.
 Dforce settings like Marvelous designer?
all of the cloth settings are under the surface pane, for stretch and expansion you unfortunately don't have it split into weft and warp like in marvelous but you have the contraction-expansion ratio setting
at 100% (default) there is no change, reducing it to 90-95% will make a tighter cling, while increasing it above 100% will make the fabric increase in size.
the one downside to dforce particularly with your example of removing bust cling is that the simulation uses the inital shape at start of sim (or at frame 0/ a morph) as the rest shape and will attempt to move back into that shape as best allowed by the settings, so you end up with often noticable crease where the bust cling was even though the fabric has moved away.
reducing the bend stiffness might help with that but I'm not sure.
if you do use the contraction ratio to shrink a baggy item you might want to also reduce the stretch stiffness on the same surface.
the settings for fabric in marvelous and surfaces in studio are similar but they don't cross over 100%
Khemsit 'normal' G8 female with improvements?While it's true that the maps can be painted onto the model with any UVs, if there is marked stretching of the surface due to the morph then the effectrive resolution of the map will be reduced in that area. Whether dealing with that via a new UV set, given that few people need the full resolution of the maps, is perhaps open to question.
Indeed, which perhaps explains why George came with 6k torso textures. It's a much larger skin area.
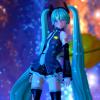
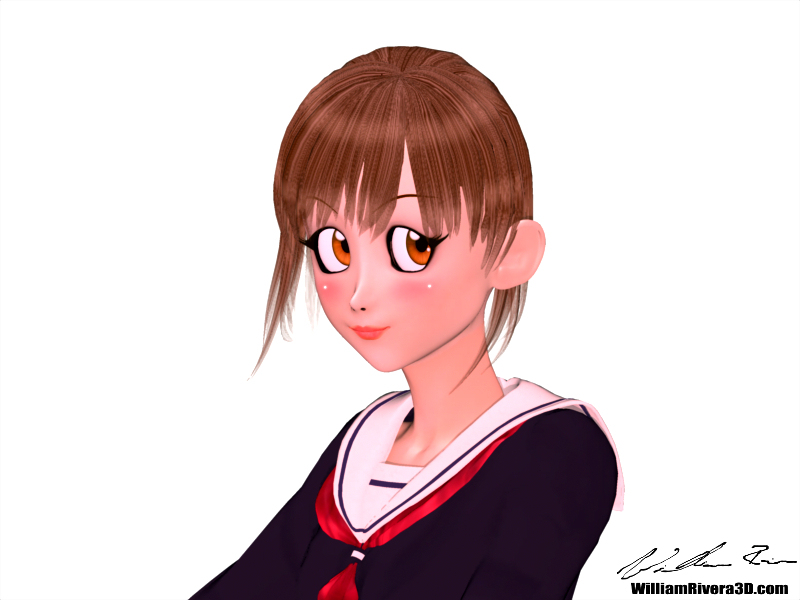
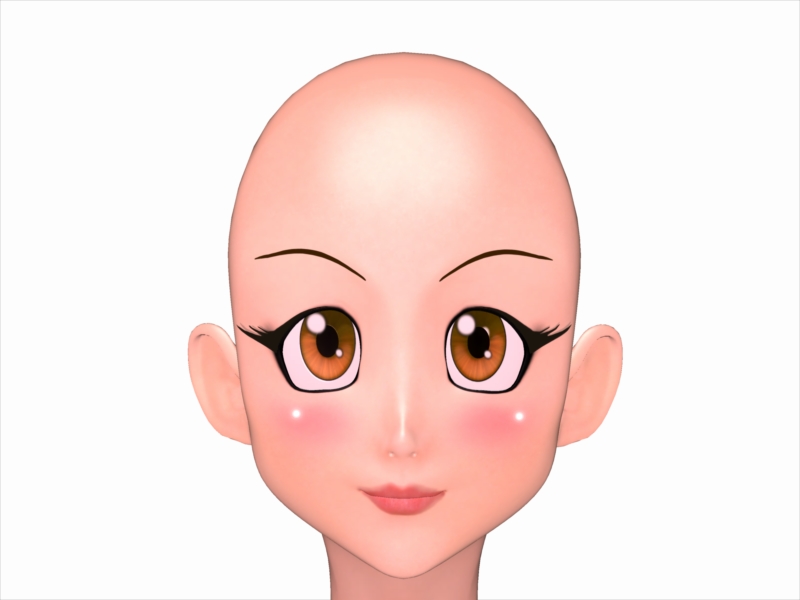
Anime and Manga with CarraraI'd like to share some skills I use to render anime characters, I flatten the character making it look 2D. I use carrara but it might be possible in Daz studios.
Please see the images below for better understanding.
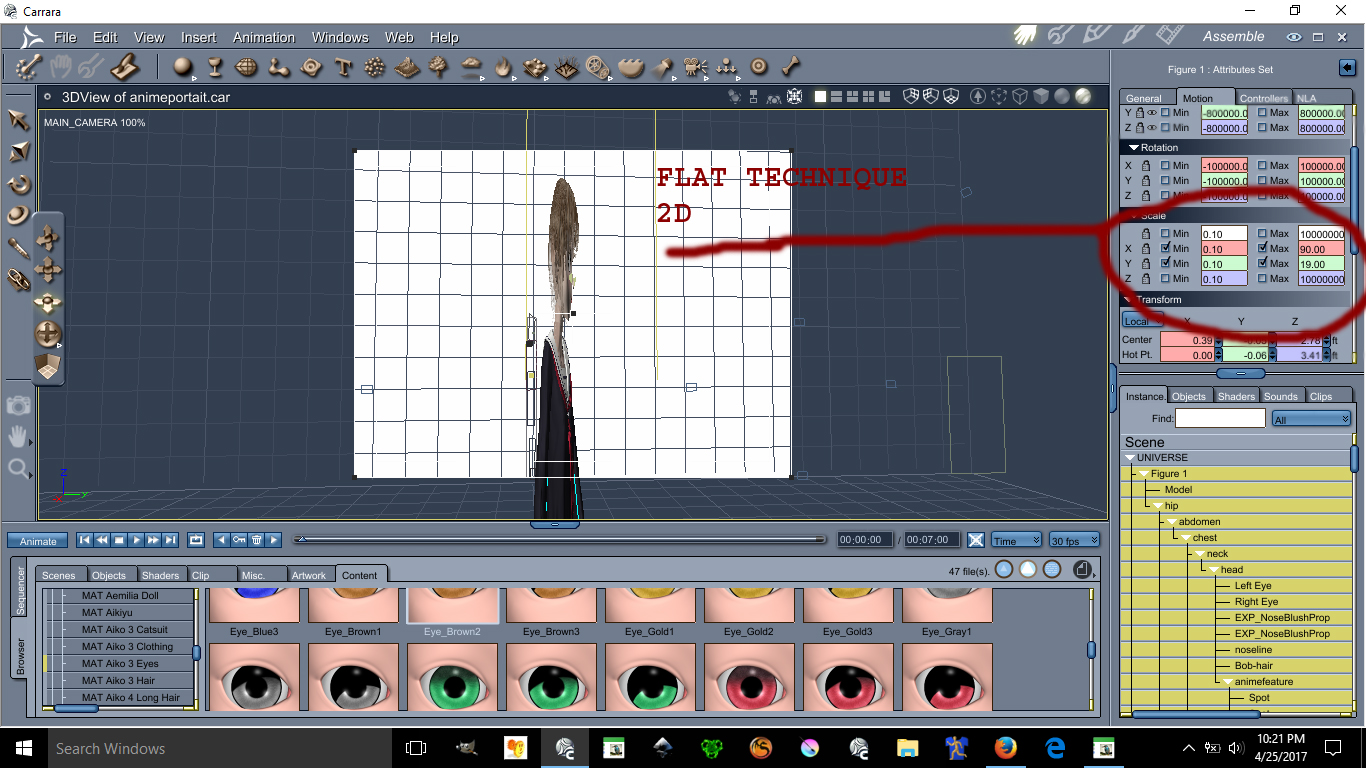
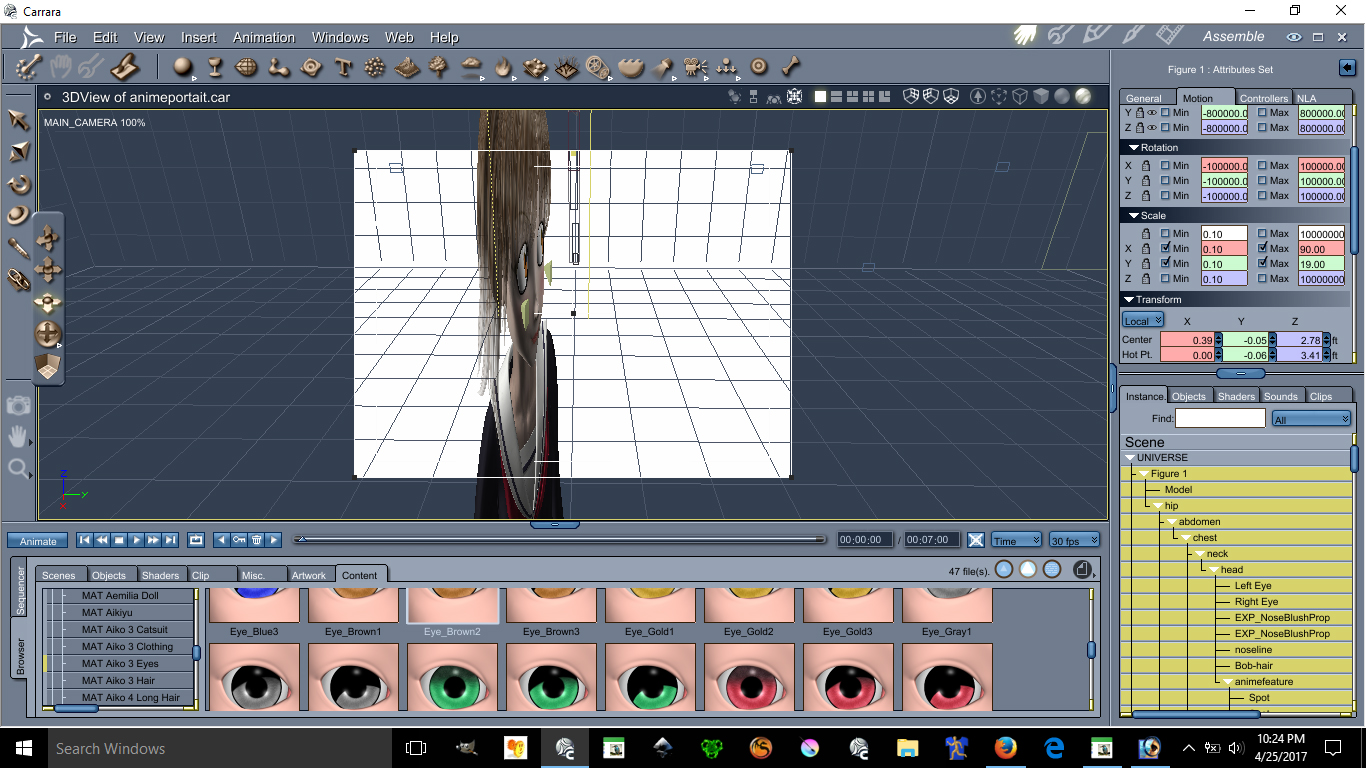
This image has been resized to fit in the page. Click to enlarge.
This image has been resized to fit in the page. Click to enlarge.
Using the scale X and Y can make possible the flatten of a character you can make her as flat as you want.
Ear Pulled, Square big eyes, small mouth, unrealistic skin and light bulbs on the cheek are all anime features.
Lets start with lightings
See images below please:
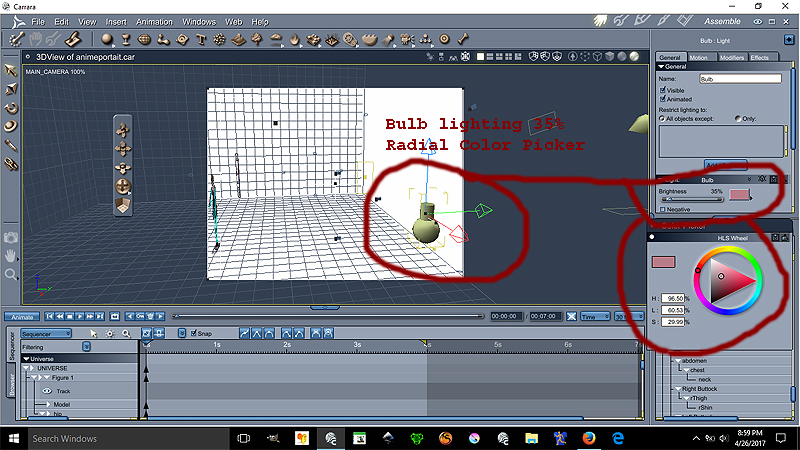
Ok the Bulb is at 35% lighting at the color on the radial is
H= 96.50%
L=60.53%
S=29.99%
This bulb gives proper anime skin lighting unrealistic notice that the bulb is over by the edge the character is centered
Now we go for the Distant light settings see image below please:
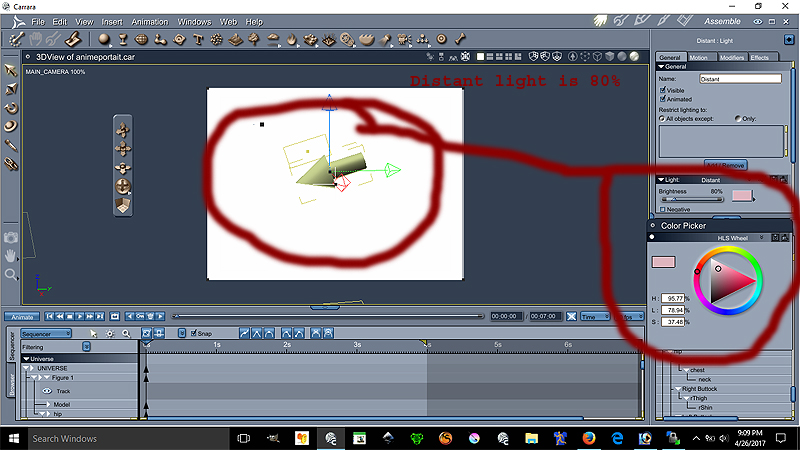
Ok the Distant light is at 80% lighting at the color on the radial is
H= 95.77%
L=78.94%
S=37.48%
The location of the distant light can be seen on image 1. Both lights are set to best settings - raytraced under the effect tab
This conclude the lesson on the environmental light settings is more of a pinkish lights.
The following lesson will focus on the Ear Pulled a very important anime feature disregarded by many :P
We will place our lovely model facing forward for better teaching.
This model is Aiko 3 with kioki morph, This character has many morph and lots of clothes. Aiko 3 is widely supported in the Japanese Community including pixiv.net PoserClub.net.
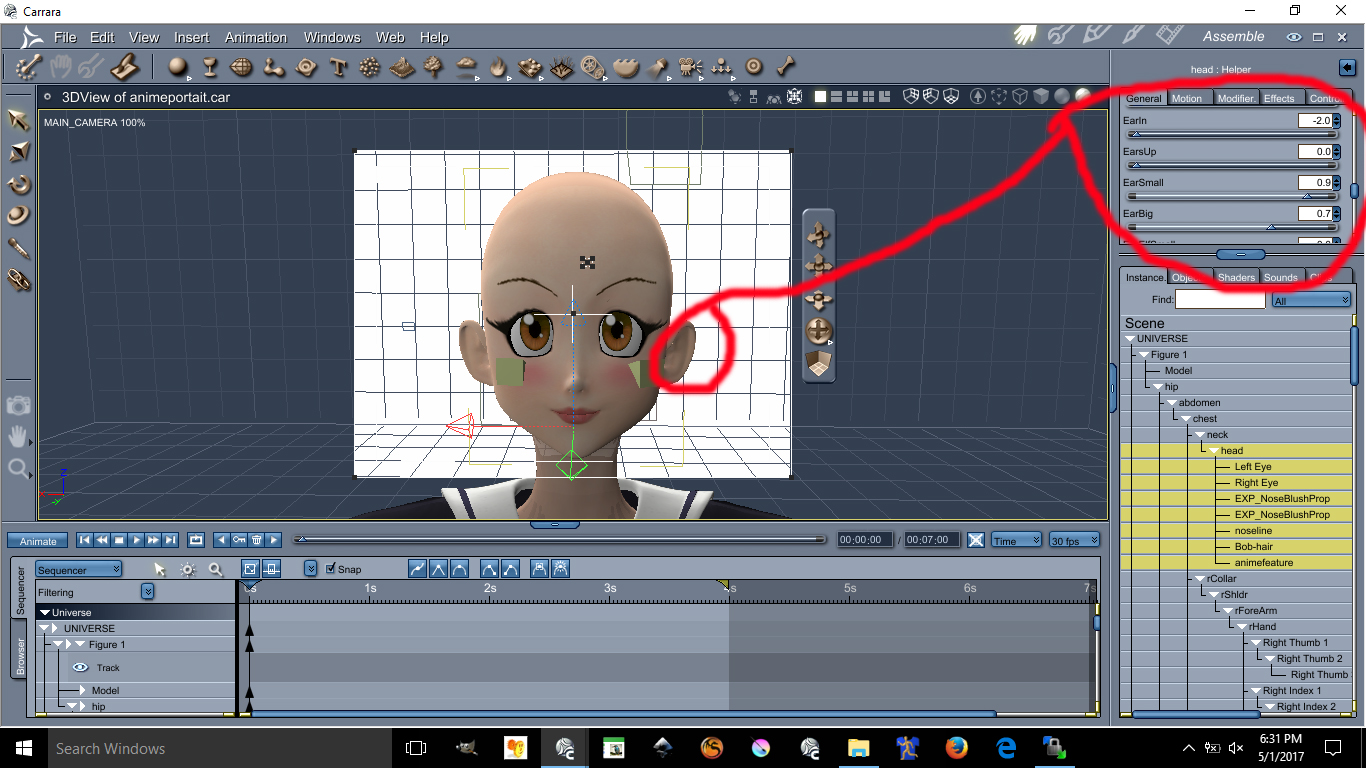
In order to pull the ears on Aiko 3, see the images below:
This image has been resized to fit in the page. Click to enlarge.
The values are as follow
Earin= -2.0 (thats minus 2.0)
EarBig= 0.7
EarSmall= 0.9
I doubt you can do these with Aiko 4 or up. I always recommened Aiko 3 for your anime needs.
Next Lesson we will talk about Triangular Chin
This next lesson focuses on her Triangular Chin. The triangular chin cannot be done using Aiko 3 alone. You need to have Kioki for Aiko 3 to make this triangular chin, without Kioki I do not think you can create such a perfected Anime Chin. Kioki by Capces can be purchased here at Daz. at https://www.daz3d.com/kioki and Kioki Requires Aiko 3 morph and map located here https://www.daz3d.com/aiko-3-0-morphs-and-maps now on to the lesson.
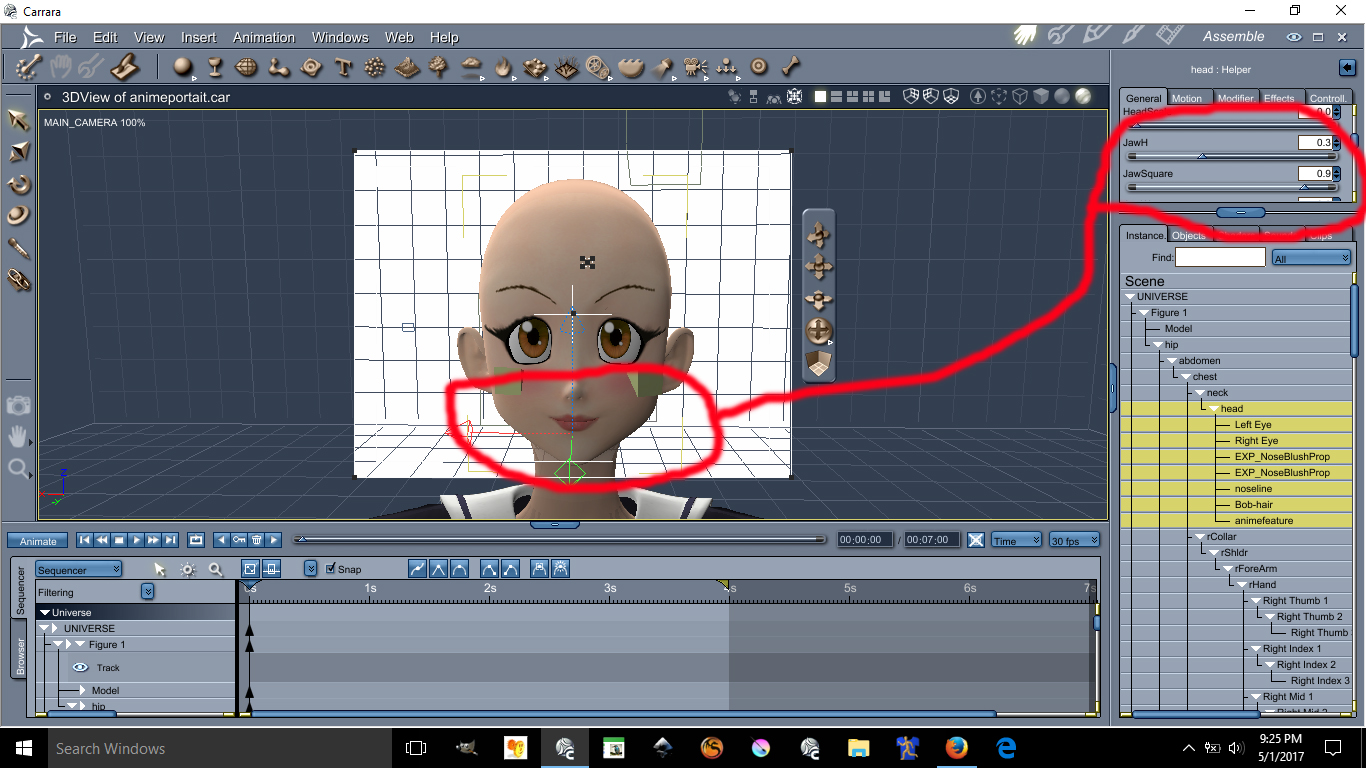
This image has been resized to fit in the page. Click to enlarge.
The values are as follow:
JawH=0.3
JawSquare= 0.9
Here are the eyes lesson, possibly the hardest and tedious part is morphing these eyes in an anime style shape. First you need to darken the eye socket materia, by making the eyes socket material dark it will create a dark outline all around the eyes. Again, the morph I used on these requires the Kioki Morph. Here are the values of the Anime Eyes Shapes along with links.
I recommend Dumb or Anime Eyes for Victoria 3 (Victoria 3 Eyes fits on Aiko 3) @ https://web.archive.org/web/20060925192216/http://jjdelpy.free.fr/Poser/doaeyes.html
The values for the eyes are as follow:
EyesScale 0.5
EyeSpace 0.5
EyeAngle Up 0.2
EyeGumDrop 0.3
EyeinSquare 0.3
Eyelwrflat 0.3
EyeOutDwn 0.4
EyeShape1 0.8
EyeUpFlat 0.1
EyeDepth -0.1
EyeHeight 0.1
EyeWidth 0.1
Eyelidshllw 0.1
Eyelidshvy 0.1
Lasheslong 1.0
Lashlofull -9.0
Headshape and nose is as follow:
HDstylized 0.8
ThroatThin 1.0
Nosepointed 0.4
MouthSmall 0.2
MouthNarrow 0.2
Doing the HDStylized will automatically make the nose small and will also give the head an anime style. This are the basics of making an anime head using Aiko 3 with Kioki morph in Daz Studios it may be possible to do all this but I am not 100% sure if Kioki will work in DazStudios, I assume it does because is sold here. The above was all done in Carrara Studios.
About the Cheek Lights and Skin will required some photoshop and some advance lighting in carrara. I am not going to discuss these here if you are still interested in those send me a email w[email protected]
Face transfer questionFace transfer works great but there is one question I have about it. I transfer the face and then saved the face. Do not remember exactly where the
save file is right away. Is there a way that I can load another G8 figure and then use the file that I have saved to create another G8 exactly like my
first one. I was thinking of making twins. In ohter words, can I transfer the saved face onto another G8 figure or do I have to go thru the face transfer again?Thanks.
They are saved as scene subsets. Right-click on the loading icon and select "merge into scene" to load the 2nd figure.
Khemsit 'normal' G8 female with improvements?While it's true that the maps can be painted onto the model with any UVs, if there is marked stretching of the surface due to the morph then the effectrive resolution of the map will be reduced in that area. Whether dealing with that via a new UV set, given that few people need the full resolution of the maps, is perhaps open to question.
Anne for Caryn 8 (clothing costume added by elleque sep 27)I got Caryn just to be able to use your morph, she's so very, very cute! And thanks, Elleque, for the darling clothes :)
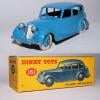
What's the one thing you've always wanted to see sold at daz but never have?3DClassics has a few 'Ordinary' cars. Not too many 'oridinary' ones from the current era, but they can be used. https://www.renderosity.com/mod/bcs/?uid=3DClassics
but the most have the Tag VUE, does Vue load in daz?
The Vue ones won't, but the Poser model is the 2CV I showed in the image above. Had to change the materials but it's rather a good model. Only problem for me is the left hand driving position. Fortunately the wheel, pedals and console are an easy translation morph in my own modeller, no mirroring needed. One other thing, the scale can be a bit strange at times, the 2CV is modelled over 5m long, but should be 3.68m.
Ah thanks for your feedback.
What's the one thing you've always wanted to see sold at daz but never have?3DClassics has a few 'Ordinary' cars. Not too many 'oridinary' ones from the current era, but they can be used. https://www.renderosity.com/mod/bcs/?uid=3DClassics
but the most have the Tag VUE, does Vue load in daz?
The Vue ones won't, but the Poser model is the 2CV I showed in the image above. Had to change the materials but it's rather a good model. Only problem for me is the left hand driving position. Fortunately the wheel, pedals and console are an easy translation morph in my own modeller, no mirroring needed. One other thing, the scale can be a bit strange at times, the 2CV is modelled over 5m long, but should be 3.68m.
What aspect of a Blender creation can transfer to Daz?I'm curious about exactly what I can export to Daz from Blender. Blender has features like Bloom, which create amazing glow effects, and lots of shading options to create textures like Voronoi texture file, but I haven't had much luck transferring a glowing object to Daz, and the Voronoi shading textures from Blender's built in mechanics didn't transfer over either.
I'm curious, what exactly can I export out from Blender that will load into Daz?No Pose Controls on Import [SOLVED]I was referring to the pose morph controls after importing with Daz to Cinema 4D bridge. The tutorial videos I've seen have the models with pose morph tags after importing using bridge.
SereneNight's Sci-Fi Fun Thread 2I did a review on Novica's thread here I did not have any trouble with it exploding when I dforced but I did set the Tuckin_waistpulldown morph before i dforced it also I did have Start bones from memorized pose turned on. I also used the waistpullleft & right morphs to fix the to wide waist line. Some of the morphs I had to uncheck the limits to use and get the results I wanted.
Novica & Forum Members Tips & Product Reviews Pt 13CC Jack for Holt 8 dforce MI Casual Outfit for G8M Wood and Marble Iray Shaders Stylished Shaved Hair for G3M & G8M
Arm Hair is from Ryker for Vladimir 8 Stubble is from Classic Side Part Hair for G8M Lighting: Theory of Lights-Energy Flow by Fabiana at Rendo
CC Jack: He is handsome, I really like his look- reminds me of Jackson Rathbone (Jasper) who played in Twilight. His textures and shaders are very nice. He comes with fibermesh brows and eyelashes and a custom vampire skin and teeth. He also comes with some custom makeups, pupil shapes, eye colors and fingernail polish.
Casual Outfit: First product release by mal3Imagery, wow what can I say its an awesome first release. The textures look great, the outfit is dforce but doesn't have to be. I did dforce in this image. Because of the custom shape of Jack I had to adjust the shirt and pants but the dials made it easy once I turned off limits to them. My only nitpick is the shoes they are not to me the same quality as the outfit although they are still not bad, since this is a first release. The PA included several texture options also a waist down and pant leg longer morph option which is great! And on top of all that he provided a link in his commercial thread to free socks to use with the shoes! Can't wait for more releases by this PA!
Wood and Marble Shaders: You get 15 Wood and Marble shaders both sets have 3 different style options and then there is a utilities with several tile size options. Very nice set. I really like the marbles available.
Stylized Shaved Hair-Nice short hair style, it has 7 different shaved side styles, 12 colors, 7 hair line styles and comes with both iray and 3delight shaders. I did have to increase the scale in this image to 100.5% I was getting the squigglies that happen when hair intersects the model. I don't know for sure if this is because of the custom shape, i have not used this hair before I don't think.
Ryker arm hair: Guiltly I have not used Ryker yet, this is what happens when you spend to much time shopping and not enough time rendering. The hair looks really nice and natural to me. I did not test any of the other stuff with this product but it looks nice and not a bad price at all for what you get. I did have to unlock the transition dials and move the hair because it was intersecting the model there are no morph dials for it. I believe because of the custom model useda nd possible pose contributed also.
Stubble from Classic Side Part Hair: I have use the hair previous and really like it so I thought I would try out the stubble. Same issue as with the other hair I had to make some transition adjustment to the stubble. It looks pretty nice the only issue I have other than positioning was if you look on the right of the neck compared to the left; the left has less coverage. I could not figure out a way to solve this as the stubble I believe is fibermesh. BUT fyi I didn't try just real hard anyway.
Theory of Lights-Energy Flow: I think ive reviewed this before but im not sure. Fabiana stuff is great! She sales at Rendo and does custom HDRI's and sets. She has several sets and I have very good results out of all of them I own.
And finally the image! Sorry so long winded but hopefully benefical to someone. I know I love seeing reviews so I can make informed decisions. Also you can view a larger version of the image at my Flickr or DeviantArt page.
 SereneNight's Sci-Fi Fun Thread 2
I'm awaiting your comments on https://www.daz3d.com/dforce-mi-casual-outfit-for-genesis-8-males. Did you buy it? I didn't like the high water look of the short pant legs, but I saw a thread showing that there was a morph to lengthen the pants and also one to lower the waist. I think both would improve the look of the product for me. I'm probably just out of touch with fashion.
Rtx 3080 pc build for £1500...is it possible?3080 £690+
Processor £170 - £300+ The realistic minimum is the AMD 3600, but its been going up in price during lockdown. And about to be superceeded late in October. If you want a machine now I wouldnt wait, but be aware it will drop in price by £30-40 in 6 ish weeks.
Mobo: £130+ Lets face it, you aren't going to put a 3080 in something that doesnt have PCIE4 anymore*. Some of the Intel boards will allow an upgrade to 11th gen later bringing PCI4, but you'd have to research this carefully.
PSU £75 Cutting it fine if you also want to go high power on cpu as well, though you dont have to.
SSD £100+ But realistically 1tb NVMEs start at £130, though like PCIE4, Daz struggles to make a huge amout of use right now on these, you'd be gutted if they update it next year and you skimped out here imo.
OS £10+
Memory £120+ 32 minimum. But in practice the temptation to spend more on over 3200mhz low cas latency means more like £160+
Case £50+
Miniumum imo : £1345 But yeah, if you start buying nicer cases, power supplies and faster/more memory then the £1500 figure is about right.
Edit: If you need a monitor.... erm, no :D
*Edit2: I mean if you are buying new. There is no detriment to the 3080 really in PCIE3 right now, just saying that your mobo is likely to last into the next gfx card, and we don't know if the new Microsoft incoming memory transfer from SSD direct to gfx memory standard will change the importance of PCIE in future for Daz.
a well constructed and really useful reply... gonna come in very handy for this project,
Thanks again.
importing G8F into Blender questionYou are trying to bring it into blender, to create a morph to import back into DS then? I thought you were looking to bring it into blender for rendering in eevvee or cycles, that's what the plugins are for. I think the way you want to do that is to make sure subdivision is set to base for g8f. Delete any extras like eye lashes and fibermesh brows etc. Export that as obj, then imort it into blender. I think the preset shown there was just something the tutorial maker set up, to make sure the axis and size are correct. The only morphs I have ever done was through the GoZ bridge, so I am not an expert at that for sure. One thing I know for sure is that keep vert order needs to be checked, or else it will fail to load as a morph. Can only move geometry around, never change the poly count or vertex count or vertex order.
Oh I forgot about something, look in your library for a folder called developer kit(I hope I didnt change that in my library) there should be something called "Export Base Resolution OBJ" inside there, that obj should work as a morph mannequin.
GenX2 and Genesis 2 AddOn released! [Commercial]Trying to convert Michael4 to Genesis... but after following the instructions for "Transferring a Character", no matter which options I select, I keep getting "No morphs with non-zero value selected for transfer".. and in the Morph table I only have "head" but no "body" etc... my source is "Michael 4" which I dragged in from the Poser content directories. I even have loaded M4 in the scene and tried "Get values from figure in scene" but it failed as well.
Please help :((((
ps. I had also purchased V4 and M4 Shapes for Genesis (https://www.daz3d.com/v4-and-m4-shapes-for-genesis)... is this actually a duplicate script similar to GenX2, if we speak of M4/V4 solely.
The shapes pack is all you need to get M4 or V4 shape on Genesis. They are morphs, just like any other character morphs. You do not need GenX2 at all to get M4 and V4 shapes on Genesis.
GenX2 and Genesis 2 AddOn released! [Commercial]Trying to convert Michael4 to Genesis... but after following the instructions for "Transferring a Character", no matter which options I select, I keep getting "No morphs with non-zero value selected for transfer".. and in the Morph table I only have "head" but no "body" etc... my source is "Michael 4" which I dragged in from the Poser content directories. I even have loaded M4 in the scene and tried "Get values from figure in scene" but it failed as well.
Please help :((((
ps. I had also purchased V4 and M4 Shapes for Genesis (https://www.daz3d.com/v4-and-m4-shapes-for-genesis)... is this actually a duplicate script similar to GenX2, if we speak of M4/V4 solely.
importing G8F into Blender questionoh, this is news to me I thought it was just as simple as importing a WaveFront obj of G8F from a folder which you saved there from Daz. This is what it looks like in Blender anyway (pic) would I still be able to use this to morph a new character from it do you know?!
second pic is from the tutorial and it has the 'daz' I didn't have but other than that option not being its the same process as mine it would appear.
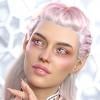
what is the hardest part about creating quality characters for G3/G8?
Apologies for getting back so late to this I wanted to thank you for the help here.1) An actual personality. Far too may items have generic and bland looks, with zero personality to them. A huge part of this leads to...
2) The face. Give the poor girl a memorable face. Don't just go for the typical BS button-nosed and high-cheekboned doxie - give the character a bit of a big/prominent honker, or a serious overbite, or somewhat bigger-than-usual ears... nothing that makes it plug-ugly, but just enough to make it stand out. The Goal is to rig it so that the individual components are a touch out-of-beauty-standard, but when combined makes for something very pretty. Finally, make sure that the face and personality match the texture! Spend the vast majority of your time on this part of the body if you're serious.
3) Asymmetry. Very few human beings on this planet have perfectly symmetrical eyes, boobs, nostrils (seriously!), ears, etc. Kick parts of the face and body just a hair off-kilter, like make one eye 0.1 - 0.5 higher than the other. Make one boob a half cup-size smaller than the other and hike it up a centimeter or so on the chest in relation to the other. Oh, and speakin' of mammaries...
4) Mammaries Based In Reality. Real women do not have massive balloon-like breasts that defy gravity and logic. Make the 'girls' *normal* sized, or explore making them smaller-than-usual, like a B-cup or A-cup.
5) Proportions. Most women are shorter than most dudes, so shove in a default G8 Male to compare against there. Give the girl a few pounds here and there, depending on what the character is and does. Don't be afraid to get a small/reasonable muffin-top action going if you're handy with making morphs by hand. Most women won't admit it, but unless your character is a teenaged girl fresh out of puberty (or some angular-as-hell hardbodied triathlete, or a scrawny transsexual person), there's gonna be a bit of belly there. Part of what makes most women... a woman. Oh, and leave at least some waist there, please? Oh, and it wouldn't hurt to shrink the chest and/or monkey with the shoulder width... the 80's shoulder-pad era is dead, and should stay that way. Finally, the head needs to be in proportion woth the body, and not that tiny alien-head that the defaul Genesis 8 character comes with, so don't be afraid to scale it up a touch.
6) A Damned Solid Skin. Seriously, this is where a lot fo characters fall mega-short. The texture (and any/all makeup and eye-color options!) should match the personality of the character you're building. I don't mean the obvious stuff like slapping a freckled Irish girl's tecture on a Korean girl's head-mesh... I'm talking the subtleties. If your character is tomboy-ish, then the makeup options should be either very sparse or very over-done (or how about both options? Oh, and don't forget an option with no makeup.) Dig into (or discover!) the ethnic makeup of your character, then go look at photos of real people with the same ethnicity - and get the entire range so you know where your boundaries are. This works even in mixed-race folks. For instance, if, say, my character is half-Black and half-Latina, then I gotta dig into the facial structures for both, blend them in a way that makes sense, but then I dig into the skin tones and find one that makes sense, blend them in a way, ensure the eye color makes sense (yeah, no baby-blue eyes here by default, folks!), and etc. Now for the technicals: Make triple-certain that your skin will show well in a wide range of lighting circumstances - for both 3DL and Iray versions. I've lost count of the texture kits that look like utter garbage in anything other than the default DS Skydome lighting. Don't get stupid with the pores - I don't need a close-up of her face to resemble a close-up photo of the Moon's surface, and over-poring (is that a word?) tends to exaggerate texture deformation when a joint bends. Don't get stupid with the rez - you do not need a 12,288px x 12,288px shader set. Unless there is a sudden spike in users who play with DS on 84" 8k UltraHD television sets, 2048x2048 will work just fine for most users, and maybe put in an HD option with 4096x4096 if you want to futre-proof things.6a) Don't 'Help' The Skin! What I mean is, don't put in genital textures, don't put in knee wrinkles, don't put in the creases between butt-cheeks and legs, and in general don't paint on anything extra to simulate what movement should be simulating. This actually helps photorealism, because you're not seeing an out-of-place butt-crease on a bent-up thigh, or knee skin wrinkles on a knee that's fully bent, or under-boob lines on a breast that's streched upwards (hey, some folks do nudes, go figure, right?) Point is, don't 'help' the user/customer out. It only leads to headaches.
7) Get to Know The Personlet You're Creating. The whole process of building a character is like getting to know someone. The deeper you get into the details, the more you come up with and 'discover' about the little person-ish thing that you're building. My favorite way to do this is to build something that sort of stands out, then invent a whole backstory about that person. Then I go back in and tweak it. Then I fill out more details... then go back in again if needed.
8) Leave Room For Change. If you're making something for yourself you can ignore this, but if you're making something for sale, you need to take this into account. Once you're done making something, toy with it a big - make it fat, make it skinny, make it pregnant (not like that you perv!), make it a midget, make it a giantess, make it a child, make it an old woman, etc... if you make a character morph too rigid, then changes made by a customer will be disappointing to say the least, so do some testing on that beforehand.
Gone on too long here, but hopefully this helps a bit.
Cheers!Daz 3D is part of

Connect
DAZ Productions, Inc.
7533 S Center View Ct #4664
West Jordan, UT 84084Licensing Agreement | Terms of Service | Privacy Policy | EULA
© 2026 Daz Productions Inc. All Rights Reserved.